TCL LE40FHDE5510 Скачать руководство пользователя страница 13

12

Connections and Setup

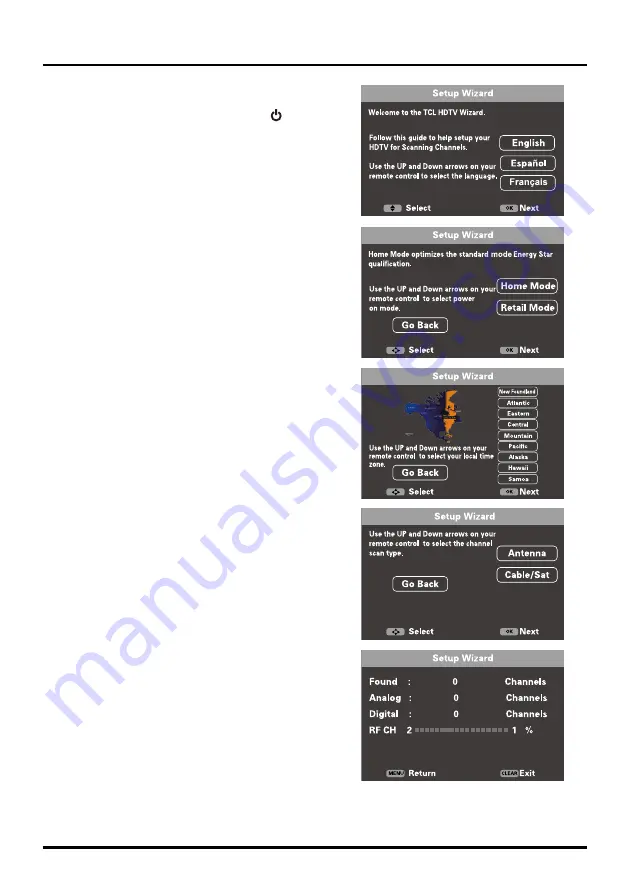
Setup Wizard

Perform the following steps before you press 


 on the remote 

control unit.
•  Insert the batteries into the remote control unit. 

•  Connect the antenna cable to the TV. 

•  Plug in the AC cord to the AC outlet.
The first time you switch the set on, the 

Setup Wizard

 opens, 

which guides you through the setup process. 
1.  The first step of the setup requires you to select your 

preferred language for the menu system. Press ▲/▼ to 

select your language, then press 

OK

 to enter the next 

screen.

2.  A menu screen asks you to set the power on mode.

•  Choosing “Home Mode” for the TV assigns the optimal 

picture settings for most home environments. 

•  Choosing “Retail mode”, which is not ENERGY STAR 

compliant, sets the unit up with predefined settings for 

retail displays. In this setting, the power consumption 

may exceed the requirements of the ENERGY STAR® 

qualification. Use ▲/▼ to select the desired location 

setting (“Home Mode” or “Retail mode”); then press 

OK


to continue to the next screen.

Note: 

if you select “Retail Mode”, a screen menu will 

display to ask you go back to the previous menu to select 

“Home Mode” by pressing ◄ to select 

Go Back

 and press 

OK

 to confirm , or you can select “Proceed“ to proceed to 

the next screen.

3.  Use ▲/▼ to select the current local time zone. Press 

OK


to continue to the next screen.

4.  Select either “Antenna” or “Cable/Sat” as the channel scan 

type. Press 

OK

 to begin the channel scan process. 

Note: 

Make sure what kind of connection is made with 

your TV when selecting “Antenna” or “Cable/Sat”. 

5.  The screen will change to show the progress of the channel 

scanning process, available channels will be stored in the 

TV’s memory.

Note: 

If you do not want to scan for channels at this time, 

you can press 

CLEAR

 or 

MENU

 to exit the scanning 

process, and perform the channel scan later in the “Setting” 

menu.

If you are using a cable set-top box and connect using the 

RF connection, you do not have to complete the Channel 

Scan. You can simply tune to channel 3 or 4 on the TV, 

then use the remote that came with yout cable/satellite 

box.

6.  When the scanning is finished, the unit will switch to the 

first channel found.

Содержание LE40FHDE5510

Страница 1: ...0 1269 for AK HI and Puerto Rico User s Guide For use with models LE40FHDE5510 LE46FHDE5510 LE40FHDE5510TA LE46FHDE5510TA Figures and illustrations in this User s Guide are provided for reference only and may differ from actual product appearance Product design and specifications may be changed without notice ...

Страница 2: ... the disconnect device shall remain readily operable Therefore you should ensure that the TV is installed in a manner that allows you to disconnect the power cord when desired Product Registration Please register your TCL purchase on line at www tclusa com It will make it easier to contact you should it ever be necessary Registration is not required for warranty coverage Product Information Keep y...

Страница 3: ...ce personnel Service is required when the component is damaged in any way such as power supply cord or plug damage liquid spilled on or objects falling onto the component rain or moisture exposure abnormal operation or if the component has been dropped 14 If an outside antenna or cable system is connected to the product be sure the antenna or cable system is grounded so as to provide some protecti...

Страница 4: ...splay 13 Using Menu System 14 Input Menu 14 Picture Menu 14 Picture Mode 14 Brightness 14 Contrast 14 Saturation 14 Sharpness 14 Tint 14 Color Mode 14 Back Light 14 Dynamic Backlight 14 Geometry 14 Advanced Settings 15 Sound Menu 15 Equalizer 15 SRS TruSurround HD 15 Speaker 15 SPDIF Type 15 Smart Volume 15 MTS 15 Audio Language 15 Setting Menu 15 Language 16 Channel 16 Closed Caption 16 Parental ...

Страница 5: ...e it on the top shelf so the heated air from it won t harm other components Avoid Audio Interference Position cables properly insert each cable firmly into the designated jack If you place components above the TV route all cables down one side of the back of the TV instead of straight down the middle If your antenna uses 300 ohm twin lead cables do not coil the cables Keep twin lead cables away fr...

Страница 6: ...ws and plastic parts away from grease and organic solvents to avoid damage Especially during the assembly process Mounting Your TV to the Wall If you are mounting your TV to the wall don t attach the table stand To mount your TV to the wall purchase a VESA wall mount Models of 40 Purchase a VESA 200 x 200 M6 screw Models of 46 Purchase a VESA 400 x 200 M6 screw The VESA number is the horizontal an...

Страница 7: ...k for VIDEO connection red and white jacks for R AUDIO and L AUDIO connection VGA PC VIDEO IN Connect your computer or other component with a VGA output to this jack using a 15 pin D sub cable DVI PC AUDIO IN used for DVI PC only Provides audio connection when using HDMI DVI INPUT 1 jack for DVI or when using PC VIDEO IN Note If using a DVI component remember to connect the audio cable because the...

Страница 8: ...obile High definition Link and allows you to link a MHL capable mobile device to the television HDMI 3 IN Lets you connect a component such as a digital cable or satellite box with an HDMI output for the best picture quality Choose Your Connections There are several ways to connect components such as BD player DVD players and set top boxes to your TV Note No cables are supplied with this unit Plea...

Страница 9: ...essing INPUT button Input Input Same connection to HDMI 1 HDMI 3 IN COMPONENT IN CMPT AUDIO VIDEO IN AV HDMI 1 DVI IN PC VIDEO IN Component Video Connection Better Composite Video Connection Good HDMI Connection Best Set top box or or HDMI cable HDMI 2 IN AUDIO VIDEO VIDEO AUDIO AUDIO AUDIO DVI Connection Audio cable PC Connection Audio cable VGA cable VGA HDMI DVI conversion cable DVI PC AUDIO IN...

Страница 10: ...omatically When connecting MHL compatible device to HDMI 2 MHL port on the TV switch TV source to HDMI 2 Note Do not connect the MHL compatible device to any ports other than HDMI 2 MHL port When using MHL Interoperability with MHL devices of other manufacturers is not guaranteed TCL does not provide any guarantee therefore against operational failure such as that described below when an MHL sourc...

Страница 11: ...f no menus are currently active press INFO to display the Channel information VOL Increases or decreases the TV volume MUTE Turns the volume on and off FAV Press the FAV button to browse the channels set in your favorite list Use to select one of the favorite channel to watch Press CLEAR to exit the menu MEDIA Goes to the USB menu POWER button Turns the TV on or standby GUIDE Toggles the Electroni...

Страница 12: ...your location and the program will list local analog and digital stations available using your antenna Switching On Follow the instructions on this page on how to switch on your TV set and use the remote control before going on to following pages describing how to use the channel scan procedure 1 Insert two AAA batteries in the remote control Precautions on using batteries Only use the battery typ...

Страница 13: ... continue to the next screen Note if you select Retail Mode a screen menu will display to ask you go back to the previous menu to select Home Mode by pressing to select Go Back and press OK to confirm or you can select Proceed to proceed to the next screen 3 Use to select the current local time zone Press OK to continue to the next screen 4 Select either Antenna or Cable Sat as the channel scan ty...

Страница 14: ... Sharpness Tint Color Mode Back Light Dynamic Backlight Geometry Advanced Vibrant 48 49 12 12 8 Cool 64 Off Picture Sound Settings Exit Return MENU CLEAR Exit Sound Equalizer SRS Trusurround HD Speaker SPDIF Type Smart Volume MTS Audio Language Off On Dolby Digltal Off Stereo English Picture Sound Settings Exit Return MENU CLEAR Exit Settings Language Channel Closed Caption Parental Control Time S...

Страница 15: ...justing the picture are used to obtain the best picture settings according to your preference the type of program you are watching and the ambient lighting To access the Picture menu press MENU to display the menu screen Press to select Picture then press OK to display options Picture Mode Displays a list that lets you select one of the preset picture settings Energy Star Vibrant Cinematic Natural...

Страница 16: ...emium virtual surround sound Speaker Option On Off When you select the Off option the sound speaker on the TV will be turned off SPDIF Type This option controls the type of audio stream sent to the Digital Audio Output jack SPDIF OUT Available options are Dolby Digital PCM Smart Volume Option On Off This option reduces the annoying blasts in volume that often occur during commercial breaks and als...

Страница 17: ...ress OK to check the highlighted channel You can add the channel back into the Channel List by highlighting it and un checking it 3 Repeat the process to hide additional channels 4 Press MENU to return to the previous menu or press CLEAR to close the menu DTV Signal Show the condition of DTV signal Good or Bad Normal Bad for no DTV signal or very weak DTV signal Closed Caption Many programs are en...

Страница 18: ...that have been given an Exempt rating and programs that are considered unrated Change V Chip Password The first time you enter the Parental Control menu you must enter the default secret code 0000 to adjust other parental control settings Then set your individual password 1 Selelct Parental Control Change Password press OK to enter 2 Use the number buttons to enter the four digit number for your p...

Страница 19: ...local and weather programs emergency bulletins public announcements and programs without ratings The Exempt option applies to both US and Canadian unrated programs and Canadian programs rated E 1 Select Parental Control Unrated 2 Press to toggle between View and Block View All unrated programs are available Block All unrated programs are not available Keyboard Lock This option allows you to block ...

Страница 20: ...it into the drive directly If you have a device with a USB port connect one end of the USB cable to the USB port and the other end to the USB jack on the side of the TV The USB feature on your TV allows you to play audio files format supported MP3 or display pictures format supported JPEG To utilize this feature follow these steps 1 Press MENU to display the menu screen 2 Use to select Input 3 Pre...

Страница 21: ...mes sent in 4 3 which does not fill your screen It depends on how the station or device connected to your TV is formatting the video If there are bars on the screen press the ZOOM button to try a different format that may eliminate the bars Some bars can t be removed because of the way the format is sent by the broadcaster The format changes as you press the ZOOM button and the format type is disp...

Страница 22: ...r back of your TV three video cables or bundled component video cables red blue and green connect to the corresponding COMPONENT INPUT jacks on the back of your TV Check the antenna connections Make sure all of the cables are firmly connected to the jacks There is no sound but the picture is fine The sound might be muted Try pressing the volume up button to restore sound If using DVI or Y PB PR re...

Страница 23: ...ssistance If you have black bars on each side of your picture the component you connected might have a switch or a menu option allowing you to change the picture quality output that will fix this Choose either 720p or 1080i The remote control doesn t work Something might be between the remote and the remote light sensor on the front of the TV Make sure there is a clear path The remote may not be a...

Страница 24: ... may use a cloth dampened with warm water While cleaning do not spray liquid directly on the screen or allow liquid to run down the screen and inside the TV Also never place drinks or vases with water on top of the TV This could increase the risk of fire shock hazard or damage to the TV Television Specifications Broadcasting system US System NTSC M ATSC standard 8VSB QAM Receiving Channels VHF2 13...

Страница 25: ...vice location will be at the sole discretion of TTE based upon the TTE Limited Warranty Statement At the sole discretion of TTE television screen sizes 32 and smaller will either be repaired at an Authorized TCL Service Center or directly exchanged for a new or refurbished remanufactured unit At the sole discretion of TTE television screen sizes 33 through 55 or larger will either be repaired at a...

Отзывы: