15
Chapter 4
Menu Operation
Music, Movie, Clear voice
and
Personal
.
TV placement:
Use
/
to balance the sound between
Desk top
and
Wall mount
.
Auto volume control:
Select
On
mode to reduce the
annoying blasts in volume during commercial breaks
and also
softer sounds in program material.
Eliminates the need to constantly adjust the volume.
SPDIF type:
Connect to an audio device through the
SPDIF output. Select
SPDIF type
and press
OK
/ to
display the options. Select a proper sound type from the
list for digital programs.
- If the current program outputs sound in
Dolby
format, then either
PCM
or
Dolby
can be selected.
- If the current program does not output sound in
Dolby
format, only
PCM
can be selected.
Otherwise no sound will be output.
Note:
The options you may choose depend on the
program you are watching. If you select
PCM
and the
sound output is ahead of the picture, you can select
SPDIF delay
from the
Sound
menu and press
to adjust the delay time to synchronize the sound with
the picture.
SPDIF delay:
If the sound output does not match
the picture, press
to adjust the delay time to
synchronize the sound with the picture.
Advanced settings:
Press
OK
/ to display its submenu.
Use
to select the items, such as Balance, to obtain a
better sound.
Note:
The options offered depend on the program you
are watching.
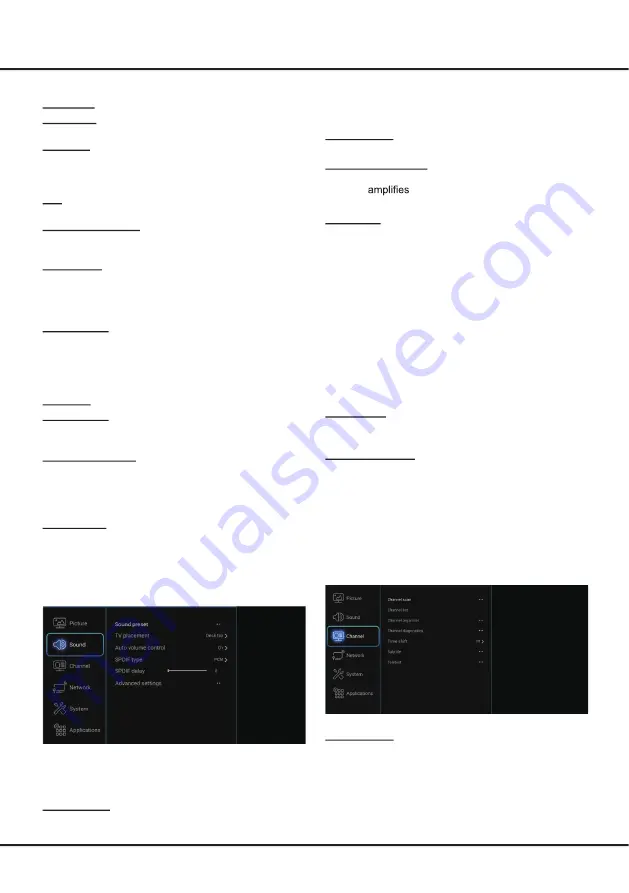
Channel
Select
Settings > Channel
, then the
Channel
menu
appears on the right with the following options. Press
to enter and use
to choose an option.
Channel scan:
Press
OK
/ to display channel scan
options.
Country:
Press
OK
to display the country list and
use
to select your country.
Tuner Mode:
select
Antenna
or
Cable
option
according to your actual use.
(Note: the
Cable
option
areas of the picture.
Saturation:
Adjusts the richness of colour.
Sharpness:
Adjusts the crispness of the edges in the
picture.
Backlight:
Adjusts the brightness of the backlight,
depending on room lighting.
Note:
This option is only available when Energy saving
of ECO settings is set to off.
Tint:
Adjusts the balance between the red and green
levels.
Colour temperature:
Adjusts the colour temperature
of the picture. Use
to scroll through the colour
settings:
Normal
,
Warm
,
Cool
and
Customer.
Auto format:
Use
to select
On
and
Off
, when
On
is selected, the TV will display the picture according to
HD Signal's format.
Note: Auto format
is available only in TV and HDMI
mode.
Screen mode:
Use
to select the picture size.
Note
: You are recommended to use the full screen
mode. Do not use the display mode with black bars on
both sides of the picture (such as 4:3) for a long time,
otherwise the TV screen may be damaged permanently.
This function is only available when
Auto format
is
off
.
Overscan:
Set Overscan function to
On
or
Off
.
ECO settings:
Press
OK
/ to display its submenu.
Energy saving:
Press
to select the desired
power saving mode,
High
,
Low
or
Off
.
Advanced settings:
Press
OK
/ to display its
submenu. Use
to select the items, such as
Noise
reduction
, to adjust for obtaining a clearer picture.
Note:
The options offered depend on the program you
are watching.
Picture reset:
Select to reset the picture settings to the
factory default
.
Sound
Select
Settings > Sound
, then the
Sound
menu
appears on the right with the following options. Press
to enter and use
to choose an option.
Note:
Some options may not be available for certain
signal sources. Some options may appear in the next
page of the
Sound
menu, you can press
to
switch.
Sound preset:
Press
OK
/ to display the option list.
Use
to select a sound type from the list:
Standard,
Содержание L49P10FS
Страница 1: ...L49P10FS...
Страница 3: ...Legal Statement 21...
Страница 5: ......
Страница 6: ...AUDIO OUT adapter AUDIO OUT adapter output socket HDMI 3...
Страница 19: ...Note The information in the picture will be changed due to network or system upgrade...


