TCL L43P8US Скачать руководство пользователя страница 7

5

Introduction

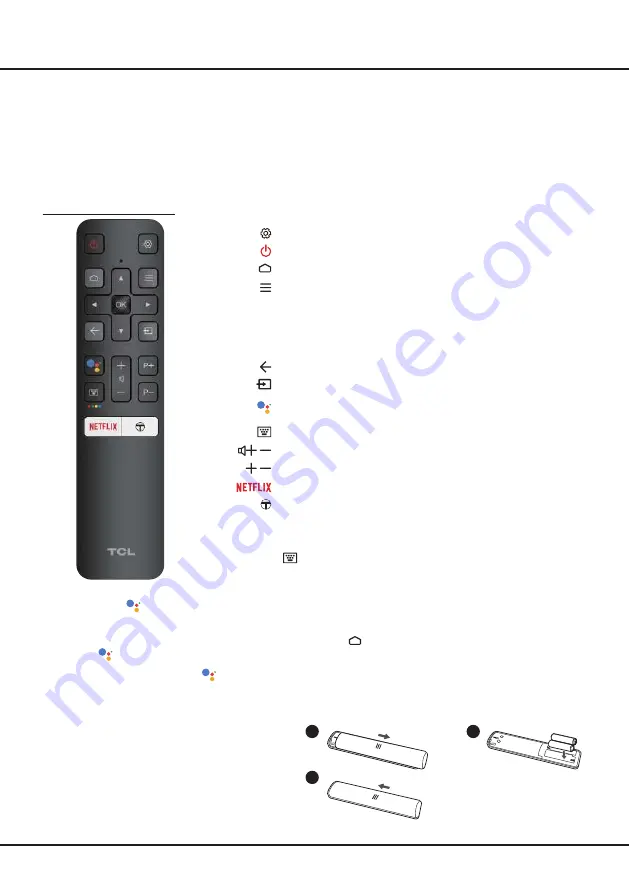
Remote Control Functions

Most of your television's functions are available via the menus that appear on the screen. The remote control(s) 

supplied with your set can be used to navigate through the menus and to configure all the general settings.

Note

:


1.

Figures and illustrations in this operation manual are provided for reference only and may differ from actual product 

appearance. 2.The remote control type may be changed without notice, please refer to the remote control attached 

with your TV. 3.

Certain function may not be available for some models, e.g. GUIDE/SUBTITLE functions are only 

available under DTV source. And DTV is not available for certain model.


-

Installing Batteries
1. 

Push to open the back cover as illustrated.

2. 

Insert two AAA batteries according to the 

polarities marked on the battery case.

3. 

Replace the back cover as illustrated.

To display the Settings menu.
Standby / quit standby.
To


access the Smart TV homepage.

To display the Option menu.

▲/▼/

/

Navigation direction buttons. The 

▲/▼ buttons are also used


to 

change channels in TV mode.

OK

To confirm an entry or selection. 

This button is also used


to 

display the channel list in TV mode.
To return to the previous menu or quit an app.
To select input source.
To turn on the voice function. 

(Available only when the network 

connection works normally.)

To pop up the virtual remote control keyboard when available.

/

To control the volume.

P /

To change channels.

To access Netflix.


(Not available for some models.)

To access T recommended apps.

RC802V remote control

Note: Certain function may be accessed from the virtual remote control keyboard only, 

please press   button on the remote to display it and operate accordingly. 


-

How to Use the Remote Control

When using 

 button for the first time, you will be prompted to pair the remote with the TV. Please follow the 

on-screen guide for paring instructions. 

a.Keep the remote control and TV in 1 meter, press 

OK

 and   button on the remote at the same time. You can 

use 


button after activating successfully.

b.This voice search function   is only available for content search from certain apps.
c.Set languages in the 

settings

 menu under smart TV homepage to your local language or official language to 

enhance voice search successfully.

1

2

3

Содержание L43P8US

Страница 1: ...1 1 A5 80g 72 RT51HS EAP1A 70 STDD30 EEM1A HZ2019 05 115R 72 RT51HS EAPAC 43P8 2019 6 3 BOM H7 43F60ND URNB0AA ELQ142311H TCL L43P8US RT51TS RU PREPARED BY ENG CHECKED BY CONFIRM BY RUSSIA TCL TV PE...

Страница 2: ...L43P8US L50P8US L55P8US L65P8US...

Страница 3: ......

Страница 4: ...ons menu 10 Chapter 4 Using More of Your TV Installing Channels 11 Common Interface 11 Using the Common Interface Function 11 Accessing Common Interface Services 11 Using Subtitles 11 11 Enabling Subt...

Страница 5: ...If this happens unplug the set and refer to the service personnel If the set is subject to impact or has been dropped and the cabinet has been damaged Where the mains plug or an appliance coupler is...

Страница 6: ...f equipment including video recorders camcorders decoders satellite receivers DVD players or games consoles Digital audio out Optical socket This socket can be used to connect a compatible digital aud...

Страница 7: ...e also used to change channels in TV mode OK To confirm an entry or selection This button is also used to display the channel list in TV mode To return to the previous menu or quit an app To select in...

Страница 8: ...Settings menu LANG To select an audio language available for selected digital TV program GUIDE To toggle the Electronic Program Guide on or off only available for digital channels TEXT To toggle Telet...

Страница 9: ...le to the mains socket Your TV set should only be connected to an AC supply It must not be connected to a DC supply If the plug is detached from the cable do not under any circumstances connect it to...

Страница 10: ...onnect to a wired network 1 Ensure you have An Ethernet cable long enough to reach your TV A router or modem with an available Ethernet port A high speed Internet connection An Ethernet LAN port on th...

Страница 11: ...gure below Press to move the highlight to the next function selection Press and hold the button for more than 2 seconds to confirm your selection Note You can follow the on screen guide to operate Fig...

Страница 12: ...e applications may have limited service or not be supported Changes in application content may be made without prior notice by the service provider 1 Press on the remote control to display the Smart T...

Страница 13: ...e channels automatically This may be done in any of the cases below you are prompted that there are no channels in TV mode you want to update your channels 1 In TV mode press on the remote control and...

Страница 14: ...can navigate select and view programs 1 Press on the remote control select Channel EPG and press OK to enter or press GUIDE 1 Press on the remote control select Channel Subtitle Subtitle type and pre...

Страница 15: ...al Video Recorder not available for some models Allows you to record your favourite TV programs Before you use the function connect a USB drive to the TV first directly if available on the remote cont...

Страница 16: ...It starts to record automatically 3 Press BLUE button to access Settings and use to adjust the recording duration 4 Press OK or to stop recording manually the recorded file will be saved In normal ope...

Страница 17: ...stable 1 Fail to link to the network Check if your TV is connected with the network Reboot your TV Consult your internet service provider to confirm if access of your router is supported Refer to the...

Страница 18: ...osition of the antenna may improve the reception Radio frequency interference This interference produces moving ripples or diagonal streaks and in some case loss of contrast in the picture Find out an...

Страница 19: ...vices either express or implied including but not limited to warranties of merchantability of satisfactory quality fitness for a particular purpose of accuracy of quiet enjoyment and non infringement...

Страница 20: ...18 Other Information...

Страница 21: ...lby Laboratories Dolby Dolby Audio and the double D symbol are trademarks of Dolby Laboratories are trademarks or registered trademarks of HDMI Licensing Administrator Inc Figures and illustrations in...

Страница 22: ...L43P8US L50P8US L55P8US L65P8US...

Страница 23: ......

Страница 24: ...RC802V 5 RC802N 6 2 7 7 8 TV 9 9 3 10 RC802V 10 RC802N 10 10 10 Smart TV 10 T 10 10 11 4 12 12 12 12 12 12 13 13 13 13 13 13 13 T Link 13 T Link 13 14 14 EPG 14 Bluetooth 14 15 15 PVR 15 T cast 16 16...

Страница 25: ...3 1 TCL 5...

Страница 26: ...AV adapter HDD LAN Antenna Cable input Router Modem USB 2 0 Satellite input Common interface Digital audio out Optical HDMI or HDMI Service port or HDMI ARC V L R V L R V L R AV adapter HDD AV AV VID...

Страница 27: ...5 1 2 3 GUIDE SUBTITLE RC802V Smart TV OK P a 1 OK b c settings Smart TV 1 2 3 1 2 3...

Страница 28: ...6 LIST P Smart TV OK EXIT LANG GUIDE TEXT SUBT RC802N 1 2 3...

Страница 29: ...7 1 AAA 2 3 ANTENNA IN 75 VHF UHF CABLE IN 4 2...

Страница 30: ...Ethernet Ethernet Ethernet LAN 2 Ethernet 3 Network Internet 1 2 Network Internet Network Internet 1 Smart TV 2 Settings OK 3 Network Internet OK Router Modem Internet LAN port Modem Internet Wireles...

Страница 31: ...9 TV 2 Welcome...

Страница 32: ...10 RC802V OK OK OK P P LIST RC802N P P LIST LIST OK OK Inputs OK OK Smart TV Apps Smart TV 1 Smart TV 2 OK 3 4 OK Smart TV T Apps 1 2 OK 3 1 Smart TV 2 Settings OK 3...

Страница 33: ...11 3 OK 4 1 2 OK 3 OK 4 Settings OK LED Motion clear...

Страница 34: ...T DVB T2 DVB C Subtitle On 1 Channel Subtitle OK 2 Subtitle OK On Off OK 3 TV 1 TV Channel Channel scan OK 2 Country Region OK 1234 System Lock OK 3 Automatic search OK 4 Tuner mode Cable Antenna Sat...

Страница 35: ...ngs Device Preferences Power Instant power on T Link CEC HDMI CEC T Link 1 System T Link OK 1 Channel Subtitle Digital subtitle language 1st OK 2 OK 3 Digital subtitle language 2nd OK 4 OK 5 1 Channel...

Страница 36: ...luetooth Bluetooth Bluetooth 1 Settings Remotes Accessories OK 2 Add accessory OK Bluetooth 3 OK Bluetooth 2 4 Wi Fi Bluetooth Bluetooth Bluetooth SIG TCL 2 T Link OK 3 On Off OK 4 CEC DVD On CEC On C...

Страница 37: ...me Shift RC802N PVR USB 1 PVR 2 OK Record 3 Settings 4 OK RC802V 5 PVR 6 PVR PVR PVR list OK Time Shift On Settings Channel Time Shift OK USB USB Time Shift OK 1 2 3 Time Shift OK 4 RC802V OK USB USB...

Страница 38: ...references Reset OK 2 Factory data reset OK Erase everything OK 3 1234 4 OK OK 5 Initial setup Netflix Netflix Netflix www netflix com http www netflix com Netflix NETFLIX 1234 0423 USB USB PVR USB T...

Страница 39: ...17 6 7 8 9 USB 10 USB 11 nScreen 12 Google 1 Ethernet 2 USB a A b c d 3 4 USB 5 1 2 5...

Страница 40: ...18 1 2 3 4 1 2 3 4 1 2 3 1 2 1 2 1 2 3 4...

Страница 41: ...19 TCL SmartTV SmartTV SmartTV TCL TCL TCL TCL TCL TCL TCL TCL...

Страница 42: ...20...

Страница 43: ...Screen size Model Format of signal 21 L43P8US 43 cd m2 270 3840x2160 178 178 8 2 7 5 16 9 DVB T T2 L50P8US 50 cd m2 270 3840x2160 178 178 8 2 10 2 16 9 DVB T T2 L55P8US 55 cd m2 270 3840x2160 178 178...

Страница 44: ...5 15150 69 50 40 75 100 1 15150 69 5 40 TCL http tcl com ru...

Страница 45: ......

Страница 46: ...Dolby Laboratories Dolby Dolby Audio D Dolby Laboratories HDMI HDMI Licensing Administrator Inc 72 RT51HS EAPAC...

Отзывы: