background image

7

Chapter 2

General Operation

Switching on

Follow the instructions on this page on how to switch on your TV set and the remote 
control before going on to following pages describing how to use the channel set-up 
procedure.

1. Insert two AAA batteries in the remote control.

    Precautions on using batteries:
    - Only use the battery types specified.
    - Make sure you use the correct polarity.
    - Do not mix new and used batteries.
    - Do not use rechargeable batteries.
    - 

    - Remove the batteries from the remote control if you are not using it for a long 
      period of time.

Do not expose batteries to excessive heat such as sunshine, fire or the like, 

      throw them in a fire, recharge them or try to open them, as this could cause 
      them to leak or explode.

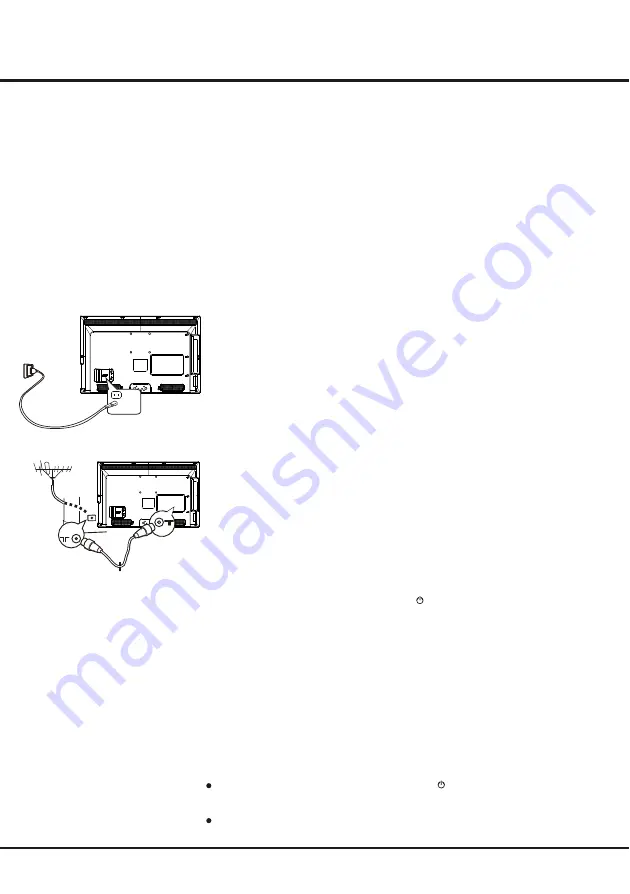
3. Connect an outside aerial to the 

ANTENNA IN 

socket at the back of the TV set. 

    The aerial socket (75 OHM - VHF / UHF / cable) can be used for connecting 
    an external aerial or other equipment fitted.

4. When powered on, the TV will be turned on directly or be in standby mode.


    If the TV set is in standby mode, press the    button on the remote control or 
    on the TV set to turn on the TV.


2. Connect the power cable 

FIRST 

to the television, 

THEN 

to a mains socket.

    Your TV set should only be connected to an AC supply. It must not be connected 
    to a DC supply. If the plug is detached from the cable, do not, under any 
    circumstances, connect it to a mains socket, as there is a risk of electric shock.


 Note:

 the figures are for representation only. The location of the power socket at

    the back of the television might differ depending on the model.

Switching off

To put the TV set into standby mode, press the    


button on the remote control

or on the TV, the TV set remains powered up, but with low energy consumption.

To switch off the TV set, unplug the mains socket from the mains outlet.

Содержание L39E3000F

Страница 1: ...is User s Guide are provided for reference only and may differ from actual product appearance Product design and specifications may be changed without notice OPERATION MANUAL LED TV For use with model...

Страница 2: ...Use Environment Cleaning Hanging the TV Set on the Wall Sockets Remote Control Functions Important Information Buttons on the TV Switching on Switching off Using Menu System Language Selection Automat...

Страница 3: ...and the signal cable to moisture Do not place the set on an unstable cart stand or table Use Environment Place the set on a place that allows good ventilation Do not use the set near damp and cold ar...

Страница 4: ...n buttons on the remote and adjust menu controls 3 OK button 4 Notes The location and names of the function buttons and power button on the TV may vary according to TV model 1 2 3 4 5 VOL PR 4 SPDIF S...

Страница 5: ...IO IN AUDIO IN or AUDIO IN adapter sockets input Note T AUDIO in adapter and COMPONENT CMP he CMP socket can be used to connect the attached AUDIO in adapter cable with audio L R sockets be used to ob...

Страница 6: ...AM UP DOWN Scans up or down through the current channel list and input sources V VOLUME UP DOWN Increases or decreases the TV s volume Returns you to the previous channel In USB function returns to th...

Страница 7: ...the TV set The aerial socket 75 OHM VHF UHF cable can be used for connecting an external aerial or other equipment fitted 4 When powered on the TV will be turned on directly or be in standby mode If...

Страница 8: ...o confirm your selection and enter the last step Note the Shop mode does not satisfy the MEPS certification suggest selecting Home 5 In this step you can press OK to exit the initial setup The channel...

Страница 9: ...nel name finally press OK to confirm This allows you to update all available channels without altering the sorting of existing channels 1 Display the Channel install menu press the up or down directio...

Страница 10: ...l is performed in this mode Minimum energy performance standards Adjusting the Picture static or any type of interference This feature is especially useful for providing a clearer picture in weak anal...

Страница 11: ...nput lock this option allows you to lock a certain external source you want to lock Press the OK or right direction button to display Input lock menu then press the up or down direction button to sele...

Страница 12: ...s submenus Subtitle press the left or right direction button to turn On or off the subtitles Subtitle type press the left or right direction button to select a subtitle type You can select Hearing imp...

Страница 13: ...layed in Vivid mode In Shop mode you can adjust the picture mode but when turning on the TV next time the Picture preset will restore to Vivid mode and a prompt about Shop mode will appear Customising...

Страница 14: ...the file exceed the limitations of the system the file format is not supported the file is damaged or the file can not be decoded Do not unplug the USB memory device when the system is reading a file...

Страница 15: ...function bar at the bottom of the TV screen Music To playback music if available 1 Select Media center Music then press OK to enter the main file content browser 2 Use the left right up down buttons t...

Страница 16: ...resolution or other standard resolutions of the Windows system Snowy dots and interference If the antenna is located in the fringe area of a television signal where the signal is weak the picture may...

Отзывы: