TCL 65DP660 Скачать руководство пользователя страница 8

EN

8

English

Getting started

To switch the sound off and back on.

Standby / quit standby.

/

To control the volume.
To access or exit T-Launcher.
To turn on the mouse function.

P /

To change channels.
To access the Android TV homepage.
To select input source.

/ / /

Navigation direction buttons.

OK

To confirm an entry or selection.

To return to the previous menu or quit an App.
To display the Option menu.
To pop up the virtual remote control keyboard when 

available.
To turn on the voice function. 

(Available only when the 

network connection is normal.)

Note: This remote control is available only for selected models. The remote 

control type may be changed without notice.
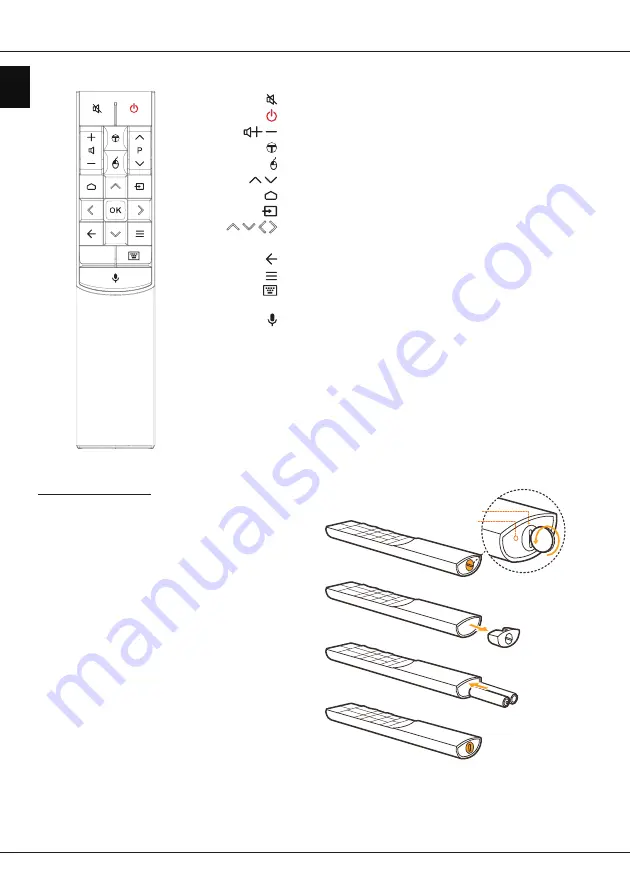
Open

Close

Installing batteries

1. 

Hold the bottom part of the remote control, use a 

plastic coin-shaped object to twist the switch to the 

"Open" location as illustrated.

2. 

Pull the batteries cover out.

3. 

Insert two AAA batteries according to the polarities 

marked on the batteries case.

4. 

Replace the batteries cover and use a plastic coin-

shaped object to twist the switch to the "Close" 

location.

Exclusive remote control

Содержание 65DP660

Страница 1: ... hazard Leave more than 10cm clearance around the television to allow adequate ventilation The ventilation should not be impeded by covering the ventilation openings with items such as newspapers table cloths curtains etc The apparatus shall not be exposed to dripping or splashing and no objects filled with liquids such as vases shall be placed on the apparatus Batteries battery pack or batteries ...

Страница 2: ...f you face interruptions in audio reception you should restart your Bluetooth device to find frequency with less interferences and if you continue to face issues you should move closer to TV or increase space between TV and source of interferences Bluetooth declaration ID D038235 Hanging the TV set on the wall Warning This operation requires two people To ensure a safe installation observe the fol...

Страница 3: ...ive 2012 19 EU 2006 66 EC and 2008 12 EC By disposing of these products correctly you will help to conserve natural resources and will help to prevent potential negative effects on the environment and human health which could otherwise be caused by inappropriate waste handling of these products For more information about collection points and recycling of these products please contact your local m...

Страница 4: ... settings menu 10 Chapter 4 Using more of your TV Installing channels 11 Common interface 11 Using the common interface module 11 Accessing common interface services 11 Using subtitles 11 Turning on off subtitles 11 Enabling subtitle languages on digital TV channels 11 Selecting a subtitle type on digital TV channels 11 Using Teletext 12 Selecting decoding page language 12 Digital Teletext languag...

Страница 5: ...necting devices Cable Chapter 1 Connections USB 2 0 Service port 5V 0 5A MAX LAN HDMI 3 4K HDMI 2 4K ARC Antenna Cable input Satellite input 13 18V 0 4A MAX SPDIF HDMI 1 4K USB 3 0 5V 1A MAX Common interface AV adapter HD game console Blu ray Disc player HD Camcorder Connect Blu ray Disc player HD game console HD camcorder headphones CI module ...

Страница 6: ...errite beads ARC Audio Return Channel function is only supported on the HDMI port identified with ARC To use ARC function please turn on T Link function first as described in the T Link section It is recommended to use high quality and well shielded HDMI cables to avoid possible interferences Please use headphones with 3 5mm TRS connector Excessive sound pressure from headphones can cause hearing ...

Страница 7: ... select a sound type available for selected analogue TV programme to select an audio language available for selected digital TV programme GUIDE To toggle the Electronic Programme Guide on or off only available for digital channels TEXT To toggle Teletext on or off SUBT To select a subtitle language available for selected digital TV programme Colour buttons To select tasks or Teletext pages to be u...

Страница 8: ... when available To turn on the voice function Available only when the network connection is normal Note This remote control is available only for selected models The remote control type may be changed without notice Open Close Installing batteries 1 Hold the bottom part of the remote control use a plastic coin shaped object to twist the switch to the Open location as illustrated 2 Pull the batteri...

Страница 9: ... models with below button on the set Power on Standby Switch the TV on and off 1 When the power cord is connected the TV will be turned on directly or be in standby mode If the TV is in standby mode press the or POWER button on the set or the button on the remote control to turn it on 2 To put the TV into standby mode press the button on the remote control The TV set remains powered up but with lo...

Страница 10: ...experience a problem using an application please contact the content provider According to circumstances of the content provider an application s updates or the application itself may be discontinued Depending on your country s regulations some applications may have limited service or not be supported Changes in application content may be made without prior notice by the service provider 1 Press o...

Страница 11: ...insertion of a common interface module may damage both the module and your TV 1 Following the directions printed on the common interface module gently insert the module into the common interface slot on the TV 2 Push the module in as far as it will go 3 Turn on the TV and wait for the common interface function to be activated This may take several minutes Note Do not remove the common interface mo...

Страница 12: ...Enabling or disabling T Link 1 Press on the remote control select System T Link and press OK to enter 2 Press to select T Link and press OK to enter 3 Press to select On or Off and press OK to confirm 4 Press EXIT or to close the menu Using one touch play With one touch play pressing the play button on for example your DVD remote control starts playback on your DVD device and automatically switche...

Страница 13: ... select Apply and press OK to confirm Custom schedule Press the red button to set a schedule You can select one or more items and press OK to edit then add it into your schedule list Select date Press the green button to select date Schedule list Press the yellow button to view your schedule list More detail Press the blue button to view more details 3 Press GUIDE or EXIT to exit EPG Bluetooth fun...

Страница 14: ... the warranty card for service information Operating Conditions Temperature 5 C 35 C 41 F 95 F Humidity 20 75 non condensing Storage Conditions Temperature 15 C 45 C 5 F 113 F Humidity 10 90 non condensing Radio Information Bluetooth transmitter frequency range 2402 2480MHz Bluetooth transmitter power 2dBm 5dB 2 4G Wi Fi transmitter frequency range 2412 2472MHz 2 4G Wi Fi transmitter power 16dBm 4...

Страница 15: ...ACY OF QUIET ENJOYMENT AND NON INFRINGEMENT OF THIRD PARTY RIGHTS TCL DOES NOT GUARANTEE THE ACCURACY VALIDITY TIMELINESS LEGALITY OR COMPLETENESS OF ANY CONTENT OR SERVICE MADE AVAILABLE THROUGH THIS DEVICE AND DOES NOT WARRANT THAT THE DEVICE CONTENT OR SERVICES WILL MEET YOUR REQUIREMENTS OR THAT OPERATION OF THE DEVICE OR SERVICES WILL BE UNINTERRUPTED OR ERROR FREE UNDER NO CIRCUMSTANCES INCL...

Отзывы: