Sevcon Troubleshooting
Page 16
Electrical Troubleshooting
Test 9. ELECTRIC MOTOR BRAKE
Description:
The electric motor brake is a 24-volt electromagnetic disc brake mounted between the drive motor
and the primary reduction gear case. The brake is controlled by the speed controller logic. At what
times the brake is applied or released is dependent on the controller programing and will vary
depending on the model vehicle.
Operation:
B+ is supplied to the brake when the key switch is turned on. When the control logic determines that
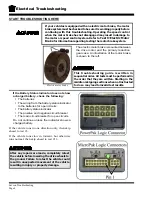
it is time to start, it provides B- at 24-volts through pin #9 on the logic card connector.
Testing:
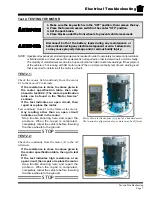
Place the forward and reverse switch in the OFF
position, turn the key switch OFF.
Rotate the drive wheels to confirm the brake is
engaged.
If the brake is engaged then skip ahead to
9.1.
If the brake is not engaged then:
Disconnect the electric brake harness connector and
repeat the test.
If the brake is still not engaged then:
•
Remove the brake and repair or replace
the brake as required. Stop trouble shooting
here and repair the problem. When the
repair is completed, completely retest the
vehicle before lowering the drive wheels to
the ground.
If the brake engaged after the harness was
disconnected then:
Inspect the harness for shorts.
Stop troubleshooting here and repair the problem.
When the repair is completed, completely retest the
vehicle before lowering the drive wheels to the
ground.
Test 9.1
Close the seat switch, turn the key switch ON, place
the forward and reverse switch in the FORWARD
position, depress the accelerator pedal to engage
FS-1 only (creep speed).
Rotate the drive wheels to confirm the brake has
released.
If the brake released, then the brake system
is working and no further testing of the brake
is required.
If the brake did not release, then perform the
following tests:
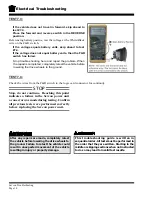
Connect a volt meter from battery negative to the
Violet/Black wire at the electric brake harness plug.
If the voltage is less than battery volts then:
•
Check wiring to the key switch and continue
troubleshooting at test #4.2.
If the voltage equals battery volts then:
Connect a volt meter across the Violet/Black wire
and the Blue wire at the electric brake harness plug.
The voltage should start at approximately 24 volts,
then drop to approximately 15 volts after about 0.5
seconds.
If the test is good then:
•
The pigtail harness to the electric brake is
broken or the electric brake has failed.
Remove the brake and repair or replace
as required.
If the test is bad then:
The electric brake is part of the vehicle braking
system. Do not operate a vehicle with the
electric brake bypassed or disabled unless the
system is being tested for faults. Operating a
vehicle with the brake bypassed or disabled
may result in severe personal injury or property
damage.
Содержание RE-380-36
Страница 12: ...TAYLOR DUNN...
Страница 30: ...TAYLOR DUNN...
Страница 31: ...TABLE OF CONTENTS General Maintenance Maintenance Guidelines 2 Troubleshooting Guide 3 Lubrication Chart 4...
Страница 50: ...TAYLOR DUNN...
Страница 64: ...Maintenance Service and Repair Steering Page 14 Exploded View of Steering Gear...
Страница 90: ...TAYLOR DUNN...
Страница 116: ...Maintenance Service and Repair Transmission Page 20 NOTE Values shown are for reference only C D...
Страница 128: ...TAYLOR DUNN...
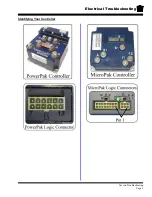
Страница 143: ...Sevcon Troubleshooting Page 3 Electrical Troubleshooting Identifying Your Controller...
Страница 162: ...TAYLOR DUNN...
Страница 185: ...Wire Diagrams...
Страница 190: ...Illustrated Parts Parts Page 4 Steering Linkage...
Страница 192: ...Illustrated Parts Parts Page 6 Steering Gear 4 1 6 8 7 5 9 10 2 3 14 17 12 11 13 15 16...
Страница 194: ...Illustrated Parts Parts Page 8 Front Suspension...
Страница 196: ...Illustrated Parts Parts Page 10 Transmission primary reduction...
Страница 198: ...Illustrated Parts Parts Page 12 Transmission secondary reduction Rear Axle...
Страница 200: ...Illustrated Parts Parts Page 14 Rear Brakes Front Brakes optional Brake Body...
Страница 202: ...Illustrated Parts Parts Page 16 Rear Suspension...
Страница 204: ...Illustrated Parts Parts Page 18 Motor...
Страница 206: ...Illustrated Parts Parts Page 20 Deadman Seat Brake...
Страница 214: ...Illustrated Parts Parts Page 28 Wheels and Tires Ref wheel hub 1 2 5 assembly 4 3 6 7 8 9 10...
Страница 216: ...Illustrated Parts Parts Page 30 Instrument Panel dash ending s n 179484 Instrument Panel dash starting s n 179485...
Страница 218: ...Illustrated Parts Parts Page 32 Speed Control Panel R 3 80 36 1 2 4 5 6 6 7 8 3 9 10 11 12 13...
Страница 220: ...Illustrated Parts Parts Page 34 Miscellaneous Electrical Miscellaneous Frame...
Страница 222: ...Illustrated Parts Parts Page 36 Seat Cushions and Lights 1 2 3 4 5 6 7 8 9...
Страница 230: ...Illustrated Parts Parts Page 44 Batteries 36 Volt 48 Volt...
Страница 232: ...Illustrated Parts Parts Page 46 Decals Front Cowl Tray Battery Compartment...
Страница 234: ...Illustrated Parts Parts Page 48 Trailer Hitch...
Страница 236: ...Illustrated Parts Parts Page 50 Strobe Light Other Front End Options...
Страница 238: ...Illustrated Parts Parts Page 52 Cab Cowl With Windshield Options...
Страница 240: ...Illustrated Parts Parts Page 54 Optional Cab Accessories...
Страница 242: ...Illustrated Parts Parts Page 56 Cab Door Options...
Страница 244: ...Illustrated Parts Parts Page 58 Optional Top Cover...
Страница 246: ...Illustrated Parts Parts Page 60 Rear Seat Rear Gate and Rear Deck...
Страница 248: ...Illustrated Parts Parts Page 62 9 Side Panels...
Страница 250: ...Illustrated Parts Parts Page 64 Front Bumper and Splash Pan...
Страница 252: ...TAYLOR DUNN...


