background image

Installation Checklist


Perform a site inspection prior to the installation date to check existing site conditions and identify 

constraints and limitations that could possibly cause delays or problems during the actual installation. 


SITE ACCESSIBILITY 

1.


Verify existing loading facilities and proximity of loading dock to staging area. 

2.


Verify if receiving area is accessible by trailer. 

3.


Verify access to service elevators. 

4.


Reserve service elevators in advance, if necessary. 


SITE PREPARATION 

1.


Clear all obstacles that could interfere with the installation process. 

2.


When doing a reconfiguration, ensure that all furniture to be re-used are clear of computers, 

accessories, books, papers and all personal effects. 

3.


Ensure that all live wires and data/communications wires are disconnected prior to installation. 


FURNITURE PLANS 

1.


Labeled furniture plans for installation purposes are located in the hardware box.  Ensure that 

drawings are complete and handy before beginning installation. 


STAGING 

1.


If damages are noticed upon opening the trailer, these must be noted by the receiver on the Bill 

of Lading. Also note any imperfections or missing components discovered while unpacking the 

furniture.  This information is necessary when requesting for product replacement and shipping 

claims. 

2.


Unpack products in the general order of installation (refer to Installation Sequence). 


WASTE MANAGEMENT 

1.


Establish a trash removal area separate from the product staging area. 


2 Height adjustable table

APRIL 2019

Содержание Height Adjustable Tables

Страница 1: ...djustableTables installationguide F O R M O R E I N F O R M A T I O N C O N T A C T I N S T A L L A T I O N SE R V I C E Mon Fri 8 30 AM 5 00 PM EST Phone 416 252 8000 Toll Free 1 800 675 4092 www tay...

Страница 2: ...ble of Contents 1 Installation Checklist 2 Care and Maintenance 3 Height Adjustable Table Base Installation 4 17 2 Legged Height Adjustable Base Installation 4 3 Legged Height Adjustable Base Installa...

Страница 3: ...of computers accessories books papers and all personal effects 3 Ensure that all live wires and data communications wires are disconnected prior to installation FURNITURE PLANS 1 Labeled furniture pl...

Страница 4: ...Countertop Magic both manufactured by Magic American Corporation Painted Metals Tayco s painted metal products are powder paint coated To clean these products use a damp cloth using only a small amou...

Страница 5: ...For worksurface 46 inches in length go to step 2 and for worksurface 48 to 72 inches in length proceed to step 6 2 Remove half of the main frame by sliding it out Set it aside Figure 2 2 legged heigh...

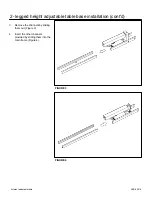
Страница 6: ...y sliding them out Figure 3 4 Insert the other channels provided by sliding them into the main frame Figure 4 2 legged height adjustable table base installation cont d FIGURE 4 FIGURE 3 5 Height adjus...

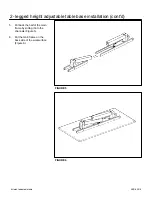
Страница 7: ...in frame by sliding it into the channels Figure 5 6 Put the main frame on the back side of the worksurface Figure 6 2 legged height adjustable table base installation cont d FIGURE 6 FIGURE 5 6 Height...

Страница 8: ...g it into the main frame Figure 7 8 Set the column straight then tie up the screws inside the main frame Figure 8 2 legged height adjustable table base installation cont d tools hardware needed FIGURE...

Страница 9: ...e holes of the side frame and pre drilled holes of the worksurface with 10 24 x 5 8 machine screws Figure 10 2 legged height adjustable table base installation cont d tools hardware needed M6 x 15 4 p...

Страница 10: ...r side of the main frame Figure 12 2 legged height adjustable table base installation cont d tools hardware needed cross head screw driver 4x25 cross head screw 2 pcs FIGURE 13 FIGURE 12 tailstock scr...

Страница 11: ...cont d tools hardware needed FIGURE 15 FIGURE 14 M10x35 machine screw 8 pcs 5 mm allen key CAUTION RESET THE DESK BEFORE 1 Press the buttons at the same time for 3 seconds 2 Continue pressing the butt...

Страница 12: ...and place it on a clean solid surface or floor Figure 1 2 Remove half of the main frame by sliding it out Set it aside Figure 2 3 legged height adjustable table base installation FIGURE 2 FIGURE 1 11...

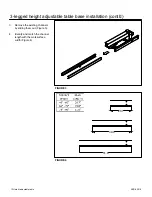
Страница 13: ...ting channels by sliding them out Figure 3 4 Identify and match the channel length with the worksurface width Figure 4 3 legged height adjustable table base installation cont d FIGURE 4 FIGURE 3 12 He...

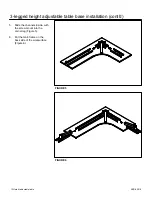
Страница 14: ...ith the screw mount into the corner leg Figure 5 6 Put the main frame on the back side of the worksurface Figure 6 3 legged height adjustable table base installation cont d FIGURE 6 FIGURE 5 13 Height...

Страница 15: ...it into the main frame Figure 7 8 Set the column straight then tie up the screws inside the main frame Figure 8 3 legged height adjustable table base installation cont d tools hardware needed FIGURE...

Страница 16: ...holes of the side frame and pre drilled holes of the worksurface with 10 24 x 5 8 machine screws Figure 10 3 legged height adjustable table base installation cont d tools hardware needed M6 x 15 4 pc...

Страница 17: ...f the main frame Figure 13 height adjustable corner table base installation cont d tools hardware needed cross head screw driver 4x25 cross head screw 2 pcs FIGURE 13 FIGURE 12 tailstock screw pre ins...

Страница 18: ...ont d tools hardware needed FIGURE 15 FIGURE 14 M10x35 machine screw 8 pcs 5 mm allen key CAUTION RESET THE DESK BEFORE 1 Press the buttons at the same time for 3 seconds 2 Continue pressing the butto...

Отзывы: