Height Adjustable Tables
installation guide
F O R M O R E I N F O R M A T I O N , C O N T A C T I N S T A L L A T I O N S E R V I C E
Mon-Fri • 8:30 AM – 5:00 PM EST
Phone 416.252.8000 • Toll Free 1.800.675.4092
www.tayco.com
Страница 1: ...djustableTables installationguide F O R M O R E I N F O R M A T I O N C O N T A C T I N S T A L L A T I O N SE R V I C E Mon Fri 8 30 AM 5 00 PM EST Phone 416 252 8000 Toll Free 1 800 675 4092 www tay...
Страница 2: ...ble of Contents 1 Installation Checklist 2 Care and Maintenance 3 Height Adjustable Table Base Installation 4 17 2 Legged Height Adjustable Base Installation 4 3 Legged Height Adjustable Base Installa...
Страница 3: ...of computers accessories books papers and all personal effects 3 Ensure that all live wires and data communications wires are disconnected prior to installation FURNITURE PLANS 1 Labeled furniture pl...
Страница 4: ...Countertop Magic both manufactured by Magic American Corporation Painted Metals Tayco s painted metal products are powder paint coated To clean these products use a damp cloth using only a small amou...
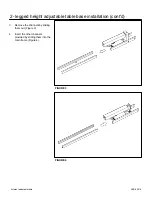
Страница 5: ...For worksurface 46 inches in length go to step 2 and for worksurface 48 to 72 inches in length proceed to step 6 2 Remove half of the main frame by sliding it out Set it aside Figure 2 2 legged heigh...
Страница 6: ...y sliding them out Figure 3 4 Insert the other channels provided by sliding them into the main frame Figure 4 2 legged height adjustable table base installation cont d FIGURE 4 FIGURE 3 5 Height adjus...
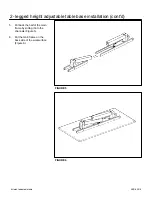
Страница 7: ...in frame by sliding it into the channels Figure 5 6 Put the main frame on the back side of the worksurface Figure 6 2 legged height adjustable table base installation cont d FIGURE 6 FIGURE 5 6 Height...
Страница 8: ...g it into the main frame Figure 7 8 Set the column straight then tie up the screws inside the main frame Figure 8 2 legged height adjustable table base installation cont d tools hardware needed FIGURE...
Страница 9: ...e holes of the side frame and pre drilled holes of the worksurface with 10 24 x 5 8 machine screws Figure 10 2 legged height adjustable table base installation cont d tools hardware needed M6 x 15 4 p...
Страница 10: ...r side of the main frame Figure 12 2 legged height adjustable table base installation cont d tools hardware needed cross head screw driver 4x25 cross head screw 2 pcs FIGURE 13 FIGURE 12 tailstock scr...
Страница 11: ...cont d tools hardware needed FIGURE 15 FIGURE 14 M10x35 machine screw 8 pcs 5 mm allen key CAUTION RESET THE DESK BEFORE 1 Press the buttons at the same time for 3 seconds 2 Continue pressing the butt...
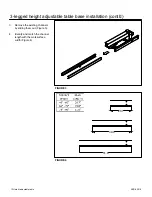
Страница 12: ...and place it on a clean solid surface or floor Figure 1 2 Remove half of the main frame by sliding it out Set it aside Figure 2 3 legged height adjustable table base installation FIGURE 2 FIGURE 1 11...
Страница 13: ...ting channels by sliding them out Figure 3 4 Identify and match the channel length with the worksurface width Figure 4 3 legged height adjustable table base installation cont d FIGURE 4 FIGURE 3 12 He...
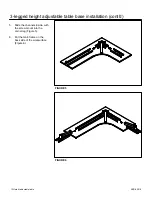
Страница 14: ...ith the screw mount into the corner leg Figure 5 6 Put the main frame on the back side of the worksurface Figure 6 3 legged height adjustable table base installation cont d FIGURE 6 FIGURE 5 13 Height...
Страница 15: ...it into the main frame Figure 7 8 Set the column straight then tie up the screws inside the main frame Figure 8 3 legged height adjustable table base installation cont d tools hardware needed FIGURE...
Страница 16: ...holes of the side frame and pre drilled holes of the worksurface with 10 24 x 5 8 machine screws Figure 10 3 legged height adjustable table base installation cont d tools hardware needed M6 x 15 4 pc...
Страница 17: ...f the main frame Figure 13 height adjustable corner table base installation cont d tools hardware needed cross head screw driver 4x25 cross head screw 2 pcs FIGURE 13 FIGURE 12 tailstock screw pre ins...
Страница 18: ...ont d tools hardware needed FIGURE 15 FIGURE 14 M10x35 machine screw 8 pcs 5 mm allen key CAUTION RESET THE DESK BEFORE 1 Press the buttons at the same time for 3 seconds 2 Continue pressing the butto...