background image


98 


 Opening 

To open the ISM main circuits, a trip command should be applied to the CM trip command input. It is a “dry 
contact“ input so no external voltage should be applied. The trip command will be accepted if: 


CM state is “Ready” (Ready LED flashes green) or within 60 seconds after the removal of the auxiliary 
power supply; 


optional electrical interlock is unlocked; 


mechanical and electrical interlock is unlocked (in case of ISM15_MD_1, ISM15_MD_3, ISM15_Shell_2 
and ISM15_HD_1 only) 

If the trip command is applied and kept before the CM is in a “Ready“ state, the 

trip command will not be accepted. 

 Emergency opening 

The  ISM  can  also  be  opened  manually.  When  the  synchronizing  shaft  is  rotated,  a  force  exceeding  the 
magnetic attraction forces of the ring magnet is applied to the armature, which subsequently starts to move. 
As the air gap increases, the opening springs and the contact pressure springs overcome the magnetic holding 
force, and the vacuum interrupter opens. 

To open the ISM15_LD_1, LD_3, LD_6 and ISM25_LD1, LD_2, LD_3 manually, the force shall be applied to 
the interlocking pins or torque shall be applied to the stub shaft evenly  during their movement  - see Figure 
158

. Force shall be applied along the pin‘s movement axis and directed to the ISM frame. The torque shall be 

applied in the direction of shaft rotation during ISM opening. The force or torque influence shall not be applied 
at the end of pin‘s stroke or shaft rotation and shall not be applied to the pin or shaft before ISM closing. 


Figure 158 

ISM15_LD_1, LD_3, LD_6 and ISM25_LD1, LD_2, LD_3  manual trip execution. 
Force or torque can be applied to any of the points shown above 


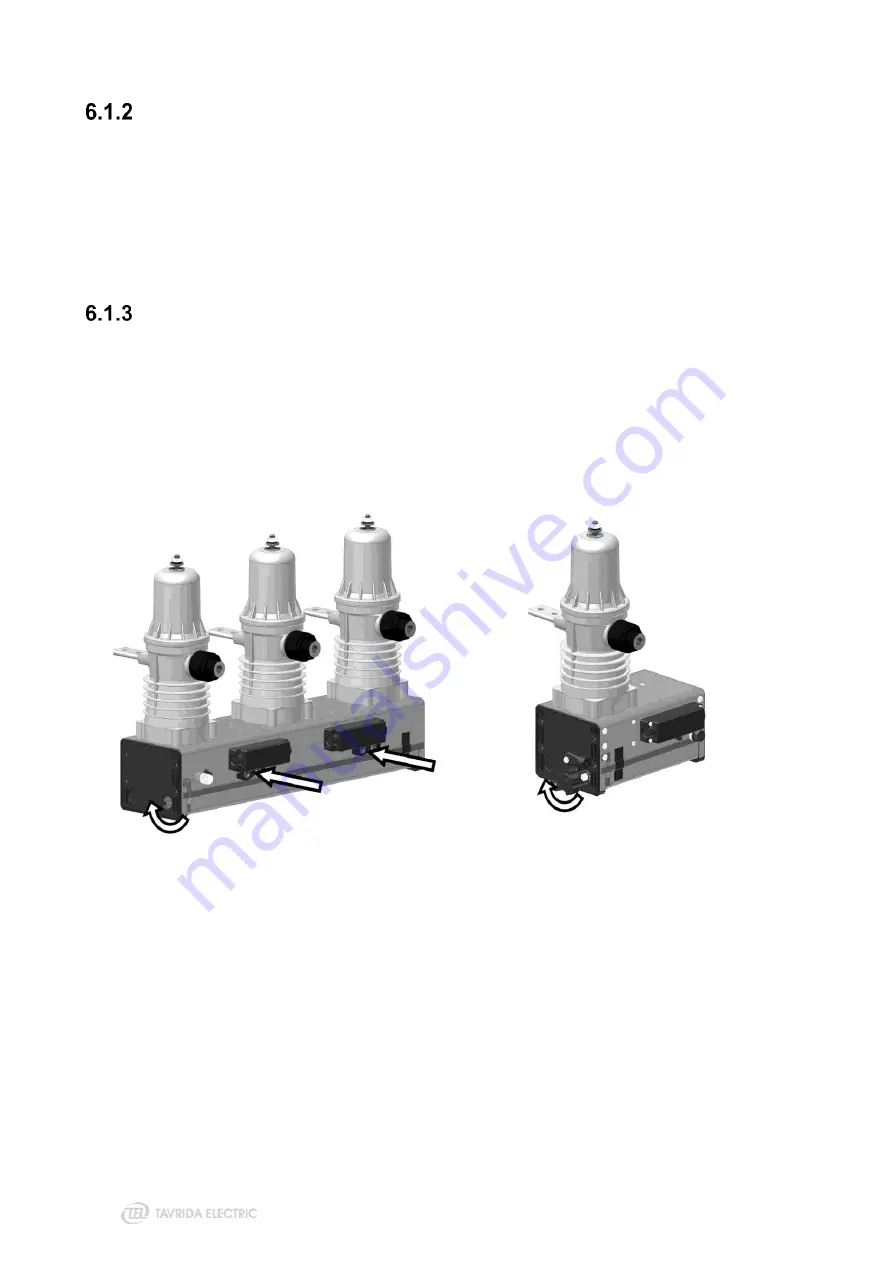
To  open  the  ISM15_LD_8,  ISM15_MD_1,  ISM15_MD_3,  ISM15_Shell_2  and  ISM15_HD_1  manually,  the 
torque shall be applied to the interlocking shaft evenly during its movement - see Figure 159. The torque shall 
be applied counterclockwise of shaft rotation (90 degrees angle). The torque shall not be applied at the end of 
shaft rotation. ISM15_LD_8, ISM15_MD_1, ISM15_MD_3, ISM15_Shell_2 and ISM15_HD_1 have a built in 
electrical interlock that interrupts the ISM coil circuit  after the interlocking shaft is rotated counterclockwise. 
After manual trip, the shaft should be rotated clockwise to unlock the ISM. 

Содержание VCB Series

Страница 1: ...COMPATIBLE SERIES USER GUIDE...

Страница 2: ......

Страница 3: ...Storage19 3 3 Unpacking and inspection 19 3 4 Handling 36 4 Installation 37 4 1 Primary part 38 4 2 Secondary part 75 5 Commissioning 88 6 Operation 96 6 1 Switching 97 7 Maintenance and troubleshoot...

Страница 4: ......

Страница 5: ...1 Product description...

Страница 6: ...operation protection and data logging functions Kits The kits of components are used to provide circuit breaker application properties This guide contains information on switching operations required...

Страница 7: ...Hz 50 60 Hz 50 60 Hz 50 60 Hz 50 60 Hz 50 60 Hz 50 60 Hz 50 60 Hz 50 60 Hz 50 60 Hz 50 60 Hz Mechanical life CO cycles 50 000 50 000 20 000 50 000 30 000 50 000 30 000 8 30 000 8 30 000 8 30 000 30 0...

Страница 8: ...r 12 V AC DC ohmic load 100 mA 100 mA 100 mA 100 mA 100 mA 100 mA 100 mA 100 mA 100 mA 100 mA 100 mA Minimum current for 12 V AC DC inductive load t 20 ms cosj 0 3 100 mA 100 mA 100 mA 100 mA 100 mA 1...

Страница 9: ...tion of the CM after switching on the auxiliary power supply 0 1 s 0 1 s 0 1 s 0 1 s 0 1 s 0 1 s 0 1 s 0 1 s 0 1 s 0 1 s 0 1 s Trip capability after failure of the auxiliary power supply 60 s 16 60 s...

Страница 10: ...30 V 30 V Contacts closed current 50 mA 50 mA 50 mA 50 mA 50 mA 50 mA 50 mA 50 mA 50 mA 50 mA 50 mA Steady state current 5 mA 5 mA 5 mA 5 mA 5 mA 5 mA 5 mA 5 mA 5 mA 5 mA 5 mA 1 For VCB ISM15_Shell w...

Страница 11: ...erm duty Continuous current 5 A 15 Gold plated auxiliary contacts are availbale on request Contact your nearest sales representatives 16 In case of Dry contacts Close and Trip are open 17 At Cos j 0 6...

Страница 12: ...IEC accident prevention regulations and the connecting conditions of the electric utilities shall be followed Take note that during operation of the Vacuum Circuit Breakers certain parts are subject...

Страница 13: ...13 2 Nameplates and seals...

Страница 14: ...7 Rated duration of short circuit tk 8 Rated short circuit current Isc 9 Rated normal current Ir 10 Phase center distance p 11 Weight W 12 Year of manufacturing 13 Rated operating sequence The serial...

Страница 15: ...el arrangement CM nameplates and seals Each CM has the following labels Serial number label Label with applicable ISM designation Warning label Firmware version label Information label with terminals...

Страница 16: ...tion label with terminals connections and main parameters 1 Serial number label 2 Label with applicable ISM designation 3 Warning label 4 Warranty seal 5 Firmware version label 6 Information label wit...

Страница 17: ...17 Manual generator nameplates Each manual generator has the following labels Designation label Serial number label Figure 11 Designation label Figure 12 Serial number label...

Страница 18: ...18 3 Product handling...

Страница 19: ...are permitted In case the storage term exceeds one year from the production date it is recommended to perform the procedu re of CM s electrolytic capacitor conditioning apply power to the CM for 20 se...

Страница 20: ...ransport damage must be reported immediately to the carrier in writing Damages shall be photographically documented VCB packaging and scope of supply The VCB are placed in cardboard boxes Figure 18 ha...

Страница 21: ...urers and product information The ISM shall have undamaged warranty seals appearance of seal is shown in Figure 3 its placement on the ISM there are two warranty seals on each side of the ISM metal fr...

Страница 22: ...appearance of the CM serial number label and designation label are shown in Figure 5 and Figure 6 their placement on the CM in Figure 10 Each CM is supplied with the following components a CM b screw...

Страница 23: ...sets of auxiliary switches boards with 3NO 3NC 4NO 4NC 6NO 6NC contacts or without them In addition the optional position indicator can be included in the package Each ISM15_LD_8 is supplied with the...

Страница 24: ...following components e ISM f screwdriver Unit_Screwdriver_1 g auxiliary board EA_ASboard_28 h position indicator CBkit_PosInd_1 Figure 25 ISM15_MD_1 scope of supply a ISM b screwdriver Unit_Screwdriv...

Страница 25: ...Bkit_PosInd_1 c screwdriver Unit_Screwdriver_1 Figure 27 ISM15_Shell_2 scope of supply a ISM b screwdriver Unit_Screwdriver_1 c auxiliary board EA_ASboard_28 d position indicator CBkit_PosInd_1 Figure...

Страница 26: ...5_16 F include CBkit_Shell15_1 for flat busbar connection to ISM terminals As part of a VCB CBkit_Shell15 is placed inside the VCB package If the kit is delivered separately as a spare part of the VCB...

Страница 27: ...case of double busbar connection 20 mm thickness CBkit_LD15_2 and CBkit_LD15_3 scope of supply VCB15_LD6_16 RD includes the plastic parts kit CBkit_LD15_2 for LMT Retrofit Draw out type VCB or CBkit_...

Страница 28: ...check CBkit_Interlock_1 packaging and scope of supply CBkit_Interlock_1 can be used with the VCB15_LD1_16 F and VCB25_LD1_16 F as an interface for various manual trip indication lockout accessories Th...

Страница 29: ...of the following options depending on the parameter value Rubber insulator CBdet_RubberIns_2 for bars 40x10 mm 2 pcs Rubber insulator CBdet_RubberIns_3 for bars 80x10 mm 2 pcs Figure 35 CBkit_Ins_4 1...

Страница 30: ...king 1 Manufacturer 2 Type of device 3 Product name 4 Product code 5 Handling symbols 6 Product quantity in the package Figure 39 CBkit_Interlock_8 package labeling The kit includes 1 Holder CBdet_Hol...

Страница 31: ...r 2 Type of device 3 Product name 4 Product code 5 Handling symbols 6 Product quantity in the package Figure 42 CBkit_Interlock_3 package labeling The kit includes 1 Screw StandDet_Screw_DIN912 M10_20...

Страница 32: ...f the ISM by rotary switch The kit is packed in a cardboard box Figure 44 CBkit_Interlock_4 packing 1 Manufacturer 2 Type of device 3 Product name 4 Product code 5 Handling symbols 6 Product quantity...

Страница 33: ...6 F VCB15_MD3_16 F and VCB15_HD1_16 F as an accessory for manual trip of the ISM as a manual trip button The kit is packed in a cardboard box Figure 47 CBkit_Interlock_5 packing 1 Manufacturer 2 Type...

Страница 34: ...scope of delivery CBunit_ManGen is used to charge the CM_16_1 in cases where the main auxiliary power supply is not available It is packed in a cardboard box Figure 50 CBunit_ ManGen_1 and CBunit_ Ma...

Страница 35: ...packed in a plastic bag Figure 53 CBkit_PosInd_1 scope of supply CBcomp_RelCable_3 packaging and scope of supply CBcomp_RelCable_3 is a flexible trip and lock cable used for connection of ISM manual t...

Страница 36: ...equipment damage follow the handling recommendations listed below 1 handling in accordance with pictorial symbols 2 elimination of drops from any heights 3 elimination of any mechanical impacts which...

Страница 37: ...4 Installation...

Страница 38: ...ng washers shall be used for connecting the terminals of the ISM with the busbars If additional fastening material is required steel bolts according to EN ISO 898 class 8 8 yield point 800 N mm2 nuts...

Страница 39: ...er No pressure tension or torsion forces shall act on the ISM To avoid unacceptable high mechanical loads on the ISM the busbar connections shall be supported by additional insulators Figure 61 Calibr...

Страница 40: ...igure 63 ISM15_LD_8 mounting points 1 Mandatory mounting points 3 additional mounting points required in case uncontrolled horizontal force will be applied to ISM terminals ex draw out unit Figure 64...

Страница 41: ...ry ISM fixing which are formed in the module support insulator M12 torque 40 4 Nm 2 Eight threads on both sides of the frame for optional ISM fixing M8 torque is 10 1 Nm Figure 66 ISM15_Shell_2 mounti...

Страница 42: ...ars to lower terminal of ISM15_LD_1 90 M8 bolt should be used with a torque of 10 1 Nm To prevent static load to the ISM poles it is not allowed to fasten busbars to the ISM terminal if there is a gap...

Страница 43: ...ncy rated voltage Impulse test voltage BIL Minimum clearance b for LD series ISM 12 kV 75 kV 120 mm 17 5 kV 95 kV 140 mm 160mm for ISM15_LD_8 24 kV 125 kV 220 mm Figure 70 LD ISM dielectric clearances...

Страница 44: ...o the pole Main terminal connections of ISM15_MD_1 ISM15_MD_3 ISM15_Shell_2 ISM15_HD_1 Primary terminals connection To comply with the rated impulse withstand voltage according to IEC 62271 1 it is re...

Страница 45: ...have radius at least 3 mm on their edges and shall be insulated for example by shrinkable tube Figure 76 Edges of bars 100x10 mm at the place to ISM terminal connection If insulation kit will not be...

Страница 46: ...n for example Figure 78 Details of ISM15_MD terminals connection to rectangular cross shaped busbars with help of CBkit_Ins_4 1 at fixed installation for example Figure 79 Details of ISM15_MD terminal...

Страница 47: ...cross shaped busbars at fixed installation for example b Details of ISM15_Shell_2 terminals connection to cylindrical cross shaped busbars withdrawable unit contact arm for example c Details of ISM15_...

Страница 48: ...gular cross shaped busbars at fixed installation for example Figure 83 Details of ISM15_HD_1 terminals connection to double rectangular cross shaped busbars at fixed installation for example Electrody...

Страница 49: ...ell_2 150_L 700 450 300 ISM15_Shell_2 210_L 980 630 420 ISM15_Shell_2 210_H 980 630 420 ISM15_Shell_2 275_H 1200 820 550 ISM15_HD_1 210 1000 850 500 ISM15_HD_1 275 1000 1000 650 1 In case ISM15_MD_3 i...

Страница 50: ...mm ISM15_Shell_2 190 mm1 ISM15_HD_1 31 5 kA 150 mm ISM15_MD_1 150 mm ISM15_MD_3 190 mm ISM15_Shell_2 240 mm1 ISM15_HD_1 1 Smaller clearance on request Insulation clearances The recommended minimum ph...

Страница 51: ...51 Figure 86 ISM15_MD insulation clearances 75 kV BIL Figure 87 ISM15_MD insulation clearances 95 kV BIL...

Страница 52: ...rances Based on electromagnetic influence and rated insulation voltage the largest value clearance should be selected ISM15_LD_1 LD_3 LD_6 ISM25_LD_1 LD_2 LD_3 interlocks The ISM15_LD1 ISM15_LD6 ISM25...

Страница 53: ...terlocking interface of ISM15_LD_1 ISM25_LD_1 LD_2 A 19 5 50 mm B 22 50 mm the length of A B depends on the particular installation Figure 92 Example of connection between interlocking lever and synch...

Страница 54: ...echanism is directly attached with the synchronizing shaft the moment of inertia of the attached mechanism shall not exceed 4 3 x 10 4 kg m2 If both stub shafts of the synchronizing shaft are used the...

Страница 55: ..._DIN933 M6_20_Fe88 Zn bolt M6x20 Figure 95 Interlocking lever assembly design for single phase ISM An interlocking lever can be installed on three phase ISM15_LD_1 and ISM25_LD_1 LD_2 as shown below a...

Страница 56: ...ipped with an interlocking shaft that can be rotated clockwise to the unlatched position or counter clockwise to the open and locked position In the unlatched position the ISM can perform close and op...

Страница 57: ...57 Figure 98 ISM15_LD_8 interlocking shaft Figure 99 ISM15_Shell_2 ISM15_MD_1 ISM15_HD_1 interlocking shafts Figure 100 Interlocking shaft positions...

Страница 58: ...g d Interlocking shaft in open and locked position ISM is open e Initial state ISM is open and locked Turn interlocking shaft clockwise to unlatched position Figure 101 ISM15_Shell_2 interlock operati...

Страница 59: ...cable operating stroke is 37 0 5 mm which is equal 90 degrees rotation angle of cam as shown in the Figure 100 Minimal bend radius for cable is 100 mm There is a possibility to install two remote int...

Страница 60: ...interlocking shaft torque when ISM is closed When ISM15_Shell_2 is open and interlocking shaft is rotated from the open and locked to unlatched position and vice versa Figure 106 ISM15_Shell_2 interl...

Страница 61: ...e connection and adjustment process If the flexible release cable passes through the switchgear segregations according to the design solution it is recommended to pass it through these segregations pr...

Страница 62: ...ection to the ISM Install CBdet_Holder_14 on the ISM with help of StandDet_Screw_DIN7982 4 2_25_Fe Zn from the delivery kit of CBkit_lnterlock_2 see Figure 109 Install CBunit_lnterlock_3 on the CBdet_...

Страница 63: ...is shown below Figure 110 Figure 111 The ISM shall be in Unlatched position Notes the bending radius of the flexible release cable shall be not less than 100 mm it is recommended to install ISM in th...

Страница 64: ...rlock_3 The orientation of CBdet_Stopper_2 depends on the way of next installation of CBunit_Interlock_1 1 During fixation of StandDet_Screw_DIN912 M10_20_Fe88 Zn the rod of CBunit_Interlock_1 1 shall...

Страница 65: ...5 Figure 114 Adjustment of CBunit_Interlock_1 1 installation for variant with one or with two straddling disconnectors Figure 115 Installation of CBunit_Interlock_1 1 for variant with two disconnector...

Страница 66: ...unit_Interlock_1 1 installation for variant with two disconnectors Figure 117 Fixation of CBunit_Interlock_1 1 CBunit_Interlock_1 1 shall be fixed with help of StandDet_Screw_DIN7985 Ph M5_25_Fe48 Zn...

Страница 67: ...flexible release cable can be adjusted as shown in the Figure 118 Figure 118 Adjustment of stroke of flexible release cable Figure 119 Position of interlocking shaft of the ISM with connected CBkit_In...

Страница 68: ...t through these segregations prior interlock connection Figure 120 Connection of CBkit_Interlock_4 to the ISM interlocking shaft Figure 121 CBkit_Interlock_4 mounting on the Switchgear door Adjustment...

Страница 69: ...pass it through these segregations prior interlock connection Figure 122 Unscrew the self tapping screws of the transparent cover and remove it Installation of ISM15_LD_8 MD_1 MD_3 Shell_2 HD_1 main c...

Страница 70: ...the V shape spring contact Figure 125 Return the cover and fasten it to the ISM Figure 126 Adjust the indicator for both closed and opened states of the switching module Figure 127 Position indicator...

Страница 71: ...wn in the Figure 129 and Figure 130 a put insulator CBdet_ RubberIns_2 on the busbar b connect busbar to the ISM terminal c screw the bolt M12 with torque 50 2 H m d cover the ISM terminal tightly by...

Страница 72: ...as IEC 62271 1 IEC 62271 100 IEC 62271 200 via the marked earth screw of the ISM to the earthing arrangement of the particular panel The earthing connection can be carried out with a cable or a fat co...

Страница 73: ..._LD_1 LD_2 earthing is shown in the Figure 133 method of ISM15_LD_8 earthing is shown in the Figure 132 Figure 132 ISM15_LD_8 earthing Figure 133 ISM15_LD1 LD_6 ISM25_LD_1 LD_2 earthing Figure 134 ISM...

Страница 74: ...74 Figure 135 ISM15_Shell_2 earthing Figure 136 ISM15_HD_1 earthing Figure 137 Example of earthing the ISM15_Shell_2 by copper busbar...

Страница 75: ...13 AS1 2 Auxiliary switch S 1 4 16 Auxiliary switch S 13 AS2 3 Auxiliary switch S 2 1 17 Auxiliary switch S 7 1 4 Auxiliary switch S 2 4 18 Auxiliary switch S 7 2 5 Auxiliary switch S 3 1 19 Auxiliary...

Страница 76: ...ed separately Following auxiliary switches boards are available auxiliary board with 3NO 3NC 4NO 4NC 6NO 6NC contacts Table 10 ISM15_LD_8 MD_1 and ISM15_HD_1 terminal arrangement XT1 XT2 XT3 Auxiliary...

Страница 77: ...inal arrangement XT1 Terminal No Connection 1 Auxiliary switch SF1 AS1 2 Auxiliary switch SF1 AS2 3 Auxiliary switch SF2 4 Auxiliary switch SF2 5 Auxiliary switch SF3 6 Auxiliary switch SF3 7 Auxiliar...

Страница 78: ...11 Actuator coil SC3 without interlock Note Actuator coil input CS3 is intended for case when internal interlock is not required For instance when three single phase ISM15_MD_3 are connected in parall...

Страница 79: ...nctionality Relay 1 ISM main contact position relay Relay 2 Ready relay Relay 3 Malfunction of Loss of auxiliary supply relay Relay ISM main contact position keeps its state after CM power supply disc...

Страница 80: ...of secondary cables between ISM and CM Before connection CM to ISM the compliance between ISM type shown on ISM serial number plate Figure 2 and CM applicability of CM for particular type of ISM are s...

Страница 81: ...81 Figure 146 Secondary cables between ISM15_Shell_2 and CM Figure 147 Secondary cables between ISM15_LD_8 or ISM15_MD_1 or ISM15_HD_1 and CM...

Страница 82: ...82 Figure 148 Secondary cables between three phases ISM15_LD_1 LD_6 or ISM25_LD_1 ISM25_LD_2 and CM Figure 149 Secondary cables between single phase ISM15_LD_3 or ISM25_LD_3 ISM and CM...

Страница 83: ...may be hazardous voltage on the CM connectors Achievement of safe voltage level is indicated by the extinction of all LEDs on the CM front panel This may take up to 15 minutes after the CM is deenergi...

Страница 84: ...wire black colour wire negative polarity output wire yellow green colour wire manual generator earthing wire CM indication The CM has the following LED indication functionality CM Power indication CM...

Страница 85: ...p and Lock continuous off 5 blinks Out of temperature range continuous off 6 blinks ISM state is open without command from the CM continuous off 7 blinks Internal fault of the CM continuous off contin...

Страница 86: ...after ISM main contacts opening Periodically every 10 s in case no Close or Open command was applied from the CM In case application project requires to define main contacts position faster than the...

Страница 87: ......

Страница 88: ...5 Commissioning...

Страница 89: ...8 Visual check no tool is required 1 minute Check that free air circulation at ISM is possible Visual check no tool is required 1 minute Installation of CM shall be according to subchapter 4 2 4 Visu...

Страница 90: ...on LED must not light up The Ready relay contact must not change its state The Malfunction or Loss of auxiliary supply relay contact must not change its state The ISM main contact position relay conta...

Страница 91: ...ct must not change its state The Malfunction or Loss of auxiliary supply relay contact must not change its state The ISM main contact position relay must not change its state ISM main contacts must no...

Страница 92: ...h voltage tester and ground the circuit breaker housing Starting with zero volts gradually increase the test voltage to 1500 V RMS 50 or 60 Hz Maintain test voltage for one minute Power frequency with...

Страница 93: ...ror Main contact resistance shall be measured by appropriate equipment at test current not less than 50 A Resistance measurement test equipment with test current not less than 50 A 10 minutes Measured...

Страница 94: ...94 Figure 155 The connection points of the contact resistance meter...

Страница 95: ......

Страница 96: ...6 Operation...

Страница 97: ...the ISM Mechanical closing is not possible 1 Close command input 2 Trip command input Figure 156 CM_16 close and trip inputs If Manual generators CBunit_ManGen are used to charge the CM the Manual gen...

Страница 98: ...LD_3 manually the force shall be applied to the interlocking pins or torque shall be applied to the stub shaft evenly during their movement see Figure 158 Force shall be applied along the pin s moveme...

Страница 99: ...99 Figure 159 ISM15_Shell_2 manual trip execution ISM15_LD_8 ISM15_MD_1 ISM15_MD_3 and ISM15_HD_1 have same manual trip execution...

Страница 100: ...7 Maintenance and troubleshooting...

Страница 101: ...t period its vacuum integrity has been verifed5 Power frequency withstand voltage test set Repeat actions above to check each pole of the ISM Power frequency withstand voltage test set wires 8 minutes...

Страница 102: ...0 minutes Measured values for VCB15_LD VCB25_LD and VCB15_MD must not exceed limits specified in Table 11 Measured values for VCB15_Shell and VCB15_HD must not exceed limits specified in Table 1 incre...

Страница 103: ...ll points of the secondary circuits with a shorting wire ISM coil connection wires must be disconnected from connector X3 of the CM before the test Wires 5 minutes Connect the shorting wire to the hig...

Страница 104: ...heck presence of CM power supply its polarity and voltage level 2 blinks of CM Malfunction LED ISM cannot be closed tripped Check the circuit of ISM actuator coil connection with connector X3 of CM ch...

Страница 105: ......

Страница 106: ...8 Disposal...

Страница 107: ...vrida Electric Vacuum Circuit Breakers and their components are manufactured from environmentally friendly materials therefore no special waste disposal is required Appendix 1 VCB package dimensions a...

Страница 108: ...30x550 39 1 VCB15_LD3_16 F 645x290x550 17 1 VCB15_LD6_16 RD 470x410x700 62 3 VCB15_LD8_16F 790x290x550 31 3 VCB15_MD1_16 F 760x315x490 41 5 VCB15_MD3_16 F 300x315x190 16 1 VCB15_Shell2_16 F 790x275x80...

Страница 109: ...109 Appendix 2 Overall Drawings...

Страница 110: ...110 Dimensions of Indoor Switching Modules ISM15_LD_1 67 PCD 150 mm Weight 34 kg ISM15_LD_1 55 PCD 210 mm Weight 36 kg...

Страница 111: ...111 ISM15_LD_1 80 two lower terminals continuous busbar PCD 150 mm Weight 36 kg ISM15_LD_1 90 PCD 180 mm Weight 36 kg...

Страница 112: ...112 ISM15_LD_3 Weight 13 kg ISM15_LD_6 PCD 133 mm Weight 55 kg...

Страница 113: ...113 ISM15_LD_8 PCD 210 mm Weight 26 kg...

Страница 114: ...114 ISM15_MD_1 150_L PCD 150 mm Weight 33 kg ISM15_MD_1 210_L PCD 210 mm Weight 35 kg...

Страница 115: ...115 ISM15_MD_3 Weight 13 kg ISM15_Shell_2 150_L PCD 150 mm Weight 51 kg...

Страница 116: ...116 ISM15_Shell_2 150_L with CBkit_Shell15_1 205 installed PCD 150 mm Weight 59 5 kg busbars shown for reference and are not supplied ISM15_Shell_2 210_L PCD 210 mm Weight 52 kg...

Страница 117: ...117 ISM15_Shell_2 210_L with CBkit_Shell15_1 205 installed PCD 210 mm Weight 60 5 kg busbars shown for reference and are not supplied ISM15_Shell_2 210_H PCD 210 mm Weight 53 kg...

Страница 118: ...118 ISM15_Shell_2 210_H with CBkit_Shell15_1 310 installed PCD 210 mm Weight 61 5 kg busbars shown for reference and are not supplied ISM15_Shell_2 275_H PCD 275 mm Weight 55 kg...

Страница 119: ...119 ISM15_Shell_2 275_H with CBkit_Shell15_1 310 installed PCD 275 mm Weight 63 5 kg busbars shown for reference and are not supplied ISM15_HD_1 210 PCD 210 mm Weight 70 kg...

Страница 120: ...120 ISM15_HD_1 275 PCD 275 mm Weight 72 kg ISM25_LD_1 210_Par2 PCD 210 mm Weight 36 kg...

Страница 121: ...121 ISM25_LD_1 210_Par2 with CBkit_Ins_3 installed PCD 210 mm Weight 36 5 kg upper busbars shown for reference and are not supplied ISM25_LD_1 275_S PCD 275 mm Weight 38 kg...

Страница 122: ...122 ISM25_LD_1 275_S with CBkit_Ins_3 installed PCD 275 mm Weight 38 5 kg upper busbars shown for reference and are not supplied ISM25_LD_2 1 PCD 150 mm Weight 35 kg...

Страница 123: ...123 ISM25_LD_2 2 PCD 150 mm Weight 37 kg ISM25_LD_3 Weight 14 kg...

Страница 124: ...124 ISM25_LD_3 with CBkit_Ins_3 installed Weight 14 5 kg upper busbar shown for reference and is not supplied...

Страница 125: ...125 Dimensions of Control Module CM_16_1 Par1_Par2_Par3_Par4_Par5 Weight 1 kg...

Страница 126: ...126 Dimensions of accessories Dimensions of Position Indicator Rope length L 1m CBkit_PosInd_1 Dimensions of Manual Generator CBunit_ManGen_1 CBunit_ ManGen_2...

Страница 127: ...127 Dimensions of Interlocking Kits CBkit_Interlock_1 CBkit_Interlock_3...

Страница 128: ...128 CBkit_Interlock_4 CBkit_Interlock_5...

Страница 129: ...Appendix 3 Secondary Schemes...

Страница 130: ...130...

Страница 131: ...131...

Страница 132: ...132...

Страница 133: ...133...

Страница 134: ...134...

Страница 135: ...135...

Страница 136: ...136...

Страница 137: ...137...

Страница 138: ...138...

Страница 139: ...139...

Страница 140: ...140...

Страница 141: ...of comment that CM s relay can have incorrect state in case CM is not operable due to absence of auxiliary supply Adding of description that USB port is not used in service Adding of CBkit_Interlock_2...

Страница 142: ...Bartlett...

Отзывы: