background image

T9.9


27

P2 (climbing) 

Program P3 to P6: Setting corresponds to P2

P3 (hill run)

P4 (interval) 

P5 (rolls) 

P6 (weight reduction)

Содержание T9.9 Touch

Страница 1: ...Assembly and operating instructions Treadmill T9 9 Art No TF T99 2 ...

Страница 2: ...T9 9 2 ...

Страница 3: ...re informed about these instructions and its content in advance In case of doubt a responsible person must supervise the use of the equipment This equipment has been manufactured according to the latest safety knowledge As faraspossible potentialsafetyhazardswhichcouldcauseinjuryhavebeeneliminated Make sure to follow the instructions carefully and that all parts are securely in place If required r...

Страница 4: ...ndar 14 3 ASSEMBLY 15 3 1 Package contents 15 3 2 Assembly instructions 16 4 OPERATING INSTRUCTIONS 18 4 1 Console display 18 4 2 Button functions 20 4 3 Turning on the equipment 23 4 4 Programs 25 4 4 1 Manual program 26 4 4 2 Training program 26 4 4 3 Random program 28 4 4 4 Heart rate controlled programs 28 4 4 5 User defined programs 31 4 4 6 Body fat mode 32 4 4 7 APP iOS Android installation...

Страница 5: ...g chest muscles 47 5 5 Workout journal 49 6 WARRANTY INFORMATION 50 7 DISPOSAL 52 8 ORDERING ACCESSORIES 53 9 ORDERING SPARE PARTS 54 9 1 Service hotline 54 9 2 Serial number and model name 54 9 3 Parts list 55 9 4 Exploded drawing 60 ...

Страница 6: ...kg 771 lbs Speed range 0 8 20 km h Incline range 0 15 Total number of training programs 15 Pre set programs 6 Manual program 1 Heart rate controlled programs 3 Random program 1 User defined programs 4 Running surface size L x W 157 5 x 55 cm Wheel diameter 76 mm Running belt thickness 4 4 mm orthopedic running belt Running deck thickness 25 4 mm Weight and dimensions Article weight gross including...

Страница 7: ... an expert explain the correct usage of the product to you Make sure that nobody is in the range of motion of the equipment while exercising Keep your hands feet and other body parts hair clothing jewelry and other objects well clear of moving parts During use wear suitable sports clothing rather than loose or baggy clothing When selecting sports shoes think about the suitability of the sole prefe...

Страница 8: ...ans of the power cable supplied The use of multi socket adapters or similar is not recommended Extension leads must comply with local electrical safety guidelines Always fully unwind the power cable The outlet should be secured with a fuse with a minimum value of 16 amperes slow In order to reduce the risk of an electric shock always unplug the equipment from the mains socket immediately after you...

Страница 9: ...e is enough free space clearance to the front the rear and to the sides of the equipment at least 1 50 m Furthermore the equipment should not be set up in main entrances or on escape routes Always keep the power cable away from hot surfaces and grounds and make sure that the cable is not stuck somewhere or becomes a trip hazard No objects of any type should be inserted into the openings of the equ...

Страница 10: ...fore starting assembly all individual parts should be placed on the floor next to each other Read the assembly instructions carefully and assemble the equipment according to the illustrations Proceed carefully and cautiously First loosen all parts and check for their correct fitting Then tighten the screws using a tool Modifications to the design or improper repairs may pose a hazard to the user a...

Страница 11: ...s Safety key missing Check if the safety key is inserted and place it in Running belt tilted Running belt not aligned Align running belt in accordance with the instructions Running belt slips through stops Belt tension lubrication not ok Check belt tension lubrication in accordance with the instructions Scraping noises Running belt scrapes because it is not aligned Align running belt in accordance...

Страница 12: ...aused due to a lack of care or negligence will not be covered by the warranty Thus check for maintenance in regular intervals Be extremely careful when adjusting and tensioning the belt because a strong over or under tension may cause damages The running belt is set properly in the factory before delivery However the running belt may get out of place during transport Aligning the running mat Durin...

Страница 13: ...oning the belt If the running belt slips over the rollers during operation if this is the case a noticeable jerking will be noticed while running the running belt must be tightened again In most cases the cause for the slipping is a straining of the belt through usage This is completely normal It can be tightened through the same setting screws that were used during alignment While tensioning the ...

Страница 14: ...ed slightly Then apply some silicone spray on the entire running deck Apply three short approximately 1 second sprays of silicone lubricant between the belt and the running deck The spraying tube should be held sideways in order to guarantee a moistening of the entire underside of the belt Continue to rotate the belt by hand so that the entire area between the endless belt and running deck is lubr...

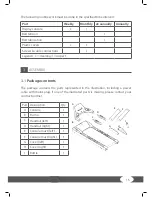
Страница 15: ...ds C cleaning I inspect 3 ASSEMBLY 3 1 Package contents The package contains the parts represented in the illustration including a power cable with mains plug If one of the illustrated parts is missing please contact your contract partner Part Description Qty A Console 1 B Frame 1 C Handrail left 1 D Handrail right 1 E Console mast left 1 F Console mast right 1 G Cover left 1 H Cover right 1 I Bot...

Страница 16: ...uctions Before starting assembly look carefully through the individual assembly steps shown and assemble the equipment in the order indicated Step1 Assemblyofthehandrails Turn the console A and connect the control cables of the left C and right D handrails with the cables from the console A The logo sticker must show outwards After you have assembled the handrails on the console mount the parts wi...

Страница 17: ...ng down mount it in the upper area of the side frame C with the wire Now plug the left side frame C into the left adapter of the base frame B and mount this then with the screws c Then proceed exactly the same for the right upright side frame D Once you have tightened all screws a press the cover caps f onto the heads of the screws Step 3 Assembly of the cockpit Connect the console cable A first w...

Страница 18: ...T9 9 18 4 OPERATING INSTRUCTIONS 4 1 Console display ...

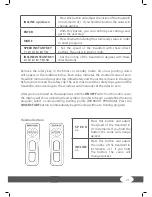
Страница 19: ...mation of your actual energy consumption you can enter your body weight for this model 6 Equipment connection status 7 Weight distance 8 LCD text display 9 Speed 10 Muscle zone 11 Incline Energy saving mode If the treadmill is not used for more than four minutes it will turn into energy saving mode If you would like to use the treadmill again remove the safety key and insert it again Muscle displa...

Страница 20: ...to the pause mode The display shows PAUSE the defined pause time is four minutes If more than four minutes are needed the system will go into the standby mode and the screen turns off the background lighting Press this button in the pause mode for four seconds in order to stop the training and to get to the standby mode Press this button in the menu mode in order to return to the main menu 4 2 But...

Страница 21: ...d value of zero Treadmill motor and program stop immediately and the incline remains in the angle before you removed the safety clip The user must insert the safety clip again and the treadmill can be used again The windows automatically set the sides to zero After you have turned on the equipment with the ON OFF switch on the motor cover the display will show a blinking heart symbol In order to b...

Страница 22: ... AGE BPM H Basis L H Basis L H Basis L 13 197 124 124 36 175 110 110 59 153 97 97 14 196 124 124 37 174 110 110 60 152 96 96 15 195 123 123 38 173 109 109 61 151 95 95 16 194 122 122 38 172 109 109 62 150 95 95 17 193 122 122 40 171 108 108 63 149 94 94 18 192 121 121 41 170 107 107 64 148 94 94 18 191 121 121 42 169 107 107 65 147 93 93 20 190 120 120 43 168 106 106 66 146 92 92 21 189 119 119 44...

Страница 23: ...in the start ready mode and it will take you to the manual mode 6 After you have started the program the treadmill will adjust to the speed and incline in accordance with the program 7 The incline system from the treadmill corresponds to the important safety rules listed below If you press STOP the system will go into the pause mode The main motor and incline motor stop immediately If you press QU...

Страница 24: ...firm the weight with ENTER SELECT PROGRAM appears on the screen Press SPEED or SPEED in order to select a program Optionally you can press QUICK START in order to directly begin training The reason for the weight setting is to show the user the burnt calories and to show the fitting formula for the change The weight can be entered during any restart After training or as soon as the safety key is r...

Страница 25: ...EED QUICK KEY 3 Press STOP while training in order to get to the pause mode The speed returns to zero and the incline stops at the current angle 4 If the training time is achieved 99 59 or one of the target values for time distance or calories in this time the speed will return to zero the incline stops at the current angle the screen shows RUN END If you press STOP for four seconds or longer the ...

Страница 26: ... as the default values are at zero the program is complete 4 4 2 Training program P1 to P6 profiles There is a total of 30 levels 1 minute per level Program P1 9 hole 3 5 km 1 Confirm the program selection P1 with ENTER Press SPEED or SPEED in order to enter the level The default value is 1 the range is between 1 to level 10 2 Confirm the target distance with ENTER Ready Go appears on the screen a...

Страница 27: ...27 P2 climbing Program P3 to P6 Setting corresponds to P2 P3 hill run P4 interval P5 rolls P6 weight reduction ...

Страница 28: ...fter you have completed the settings press START to begin the training Note Time distance calories can be entered As soon as one of the values is entered the other two automatically go back to zero RANDOM random speed 4 4 4 Heart rate oriented programs The training goal from this program is the heart rate If the average exceeds the defined value the incline and speed remain the same and the heart ...

Страница 29: ... times the incline will decrease by one level The maximum speed can be achieved The speed can achieve the lowest value of 0 8 km h 0 5 mph The maximum incline level is 15 1 60 and 75 Confirm the selection 60 with ENTER Press SPEED or SPEED in order to enter the time The default value is 0 00 min sec The range is between 20 00 and 99 00 Confirm the time with ENTER Press SPEED or SPEED in order to e...

Страница 30: ...ulse sensors If the user grabs the hand pulse sensor during training the pulse symbol will light up in the heart rate window The current heart rate is recorded and displayed within 20 seconds Wireless pulse receiver For safety reasons and for the purpose of a correct display the use of a chest strap as a pulse transmitter is recommended instead of handle sensors starting at a speed of 7 2 kmh 4 5 ...

Страница 31: ...irm the time with ENTER Press SPEED or SPEED in order to enter the distance The default value is 0 00 km mile The range is between 1 00 and 99 00 3 Confirm the distance with ENTER Press SPEED or SPEED in order to enter the target calories The default value is 0 calories the range is between 10 to 9990 4 Hold ENTER for about two seconds Now you can manually set each of the 20 sections of the traini...

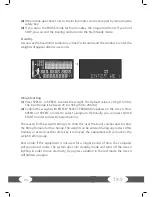
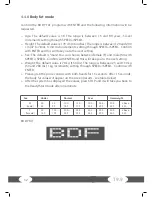
Страница 32: ...EED SPEED Confirm with ENTER and this will take you to the next setting Weight The default value is 70 kg 150 lbs The range is between 23 and 130 kg 50 and 286 lbs 1kg increments setting through SPEED SPEED Confirm with ENTER Please grab the pulse sensors with both hands for 15 seconds After 15 seconds the body fat value will appear on the screen results see table below After the system has displa...

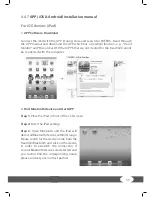
Страница 33: ...d for the treadmill cannot be connected with the computer 2 Find Bluetooth device and start APP Step 1 Place the iPad in front of the LCD screen Step 2 Enter the iPad settings Step 3 Open Bluetooth and the iPad will detectallBluetoothdeviceswithinitsrange Please search for the device name from the treadmill Bluetooth and click on the device in order to establish the connection If several Bluetooth...

Страница 34: ...th is open but not connected Step 5 As soon as Bluetooth has been successfully connected for more than 10 seconds a white background will appear on the LCD display The sign in the lower right corner changes from not connected to connected This means that the computer is successfully connected with the iPad Step 6 Press HOME on the iPad and the screen will go to the iPad desktop Then open the tread...

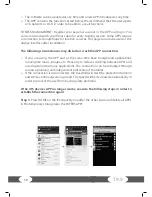
Страница 35: ...APP that was just used in the background see image Then go back to the iPad settings in order to close the Bluetooth function After about 10 seconds a beep will sound and the screen will return to the regular LCD display For Android devices 1 APP Software Download Connect the Android tablet with the Play Store and search for PAFERS Read through the APP manual and download the APP which has a tread...

Страница 36: ... downloaded from the Play Store Step 4 Once you have gotten to the APP page the treadmill will find the APP Then a page will appear with the connection option Press Connect and the Android Tablet will detect all Bluetooth devices in its range Search for the Bluetooth device name from the treadmill and click on it to connect As soon as the Bluetooth devices are detected but you do not know the corr...

Страница 37: ...oid tablet setting page in order to close the Bluetooth function After about 10 seconds a beep will sound and the screen will return to the regular LCD display NOTES The APP function is based on the connection of the treadmill via Bluetooth Make sure that the treadmill is equipped with a Bluetooth set Once the connection was successful start the treadmill APP within two minutes If the APP is not s...

Страница 38: ... APP connection If you are using the APP and at the same time have background applications running like music images etc Please try to reduce switching between APPs and avoid opening too many applications The connection can be disrupted through resource planning and independent protection of the tablet If the connection is disconnected the treadmill will start the protection function and emit a co...

Страница 39: ...start the PAFERS APP If the Android devices APP no longer works execute the following steps in order to establish the connection again Search download and install Advanced Task Killer in the Google Play Store Open Advanced Task Killer select all APPs also the PAFERS APP Then press Kill selected APP Enter the Android tablet setting program Press cancel matching Close the Bluetooth function and turn...

Страница 40: ...4th iPod touch 3rd iPhone 5 iPhone 4S iPhone 4 Mini iPad iPad 2 iPad 2 Android devices ASUS Nexus 7 Samsung Galaxy Note 2 Samsung S4 The app can also be installed and used on other iOS or Android devices that are not listed here Due to the different screen sizes and resolutions the illustrations may be different and a calibration may be necessary if required The models specified have already been ...

Страница 41: ...mend using a chest strap to achieve a permanently correct heart rate display CAUTION Your training equipment is not a medical device Different factors may influence the accuracy of the heart rate display The heart rate display only serves as a training aid Telemetric heart rate measuring This treadmill is already equipped with a heart rate receiver as standard Using a chest strap makes it possible...

Страница 42: ...t management The main goal here is to burn deposits of fat In order to achieve this training goal a low training intensity approximately 55 of the maximum heart rate and a longer training period are required Cardiovascular training cardio training The primary goal is to increase stamina and fitness through an improved provision of oxygen through the cardiovascular system In order to achieve this t...

Страница 43: ...ately 157 beats min 220 age x 0 9 20 80 100 120 140 160 180 200 220 65 70 60 55 50 45 40 35 25 30 200 195 190 185 180 175 170 180 150 110 146 107 175 171 166 162 157 153 148 143 139 135 131 128 124 105 102 99 96 94 91 88 85 83 113 116 120 144 139 136 150 155 160 165 Heart rate diagram for training intensity Maximum pulse 220 age 90 of maximum pulse anaerobic maximum intensity training 75 of maximu...

Страница 44: ...er to not overload their joints in the beginning 4 Correct breathing appropriate resistance level Do not overexert yourself physically and mentally by starting with resistance levels that are too high Start slowly and increase the resistance steadily Aim for regular and calm breathing 5 Keep yourself properly hydrated Drink drink drink Have a drinking bottle close by during your workout 6 Sufficie...

Страница 45: ... 5 min Dynamic movement of large muscle groups at a low intensity Core body temperature increases and the metabolic process is speeded up WEEK 1 2 Beginner Advanced Days Duration Intensity Duration Intensity Mon 20 min Brisk walking 30 min Running at a slow speed Wed 20 min Brisk walking 30 min Running at a slow speed Fri 20 min Brisk walking 30 min Running at a slow speed Increased speed for two ...

Страница 46: ...fth week run for three minutes after every eight minutes In the sixth week run for three minutes after every six minutes Maintain your heart rate Pay attention to your heart rate WEEK 7 8 Beginner Advanced Days Duration Intensity Duration Intensity Mon 35 min Walk 8 minutes run 5 minutes 45 min Running according to heart rate Wed 35 min Walk 8 minutes run 5 minutes 45 min Running according to hear...

Страница 47: ... knee points downwards no abduction Straight upper body avoid tilting the pelvic forward hollow back by tensing the abdominal muscles Change legs 2 Exercise Stretching the back thigh leg curl hamstring Pull thigh towards upper body with both hands Stretch through increased stretching in the knee joint The lower leg maintains contact with the floor keep hips bent Change legs ...

Страница 48: ...lace your forearm at 90 to the wall with the elbow just above shoulder height Turn your head and upper body gradually to the opposite sides until you feel a stretch in the front chest of the shoulder being leaned on Pay attention to tension in your abdominal and gluteal muscles Your weight is on your front leg Change legs All recommendations of these instructions apply solely to healthy persons an...

Страница 49: ...49 5 5 Workout journal Date Training weight Time min Calories burnt Body weight Distance Ø Pulse Resistance level I feel Copy template ...

Страница 50: ...provide a warranty for every fitness equipment purchased from us according to the following provisions Your statutory rights are not affected Warrantee The warrantee is the first original buyer and or any person who received a newly purchased product as a gift from the original buyer Warranty periods The following warranty periods begin on delivery of the fitness equipment Model Use Full warranty ...

Страница 51: ... After expiry of the warranty the buyer bears the costs of transport and insurance If the fault is covered by our warranty you will receive a new or repaired equipment in return Warranty claims are invalid in case of damage resulting from misuse or improper handling environmental influences moisture heat electrical surge dust etc failure to follow the current safety measures for the equipment fail...

Страница 52: ...y period We are also happy to issue an individual cost estimate if there is a problem with your fitness equipment after the warranty has expired or in cases which do not fall under the terms of the warranty e g normal wear and tear Please contact our customer service team to find a quick and cost effective solution to your problem In such a case you will be responsible for the delivery costs Commu...

Страница 53: ...ize XXL Art No ST FM XXL Polar transmitter chest strap T34 uncoded Art No T34 Togu Senso Walking Trainer Art No TOGU 470501 Chest strap contact gel 250ml Art No BK 250 Sport Tiedje silicone spray Art No ST 1003 Fitness equipment care set Art No HF 500 ...

Страница 54: ...el name Before assembling your equipment find the serial number on the white sticker and enter it in the appropriate space Serial number Brand category Model name Taurus treadmill T9 9 31 172 619961 info fitshop nl Mon Thu 9 am 5 pm Fri 9 am 9 pm Sat 10 am 5 pm NL 44 141 876 3972 orders powerhousefitness co uk Mon Fri 9 am 5 pm UK 49 4621 4210 0 49 4621 4210 699 service sport tiedje de Mon Fri 8 0...

Страница 55: ... 001 handrail tube 4 SOF8A hex nut M8XP1 25 16 1 P 3540R handrail upper cover right 17 1 RCA 004 console overlay decal 18 1 P 3541R handrail lower cover right 19 4 NO 4994 hand pulse sensor plate 20 2 P 3542 hand pulse plastic base 21 2 P 3543 rocking bar switch cover 22 4 NS 266 compressed spring 23 2 XL 1293B handrail switch with hand pulse wire lower XEK 249 handrial keyboard 24 1 RBA 043 handr...

Страница 56: ...B charging board 45 4 BAC0250 150 03 double sided tape 25mmx15mmx0 3t 46 2 SAE5 8 round head Philips screw M5xP0 8x8 50 1 JTCA064 upright tube left 51 1 JTCB058 upright tube right 52 8 SK 298A truss hex screw 54 1 P 2588 motor cover upper 55 15 SCE5 15 truss head Philips screw M5xP0 8x15 56 2 BAA1000 120 50 foam sticker 100mmx12mmx5t 57 1 XM 121 incline motor 58 1 SK 439 CKS hex screw M10xP1 5x40 ...

Страница 57: ...ning deck the part number 184 x2pcs 185 x3pcs must be replaced together 84 1 SCI4 12 truss head Philips self tapping screw ø4x12 85 1 BJ 22 080B cable tie 2 2mmx80mm 86 6 SIA8 35I counter sink hex screw M8xP1 25x35 87 4 SIA8 40I counter sink hex screw M8xP1 25x40 88 2 NAL286E1367 aluminum pedal to replace aluminum deck the part number 89 must be replaced together 89 2 BAA13480 200 15 foam sticker ...

Страница 58: ...0xø10x30 114 2 SGC10 60 30I CKS hex screw M10xP1 5x60 115 2 NT 1379 incline base flex ㄇ shaped iron plate pin 116 2 SQC100 20 R pin 117 2 P 1155 foot pad 118 2 SPA060 160 10 washer ø6xø16x1t 119 2 SMM4 16 washer Philips self tapping screw ø4x16 120 1 JTAA040B frame assmebly 121 1 XLT002 extension wire white 14AWGx90x2T 122 2 XLT001 extension wire black 14AWGx90x2t 126 1 XLT047 extension wire yello...

Страница 59: ...ion wire yellow 14AWGx300x1T1R 174 1 XLT027 extension wire white 14AWGx260x2t 175 1 XLT029 extension wire black 14AWGx260x2t 177 1 XLT033 extension wire white 14AWGx300x2t 179 1 XLT050 extension wire black 14AWGx300x2t 180 1 P 2214 safety key 1 DEC 20 1100 nylon rope 1 PM 001 clip 184 2 RBA 016 grounding sticker 20x1390L 185 3 RBA 014 grounding sticker 20x670L 186 1 XHA T34 Polar heart rate transm...

Страница 60: ...T9 9 60 9 4 Exploded drawing ...

Страница 61: ...cit written permission of Sport Tiedje is prohibited Product and instructions are subject to change Technical data can be changed without advance notice Hotline for Technical Information DE 49 4621 4210 0 49 4621 4210 699 service sport tiedje de NL 31 172 619961 info fitshop nl UK 44 141 876 3986 support powerhousefitness co uk www sport tiedje com www taurus fitness de Please find a detailed over...

Страница 62: ...T9 9 62 Notes ...

Страница 63: ...63 ...

Страница 64: ...Treadmill T9 9 ...

Отзывы: