background image

To stop:  

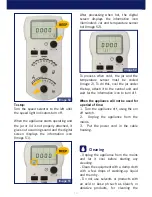
Turn the speed selector to the left until 
the speed light indicators turn off. 

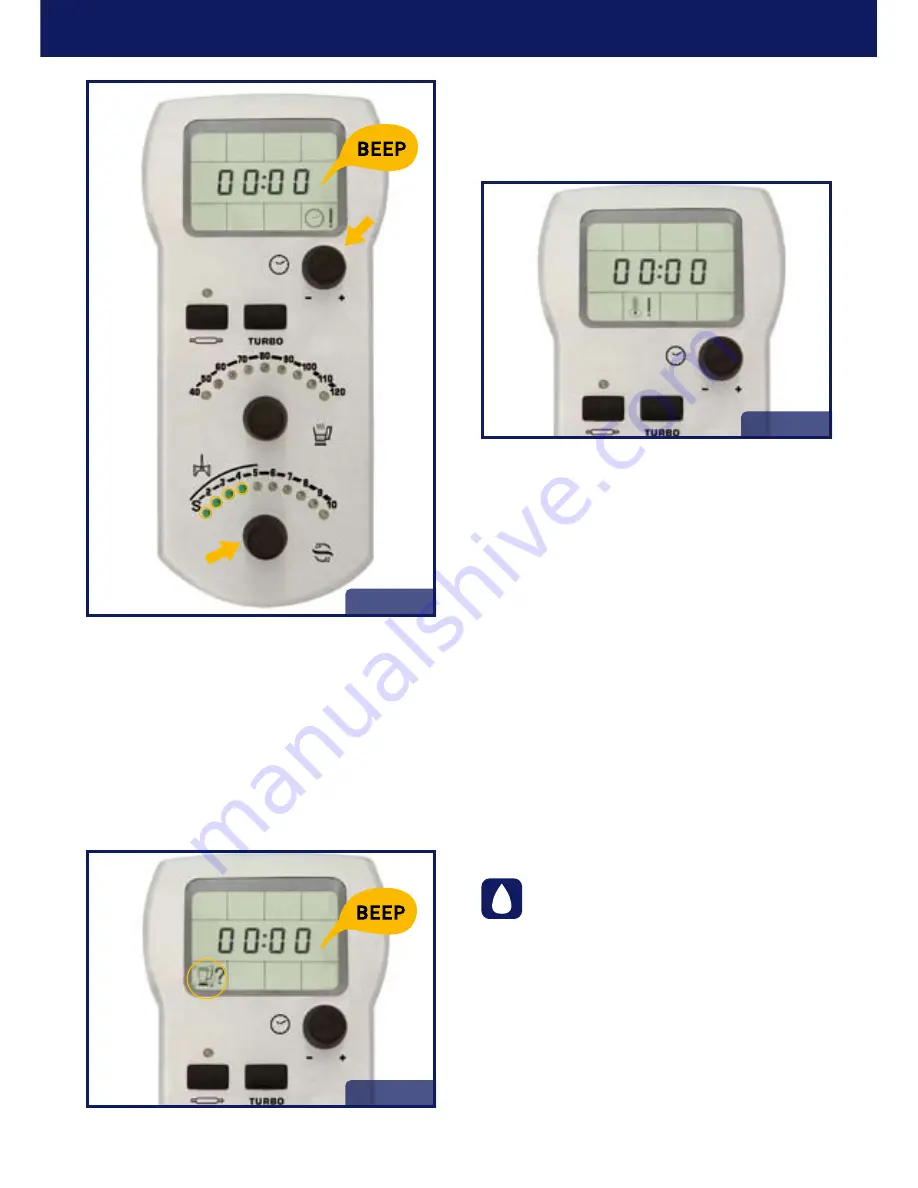
When the appliance starts operating and 
the jar or lid is not properly attached, it 
gives out a warning sound and the digital 
screen  displays  the  information  icon 
(Image 51).

After  processing  when  hot,  the  digital 
screen  displays  the  information  icon 
illuminated: Jar and temperature sensor 
hot (Image 52). 

16

Image 50

Image 51

Image 52

To  process  when  cold,  the  jar  and  the 
temperature  sensor  must  be  cooled 
(Image 2). To do this, cool the jar under 
the tap, attach it to the central unit and 
wait for the information icon to turn off.

When the appliance will not be used for 
a period of time:

1.  Turn the appliance off, using the on/
off switch.
2.    Unplug  the  appliance  from  the 
mains.
3.    Put  the  power  cord  in  the  cable 
housing. 


Cleaning

-  Unplug  the  appliance  from  the  mains 
and  let  it  cool  before  starting  any 
cleaning.
- Clean the equipment with a damp cloth 
with  a  few  drops  of  washing-up  liquid 
and then dry.
-  Do  not  use  solvents  or  products  with 
an  acid  or  base  ph  such  as  bleach,  or 
abrasive  products,  for  cleaning  the 

Содержание MYCOOK 1.8

Страница 1: ...MYCOOK 1 8...

Страница 2: ...hed to it are defective Replace them immediately Do not use the appliance if the parts or accessories are not properly fitted ENGLISH Cooking blender Mycook 1 8 Dear customer Many thanks for choosing...

Страница 3: ...appliance Do not put the appliance away if it is still hot Make sure that the fan grid on the appliance is not blocked by dust dirt or other foreign objects Keep the appliance in good condition Check...

Страница 4: ...uarantee 4 Image 3 Image 5 Image 6 Image 4 To save space the appliance is packed with the jar placed in a non operating position To take the jar out of the central unit Take it by the handle turn it c...

Страница 5: ...the handle It also has a hole in the central part through which the food is added introduce the spatula to stir it and attach the measuring cup It incorporates a silicone gasket which prevents liquids...

Страница 6: ...hat it has been attached correctly 6 Image 11 Image 12 Image 13 The jar has a maximum capacity of 2 litres On the inside it has a measure scale which indicates 1 litre 1 5 litres and 2 litres Images 1...

Страница 7: ...cannot be covered or uncovered when it is attached to the central unit The arrow of the jar base coincides with the lock of the central unit Image 18 Do not use force A safety element might be broken...

Страница 8: ...centering them and fixing them correctly to the jar To remove the blades from the jar 1 Move the clamp 180 to the open position and pull the jar support away as indicated by the arrows Images 23 and 2...

Страница 9: ...h one hand and press on the safety ring with your thumb Image 30b 9 Image 28 Image30a Image30b Image30c Image 29 The spatula is for mixing ingredients preventing them from sticking to the walls of the...

Страница 10: ...t in a single position over the blades and pressing softly downwards until you hear a click which indicates that it is properly anchored Image 34 10 Image 33 Image 31 Image 32 Attention Never use uten...

Страница 11: ...n E Turbo speed button F Temperature light indicators G Temperature selector control H Speed light indicators I Speed selector control Central Unit Image 37 11 Image 36 Image 37 J Fan grid K Jar prese...

Страница 12: ...er ended Timer selector control Image 41 12 Image 38 Image 39 Image 41 Image 40 On Off switch The appliance is now ready for use Digital screen Image 40 Icons indicating function in the upper part Q B...

Страница 13: ...of dough and mixtures The kneading mixing function is activated from a stop position It is not advisable to activate this function if the jar is at a temperature higher than 60 C Image 44 Keep the bu...

Страница 14: ...e begins to heat up Image 47 14 Image 45 Image 46 2nd Select temperature Turn the temperature selector control slowly to the right left to select a heating temperature The light indicators of the temp...

Страница 15: ...ed light indicators turn off IMPORTANT ALWAYS STOP THE APPLIANCE USING THE SPEED SELECTOR CONTROL BEFORE LIFTING THE LID OF THE JAR WAIT A FEW SECONDS UNTIL THE BLADES HAVE STOPPED COMPLETELY NEVER OP...

Страница 16: ...ar and the temperature sensor must be cooled Image 2 To do this cool the jar under the tap attach it to the central unit and wait for the information icon to turn off When the appliance will not be us...

Страница 17: ...act with the water only takes place on the upper part of the blades Image 53 You can also clean the inside of the jar and blades by filling half the jar with water and selecting the turbo speed for ho...

Страница 18: ...er and take the appliance to the Taurus Technical Assistance Services The digital screen displays ERR8 Possible overheating of the induction Disconnect form the mains and remove the jar Leave to cool...

Страница 19: ...d harmful to the environment This appliance complies with Directive 2006 95 EC on Low Voltage and Directive 2004 108 EC on Electromagnetic Compatibility ANOMALY REPAIR It does not turn on Check whethe...

Страница 20: ...Avda Barcelona s n E 25790 OLIANA Spain www taurus es Product weight aproximate Mycook 1 8 G W 8 8 Kg N W 7 8 Kg Cod 062667 2...

Отзывы: