4 – Mixer configuration and settings
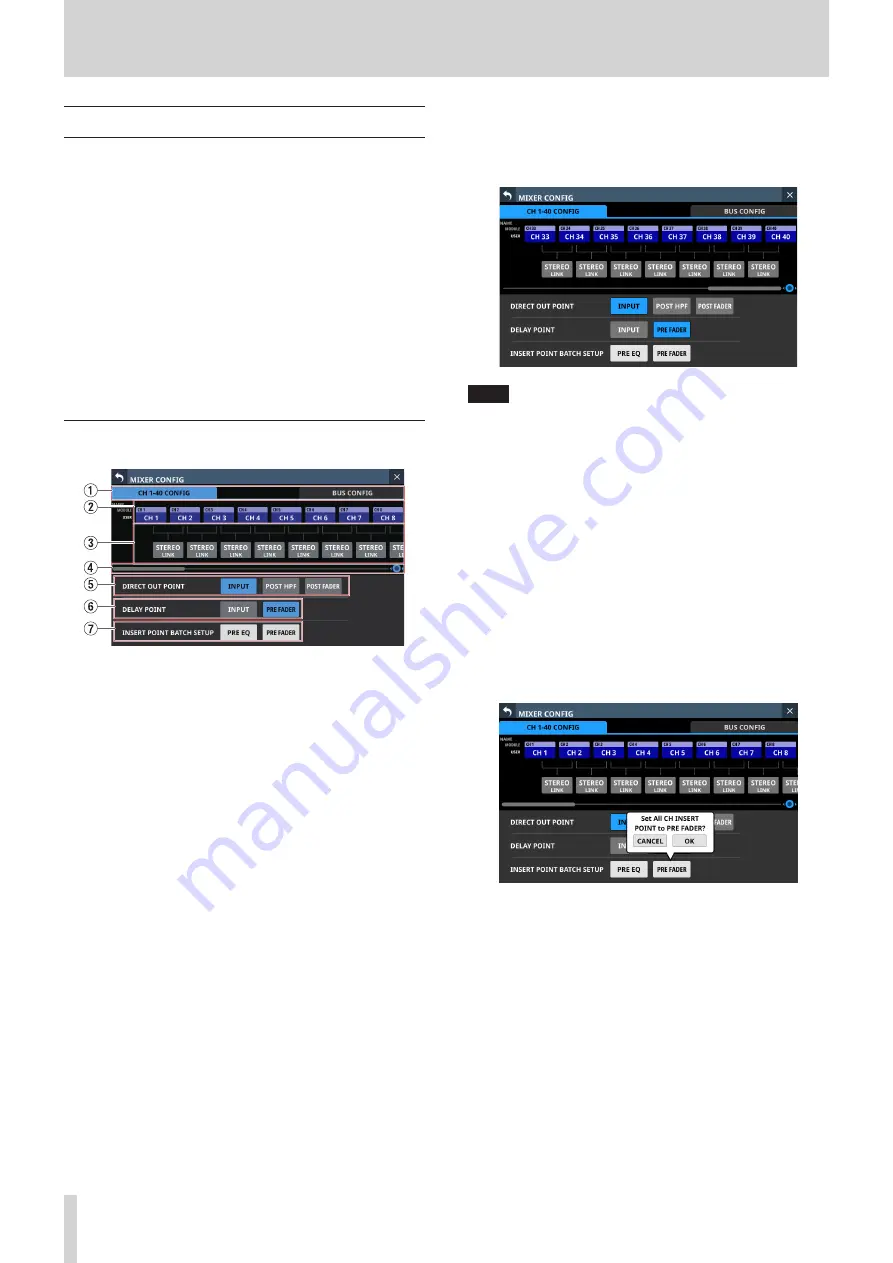
MIXER CONFIG screen
Make the following settings on this screen.
o
CH 1-40 CONFIG page
i
CH 1–40 stereo link settings
i
DIRECT OUT POINT settings
i
DELAY POINT settings
i
INSERT POINT unified settings
o
BUS CONFIG page
i
BUS MODE settings
i
MIX 1–22 stereo link settings
i
Pan link settings
Tap Menu Screen > Mixer Setup > Mixer Config/Bus Config to
open this screen.
CH 1-40 CONFIG page
1
Page selection buttons
Tap these buttons to switch the page shown.
2
CH 1–40 module name button area
o
This shows the module names and user module names for
the CH 1–40 modules.
o
Tap these buttons to open the MODULE NAME Screen
where the user module name and set module color can be
changed. (See “MODULE NAME screen” on page 122.)
3
STEREO LINK button area
o
These show the stereo link settings states of the CH 1–40
modules.
o
Tap these buttons to turn the stereo link setting on and off
(default) for the CH 1–40 modules.
When the stereo link is on, the button will appear
highlighted.
4
Scroll knob and scrollbar
Drag the scrollbar left and right to show CH 1-40 modules
that are not shown on the screen. The screen can also be
scrolled by turning LCD knob 8.
NOTE
The screen can also be scrolled by swiping left and right
between the CH 1-40 module NAME area (
2
) and the
STEREO LINK button area (
3
).
5
DIRECT OUT POINT buttons
Tap these buttons to change all direct out points for the CH
1–40 modules at the same time.
Options: INPUT (default), POST HPF, POST FADER
6
DELAY POINT buttons
Tap these buttons to change the delay function insert
position for the CH 1–40 modules at the same time.
7
INSERT POINT BATCH SETUP buttons
These change all the insert points at once for the CH 1–40
modules, which can be set individually on the MODULE
(OVERVIEW) Screen.
Tapping a button will open a setting change confirmation
message.
Tap the OK button to change the insert points for all CH 1–40
modules at the same time.
36
TASCAM Sonicview 16/Sonicview 24


