background image

42


TASCAM  DR-680MKII

6 – Playback

Setting the playback area

1.  Press the MENU button to open the 

PLAY

 page of the 

MENU

 screen.

2.  Use the DATA wheel to select the 

AREA

 item, and press 

the MARK (

¯

) button or ENTER/MARK button.

3.  Use the DATA wheel to set the playback area. 

SINGLE: Play only the selected take. 
FOLDER (default value): Play all the takes in the 

currently selected folder on the 

BROWSE

 screen.

ALL: Play all takes in the MUSIC Folder on the SD card.

4.  When you have finished making the settings, press the 

HOME/DISP button to return to the Home Screen.

Selecting a folder for the playback 

area on the BROWSE screen

Regardless of the current playback area, if you play a take 

on the 

BROWSE

 screen, the playback area changes to the 

folder that contains that take.
1.  Press the MENU button to open the 

GENERAL

 page of 

the 

MENU

 screen.

2.  Use the DATA wheel to select the 

BROWSE

 menu 

item, and press the ENTER/MARK button to open the 

BROWSE

 screen.

3.  Use the DATA wheel to select the folder that contains 

the take that you want to play. 

NOTE

For additional information about how to navigate the 

BROWSE screen, see “Navigating the BROWSE screen” 

on page 38

4.  Press the MARK (

¯

) button.

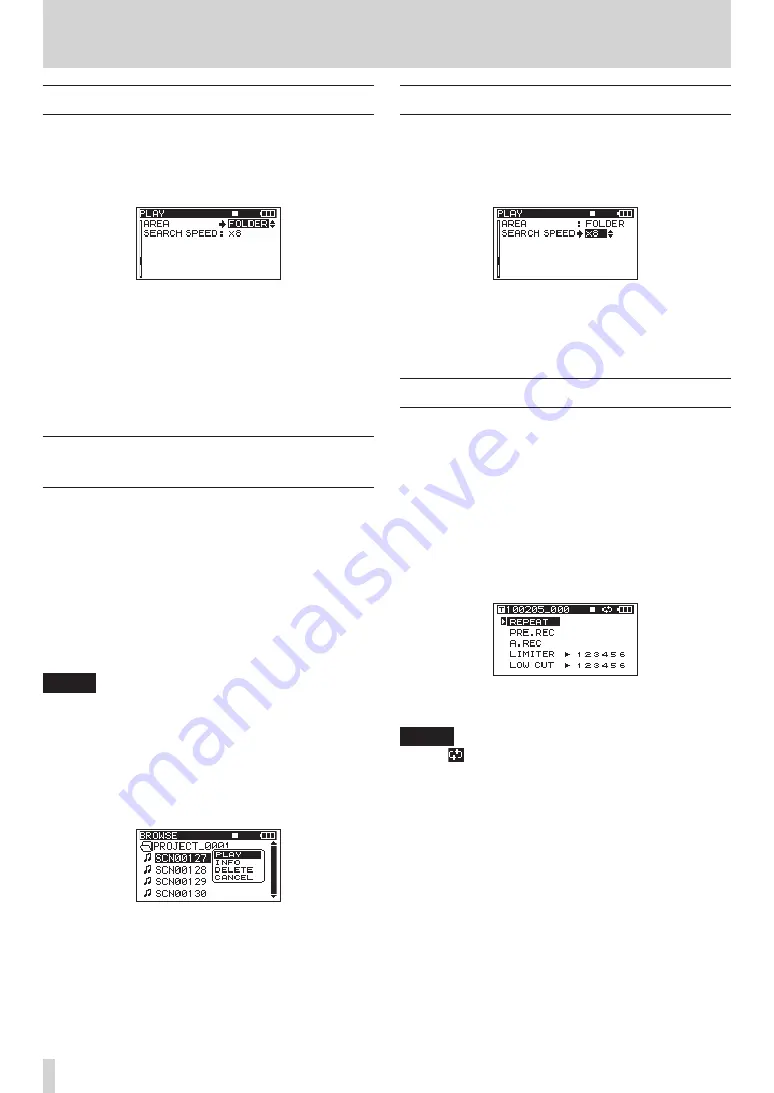
5.  Select the take that you want to play. 
6.  Press the ENTER/MARK button to open the following 

pop-up menu.

Use the DATA wheel to choose 

PLAY

, and press the 

ENTER/MARK button to return to the Home Screen.
The selected take begins to play. If the playback area 

is set to 

FOLDER

, the folder that contains that take 

becomes the playback area.

Setting the search speed

1.  Press the MENU button to open the 

PLAY

 page of the 

MENU

 screen.

2.  Use the DATA wheel to select the 

SEARCH


SPEED

 item, 

and press the ENTER/MARK button.

3.  Use the DATA wheel to set the search speed to 

x2

x4

x8

 (default value) or 

x10

4.  When you have finished making the settings, press the 

HOME/DISP button to return to the Home Screen.

Repeat playback

You can set the unit to repeatedly play a single take or all 

takes in a folder.
1.  When the Home Screen is open, press the FUNCTION 

button to open the Functions Screen.

2.  Use the VALUE/MARK knob to move the cursor and 

select the 

REPEAT

 menu item.

3.  Press the VALUE/MARK knob to turn the repeat 

playback ON or OFF. 
If the repeat has been turned ON, the 

REPEAT


indicator appears with a dark background.

4.  When you have finished making the settings, press the 

HOME/DISP button to return to the Home Screen.

NOTE

• 

The   icon appears on the Home Screen when the 

repeat function is ON.

• 

The takes in the currently set playback area are 

repeated. (See “Setting the playback area” on page 

42.)

Содержание projector

Страница 1: ...DR 680 Portable Multitrack Recorder OWNER S MANUAL D01252220A...

Страница 2: ...nstallation If this equipment does cause harmful interference to radio or television reception which can be determined by turning the equipment off and on the user is encouraged to try to correct the...

Страница 3: ...s been damaged in any way such as power supply cord or plug is damaged liquid has been spilled or objects have fallen into the apparatus the apparatus has been exposed to rain or moisture does not ope...

Страница 4: ...battery could harm skin or clothing 8 8 For European Customers Disposal of electrical and electronic equipment a All electrical and electronic equipment should be disposed of separately from the munic...

Страница 5: ...in speaker output on and off 23 Connecting monitoring equipment 23 Adjusting the display contrast 23 4 Recording 24 Files and takes 24 Recording settings 24 Setting the recording file format 24 Setti...

Страница 6: ...rch speed 42 Repeat playback 42 7 Connection with a computer 43 Copying files to a computer 43 Copying files from a computer 44 Ending the connection with a computer 44 8 Cascade function 45 Preparing...

Страница 7: ...fic playback positions Button lock function can be used to prevent misoperation Repeat playback function Mixer for monitoring with level and pan controls User can start a new take at any time without...

Страница 8: ...property rights or other proprietary rights and further assumes no liability of whatsoever nature in the event of any such infringement or arising from or connected with or related to the use of such...

Страница 9: ...this occurs use this unit farther away This unit might produce noise if a mobile phone or other wireless device is used nearby to make calls or send or receive signals If this occurs increase the dis...

Страница 10: ...ches Use these to turn phantom power ON or OFF for input pairs 1 2 3 4 and 5 6 CAUTION Do not connect or disconnect mics when a PHANTOM switch is set to ON Doing so could cause a loud noise and might...

Страница 11: ...the next take Press and hold to search forward r STOP button Press to stop recording and playback and locate the transport to the beginning of the current take Press to end recording standby t PLAY P...

Страница 12: ...s when the LEVELsettings screen is open to close it and return to the Home Screen j Channel number buttons 1 6 buttons Use these to select tracks on the TR I M LEVELand PAN settings screens Press when...

Страница 13: ...z When linking two of these units using the cascade function connect the DIGITAL SYNC OUT jack of the other DR 680MKII to this jack c DIGITAL SYNC OUT jack The stereo signal mixed by the internal mixe...

Страница 14: ...der strap Attach the included shoulder strap here Stand Use this stand to raise the front of the unit when operating it on a flat surface Battery compartment cover Battery compartment Install batterie...

Страница 15: ...ack of a multitrack file the playback levels of each track are shown When recording the recording levels of each track are shown When recording if a signal is distorted at the input stage the area ben...

Страница 16: ...ake being recorded is shown When the take being recorded or played is an MP3 its bit rate is shown BWF WAV 16 bit 24 bit MP3 96 kbps 48 kbps 128 kbps 64 kbps 192 kbps 96 kbps 320 kbps 160 kbps NOTE Th...

Страница 17: ...etained even when the unit is turned off Using menus In this example we show how to change the sampling frequency 1 Press the MENU button on the top or front of the unit to open the GENERALpage of the...

Страница 18: ...the HOME DISP button to return to the Home Screen Functions Screen When the Home Screen is open press the FUNCTION button to open the Functions Screen On the Functions Screen you can view and activat...

Страница 19: ...n the limiter ON or OFF for each input independently If the limiter has been turned ON for one or more inputs the L I M I TERindicator appears with a dark background Limiter ON for all inputs Limiter...

Страница 20: ...of power is required to provide phantom power to a condenser microphone If you use a condenser microphone while running the unit on AA batteries NiMH rechargeable or alkaline the operation time will b...

Страница 21: ...TANDBY ON button until the startup screen with TASCAM DR 680MK I Iappears The unit starts up and the Home Screen opens CAUTION Do not remove or insert an SD card until the Home Screen appears Putting...

Страница 22: ...nit has been inserted the following pop up message appears 3 Press the ENTER MARK button to start formatting 4 When formatting is complete the Home Screen opens You can reformat a card at any time wit...

Страница 23: ...might damage your hearing or equipment NOTE When headphones are connected no sound is output from the speaker Connecting monitoring equipment To monitor with headphones connect them to the PHONES jac...

Страница 24: ...ng a new take while continuing to record This occurs when you press the REC button during recording and automatically if the maximum file size is exceeded For details see Track incrementation on page...

Страница 25: ...set to MP3 or the sampling frequency is set to 192 kHz When dual recording is enabled only MONO can be selected See Enabling dual recording on page 31 Press the MARK button to return to item selection...

Страница 26: ...em selection on the MENUscreen 5 Press the HOME DISP button to return to the Home Screen Setting the name given to recording takes Set whether take names are based on the date or one of three names th...

Страница 27: ...Press the ENTER MARK button to open the confir mation pop up message 4 Press the ENTER MARK button again to reset the number that follows the characters to 0000 Press the MARK button on the top of the...

Страница 28: ...nes Use the PHANTOM switches on the top panel to turn the phantom power supply ON or OFF for mic input pairs 1 2 3 4 and 5 6 CAUTION Phantom power is also supplied to the TRS pins of the MIC LINE INPU...

Страница 29: ...tion ON for tracks that you want to record When the record function is ON for a track an appears under its meter on the display NOTE If the file recording mode is set to STEREO the record function is...

Страница 30: ...stance of a micro phone also changes the sound quality You can use the limiter function to prevent distortion when recording even when loud sounds are input See Using the limiter on page 34 7 Press th...

Страница 31: ...ired You can check the balance with the MIX meters at the far right 7 When you have finished making the settings press the HOME DISP button to return to the Home Screen Simultaneously recording two fi...

Страница 32: ...set in advance is detected on any input channel recording starts In addition the unit can automatically cut silent parts and add marks at points where recording starts again NOTE The levels of input...

Страница 33: ...utomatically pauses When the input sound exceeds the level set in the LEVELitem again recording restarts automatically Automatically adding marks at the position where recording restarts You can set w...

Страница 34: ...file size When recording if the size of the file reaches one of the limits listed below the unit stops recording the current take and starts recording in a new take without inter rupting the recording...

Страница 35: ...the MENU button to open the LOW CUTpage of the MENUscreen 2 Use the DATA wheel to set the cut off frequency to 40 Hz 80Hz default value or 1 20Hz 3 When you have finished making the settings press th...

Страница 36: ...it in the recording 1 When the Home Screen is open press the FUNCTION button to open the Functions Screen 2 Use the VALUE MARK knob to move the cursor and select the PRE RECmenu item 3 Press the VALUE...

Страница 37: ...8 0 57 1 55 3 51 7 42 15 25 30 51 96 16 6 0 28 0 57 1 55 3 51 7 42 15 25 30 51 8 0 21 0 43 1 26 2 53 5 47 11 34 23 08 24 6 0 19 0 38 1 17 2 34 5 08 10 17 20 34 8 0 14 0 28 0 57 1 55 3 51 7 42 15 25 19...

Страница 38: ...open the pop up menu Icons on the BROWSE screen The meanings of the icons that appear on the BROWSE screen are as follows MUSIC folder The MUS I Cfolder is the highest level folder root folder shown o...

Страница 39: ...that you want to rebuild the selected folder Rebuilding refreshes the take information inside the selected folder and recognizes files that are not contained in takes as independent takes making thei...

Страница 40: ...g Pausing playback On the Home Screen press the PLAY PAUSE button during playback to pause playback at the current position in the take Press the PLAY PAUSE button again to restart playback from that...

Страница 41: ...on of each channel Use the channel number 1 6 buttons to select the channels that you want to adjust NOTE Multiple channels can be linked and controlled at the same time See GANG function on page 48 6...

Страница 42: ...the take that you want to play 6 Press the ENTER MARK button to open the following pop up menu Use the DATA wheel to choose PLAY and press the ENTER MARK button to return to the Home Screen The selec...

Страница 43: ...rted correctly into the unit If an SD card is not inserted correctly when the unit is connected to a computer by USB a Can tSaveData pop up message appears When connected USBconnec tedappears on the d...

Страница 44: ...You can also use the computer to manage the contents of the MUSIC folder You can create subfolders inside the MUSIC folder but this unit can only recognize one level of subfolders The unit ignores dee...

Страница 45: ...ck both the master and slave units must be set the same o o PRE REC Set both the master and slave units to the same value 3 Press the HOME buttons on both the master and slave units to open their Home...

Страница 46: ...em of the RECmenu is set to NEW TAKE recording might not start simultaneously when the REC button is operated The reason for this is that the processing time for the units differs when the slave and m...

Страница 47: ...t the transport icon should be before changing the settings Recording with mid side decoding 1 On the MS MODEscreen set the decoding mode to I NPUT 2 Press the MIX PAN button on the front panel to ope...

Страница 48: ...he ganged channels are the same on the TR I M PANand LEVELscreens However channels that have been set to use mid side decoding cannot be ganged or unganged on the PANand LEVEL screens NOTE You cannot...

Страница 49: ...o be used as well as to view system information 1 Press the MENU button to open the SYSTEMpage of the MENUscreen On the SYSTEMmenu screen you can make various settings described below Use the MARK and...

Страница 50: ...ng battery charge and determine the minimum necessary remaining charge for correct operation Options ALKAL I alkaline batteries default value N i MH nickel metal hydride batteries L i F eS2 lithium ba...

Страница 51: ...E Using the ERASE FORMAToption might restore an SD card that has decreased writing performance due to repetitive use 5 Press the ENTER MARK button to open a confirmation screen 6 Press the ENTER MARK...

Страница 52: ...other folders and files Unlock the write protect switch restart the power and format the card Wr i te T i meout Writing to the SD card was not fast enough Back up files to a computer and then use the...

Страница 53: ...batteries and disconnect the AC adaptor if connected If the error message continues to appear please contact a TASCAM Service Center F i l e Error Can t Save Data P l ayer Error Dev i ce Error Wr i t...

Страница 54: ...ones minimized 8 8 No sound is output from the headphones Is the volume level of the headphones minimized 8 8 No sound is output from the monitoring system Confirm that the monitoring system is connec...

Страница 55: ...nectors XLR 3 31 1 GND 2 HOT 3 COLD 6 3mm 1 4 standard TRS jacks Tip HOT Ring COLD Sleeve GND INPUT switch set to MIC phantom power supported Input impedance 2 4 k Nominal input level GAIN LOW 20 dBu...

Страница 56: ...60 Hz included Power consumption 100 120V 9W When phantom power ON and GPE248 120200 Z AC adaptor used 220 240V 9 5W When phantom power ON and GPE248 120200 Z AC adaptor used Battery operation time w...

Страница 57: ...ecifications Dimensions 202mm 54mm 56mm 188 4mm 216 4mm Illustrations in this manual might differ from the actual product In order to improve the product specifications and appearance could be changed...

Страница 58: ...58 TASCAM DR 680MKII 12 Specifications Block diagrams 8 8 Recording 8 8 Play...

Страница 59: ...coveredbythewarranty we will pay return surface shipping charges to any destination within theUnitedStates LIMITATION OF IMPLIED WARRANTIES Any implied warranties INCLUDING WARRANTIES OF MERCHANTABILI...

Страница 60: ...m Germany TEAC SALES TRADING SHENZHEN CO LTD http tascam cn Phone 86 755 88311561 2 Room 817 Block A Hailrun Complex 6021 Shennan Blvd Futian District Shenzhen 518040 China Printed in China Model Mod...

Отзывы: