background image

- 42 -

Digital Transfers

The only time you don't have to set a level going into your MX-2424 is when you make
a digital transfer (such as, AES/EBU, TDIF, or ADAT Optical). This is because the level
has already been set at the source. During a digital transfer, the MX-2424 is simply
copying data from the digital source to its own hard drive

HARD DRIVE & SCSI BASICS

HARD DRIVE & SCSI BASICS

HARD DRIVE & SCSI BASICS

HARD DRIVE & SCSI BASICS

Your MX-2424 comes standard with an internal 9 GB Hard Drive (HD). This is the drive
where all of your audio is stored (until it's backed up to another device). The 9 GB HD
provides up to 45 minutes of 24-track recording at 24-bit, 44.1 kHz. Of course, you can
always install an additional internal HD, or connect an external drive if you need more
space.

Remaining Drive Space

If you aren't sure whether your next project will fit on the drive space currently available,
your MX-2424 can figure it out for you. Follow the steps below to find out how.

Checking Remaining Recording Time

1) Make sure that your bit depth and sample rate are set for the upcoming project.

2) Press [

SETUP

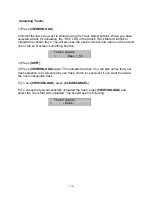
] and access menu #703. It should look something like this,

703  Rec Disk Free

* 08:11:06:14

3) Use the Track Select buttons to record-enable the total number of tracks you believe
the project will be.

4) The remaining time will automatically adjust to take your record-enabled track count
into consideration. (If no tracks are selected, the remaining time is based on a single
track.)

SCSI Basics

Plugging an external hard drive or DVD RAM drive into your MX-2424 is a pretty simple
operation with the proper terminator and cables. To achieve the performance standards
of the MX-2424 certain SCSI devices have been tested/approved for use.  It is very
important that only tested/approved devices be connected to the MX-2424 to ensure
performance and reliability.  Once you have all the hardware, there are a several rules
you must always follow when connecting a SCSI device. These rules are listed below,
but for a more detailed overview of MX-2424 SCSI configurations, please read the 

MX-

2424 SCSI Instructions

 which is updated as needed and available for download on the

TASCAM web site

.

Содержание MX-2424

Страница 1: ...TASCAM TEAC Professional Division MX 2424 24 Track 24 Bit Hard Disk Recorder Operational Tutorial...

Страница 2: ...rounded 9 Avoiding Ground Loops 9 Audio Cable Considerations 10 Wiring Rules 10 Connecting Back Up Devices 10 Getting around 11 Control Section Descriptions 11 Track Function 11 Track Select 11 Edit C...

Страница 3: ...nal Hard Drive 29 Mounting the Internal Hard Drive 29 Making Operating Choices 30 Monitoring Modes 30 Choosing Auto Input Off Monitoring 30 Entering Record 31 Record Enable All 31 Setting One Button R...

Страница 4: ...t 44 Backup Your Stuff 44 DVD RAM 45 Ethernet 45 Offline 45 Disk Cleanup 46 Performing a Disk Cleanup 46 Low Level Formating 47 Performing a Low Level Format 47 Initializing a Drive 48 Performing A Dr...

Страница 5: ...100 levels of undo I O and Sync AES EBU and S PDIF one stereo pair each MIDI In Out and Thru SMPTE In Out and Thru Word Clock In Out and Thru Video Sync In and Thru TL Bus for synchronization of up to...

Страница 6: ...ined analog digital systems First Project The first part of this section is a road map of the MX 2424 s interface LCD displays and general operating conventions The second part of this section walks y...

Страница 7: ...highlighted in their own boxes see the example below These Hot Tips call your attention to special situations and offer helpful operating suggestions HOT TIP While reading the MX 2424 Instructions Tu...

Страница 8: ...n help you select the card or cards that are best for your setup All the cards are user installable but if you prefer an authorized TASCAM service center can perform the installation for you I O Optio...

Страница 9: ...oduce hums and buzzes to your audio signal and can lead to serious equipment damage especially in the event of an electrical storm and even electrical shock If your residence does not have grounded ou...

Страница 10: ...dio cables Always unplug by grabbing the plug s body don t tug on the cable itself HOT TIP Check the MX 2424 Downloads section of http www tascam com and http www mx2424 com for setup instructions wit...

Страница 11: ...nput monitoring mode selecting a track to record on or selecting a track to edit Track Select The buttons immediately below the Track Meters make up the Track Select section In their default mode thes...

Страница 12: ...confirming or canceling an action Jog Shuttle Wheel Surrounding the Jog Shuttle wheel are several buttons for navigating the MX 2424 s system project and track pages Use these buttons to call up spec...

Страница 13: ...ow give you value up and down control The two buttons to the left of the Jog Shuttle NUDGE CAPT EVENT and TRIM are for nudge and trim functions The Jog Shuttle Wheel can be used for dialing in numeric...

Страница 14: ...there is a system parameter you need to adjust you will have a good idea of where to find it Setup Bank Descriptions Bank Title Description 000 Rates References Timecode sample rates and varispeed 10...

Страница 15: ...15 Load...

Страница 16: ...16 Delete...

Страница 17: ...17 Rename...

Страница 18: ...18 Smart Copy TapeMode Convert Convert Copy Abort...

Страница 19: ...e tracks one at a time using the Up Arrow and Down Arrow buttons or the Jog Dial It is also possible to go directly to a track using the Track Select buttons The shifted function of VIEW UNLOAD lets y...

Страница 20: ...rompt to press its associated button to perform the action Changing Parameters Pressing TRIM allows parameters to be changed You can press SETUP and scroll to any system page but until you press TRIM...

Страница 21: ...is in the non destructive record mode more on this in a minute Each consecutive press of UNDO takes you back to the previous edit or recording pass up to 100 times Press REDO to reverse the last undo...

Страница 22: ...ting and ready to run the LCD will read MX 01 01 00 00 00 00 00 00 00 2 Press PROJ NEW The button s associated LED will light and the STORE YES LED will flash The LCD will read Load Select Action 3 Pr...

Страница 23: ...project TRIM becomes active automatically when you press SHIFT and PROJ NEW so the project name is ready to be edited Use the Shuttle Ring the outside control of the Jog Shuttle Wheel to scroll left...

Страница 24: ...ss 0 on the numeric keypad and then use the Up Arrow to scroll to system page 005 You will see 005 Sample Rate 44100 3 Press TRIM 4 Use the Up Arrow to scroll to your desired sample rate For example 0...

Страница 25: ...n DAW TapeMode makes this easy A project recorded in Non Destructive Mode can be converted to a TapeMode project using the TapeMode Convert function You ll find TapeMode Convert under the PROJ NEW but...

Страница 26: ...Press STORE YES 8 Use the Up Arrow to change the display to 231 Tape Mode Length 00 10 00 00 9 Press TRIM then use the Shuttle Ring and numeric keypad to set the desired value Press STORE YES HOT TIP...

Страница 27: ...eters Be sure the outputs of the MX 2424 are connected to playback channels of your mixer in order to hear the recorded sound 3 Adjust the incoming signal so that the peaks do not exceed 0 dB on the t...

Страница 28: ...ead of a track in the project 5 Press PROJ NEW and the name of a track appears This is the first track of the project chosen in step 4 It will look something like this Rename Track MX Trk 1_001 6 Scro...

Страница 29: ...hen your hard drive is successfully unmounted the LCD screen will display a message similar to this MX 01 01 02 50 10 1 Volume Unmounted Mounting the Internal Hard Drive 1 If you decide you want to co...

Страница 30: ...ction environments In the Auto Input On mode your MX 2424 will monitor incoming signal just like a traditional tape machine When you record enable a track using a Track Select button the input to that...

Страница 31: ...iliar to many people there are alternative methods to choose from For example you can set your MX 2424 to enter record without having to hold down Play In this mode all you need to do is press Record...

Страница 32: ...or confirmation An asterisk will appear next to the new setting 5 To change one touch Record back to Record Play repeat steps 1 to 4 Footswitch Punching 1 Make sure your MX 2424 is turned off and plug...

Страница 33: ...asonable time before your punch In Point and record enable the track s you want to record on 5 Press SHIFT then press Record The Record button s LED will blink to let you know that it is in standby 6...

Страница 34: ...ul when recording in TapeMode since there is no record Undo available in TapeMode The Rehearse feature lets you monitor a punch just like a real record punch without actually recording anything The Re...

Страница 35: ...ool it becomes a Virtual Track Track 18 is now empty and ready to be recorded on again We record a New Rhythm Guitar Track on Track 18 in order to compare or combine the first Rhythm Guitar Track to t...

Страница 36: ...second line of the LCD screen something like this Track Contents 1 Bass_1_58 3 Press SHIFT 4 Press VIEW UNLOAD again This unloads the track You will also notice that your track selection is increment...

Страница 37: ...ded or loaded Such as Load into Track 23 Bass_1_58 5 Use the Up Down buttons to scroll to the Virtual Track you want to load 6 Use the Track Select buttons to choose the track position 1 24 where you...

Страница 38: ...0 locations that are automatically stored in your project file Locations can be stored or recalled using the numeric keypad Storing a Location 1 Press CAPT SPACE to capture a location The MX 2424 can...

Страница 39: ...on displayed in the lower half of the LCD You will see the time code on the top line of the LCD become equal the time code on the bottom line of the LCD For example MX 01 00 01 05 24 MEM15 00 01 05 24...

Страница 40: ...nhance your productivity and enjoyment of your MX 2424 In Sample Terms Digital recording is the process of converting an analog signal into numbers that represent a sound s amplitude frequency and har...

Страница 41: ...m of a lower noise floor HOT TIP Confused about the terms A binary digit is a bit Eight bits makes up a byte Half a byte or four bits is called a nibble And a large group of bits is a word For example...

Страница 42: ...g Recording Time 1 Make sure that your bit depth and sample rate are set for the upcoming project 2 Press SETUP and access menu 703 It should look something like this 703 Rec Disk Free 08 11 06 14 3 U...

Страница 43: ...ique SCSI ID number 5 The MX 2424 supports up to four devices on its SCSI bus 7 A SCSI chain s total cable length should not exceed 6 feet 8 A SCSI chain must always be properly terminated 9 High qual...

Страница 44: ...fore your next back up you will never lose too much of your work Backup after every session or at the end of each day Always make sure you have backed up your projects before erasing them This might s...

Страница 45: ...e by the Smart Copy process The advantage of this method is that a FAT 32 DVD RAM disk will be recognized by a PC Initializing a DVD RAM disk to HFS or HFS on the MX 2424 is not possible such an initi...

Страница 46: ...o scroll to Menu 720 It should look similar to this 720 Disk Cleanup Cleanup Disk 0 3 Press TRIM and select the SCSI device you want to cleanup The stock internal hard drive is SCSI ID 0 4 Once you ha...

Страница 47: ...ialize the disk before it can be used to learn how to initialize a disk read on Performing a Low Level Format A drive must be unmounted to perform a low level format 1 Press SETUP press 7 on the numer...

Страница 48: ...not function reliably Performing A Drive Initialization 1 The drive will already be unmounted from the low level format process If not it must be unmounted before initializing 2 Press SETUP press 7 o...

Страница 49: ...of the slave decks transport functions Generally the slave decks are placed in a standby mode while they await timecode transport and location commands from the master Chase Lock Once you have made t...

Страница 50: ...d select the digital clock source you want your MX 2424 to reference 3 Press STORE YES to lock the setting in 4 If you have selected a valid external digital clock source that is connected to the MX 2...

Страница 51: ...deo term used to describe small changes in the location of a video such as two or three frames Jogging is the process of using a jog wheel to move the digital recorder s play head back and forth small...

Страница 52: ...ten used in place of the phrase Linear Time Code LTC SMPTE is used to lock different pieces of equipment together by having them all receive and chase a specific time code Synchronization Synchronizin...

Отзывы: