background image

GIGAPULSE IN THE MIDI MIXER 

GigaPulse Convolution can be used to model environments, instrument bodies, signal paths, 
digital reverbs, and pretty much anything else you can send audio through. It is up to the library 
or soundware developer as to how these impulse responses appear to the end-user within GVI.  


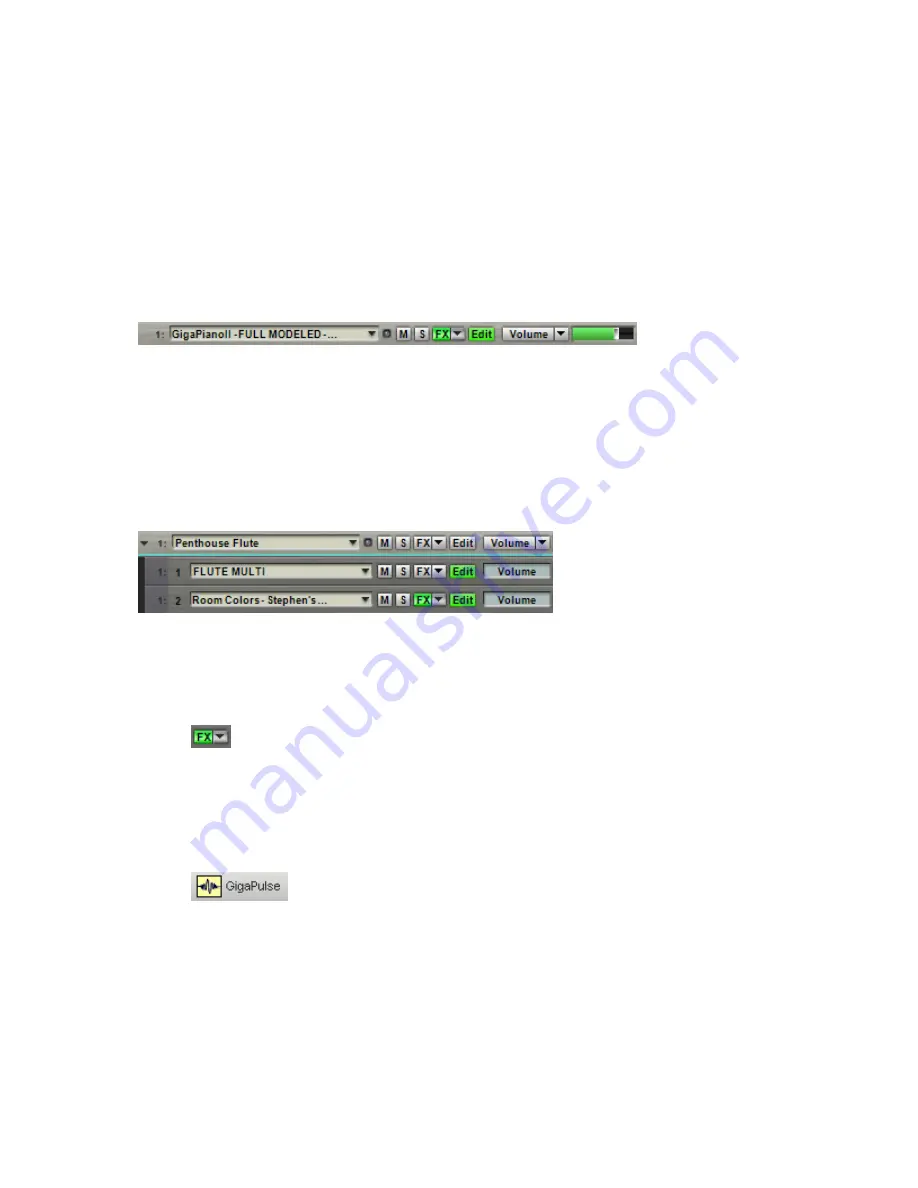
For instance, in the case of GigaPiano II, a piano soundboard resonance IR was embedded 
directly into the GIG instrument that the actual piano sample data is stored in. Because of this 
integration, the GigaPiano II appears as a single instrument when loaded into GVI; the 
illuminated “FX” button indicates that the instrument also contains embedded convolution. 


(Integrated Sample and GigaPulse instrument) 


Alternatively, a developer might choose to leave their GigaPulse content and Sample content 
separate, or modular. In these cases, the GigaPulse convolution appears as its own instrument 
on a Stacked Instrument Sub-Channel. This kind of Stack contains two types of instruments, 
those containing traditional sample data and those containing encoded GIG Instrument Banks 
(Impulse Responses). Again, the illuminated “FX” button indicates that the instrument sub-
channel contains embedded convolution. 


(Modular Sample and GigaPulse instrument) 

OPENING THE GIGAPULSE UI 

There are two methods by which the GigaPulse UI can be opened from within the MIDI Mixer: 


FX Button:

 The FX button is located on the channel strip or sub-channel strip that 

contains the instrument with embedded convolution. Clicking on the green FX button 
will open a menu that lists all of the GigaPulse Instances and encoded GIG Instrument 
Banks available for that particular channel. From this FX menu, select “Edit” to open the 
GigaPulse UI (when only one bank is available, simply click on the bank name).  


GigaPulse Button:

 This global GigaPulse button is located in the GVI Navigation 

toolbar. The GigaPulse Button only becomes active when a channel containing an 
embedded GigaPulse instrument is selected.  Clicking on this button will then open the 
GigaPulse instance that exists on the selected channel. 


25

Содержание GVI

Страница 1: ...Owner s Manual QuickEdit and GigaPulse Addendum 100206 ...

Страница 2: ...LOPE MODULATION SECTION 13 AMPLITUDE LFO SECTION 14 PITCH LFO SECTION 15 GVI FILTER TAB 16 FILTER SECTION 16 FILTER ENVELOPE SECTION 18 MIDI CONTROL SECTION 19 FILTER ENVELOPE MODULATION SECTION 19 KEY RESPONSE SECTION 19 FILTER LFO SECTION 20 GVI LOOP TAB 21 SAMPLE START SECTION 21 LOOP SECTION 21 QUICKEDIT WAVEFORM VIEW 22 WAVEFORM VIEW ZOOM TOOLS 22 WAVEFORM DISPLAY WINDOW 23 Envelope and LFO S...

Страница 3: ...he global EDIT button located on the GVI navigation toolbar or the green channel specific EDIT buttons located on MIDI Mixer channel strips that contain loaded instruments Instrument Select Drop Down Menu Once in the QuickEdit View it is possible to select any instrument currently attached to a MIDI channel or Stack Sub channel using the QuickEdit instrument select drop down menu The menu is locat...

Страница 4: ...s are stereo there are even separate parameter values for the left and right sides making a total of 48 complete parameter sets per region To show which split you are currently editing the instrument s dimensions are displayed as horizontal strips just below the editing tabs In the example above you d find three strips for velocity sustain pedal and stereo This is only an example every Giga instru...

Страница 5: ...LECT DROP DOWN MENU We noted above that a GVI instrument can contain a large number of regions each subdivided into many independent splits Often you will want to apply an edit globally across an entire instrument At other times you may need to edit only a particular region or group of regions The Keyboard Select setting helps make either kind of editing possible The options are All regions In thi...

Страница 6: ...st velocity levels for editing by highlighting the last three segments in the velocity strip The sustain pedal strip would control whether you re editing the three loudest pedal up splits the three loudest pedal down splits or both six splits in all To select multiple splits in any dimension click in that dimension strip while holding down the CTRL or SHIFT keys Individual splits When viewing a st...

Страница 7: ...right Tune The Tune knob adjusts a region s fine tuning between 49 and 50 cents Self mask When checked this causes high velocity notes to terminate lower velocity voices This feature conserves polyphony and should be tried on all samples with percussive attacks and releases pianos guitars cymbals etc Sustain Defeat This setting enables or disables the sustaining action of the sustain pedal This al...

Страница 8: ...result would be a cross fade between both layers Attenuation Controller Threshold This parameter allows you to assign a minimum threshold to the external volume attenuation controller This is useful for volume crescendo decrescendo and expressive dynamics It is very similar to the threshold knob found on controller volume pedals For example this allows a MIDI controller to set the volume from full...

Страница 9: ...Velocity Curve There are three general response curves available Linear Non Linear and Special See the diagrams below for a graphical representation of each curve class Linear Curve Non Linear Curve 9 ...

Страница 10: ...ws you set longer or shorter release times depending on how hard you hit the note Release Range Use the Release Range slider to select one of five velocity release range offsets for the specified Release Curve Linear Non Linear Special Like Velocity Range the release range is also set from High to Low High producing the most dynamic release curve and Low producing the least dynamic release curve R...

Страница 11: ...the upward and downward transposition boundaries 11 Piano Release Mode This option is intended for Acoustic Piano sample libraries On an actual acoustic piano you can step on the sustain pedal very quickly after releasing a note and hear some string resonance Enabling this option emulates that phenomenon within GVI using an instrument s pedal down samples This option is only needed for piano libra...

Страница 12: ...etween Decay1 and Decay2 Hold If a sample has a loop point the Hold function will prevent the first Decay Decay1 from happening until the sample has played through its entire loop one time Hold is handy for natural decaying instruments like Piano or Guitar that have small looped samples When Hold is enabled the sample will hold its peak volume until it plays through the loop once The envelope will...

Страница 13: ...oose the MIDI controller from the list of standard MIDI controllers Invert When enabled this setting reverses the incoming MIDI controller data values Attack Decay and Release depth These sliders allow you to enable MIDI control of amplitude envelope parameters Enabling these parameters allows the specified MIDI Modulation Controller to affect one two or all three parameters at once with varying i...

Страница 14: ...hat note is played or when it is struck When Synch is disabled the LFO begins at the point in time when each individual note is struck and will have its own out of synch and independent cycle When Synch is enabled the LFO cycle will stay in synch for all the notes no matter when they are triggered Internal Depth This parameter applies a fixed Amplitude LFO depth that is always present when Interna...

Страница 15: ...in time when each individual note is struck and will have its own out of synch and independent cycle When Synch is enabled the LFO cycle will stay in synch for all the notes no matter when they are triggered Internal Depth This parameter applies a fixed Pitch LFO depth that is always present when Internal is selected as a Control source External Depth An external MIDI continuous controller can als...

Страница 16: ...cies Turbo Enabling the Turbo option adds additional poles of attenuation to the Lowpass filter algorithm This creates a more intense analog filter effect This option is only audible when the selected Filter type is set to Lowpass Note When used with certain resonance settings Turbo LPF can generate high amplitude resonant frequency oscillations Proceed with caution when editing at loud volumes Th...

Страница 17: ...lso referred to as Q creates a peak in amplitude at the specific Cutoff frequency and is used to generate classic analog synth textures The maximum resonance is set close to the point of self oscillation and will resonate according to the frequency content of the waveform that is being filtered Dynamic Dyn Enabling Dynamic increases the overall resonance by dynamically scaling the Q in addition to...

Страница 18: ... The Filter Sustain value is also adjusted with percentage numbers 0 100 The Sustain setting determines the Filter Cutoff value during the sustain portion of the Filter ADSR that occurs between Decay1 and Decay2 Decay2 The Decay2 time is either measured in seconds 0 60 or set to Infinite which overrides the time setting Decay2 determines how long the Sustain section of the Filter envelope will las...

Страница 19: ...n enabled this setting reverses the incoming MIDI controller data values Resonance Controller This parameter allows you to assign a MIDI controller to the Filter Resonance for real time continuous control This assignment overrides the Filter Resonance value which will be disabled once you assign a MIDI controller here SECTION Controller Th allow external MIDI control of the Attack Decay and Releas...

Страница 20: ...d the LFO will be constant no matter what note is played or when it is struck When Synch is disabled the LFO begins at the point in time when each individual note is struck and will have its own out of synch and independent cycle When Synch is enabled the LFO cycle will stay in synch for all the notes no matter when they are triggered Internal Depth This parameter applies a fixed LFO depth that is...

Страница 21: ... soften the attack of a sample or to eliminate create pops at the beginning of a sample LOOP SECTION This section is only available for samples that already have a loop enabled Loop Start Adjusts a defined loop s start point Loop End Adjusts a defined loop s end point Note The loop points are also visible and adjustable in the Waveform View window The Green marker is the loop start and the Red mar...

Страница 22: ...u can also scroll by clicking in the Zoom Bar either to the left or right of the light purple Zoom Bar area To zoom in and out simply click on one of the outside edges of the light purple Zoom Bar area and drag to the left or right The direction of zoom depends on whether you grab the left or right boundary of the light purple Zoom Bar area You can also double click the Zoom Bar in order to zoom t...

Страница 23: ...s and Sample Offset discussed in the previous section the following Envelopes and LFO parameters are made available for graphical editing within the Waveform Display window Amplitude Envelope Preattack Attack Decay1 Sustain Decay2 and Release Filter Envelope Preattack Attack Decay1 Sustain Decay2 and Release Pitch Envelope Attack Amplitude LFO Frequency Filter LFO Frequency Pitch LFO Frequency To ...

Страница 24: ...into the MIDI Mixer just like other sampled instruments Instead of samples however embedded convolution presets contain IR s impulse responses that are automatically routed through an FX Bus when loaded onto a MIDI channel It is also possible to load an instrument such as GigaPiano II which uses convolution to model the instruments resonance and natual decays For extensive documentation on GigaPul...

Страница 25: ...kind of Stack contains two types of instruments those containing traditional sample data and those containing encoded GIG Instrument Banks Impulse Responses Again the illuminated FX button indicates that the instrument sub channel contains embedded convolution Modular Sample and GigaPulse instrument OPENING THE GIGAPULSE UI There are two methods by which the GigaPulse UI can be opened from within ...

Страница 26: ...faders trajectory the position of the fader if it had NOT been limited by the maximum or minimum As such a maximized Left Right slave fader will not move until the master has pulled the slave s trajectory below the maximum value 26 ACOUSTIC SPACE SECTION The overall graphics in the Acoustic Space Section show display graphics provided by the soundware developer In most cases the soundware develope...

Страница 27: ... into which the active preset was encoded MIC GROUP SECTION GigaPulse is capable of loading Stereo 5 1 Surround and 7 1 Surround Impulse sets When a multi channel impulse set has been loaded it becomes possible to switch which mic group is being used as well as combine mic groups for a thicker sound Changing the GigaPulse mic group is effectively the same thing as moving the position of the microp...

Страница 28: ...y clicking on them in the Placem ion window When a mic is enabled it will be highlighted in the Placement Selection window and its On button will be lit yellow a disabled mic is unlit or gray channel Enabling this option will output identical information on both the left and ls When disabled audio is routed only to the output channel specified in the FX Bus Routing section channel relative to all ...

Страница 29: ...29 ...

Страница 30: ...d Filter selections will cause GigaPulse to pause and run a short calculation when the mic models are chosen but they do not require additional CPU when processing audio Original Mic This drop down menu provides a list of microphones that might have been used in the original recording being processed by GigaPulse By selecting the appropriate mic you apply the inverse impulse response which effecti...

Страница 31: ... its recording pattern resembles a heart hence the name Cardio Variations include Wide Cardioid and Hyper Cardioid Figure 8 This is a bi directional microphone often used to record two performers while rejecting off axis sound The Figure 8 pattern is also used to creating Mid Side recordings Filter The type of microphone roll off filter is selected here While some mics have only a flat response ot...

Страница 32: ...n Window provides a quick and easy way to enable and disable microphone placements This is especially useful for Impulse sets that contain multiple Mic Groups or placements Microphone placements that are enabled appear yellow while disabled microphones appear gray All encoded GIG Instrument Banks are comprised of single source placement Impulse Sets This means that only one stage or source placeme...

Страница 33: ...ut channel 7 Channel Allows for independent routing of each mic placement within the FX Bus channels Simulated Stereo Simulates a stereo signal from a mono source audio stream passing through GigaPulse When simulated stereo is enabled GigaPulse will disable all but one microphone placement Because only one channel of convolution is used for Simulated Stereo less CPU resources are used than with St...

Отзывы: