background image

TASCAM DR-70D

 51

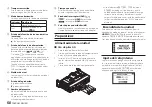
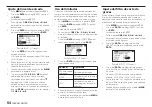
Apagado de la unidad (ponerla 

en modo de reposo)

Deslice el interruptor 

HOLD/

 hacia 


hasta que en la pantalla aparezca 

LINEAR PCM 

RECORDER

.

La unidad se apagará (entrará en modo de reposo) 

después de que se haya completado todo el proceso 

de apagado.

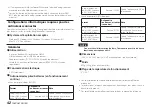
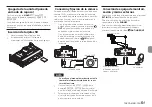
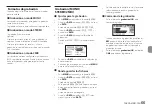
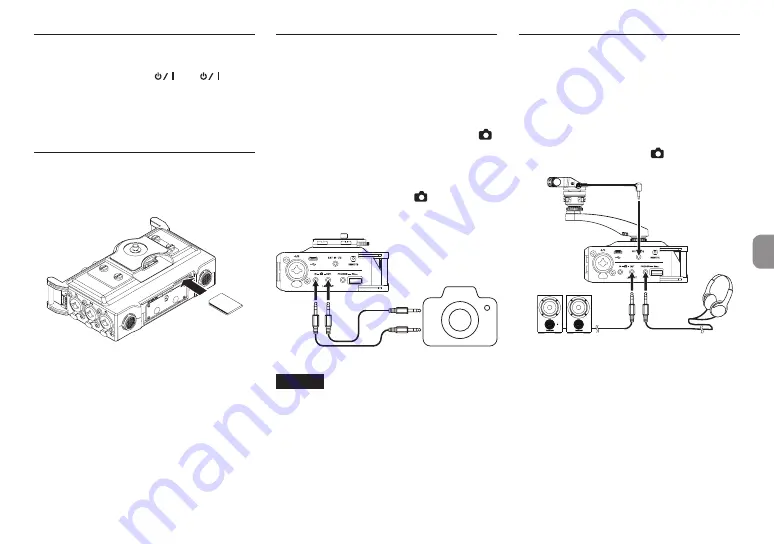
Inserción de tarjetas SD

1.  Abra la tapa del frontal de la unidad.
2.  Introduzca una tarjeta SD tal como le 

mostramos en la ilustración hasta que haga clic.

Conexión y fijación de la cámara

Para poder enviar el sonido desde esta unidad a una 

cámara DSLR y monitorizar el sonido de la cámara 

con esta unidad, deberá conectar ambas a través de 

cables con minijacks de 3,5 mm, disponibles en la 

mayoría de comercios del ramo.
1.  Si quiere grabar audio enviado desde esta 

unidad en una cámara, conecte el terminal 


OUT

 del panel derecho de esta unidad a la 

entrada de micro externo de la cámara.
Si quiere dar entrada a la señal audio proce-

dente de la cámara y monitorizarla con esta 

unidad, conecte el terminal 


IN

 del panel 

derecho de esta unidad a la salida de audio de 

la cámara.

Cámara DSLR

Salida de audio

Entrada de micro externo

NOTA

Consulte en el manual de instrucciones de la 

cámara la información relativa a los conec-

tores de la misma.

2.  Utilice el elemento 

OUTPUT LEVEL

 de la 

pantalla 

MONITOR SETTING

 para ajustar el 

nivel de salida de volumen enviado a la cámara.

3.  Para montar la cámara en esta unidad, utilice 

el tornillo de fijación de cámara que hay en la 

parte superior de esta unidad.

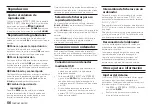
Conexión de equipo de monitori-

zación y micros externos

Conecte un micrófono estéreo externo en el terminal 

EXT IN 1/2

 del panel derecho de la unidad.

Para escuchar el sonido a través de auriculares, 

conéctelos a la salida 

PHONES

.

Para usar un sistema de monitorización externo 

(monitores autoamplificados o amplificador y 

altavoces), conéctelo a la salida 


OUT/LINE OUT

.

Auriculares

Monitores autoam-

plificados o amplifi-

cador y altavoces

Micro externo

Содержание DR-70D

Страница 1: ...DR 70D Linear PCM Recorder for DSLR D01244000B ENGLISH FRAN AIS ESPA OL DEUTSCH ITALIANO OWNER S MANUAL MODE D EMPLOI MANUAL DEL USUARIO BEDIENUNGSANLEITUNG MANUALE DI ISTRUZIONI...

Страница 2: ...heim Germany TEAC SALES TRADING SHENZHEN CO LTD http tascam cn Phone 86 755 88311561 2 Room 817 Block A Hailrun Complex 6021 Shennan Blvd Futian District Shenzhen 518040 China TASCAM is a trademark of...

Страница 3: ...ty to operate this equipment For U S A For Canada THIS CLASS B DIGITAL APPARATUS COMPLIES WITH CANADIAN ICES 003 CET APPAREIL NUMERIQUE DE LA CLASSE B EST CONFORME A LA NORME NMB 003 DU CANADA Declara...

Страница 4: ...or excessive heat CAUTION for products that use replaceable lithium batteries there is danger of explosion if a battery is replaced with an incorrect type of battery Replace only with the same or equ...

Страница 5: ...ffice waste disposal service or the shop where you purchased the equipment Disposal of batteries and or accumulators a Waste batteries and or accumulators should be disposed of separately from the mun...

Страница 6: ...Connecting with a computer using USB 16 Exchanging files with a computer 16 Disconnecting from a computer 16 Other settings and information 16 System Settings 16 Quick reference for using various fun...

Страница 7: ...does not appear click Other Languages 3 Click the product name in the Search by Model Name section to open the Downloads page for that product 4 Select and download the Owner s Manual and the Referen...

Страница 8: ...q 1 8 button w DUAL indicator This lights when dual recording mode is selected e REC indicator This lights red when recording r Record 0 button t 3 L knob and PEAK indicator y 4 R knob and PEAK indic...

Страница 9: ...3 5mm stereo mini jack PHONES jack 3 5mm stereo mini jack z PHONES volume control Top panel x DSLR camera attachment bracket c DSLR mounting screw 1 4 inch Bottom Panel v Tripod mounting threads 1 4 i...

Страница 10: ...tatus HOLD switch off HOLD switch on q Peak value in decibels dB The maximum level that occurs in a fixed period of time is displayed in decibels Preparation Powering the unit 8 8 Using AA batteries 1...

Страница 11: ...xternal mic input on the camera If you want to input audio from the camera and monitor it with this unit connect the IN jack on the right side of this unit with the audio output jack on the camera DSL...

Страница 12: ...BASIC Make recording settings MONITOR Set monitoring output INPUT Make input settings RECORD Make recording format settings SLATE Make slate tone settings MIC Make mic settings BROWSE Work with files...

Страница 13: ...he MENUscreen BASIC RECORD Recording setting OFF ON PAN Set the left right balance applied to stereo files during 2MIX recording and to monitoring output LEFT 12 CENTER RIGHT 12 GAIN Set the input gai...

Страница 14: ...the DATA dial The INPUTscreen opens 3 Press the 1 8 2 7 3 or 4 button to select a channel to use the limiter on 4 Turn the DATA dial to select the LIMITERfor the selected channel and press the DATA d...

Страница 15: ...the DATA dial The RECORD SETTINGscreen opens 3 Turn the DATA dial to select FILE TYPE and press the DATA dial 4 Turn the DATA dial to select the recording format Options MONO STEREO default 2MIX 5 Pr...

Страница 16: ...when at the beginning or middle of a file to skip to the beginning of the next file Connecting with a Computer You can transfer audio files on the SD card in the unit to a computer as well as transfer...

Страница 17: ...ny files using the browse function might be more convenient Recording Change the file format Home Screen w MENU w REC SETTINGw FORMAT Set the file format BWF WAV etc used for recordings Set the low cu...

Страница 18: ...e amount of remaining space on the card for example Change the automatic power saving function Automatic power saving Home Screen w MENU w OTHERSw SYSTEMw AUTO PWR SAVE This function automatically tur...

Страница 19: ...all the data on the SD card Invalid Card Change Card Something might be wrong with the SD card Change the SD card Invalid SysFile Make Sys File The system file required to operate this unit is invalid...

Страница 20: ...nnected to a computer by a USB cable Does USB connected appear on the display 8 8 The SD card is not recognized Confirm that the SD card is inserted completely 8 8 Playback is not possible If you are...

Страница 21: ...kHz 0 5 2 dB LINE IN or MIC IN to LINE OUT Fs 44 1 48 kHz JEITA 20 Hz 20 kHz 0 5 3 dB LINE IN or MIC IN to LINE OUT Fs 96kHz JEITA 8 8 Distortion 0 02 or less LINE IN or MIC IN to LINE OUT Fs 44 1 48...

Страница 22: ...selected phantom power not used Recording 2ch 44 1kHz 16 bit WAV files About 11 00 00 When 3 4 MIC input selected Using NiMH batteries eneloop Format Operation time in hours minutes seconds Note Reco...

Страница 23: ...e fiche polaris e a deux broches l une plus large que l autre Une fiche de terre a deux broches identiques et une troisi me broche pour la mise la terre La broche plus large ou la troisi me broche ser...

Страница 24: ...aller l envers peut entra ner la rupture ou la fuite des piles source d incendie de blessure ou de d g t autour d elles Quand vous rangez ou jetez des piles isolez leurs bornes avec de l adh sif isola...

Страница 25: ...l quipement Mise au rebut des piles et ou accumulateurs a Les piles et ou accumulateurs hors d usage doivent tre trait s s par ment de la collecte municipale d ordures m nag res dans des points de col...

Страница 26: ...8 Face avant 28 Face arri re 28 Face lat rale gauche 28 Face lat rale droite 29 Face sup rieure 29 Face inf rieure 29 cran d accueil 29 Pr paration 30 Alimentation de l unit 30 Mise sous tension de l...

Страница 27: ...web pour cette langue NOTE Si la langue d sir e n appara t pas cliquez sur Other Languages autres langues 3 Cliquez sur le nom du produit dans la section Produits et ouvrez la page Liens et t l charg...

Страница 28: ...ume quand le mode double enregistrement est s lectionn e Voyant REC S allume en rouge durant l enregistrement r Touche d enregistrement 0 t Bouton 3 L et voyant PEAK y Bouton 4 R et voyant PEAK u Touc...

Страница 29: ...z Commande de volume PHONES Face sup rieure x Fixation pour appareil photo reflex num rique c Vis de montage sur appareil photo reflex num rique 1 4 de pouce ou 6 35 mm Face inf rieure v Filetage de...

Страница 30: ...atut du commutateur HOLD commutateur HOLD non enclench commutateur HOLD enclench q Valeur cr te en d cibels dB Le niveau maximal atteint au cours d une p riode de temps fixe est affich en d cibels Pr...

Страница 31: ...appareil photo Si vous voulez recevoir l audio venant de l appareil photo et le contr ler au travers cette unit branchez la prise d entr e IN sur le c t droit de cette unit la prise de sortie audio de...

Страница 32: ...ONITOR R glages de sortie d coute INPUT R glages d entr e RECORD R glages de format d enregistrement SLATE R glages de tonalit test MIC R glages de micro BROWSE Op rations sur les fichiers et dossiers...

Страница 33: ...Diff rents r glages peuvent tre faits au moyen de la rubrique BASICde l cran MENU BASIC RECORD R glage d enregistrement OFF ON PAN R glage de la balance gauche droite LEFT RIGHT appliqu e aux fichier...

Страница 34: ...4 pour s lectionner un canal sur lequel utiliser le limiteur 4 Tournez la molette DATA pour activer le limiteur LIMITER sur le canal s lectionn et pressez la molette DATA cran d entr e du canal 1 CH1...

Страница 35: ...ent appara t 3 Tournez la molette DATA pour s lectionner FILETYPE type de fichier et pressez la molette DATA 4 Tournez la molette DATA pour s lectionner le format d enregistrement Options MONO STEREO...

Страница 36: ...mporte o dans un fichier pour sauter au d but du fichier suivant Branchement un ordinateur Vous pouvez transf rer des fichiers audio de la carte SD de l unit vers un ordinateur ainsi qu en sens invers...

Страница 37: ...s commode Enregis trement Changer le format de fichier cran d accueil w MENU w RECSETTINGw FORMAT D termine le format de fichier BWF WAV etc utilis pour les enregistrements R gler le filtre coupe bas...

Страница 38: ...l unit et la quantit d espace encore libre sur la carte Changer le r glage de la fonction d conomie automatique d nergie conomie automatique d nergie cran d accueil w MENU w OTHERSw SYSTEMw AUTO PWR S...

Страница 39: ...Card Il y a quelque chose d anormal concernant la carte SD Changez de carte SD Message Signification et r ponse Invalid SysFile Make Sys File Le fichier syst me requis pour faire fonctionner cette uni...

Страница 40: ...as en position HOLD L unit est elle connect e un ordinateur par un c ble USB USB connected appara t il l cran 8 8 La carte SD n est pas reconnue V rifiez que la carte SD est compl tement ins r e 8 8 L...

Страница 41: ...nts TRS Performances audio 8 8 R ponse en fr quence 20 Hz 20 kHz 0 5 2 dB entr e ligne ou entr e micro vers sortie ligne F 44 1 48 kHz JEITA 20 Hz 20 kHz 0 5 3 dB entr e ligne ou entr e micro vers sor...

Страница 42: ...EVOLTA Format Autonomie en heures minutes secondes Note Enregistrement de fichiers WAV 2 canaux en 44 1kHz 16 bits Environ 6 00 00 Quand l entr e XLR jack est s lectionn e sans alimen tation fant me E...

Страница 43: ...TEAC CORPORATION podr n anular la autorizaci n del usuario a usarlo Para EE UU Declaraci n de Conformidad Responsable TEAC AMERICA INC Direcci n 1834 Gage Road Montebello California U S A Tel fono 1...

Страница 44: ...ras de ning n tipo No ponga objetos que contengan l quidos como jarrones sobre este aparato No instale este aparato encastrado en una librer a o mueble similar El aparato debe estar colocado lo sufici...

Страница 45: ...el cubo de basura tachado indica la obligaci n de separar los aparatos el ctricos y electr nicos del resto de basura org nica a la hora de eliminarlos e Los llamados puntos limpios de recogida y retir...

Страница 46: ...partes 48 Panel frontal 48 Panel trasero 48 Panel izquierdo 48 Panel derecho 49 Panel superior 49 Panel inferior 49 Pantalla inicial 49 Preparativos 50 Alimentaci n de la unidad 50 Encendido de la un...

Страница 47: ...escargas en dicho idioma NOTA Si no aparece el idioma que busca haga clic en Other Languages otros idiomas 3 Haga clic en el nombre del producto en la secci n Search by Model Name buscar por nombre de...

Страница 48: ...2 7 q Bot n 1 8 w Indicador DUAL Se ilumina cuando est seleccionado el modo de grabaci n dual e Indicador REC Se ilumina en rojo durante la grabaci n r Bot n de grabaci n 0 t Mando 3 L e indicador PE...

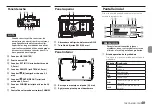
Страница 49: ...tor PHONES minijack est reo de 3 5 mm z Control de volumen de auriculares PHONES Panel superior x Abrazadera de fijaci n de la c mara DSLR c Tornillo de fijaci n DSLR 6 3 mm Panel inferior v Rosca par...

Страница 50: ...ras minutos segundos del fichero activo 0 Estado del interruptor HOLD interruptor HOLD desactivado interruptor HOLD activado q Valor de pico en decibelios dB Nivel m ximo que se produce en un periodo...

Страница 51: ...iere dar entrada a la se al audio proce dente de la c mara y monitorizarla con esta unidad conecte el terminal IN del panel derecho de esta unidad a la salida de audio de la c mara C mara DSLR Salida...

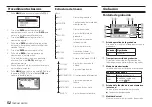
Страница 52: ...ida de monitorizaci n INPUT Ajustes de entrada RECORD Ajustes del formato de grabaci n SLATE Ajustes de los tonos de referencia slate MIC Ajustes de los micros BROWSE Gesti n de ficheros y carpetas de...

Страница 53: ...Ajuste de grabaci n OFF desactivada ON activada PAN Ajuste del balance izquierda derecha se aplica a los ficheros est reo durante la grabaci n en modo 2 MIX y a la salida de monitorizaci n LEFT izquie...

Страница 54: ...ot n 1 8 2 7 3 o 4 para seleccionar el canal en el que desee utilizar el limitador 4 Gire el dial DATA para elegir LIMITERpara el canal seleccionado y pulse el dial DATA Pantalla INPUT CH1 canal 1 5 G...

Страница 55: ...e el dial DATA para elegir FILE TYPEy pulse el dial DATA 4 Gire el dial DATA para elegir el formato de grabaci n Opciones MONO STEREO predeterminada 2MIX 5 Pulse el dial DATA para habilitar la selecci...

Страница 56: ...al principio o en medio de un fichero la posici n saltar al principio del fichero siguiente Conexi n con un ordenador Puede transferir ficheros de audio de la tarjeta SD de esta unidad a un ordenador...

Страница 57: ...le resultar m s til usar la funci n de b squeda o BROWSE Grabaci n Cambio del formato de fichero Pantalla inicial w MENU w REC SETTINGw FORMAT Establece el formato de fichero BWF WAV etc utilizado par...

Страница 58: ...mplo Cambio del ajuste de la funci n de ahorro de energ a autom tico Ahorro de energ a autom tico Pantalla inicial w MENU w OTHERSw SYSTEMw AUTO PWR SAVE Esta funci n hace que la unidad se apague auto...

Страница 59: ...rd Algo parece estar mal en la tarjeta SD C mbiela por otra Mensaje Significado y respuesta Invalid SysFile Make Sys File El fichero de sistema necesario para que la unidad funcione es inv lido Cuando...

Страница 60: ...aparece USB connected en la pantalla 8 8 La tarjeta SD no es reconocida Compruebe que la tarjeta SD est totalmente introducida 8 8 No se puede reproducir Si est tratando de reproducir un fichero WAV...

Страница 61: ...Hz 20 kHz 0 5 2 dB LINE IN o MIC IN a LINE OUT frec de muestreo 44 1 48 kHz JEITA 20 Hz 20 kHz 0 5 3 dB LINE IN o MIC IN a LINE OUT frec de muestreo 96 kHz JEITA 8 8 Distorsi n 0 02 o menos LINE IN o...

Страница 62: ...Hz 16 bits Unas 11 00 00 horas Con entrada 3 4 MIC selec cionada Usando pilas de tipo NiMH eneloop Formato Tiempo de funcionamiento horas minutos segundos Notas Grabaci n 2 canales ficheros WAV 44 1 k...

Страница 63: ...am Netzkabelausgang des Ger ts und verlegen Sie es so dass man nicht dar ber stolpern kann Ziehen Sie den Netzstecker bei Gewitter oder wenn Sie das Ger t l ngere Zeit nicht benutzen Zum Schutz vor S...

Страница 64: ...en Sollte eine Batterie ausgelaufen sein reinigen Sie das Batteriefach bzw die Halterung von R ckst nden bevor Sie neue Batterien einlegen Wenn Batteries ure ins Auge gelangt kann dies zum Verlust des...

Страница 65: ...Dieses Ger t verbraucht auch dann eine geringe Menge Strom wenn es mit dem Stromnetz verbunden und ausgeschaltet ist Pb Hg Cd Informationen zur elektromagnetischen Vertr glichkeit Dieses Ger t wurde...

Страница 66: ...beginnen 67 Auspacken Lieferumfang 67 Hinweis zum Referenzhandbuch 67 Erg nzende Sicherheitshinweise zur Aufstellung 67 Kondensation vermeiden 67 Den Recorder reinigen 67 Die globale TEAC Website nut...

Страница 67: ...n ausgesetzt sind Orte mit direkter Sonneneinstrahlung z B Fenster in der N he von Heizger ten oder an anderen Orten an denen hohe Temperaturen herrschen Orte mit Temperaturen unter dem Gefrierpunkt O...

Страница 68: ...ehen des Rads w hlen Sie auf den Men seiten Einstellungen aus und ndern Parameter 7 MENU Taste 8 Regler PEAK L mpchen f r Eingang 1 L 9 Regler PEAK L mpchen f r Eingang 2 R 0 2 7 Taste q 1 8 Taste w D...

Страница 69: ...Lineeingang 3 L XLR TRS Rechte Ger teseite f Mikrofon Lineeingang 4 R XLR TRS g Micro USB Anschluss h Zus tzlicher Eingang EXT IN 1 2 Stereoklinkenbuchse 3 5 mm j Fernbedienungsanschluss REMOTE Mikro...

Страница 70: ...Balken mehr enth lt und blinkt sind die Batterien nahezu entleert und das Ger t wird sich in K rze ausschalten Wenn Sie den separat erh ltlichen Wechsel strom adapter PS P515U oder eine USB Ver bindun...

Страница 71: ...Eine SD Karte einlegen 1 ffnen Sie die Batteriefachabdeckung auf der Ger tevorderseite 2 F hren Sie die Karte wie in der Abbildung gezeigt in den Kartenschacht ein bis sie mit einem Klicken einrastet...

Страница 72: ...d hervorgehoben 4 Dr cken Sie auf das Rad um den Wert der Einstellung zu markieren 5 ndern Sie den Wert mit dem Rad 6 Dr cken Sie auf das Rad um die nderung zu bernehmen 7 Um weitere Einstellungen vor...

Страница 73: ...ts f r die Aufnah medateien angezeigt 9 Verbleibende Aufnahmezeit Die verbleibende Aufnahmezeit auf der SD Karte wird im Format Stunden Minuten Sekunden dargestellt Sie ist abh ngig vom gew hlten Aufn...

Страница 74: ...niedrig Vorein stellung HIGH hoch HI PLUS sehr hoch 6 Wiederholen Sie die Schritte 3 bis 5 f r alle weiteren Kan le 7 Wenn Sie fertig sind dr cken Sie die MENU Taste um zur Hauptseite zur ckzukehren 8...

Страница 75: ...ahme Es werden Stereodateien erstellt Beispiele Wenn nur Kanal 1 f r die Aufnahme ausgew hlt ist wird eine Stereodatei erstellt auf der Kanal 2 stumm ist Wenn nur die Kan le 1 und 3 f r die Aufnahme a...

Страница 76: ...dr cken Sie die 1 8 Taste w hrend die Hauptseite angezeigt wird 8 8 Die Wiedergabe stoppen Um die Wiedergabe an der aktuellen Position zu stoppen dr cken Sie zun chst die 1 8 Taste w hrend die Haupts...

Страница 77: ...s Symbol des Wechseldatentr gers DR 70D um die Ordner MUSIC und UTILITY anzuzeigen Um Dateien auf den Computer zu bertragen ffnen Sie den MUSIC Ordner und ziehen Sie die zu bertragenden Dateien auf da...

Страница 78: ...e Dateien vorhanden sind ist die Browse Funktion m glicherweise besser geeignet Aufnahme Das Aufnahmedateiformat ndern Hauptseite w MENU w RECORDw FORMAT Das Dateiformat der Aufnahme w hlen BWF WAV us...

Страница 79: ...verbleibenden Speicherplatz auf der Karte zu berpr fen Die automatische Stromsparfunktion konfigurieren Stromsparfunktion Hauptseite w MENU w OTHERSw SYSTEMw AUTO PWR SAVE Dieses Funktion schaltet da...

Страница 80: ...n alle auf der Karte enthaltenen Daten gel scht Invalid Card Change Card Es ist ein unbekanntes Problem mit der SD Karte aufgetreten Tauschen Sie die Karte aus Meldung Bedeutung und Abhilfe Invalid Sy...

Страница 81: ...g mit einem Computer besteht Auf dem Display erscheint der Hinweis USB connected 8 8 Die SD Karte wird nicht erkannt Vergewissern Sie sich dass die Karte ordnungsgem eingelegt ist 8 8 Wiedergeben ist...

Страница 82: ...istungsdaten Audio 8 8 Frequenzbereich 20 Hz bis 20 kHz 0 5 2 dB LINE IN oder MIC IN bis LINE OUT Fs 44 1 48 kHz JEITA 20 Hz bis 20 kHz 0 5 3 dB LINE IN oder MIC IN bis LINE OUT Fs 96 kHz JEITA 8 8 Ve...

Страница 83: ...erte technische Daten siehe Referenzhandbuch Systemanforderungen Computer Aktualisierte Hinweise zur Kompatibilit t mit verschiedenen Betriebssystemen finden Sie gegebenenfalls auf unserer Website htt...

Страница 84: ...84 TASCAM DR 70D Benutzerhandbuch...

Страница 85: ...DIGITAL APPARATUS COMPLIES WITH CANADIAN ICES 003 CET APPAREIL NUMERIQUE DE LA CLASSE B EST CONFORME A LA NORME NMB 003 DU CANADA Dichiarazione di conformit Parte responsabile TEAC AMERICA INC Indiriz...

Страница 86: ...poter facilmente afferrare la spina del cavo di alimentazione in qualsiasi momento Se l apparecchio usa batterie inclusi pacchetto di batterie o batterie installate queste non dovrebbero essere espos...

Страница 87: ...era indica che le apparecchiature elettriche ed elettroniche devono essere raccolte e smaltite separatamente dai rifiuti domestici e I sistemi di raccolta sono a disposizione degli utenti finali Per i...

Страница 88: ...sinistro 90 Pannello laterale destro 91 Pannello superiore 91 Pannello inferiore 91 Schermata principale 91 Preparativi 92 Accensione dell unit 92 Accensione dell unit 92 Impostazione dell orologio in...

Страница 89: ...rire la pagina di download per la lingua NOTA Se la lingua desiderata non viene visua lizzata cliccare su Other Languages 3 Cliccare sul nome del prodotto in Search by Model Name per aprire la pagina...

Страница 90: ...te 1 8 w Indicatore DUAL Si illumina quando viene selezionata la modalit di registrazione duale e Indicatore REC Si illumina in rosso durante la registrazione r Pulsante Record 0 t Manopola 3 L e indi...

Страница 91: ...reo 3 5 mm z Controllo volume PHONES Pannello superiore x Staffa di fissaggio della fotocamera DSLR c Vite di montaggio DSLR 1 4 di pollice Pannello inferiore v Filettatura per il montaggio di un trep...

Страница 92: ...to interruttore HOLD attivato q Valore di picco in decibel dB Il livello massimo che si verifica in un deter minato periodo di tempo viene visualizzato in decibel Preparativi Accensione dell unit 8 8...

Страница 93: ...terno della fotocamera Se si desidera mandare l audio dalla fotocamera e monitorarlo con questa unit collegare la presa IN sul lato destro di questa unit con la presa di uscita audio della fotocamera...

Страница 94: ...ta di monito raggio INPUT Effettuare le impostazioni di ingresso RECORD Effettuare impostazioni del formato di registrazione SLATE Effettuare impostazioni per il tono Slate MIC Effettuare le impostazi...

Страница 95: ...essere effettuate utilizzando la voce BASICdella schermata MENU BASIC RECORD Impostazione di registrazione OFF ON PAN Bilanciamento sinistro destro applicato ai file stereo durante la registrazione 2...

Страница 96: ...DATA Si aprir la schermata INPUT 3 Premere il pulsante 1 8 2 7 3 o 4 per selezionare il canale su cui utilizzare il limitatore 4 Ruotare il selettore DATA per selezionare LIMITERper il canale selezion...

Страница 97: ...ORD SETTING 3 Ruotare il selettore DATA per selezionare FILE TYPEe premere il selettore DATA 4 Ruotare il selettore DATA per selezionare il formato di registrazione Opzioni MONO STEREO default 2MIX 5...

Страница 98: ...ndo si all inizio di un file per saltare all inizio del file precedente Premere il pulsante 3 quando si all inizio o a met di un file per saltare all inizio del file successivo Collegamento a un compu...

Страница 99: ...eniente usare la funzione Browse Registra zione Cambiare il formato del file Schermata principale w MENU w REC SETTINGw FORMAT Imposta il formato del file BWF WAV ecc utilizzato per le registrazioni I...

Страница 100: ...ente sulla card per esempio Modificare la funzione di risparmio energetico automatico Risparmio energetico automatico Schermata principale w MENU w OTHERSw SYSTEMw AUTO PWR SAVE Spegne automaticamente...

Страница 101: ...i nella card SD Invalid Card Change Card Qualcosa non va con la card SD Cambiare il card SD Invalid SysFile Make Sys File Il file system richiesto per operare con questa unit non valido Quando appare...

Страница 102: ...ter tramite un cavo USB Appare USB connected sul display 8 8 La card SD non viene riconosciuta Assicurarsi che la card SD sia inserita completamente 8 8 La riproduzione non possibile Se si sta tentand...

Страница 103: ...B LINE IN o MIC IN su LINE OUT Fs 44 1 48 kHz JEITA 20 Hz 20 kHz 0 5 3 dB LINE IN o MIC IN su LINE OUT Fs 96kHz JEITA 8 8 Distorsione 0 02 o meno LINE IN o MIC IN su LINE OUT Fs 44 1 48 96kHz JEITA 8...

Страница 104: ...hantom non utilizzata Registrazione di file WAV 2ch 44 1kHz 16 bit Circa 11 00 00 Con l ingresso 3 4 MIC selezionato Uso di batterie NiMH eneloop Formato Tempo in ore minuti secondi Nota Registrazione...

Страница 105: ...TASCAM DR 70D 105 V P AC AC AC AC AC AC AC 100 100 DC V N AC AC 1 AC Y V P AC AC AC N AC AC AC...

Страница 106: ...106 TASCAM DR 70D V AC AC O AC V 5 1 V V N V V Y V...

Страница 107: ...in TASCAM http tascam jp 105 107 108 108 108 108 108 108 109 109 109 109 109 110 110 110 111 111 111 111 111 SD 112 112 112 113 113 113 113 114 114 114 115 115 116 MONO STEREO 2MIX 116 117 117 117 117...

Страница 108: ...108 TASCAM DR 70D 0 0 x1 0 0USB x1 0 0 x1 0 0 x6 0 0 0 40 0 0 0 0 0 0 0 0 1 0 0 0 0 i i DR 70D i i Serial No i i i i i i 0 0 0 0 0 0 0 0 1 2 TASCAM http tascam jp support registration 0 0...

Страница 109: ...1 2 3 4 SD 5 6 DATA ENTER 7 MENU 8 1 L PEAK 9 2 R PEAK 0 2 7 q 1 8 w DUAL e REC r 0 t 3 L PEAK y 4 R PEAK u 3 i 4 o SLATE p HOLD a 1 L XLR TRS s 2 R XLR TRS d 3 L XLR TRS w f 4 R XLR TRS g Micro USB h...

Страница 110: ...110 TASCAM DR 70D j REMOTE 2 5mm TRS k IN 3 5mm l OUT LINE OUT 3 5mm PHONES 3 5mm z PHONES x c 1 4 v 1 4 b VIDEO PIN 1 8 9 7 m 2 3 MIX CH1 4 CAM IN 4 5 10 e e...

Страница 111: ...TASCAM DR 70D 111 AC TASCAM PS P515U USB 6 7 8 9 0 HOLD q dB 3 1 2 3 3 4 4 0 0 OTHERS BATTERY TYPE ALKAL HOLD TASCAM DR 70D DATE TIME HOLD LINEAR PCM RECORDER...

Страница 112: ...112 TASCAM DR 70D SD 1 2 SD 3 5mm 1 OUT IN 2 MONITOR SETTING OUTPUT LEVEL 3 EXT IN 1 2 PHONES OUT LINE OUT...

Страница 113: ...MENU MENU 2 DATA DATA 3 DATA 4 DATA 5 DATA 6 DATA DATA 7 3 6 8 MENU MENU OTHERS 1 8 MENU BASIC MONITOR INPUT RECORD SLATE MIC BROWSE OTHERS SYSTEM BATTERY INFORMATION FILE NAME DATE TIME REMOTE 1 0 2...

Страница 114: ...HIGH HI PLUS INPUT 1 2 EXT_STEREO EXT_ POWER XLR TRS INPUT 3 4 MIC XLR TRS 1 EXT IN 1 2 1 L 2 R 3 L 4 R 2 MENU MENU 3 DATA BASIC DATA BASIC BASIC Ch1 4 DATA INPUT 1 2 INPUT 3 4 DATA 5 DATA INPUT 1 2 E...

Страница 115: ...4 R 16dB b 1 L 2 R 3 L 4 R PEAK 1 MENU MENU 2 DATA INPUT DATA INPUT 3 1 8 2 7 3 4 4 DATA LIMITER DATA INPUT Ch1 5 DATA OFF MONO LINK 6 3 5 7 MENU 1 MENU MENU 2 DATA INPUT DATA INPUT 3 1 8 2 7 3 4 4 D...

Страница 116: ...3 x2 2 4 2MIX BASIC 4 MONO STEREO 2MIX 1 MENU MENU 2 DATA RECORD DATA RECORD SETTING 3 DATA FILE TYPE DATA 4 DATA MONO STEREO 2MIX 5 DATA 6 MENU 1 MENU MENU 2 DATA BROWSE DATA BROWSE 3 BROWSE DATA 4...

Страница 117: ...E OUT MONITOR SETTING OUTPUT LEVEL PHONES PHONES 2 7 1 8 1 8 1 8 4 3 DATA 4 3 4 1 3 SD USB 1 USB 2 USB SELECT STORAGE DATA USB connected 3 DR 70D DR 70D MUSIC UTILITY MUSIC MUSIC USB SYSTEM SD 1 MENU...

Страница 118: ...ENU BASIC RECORD w MENU w BASIC w RECORD 0 0 1 8 0 w 2 7 PHONES MENU w MONITOR w OUTPUT LEVEL w 4 3 w MENU w RECORD w FORMAT BWF WAV w MENU w INPUT w LOW CUT w MENU w BASIC w GAIN 1 L 2 R 3 L 4 R w ME...

Страница 119: ...BASIC w INPUT 1 2 SELECT w EXT POWER EXT IN 1 2 w MENU w OTHERS w INFORMATION w MENU w OTHERS w SYSTEM w AUTO PWR SAVE w MENU w OTHERS w SYSTEM w BACKLIGHT w MENU w OTHERS w SYSTEM w CONTRAST w MENU...

Страница 120: ...or Format CARD SD SD USB DR 70D SD DATA SD Invalid Card Change Card SD SD Invalid SysFile Make Sys File DATA Layer too Deep 2 MBR Error Init CARD SD SD SD DATA SD No Card SD SD No PB File Non Supporte...

Страница 121: ...Channels Selected 0 0 0 0 0 0 AC TASCAM PS P515U USB 0 0USB USB 0 0USB USB w i i ErP AC OFF 30 0 0HOLD HOLD 0 0USB USB Connected SD 0 0SD 0 0WAV 0 0 0 0 0 0 0 0 0 0 0 0 0 0SD 0 0 0 0 0 0 0 0 PEAK 0 0...

Страница 122: ...B USB2 0 HIGH SPEED REMOTE 2 5mm TRS 20 20kHz 0 5 2dB LINE IN or MIC IN to LINE OUT Fs44 1k 48kHz JEITA 20 40kHz 0 5 3dB LINE IN or MIC IN to LINE OUT Fs96kHz JEITA 0 02 LINE IN or MIC IN to LINE OUT...

Страница 123: ...ndows 8 8 1 Mac Mac OS X 10 2 3 4 USB AC TASCAM PS P515U TASCAM BP 6AA 5 0W 0 0 EVOLTA 2ch WAV 44 1kHz 16bit 6 00 XLR TRS 2ch WAV 44 1kHz 16bit 11 00 3 4MIC 0 0 eneloop 2ch WAV 44 1kHz 16bit 6 15 XLR...

Страница 124: ...ASCAM DR 70D 206 8530 1 47 206 8530 1 47 0570 000 809 10 00 12 00 13 00 17 00 0 0 042 356 9137 FAX 042 356 9185 358 0026 858 0570 000 501 9 30 17 00 0 0 04 2901 1033 FAX 04 2901 1036 TASCAM http tasca...

Страница 125: ...TASCAM DR 70D 125...

Страница 126: ...126 TASCAM DR 70D...

Страница 127: ...face shippingchargestoanydestinationwithintheUnitedStates LIMITATIONOFIMPLIEDWARRANTIES Any implied warranties INCLUDING WARRANTIES OF MERCHANTABILITY AND FITNESS FOR A PARTICULAR PURPOSE are limited...

Страница 128: ...Model Serial No Date of purchase http teac global com Owner s name Address Dealer s name Dealer s address DR 70D Memo WARRANTY...

Отзывы: