Tascam DR-40 Скачать руководство пользователя страница 97

TASCAM DR-40  

97

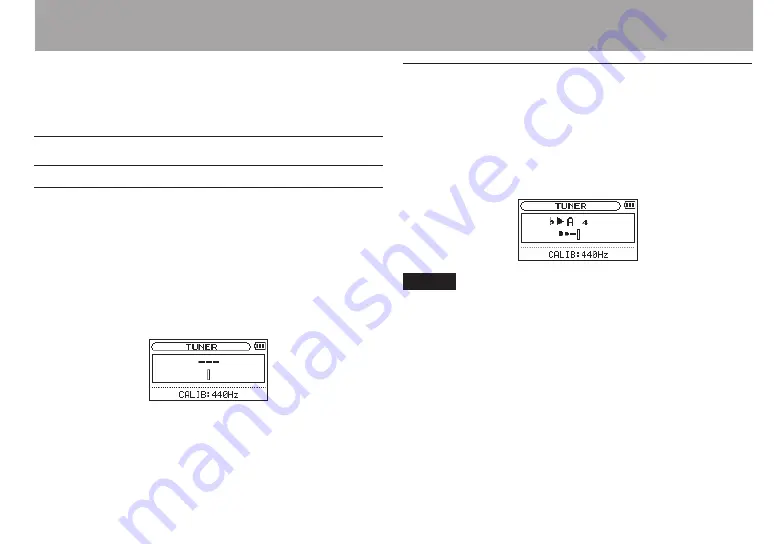
TASCAM DR-40 has a built-in tuner. The unit receives a sound 
from a musical instrument and allows you to tune it accurately 
on the tuning meter shown in the display.

Using the tuner

Setting the tuner

1  Press the MENU button to open the 

MENU

 screen. 

2  Use the + or − button to select 

OTHERS

, and press the 

ENTER/MARK or 

/

 button to open the 

OTHERS


submenu. 

3  Use the + or − button to select 

TUNER

, and press the 

ENTER/MARK or 

/

 button. 

TUNER

 screen appears.

The 

TUNER

 screen contains the 

CALIB

 option to set the 

fundamental frequency of the A. Press the 

.

 or 

/


button to decrease or increase the fundamental frequency.
Setting range: 

435Hz

 - 

445Hz

 (in 1 Hz increments, default: 

440Hz

)

Tuning a musical instrument

1  Open the 

TUNER

 screen, and sound a note near the unit.

2  Tune the instrument so that the target pitch name 

appears and the center of the tuner lights.
A bar appears on the left or right of the center if the sound 
is lower or higher than the target pitch. The bar becomes 
longer as the sound shifts away from the target pitch.

NOTE

The tuner can only be used with the built-in mics. 

10 – Tuning a Musical Instrument (Tuner)

Содержание DR-40

Страница 1: ...DR 40 Linear PCM Recorder D01157920A OWNER S MANUAL This device has a serial number located on the bottom panel Please record it and retain it for your records Serial number __________________...

Страница 2: ...ference in a residential installation This equipment generates uses and can radiate radio frequency energy and if not installed and used in accordance with the instruction manual may cause harmful int...

Страница 3: ...his apparatus during lightning storms or when unused for long periods of time 14 Refer all servicing to qualified service personnel Servicing is required when the apparatus has been damaged in any way...

Страница 4: ...ht If fluid does enter an eye wash it out thoroughly with clean water without rubbing the eye and then consult a doctor immediately If the fluid gets on a person s body or clothing it could cause skin...

Страница 5: ...a result of the presence of hazardous substances in batteries and or accumulators d The crossed out wheeled dust bin symbol indicates that batteries and or accumulators must be collected and disposed...

Страница 6: ...reen 25 Recording Screen 27 Playback Control screen 29 Menu item list 30 Using menus 31 Basic operation 32 3 Preparation 34 Powering the unit 34 Using AA batteries 34 Using an AC adaptor sold separate...

Страница 7: ...y recording two files at different input levels DUAL REC 54 Enabling dual recording 54 Starting dual recording 56 Dual recording file names 56 Recording 4 channels 57 Making 4 channel recording settin...

Страница 8: ...k of Selection Loop Playback 82 Changing the playback speed VSA 83 Using the playback equalizer PLAY EQ 83 Moving back a few seconds for replay jump back playback 84 Playback of files recorded using d...

Страница 9: ...ge 102 Restoring the factory settings 103 Using QUICK FORMAT 103 Using FULL FORMAT 103 Setting the format of file names 104 File name format 104 Setting the WORD item 105 Resetting the number COUNT 10...

Страница 10: ...le size for details on page 45 1 Install batteries in the battery compartment on the back of the unit Fit them to the and marks shown in the compartment 2 Turn on and various setting information will...

Страница 11: ...during recording 6 Press the HOME 8 button to finish recording NOTE To pause recording press the RECORD 0 button Press the RECORD 0 button again to restart recording in the same file 7 Press the PLAY...

Страница 12: ...possible Compatible with BWF format 32 320 kbps MP3 format recording possible compatible with ID3 tag v2 4 Dual recording allows two files to be recorded simultaneously at different levels Overdubbin...

Страница 13: ...f the currently played file to be replayed again by simply pressing a button Delay compensation function that eliminates time lags caused by differences in the distances of two sets of inputs from the...

Страница 14: ...l The following conventions are used in this manual When we refer to a button or connector or control on the DR 40 the typeface looks like this MENU When we show messages for example that appears on t...

Страница 15: ...hnology licensed from Fraunhofer IIS and Thomson Microsoft Windows Windows XP Windows Vista and Windows 7 are either registered trademarks or trademarks of Microsoft Corporation in the United States a...

Страница 16: ...ion be responsible for the consequences of any illegal copying performed using the recorder About SD cards This unit uses SD cards for recording and playback You can use 64 MB 2 GB SD cards and 4 GB 3...

Страница 17: ...ing this unit on top of any heat generating electrical device such as a power amplifier Beware of condensation If the unit is moved from a cold to a warm place or used after a sudden temperature chang...

Страница 18: ...ording in overdubbing mode 5 3 4 SOLO button When in 4 channel recording mode press this to open a display pull up that shows meters with the input level settings for 3 4 Press when the 1 2 input leve...

Страница 19: ...ill be displayed in a pull up window When the Playback Control screen is displayed press this button to increase the playback speed When a setting screen is open use the button to change the setting o...

Страница 20: ...volume is too high t REC MODE button Press this button to open the REC MODEscreen When the REC MODEscreen is open press this button to return to the Home Screen y RECORD 0 button indicator Press this...

Страница 21: ...button to start playback During playback press this button to start jump back playback When a file or folder is selected in the BROWSEscreen press this button to return to the Home Screen and play the...

Страница 22: ...ng a condenser microphone before connecting to and disconnecting from a EXT MIC LINE IN jack confirm that the phantom power for that jack is OFF If you connect or disconnect a mic while phantom power...

Страница 23: ...buttons are inoperative when hold is ON j INPUT LEVEL buttons Use these to adjust the input level During adjustment the input level setting status will be displayed in a pop up window Right side pane...

Страница 24: ...for tripod or tilt foot 1 4 inch Use this to attach a tripod or the included tilt foot to the recorder CAUTION Tighten the unit securely to the tripod or microphone stand to prevent it from falling of...

Страница 25: ...MUSICfolder FOLDER All files in the selected folder PLAYLIST All files added to the playlist 2 Loop repeat playback status Single playback Single file repeat playback All file repeat playback Loop pl...

Страница 26: ...n status 8 Stopped 9 Paused 7 Playing back Fast forwarding m Fast rewinding Skipping forward Skipping backward 8 Level meter The level of the input or playback sounds is shown During OVER DUB MIX this...

Страница 27: ...back or its tag information ID3 tag information is shown when available for an MP3 file being played Two project names are shown when there are two files that have been recorded in 4 channel recordin...

Страница 28: ...ion status 09 Recording standby or Recording paused 0 Recording 8 Input source This icon shows the input source Input source set to built in mics Input source set to EXT MIC LINE IN jacks Input source...

Страница 29: ...Low cut filter status This shows whether the low cut filter is ON OFF The icon appears highlighted when set to 40Hz 80Hzor 120Hz Low cut filter off Low cut filter on e Level control function status Le...

Страница 30: ...ing points and the beginnings and ends of files but not to the previous or next tracks 4 Loop playback IN starting and OUT ending points The set starting and ending points of the loop are shown The ic...

Страница 31: ...CUT and AUTO REC setting MODE and LEVEL on the REC SETTING screen AUTO RECsettings are shown but cannot be changed EFFECT PRESET LEVEL and SOURCE on EFFECT screen The MENU button is disabled in the Pl...

Страница 32: ...operation Use the following buttons to operate the various screens MENU button Opens the MENUscreen PB CONT button This opens the Playback Control screen HOME 8 button When any other screen is open pr...

Страница 33: ...menu is turned on or off in the BROWSEscreen or PLAYLISTscreen Press when the MIXERscreen is open to set the MS decoder REC MODE button Opens the REC MODEscreen When the REC MODEscreen is open returns...

Страница 34: ...ies on page 102 NOTE Manganese dry cell batteries R6 cannot be used with this unit This unit cannot recharge Ni MH batteries Use a commercially available recharger The included alkaline batteries are...

Страница 35: ...ficient distance between the AC adaptor and the unit When both batteries are installed and the AC adaptor is connected power will be supplied from the AC adaptor Using USB bus power Connect the unit t...

Страница 36: ...amage to headphones or your ears Starting up the unit To start up the unit from the stopped state press and hold the HOME 8 button until TASCAM DR 40 start up screen is displayed on the display The Ho...

Страница 37: ...has resume function When started up the unit is located to the position time where it left off when shut down previously If the Playback button is pressed after start up the file the unit was playing...

Страница 38: ...104 CAUTION The date and time setting can only be maintained for a few minutes if the unit is not powered from batteries or through the AC adaptor TASCAM PS P515U or the USB cable When using batteries...

Страница 39: ...C standards can be used with this unit A list of SD cards that have been confirmed to work with this unit can be found on our website http tascam com Card write protection SD cards have protect switch...

Страница 40: ...ENTER MARK button to start formatting 4 When formatting ends the Home Screen opens You can also reformat the card in this unit at any time See System Settings and Formatting on page 101 Using the bui...

Страница 41: ...ound according to the recording source situation etc by opening or closing the microphone pair Setting the mics to record a wide stereo sound A B position Spread the stereo microphone to the left and...

Страница 42: ...t to swap the left right channels of the microphone See Microphone position detection on page 43 NOTE Set the left right channels of the built in microphone to R L When you are using the built in micr...

Страница 43: ...up message appears automatically whenever the left microphone is opened or closed and the left right channels does not suit the angle of the microphone If only the right microphone is opened or close...

Страница 44: ...will cause the built in mic orientation to be low You can attach the included tilt foot to the tripod threads in order to keep the mic orientation from being too low Attach it as shown below When not...

Страница 45: ...fferent levels You can also use external mics with the built in mics for 4 channel recording Selecting file format sampling frequency and maximum file size Select the audio file type that you want to...

Страница 46: ...he or button to one of the following options 64M 128M 256M 512M 1G 2G default NOTE If the maximum set file size is exceeded during recording the unit will automatically continue recording in a new fil...

Страница 47: ...to the output of an external audio device Other audio equipment or external sound source CAUTION Reduce the output level of the external audio device if the input sound is distorted even when reducing...

Страница 48: ...turned on and sent to the connected mics CAUTION Confirm that phantom power is OFF before connecting a line level device to a EXT MIC LINE IN jack If you connect a line level device while phantom pow...

Страница 49: ...sound source The angle and distance of the microphone can also change the character of the recorded sound Manually adjusting the input level The following procedures explain how to use the Record Scr...

Страница 50: ...input Use the or button in the Home Screen to adjust the monitoring volume This does not affect the sound to be recorded Using the Level Control Function The level control function for recording thro...

Страница 51: ...ode after automatically setting the input level in the peak reduction mode AUTO LEVEL The input level is controlled automatically to increase or decrease the input level when the input signals are too...

Страница 52: ...This recording mode add new sounds to the playback file There are two types of OVERDUB mode MIX and SEPARATE The MIX OVERDUB mode mixes the playback sound and input sound to create a new file The SEP...

Страница 53: ...rn to the Home Screen Set where to save the file Set the folder where recorded files are saved The created sound file will be saved in the currently selected folder For details see SELECTpopup menu un...

Страница 54: ...he WORDitem on the FILE NAMEscreen 2 Recording file base number Simultaneously recording two files at different input levels DUAL REC This recorder can simultaneously record a second recording at a di...

Страница 55: ...ing range 6dB default value to 12dB 10Press the button to return to setting item selection 11Use the and buttons to select LVL CTRL and press the ENTER MARK or button 12Use the and buttons to set inpu...

Страница 56: ...ing file names Dual recording allows two files to be recorded simultaneously The name of the second file created by dual recording has DXX added to the file name of the ordinary recording DXX shows th...

Страница 57: ...selection 7 Use the and buttons to select DELAY and press the ENTER MARK or button 8 Use the and buttons to set the value according to the distance between the built in mics and external mics Options...

Страница 58: ...or the external mics or equipment channels 3 4 are created as a set TASCAM_0002S12 WAV TASCAM_0002S34 WAV 1 Set with the WORDitem on the FILE NAMEscreen 2 Recording file base number 3 S is the source...

Страница 59: ...to select REC MODE and press the ENTER MARK or button 3 Use the and buttons to set it to OVERDUB 4 Press the button to return to setting item selection 5 Use the and buttons to select DUB MODE and pr...

Страница 60: ...m selection 11When setting is complete press the HOME 8 button to return to the Home Screen Select the file you want to overdub Use the and buttons and the BROWSEscreen to select that files that you w...

Страница 61: ...e playback signal File B TASCAM_0004S34 WAV If you record again using the same playback file File A the name of File B above is changed to the file name below File C and the new recording file is give...

Страница 62: ...r of the recording file and S12 are added to the file name of the playback file If writing files copied from elsewhere is not possible enable writing using a computer for example Recording automatical...

Страница 63: ...on LEVEL the unit goes into in recording standby When the input signal level becomes higher than the standard level the unit restarts recording on a new file MARK If the input signal level falls below...

Страница 64: ...increment by file size Without pausing recording a new file can be created automatically during recording when a file size set in advance is exceeded 1 Press the MENU button to open the MENUScreen 2...

Страница 65: ...c When using the built in mics the sound of pressing the button when adding a mark could be recorded To avoid this use a remote control to add marks Adding marks automatically to a recording This func...

Страница 66: ...are recording with a microphone If you use speakers to monitor the sound output from the speakers may also be recorded causing a poor recording and even feedback NOTE LOWCUTcan be set when recording...

Страница 67: ...press the PB CONT button 2 The self timer icon appears in the recorder status screen and time is shown on the right Each time you press the PB CONT button the setting changes as follows OFF default q...

Страница 68: ...z 48 kHz 37 16 72 32 149 04 298 08 96 kbps 44 1 kHz 48 kHz 24 50 49 40 99 20 198 40 128 kbps 44 1 kHz 48 kHz 18 38 37 16 74 32 149 04 192 kbps 44 1 kHz 48 kHz 12 25 24 50 49 40 99 20 256 kbps 44 1 kHz...

Страница 69: ...on the display Screen navigation On the BROWSEScreen folders and music files appear in a hierarchical structure much like they would appear on a computer On the DR 40 folders can only be used to two l...

Страница 70: ...hows folders that do not contain subfolders Open folder The contents of the folder marked with this icon currently appear on this screen File operations Select the desired audio file on the BROWSEScre...

Страница 71: ...n be swapped Example TASCAM_0004S34 WAV q TASCAM_0004V34t1 WAV TASCAM_0004V34t1 WAV q TASCAM_0004S34 WAV The above is the same as swapping File B and File C as described on page 61 In addition since y...

Страница 72: ...e Home Screen and selects the first file in the folder Regardless of the previous setting the playback area is set to FOLDER and this folder becomes the new playback area When recording files are crea...

Страница 73: ...R MARK button to create a new folder or press the HOME 8 button to cancel Note that the unit supports only a two level folder structure and accordingly NEWFOLDERdoes not exist in the second level fold...

Страница 74: ...ea setting you can select any file on the card that you want Adjusting playback volume The volume of output through the built in speaker or the LINE OUT connector can be adjusted using the or button w...

Страница 75: ...for the playback area 1 Regardless of the current playback area if you select a folder on the BROWSEScreen the playback area changes to the selected folder 1 Press the MENU button to open the MENUscr...

Страница 76: ...n the MENUscreen 2 Use the or button to select BROWSE and press the ENTER MARK or button BROWSEscreen appears A file list of the folder that contains the file selected in the Home Screen is displayed...

Страница 77: ...he QUICK button NOTE For details about how to select the file see Screen navigation on page 69 A pop up window appears 4 Use the or button to select ADDLIST 5 Press the ENTER MARK button The file is a...

Страница 78: ...Press the ENTER MARK button to remove all the files or the HOME 8 button to cancel this operation For this operation it does not matter which file you select in step 5 All the files are removed from...

Страница 79: ...eginning of or middle of a file the playback position will skip to the beginning of the next file NOTE Only files in the playback area that is currently set can be selected for playback The track name...

Страница 80: ...utton to rewind or fast forward and search the playback file NOTE Press and hold the or button to accelerate the search speed Repeat playback REPEAT You can repeatedly playback one file or multiple fi...

Страница 81: ...ile repeatedly or change the tempo of music without changing the pitch You can also enhance the perceived overall sound pressure for comfortable listening when the playback is indiscernible These play...

Страница 82: ...the section between the IN and OUT points starts During loop playback the indicator also appears Press the PB CONT button to return to the Home Screen while maintaining the I O and loop settings effe...

Страница 83: ...button Press the or button after opening the Playback Control screen to increase or decrease the playback speed The VSA function can change the playback speed in the range from 0 5 50 to 1 5 150 times...

Страница 84: ...jump back time is set as a JUMPBACKsetting 1 Press the MENU button to open the MENUscreen 2 Use the or button to select PLAY SETTING and press the ENTER MARK or button PLAY SETTINGscreen appears 3 Use...

Страница 85: ...verdubbing you can use this to listen to the recorded file MIX MODE Press the 1 2 SOLO button to mute the input sound Solo function Press and hold the 1 2 SOLO button or 3 4 SOLO button to enable the...

Страница 86: ...elected file or folder appears if the BROWSEscreen or the PLAYLISTscreen is open NOTE The QUICK button is disabled if the MENUscreen OTHERS submenu RECSETTINGscreen or a settings screen is open for va...

Страница 87: ...ased to enhance listenability See Increasing the perceived overall sound pressure to enhance listenability Level Alignment on page 90 MIX DOWN This function combines four channels with a file each for...

Страница 88: ...ntrol Function on page 50 NOTE The input level cannot be changed if the level control function is set to AUTO LEVEL Closing the Quick menu screen Press the QUICK button to close the Quick menu screen...

Страница 89: ...HOME 8 button to return to the DIVIDEscreen without dividing the file NOTE When the DIVIDEscreen is open you can press the PLAY 7 button and set the divide position while playing the file When the DIV...

Страница 90: ...rall sound pressure to enhance listenability Level Alignment If the playback sound is very small and indiscernible the perceived overall sound pressure can be increased to enhance listenability Level...

Страница 91: ...2 From the Home Screen when stopped press the QUICK button to open the Quick Menu screen 3 Use the and buttons to select MIXDOWN and press the ENTER MARK button to open the MIXDOWNscreen 4 Press the...

Страница 92: ...ere are four setting items on the EFFECTscreen Set each item using the or buttons or or buttons EFFECT Use this to turn the effect on or off The default setting is OFF PRESET See the Effects Preset Li...

Страница 93: ...utton to return to the Home Screen NOTE When the sampling frequency is set to 96 kHz or a WAV file with a sampling frequency of 96 kHz is played the built in effects do not work However you can still...

Страница 94: ...channel file playback MS decoding of channels 3 4 2 Use the and buttons and the and buttons to move to and select the item that you want to adjust Each column is a channel and each row is a setting ty...

Страница 95: ...record 1 Connect MS mics to the external input connectors Connect the mid mic to the EXT MIC L connector and the side mic to the EXT MIC R connector Decoding cannot be conducted properly if the mid an...

Страница 96: ...ng range Operation details WIDE 0 100 Adjusts the width of the sound At 0 mid is 100 As the number increases the amount of side signal increases NOTE If MS DECODEis set to ONon the REC MODEscreen it c...

Страница 97: ...he TUNERscreen contains the CALIBoption to set the fundamental frequency of the A Press the or button to decrease or increase the fundamental frequency Setting range 435Hz 445Hz in 1 Hz increments def...

Страница 98: ...uter you can also conduct the same operations by removing the SD card from the DR 40 and connecting it directly to a computer that has a built in SD card slot or by using a card reader When the unit i...

Страница 99: ...the unit to the MUSIC folder TIP You can manage the MUSIC folder from the computer You can create subfolders in the MUSIC folder up to the second level for use with this unit The DR 40 cannot recogniz...

Страница 100: ...e currently loaded file Card information page CARD Shows the use status of the currently inserted SD card System information page SYSTEM Shows the unit s system setting information and firmware versio...

Страница 101: ...REMAIN SIZEand USEDSIZE System information page The SYSTEMpage shows information about the DR 40 s system settings and firmware version AUTO OFF Shows the automatic power OFF setting BACKLIGHT Shows...

Страница 102: ...HTto set the time until the backlight automatically turns OFF after the last operation when powered by the internal battery Options OFF turned off 5sec factory setting 10sec 15 sec 30sec ALWAYS always...

Страница 103: ...or button to select QUICKFORMAT and press the ENTER MARK or button to highlight Exec 2 Press the ENTER MARK button to open a pop up confirmation window 3 Press the ENTER MARK button to execute the qui...

Страница 104: ...on to open the MENUscreen 2 Use the or button to select OTHERS and press the ENTER MARK or button to open the OTHERS submenu 3 Use the or button to select FILENAME and press the ENTER MARK or button F...

Страница 105: ...select the character In addition to the alphabet and numbers the following characters can be used _ Resetting the number COUNT Select COUNT INIT and press the ENTER MARK button to execute it The next...

Страница 106: ...ENUscreen 2 Use the or button to select OTHERS and press the ENTER MARK or button to open the OTHERS submenu 3 Use the or button to select highlight REMOTEmenu item and press the ENTER MARK or button...

Страница 107: ...PLAY STOP SPEED CHANGE Remote control TASCAM RC 10 Wired remote control TASCAM RC 10 sold separately Setting the wired remote control Make wired remote control settings on the REMOTEscreen 1 Press the...

Страница 108: ...s the HOME button to return to the Home Screen Using the wired remote control Press the function buttons F1 and F2 on the wired remote control to use the function assigned on the REMOTEscreen Overview...

Страница 109: ...use Battery Empty The battery is almost out of power Replace the AA batteries I O Too Short The IN and OUT points are too close together Reset the IN and OUT points with at least 1 second between the...

Страница 110: ...File Size The file is larger than the designated size or the recording time exceeded 24 hours File Full The total number of folders and files exceeds 5000 Erase unnecessary files or move them to your...

Страница 111: ...restart it If the power cannot be turned off remove the batteries disconnect the AC adaptor TASCAM PS P515U and or disconnect the USB cable for bus power supply If the error message continues to appe...

Страница 112: ...not set in the direction of the arrow Is the unit connected to a PC with the USB cable Is USB connectedshown on the display The SD card is not recognized 8 8 Confirm that the SD card is inserted comp...

Страница 113: ...onfirm that the playback speed is not being adjusted Confirm the setting of the playback equalizer Confirm that the level alignment function is not enabled Do the built in effects work I cannot erase...

Страница 114: ...ted Connector XLR 3 31 1 GND 2 HOT 3 COLD 6 3 mm 1 4 TRS Standard jack Tip HOT Ring COLD Sleeve GND When EXT IN switch set to MIC MIC PHANTOM Input impedance 2 2 k Nominal input level 19 dBV Maximum i...

Страница 115: ...JEITA Total harmonic distortion 0 05 or lower EXT IN to LINE OUT Fs 44 1 48 96 kHz JEITA S N ratio 92 dB or higher EXT IN to LINE OUT Fs 44 1 48 96kHz JEITA Note JEITA Conforming to JEITA CP 2150 Com...

Страница 116: ...6 kHz 24 bit About 16 hours Headphones Format Continuous operation time Note Playback 2 ch WAV 44 1 kHz 16 bit About 21 5 hours Headphones Playback 2 ch MP3 44 1 kHz 128 kbps About 17 5 hours Headphon...

Страница 117: ...ch WAV 44 1 kHz 16 bit About 15 hours Headphones Playback 4ch MP3 44 1 kHz 128 kbps About 15 hours Headphones Dimensions W x H x D 70 x 155 x 35 mm 2 756 x 6 102 x 1 378 inches when the microphone pai...

Страница 118: ...ension of the microphone opened Illustrations and other depictions may differ in part from the actual product Specifications and external appearance may be changed without notification to improve the...

Страница 119: ...TASCAM DR 40 119 Notes...

Страница 120: ...C MEXICO S A de C V Phone 52 55 5010 6000 http www teacmexico net R o Churubusco 364 Colonia Del Carmen Delegaci n Coyoac n CP 04100 M xico DF M xico TEAC UK LIMITED Phone 44 8451 302511 http www tasc...

Отзывы: