background image

TASCAM  DR-22WL

 11

3 – Preparation

Turning the power on and off (standby 

mode)

CAUTION

• 

When you turn the power switch off while supplying power 

from the dedicated AC adapter (TASCAM PS-P515U; sold 

separately) or the USB bus power connected to a computer, 

the unit will go to a standby mode.

• 

Before turning the power switch on and off, turn the volume 

down for the sound system connected to the unit.

• 

Do not wear headphones when turning the power switch 

on and off (standby mode); the noise may cause damage to 

your ears and/or headphones.

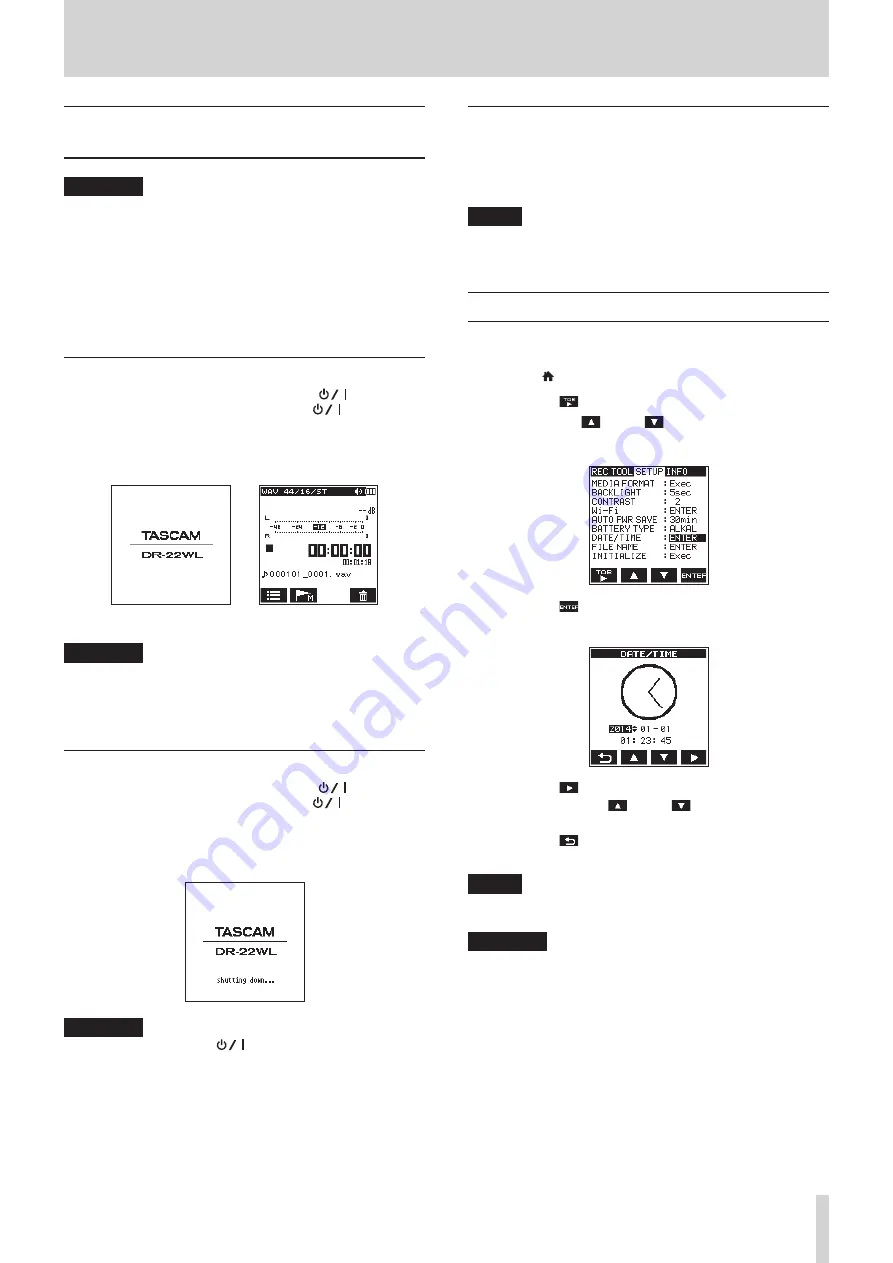
Starting up the unit

In power off mode, slide and hold the HOLD/ 

 switch 

(located at left-side of the panel) toward the 

 direction, and 

release the switch when the 

TASCAM


DR-22WL

 (start-up 

screen) appears.
The DR-22WL starts up and the home screen is displayed.


Start-up screen                    Home screen

CAUTION

When turn the power on for the first time (or when the 
built-in clock is reset due to no battery power), the 

DATE/

TIME

 screen will appear before the home screen to set 

date/time. (See “Setting the date/time” on page 11.)

Shutting down (standby mode)

In power on mode, slide and hold the HOLD/ 

 switch 

(located at left-side of the panel) toward the 

 direction, 

and release the switch when the 

TASCAM


DR-22WL


shutting


down

 appears.

The power turns off when the shut-down process is completed.

CAUTION

Always use the 

HOLD/ 

 switch to turn the power off.

In power on mode, all recorded data and settings will be 

lost if you remove the batteries, disconnect the power 

cable of the dedicated AC adapter (TASCAM PS-P515U; sold 

separately), or plug-off the USB cable for USB bus power. 

Any lost data and/or settings cannot be restored.

Resume function

The DR-22WL is equipped with a resume function to locate the 

previous position (or time) when the power was turned off.
Turn the power on and press the PLAY button to playback from 

the previous file position (time) when the power was turned off.

NOTE

The position is recorded in the microSD card. The resume 

function does not work if the microSD card is replaced or 

formatted.

Setting the date/time

The DR-22WL uses its internal clock to record the date and time 

to the recorded files.
1.  Press the  /MENU/

8

 button to display the menu screen.

2.  Press the F1 

 button to display the 

SETUP

 page.

3.  Use both the F2 

 and F3 

 buttons to select (highlight) 

the 

DATE/TIME

 item parameters.

4.  Press the F4 

 button to display the 

DATE/TIME


screen.

5.  Press the F4 

 button to move the cursor (highlighted 

area), and use the F2 

 and F3 

 buttons to change 

settings.

6.  Press the F1 

 button to finalize the settings. The screen 

will return to the 

SETUP

 page.

NOTE

The file name will include the set date/time. (See “Setting 

the file name type” on page 40.)

CAUTION

Without the use of the batteries, the dedicated AC adapter 

(TASCAM PS-P515U; sold separately) or USB bus power, the 

date and time setting can be made only for a few minutes.
When using batteries, we recommend to replace them 

before they are completely drained.

Содержание DR-22WL

Страница 1: ...D01244520C DR 22WL Linear PCM Recorder REFERENCE MANUAL...

Страница 2: ...on 18 Switching files during recording track increment 19 Manual track increment during recording 19 Automatic track increment at specified time 19 Automatic recording AUTO REC 19 Start recording from...

Страница 3: ...unit to a computer by Wi Fi after the first time 36 Transferring files from the unit to a computer 36 Changing password 37 10 Settings and Information 38 View information INFORMATION 38 File informat...

Страница 4: ...SB 2 0 port Operates on 2 AA batteries AC adapter sold separately TASCAM PS P515U or USB bus power Tripod attachment screw hole built into unit USB cable included This product has a Blackfin 16 32 bit...

Страница 5: ...the F2 button to move to the previous mark See Moving to the cue mark position on page 23 9 Built in mono speaker Use this built in speaker to listen to recordings No sound will play when o o In recor...

Страница 6: ...be supplied by using this USB cable or from an AC adapter sold separately PS P515U CAUTION Connect the DR 22WL directly be connected directly with the computer not through a USB hub a microSD card slo...

Страница 7: ...the file currently in play is displayed The ID3 tag information is displayed instead when included in the MP3 file NOTE ID3 tag information contains titles and artist names which can be stored in MP3...

Страница 8: ...splays the Automatic recording function on off status See Automatic recording AUTO REC on page 19 Blank Automatic recording off Automatic recording function on NOTE is displayed when the scene mode is...

Страница 9: ...age 39 Wi Fi page 37 AUTO PWR SAVE page 39 BATTERY TYPE page 39 DATE TIME page 11 FILE NAME page 40 INITIALIZE page 39 INFO View various types of information FILE INFO page 38 CARD INFO VERSION Using...

Страница 10: ...ter CAUTION Use only the dedicated AC adapter TASCAM PS P515U sold separately The use of another adapter may cause malfunction fire or electric shock Noise may occur during microphone recording when t...

Страница 11: ...wer on mode all recorded data and settings will be lost if you remove the batteries disconnect the power cable of the dedicated AC adapter TASCAM PS P515U sold separately or plug off the USB cable for...

Страница 12: ...tted first by the DR 22WL 1 Confirm that a microSD card is inserted and turn the power on 2 The following message appears when a new card or a card formatted by another device is inserted into the uni...

Страница 13: ...side of the unit to adjust the volume of output through the built in speaker and LINE OUT connector When doing this a volume position pop up appears at the bottom of the display When increasing the vo...

Страница 14: ...minimum vibration CAUTION When not using a mic that requires plug in power do not enable it by selecting the F3 button Doing so could damage connected equipment See the mic operation manual for detail...

Страница 15: ...ording starts the RECORD indicator lights and displays the elapsed recording time and the remaining recording time To pause press the RECORD button while recording Press the RECORD button again to res...

Страница 16: ...s On the other hand the MP3 format can record for longer hours With MP3 format recording with higher values offers better quality Cue marks in WAV file that supports BWF Broadcast Wave Format can be u...

Страница 17: ...m excessively large input volume reduce the input level when the PEAK indicator lights in red NOTE Press the MENU 8 button to cancel the recording standby mode In a recording standby or recording mode...

Страница 18: ...sh and displays the recording screen 2 Press the F4 button to display the input setting screen 3 Press the F1 button to display the INPUT page of the input setting screen 4 Use the F2 and F3 buttons t...

Страница 19: ...the F3 buttons to select the automatic track increment time Options OFF default value 5min 10min 15min 30min 60min 6 Press the F4 button to finalize the selected time CAUTION The maximum total number...

Страница 20: ...OFF default value ON 5 Press the F4 button to finalize the setting and return to the item selection mode 6 Press the MENU 8 button to return to the home screen TIPS By combining PRE REC with the AUTO...

Страница 21: ...and overdub the sounds 8 8 AIRDUB This mode records group singing or musical performance with the accompaniment music playback similar to karaoke Since only the playback sound is output from the outpu...

Страница 22: ...k or automatically set the cue mark level or time to minimize the operation noise NOTE The unit will not move to the cue mark position in recording or recording standby mode Manual cue marking during...

Страница 23: ...de 7 Use the F2 and F3 buttons to select highlight the LVL TIME in the AUTO MARK item and press the F4 button This shows the LVL TIME item parameters 8 Use the F2 and F3 buttons to set a time to autom...

Страница 24: ...48kHz 69 hour 26 minutes 277 hour 555 hour 2222 hour 64 kbps 44 1kHz 48kHz 34 hour 43 minutes 138 hour 277 hour 1111 hour 96 kbps 44 1kHz 48kHz 23 hour 08 minutes 92 hour 35 minutes 185 hour 740 hour...

Страница 25: ...Y button to return to the home screen and playback the selected file The folder that contains the above file becomes the current folder currently selected folder and the recorded files will be saved i...

Страница 26: ...ELETE A pop up message appears to confirm deletion of all files in the selected folder To delete the file press the F3 button To cancel delete press the F2 button NOTE Read only files and unrecognized...

Страница 27: ...op pause playback mode set the scene dial to in home screen The PRACTICE screen will appear with a practice mode Loop playback playback speed change and key change can be made in this mode Press the F...

Страница 28: ...PRACTICE screen press the F3 button to select highlight the SPEED item and press the F4 button to enable the playback speed change option 2 Use the F2 and the F3 buttons to change the playback speed v...

Страница 29: ...is divided names will be created ending with either a or b Example File name before division 140826_0001 wav File name after division 140826_0001a wav before the dividing point 140826_0001b wav after...

Страница 30: ...ing parameter and press the F4 button 6 Use the F2 and F3 buttons to set the desired option value 7 Press the F4 button to finalize the setting and return to the item setting item status 8 Repeat the...

Страница 31: ...the F2 and F3 buttons to set the desired option value 7 Press the F4 button to finalize the setting and return to the item setting item status 8 Repeat the 5 7 steps as necessary 9 Press the PLAY butt...

Страница 32: ...e microSD card is inserted properly to the DR 22WL NOTE When you make a USB connection while the batteries are inserted to the unit the USB port will supply power USB bus power prioritized If USB conn...

Страница 33: ...nternet 2 Search the exclusive application TASCAM DR CONTROL and download from either Google Play Android smart phone or App Store iOS device for installation Connecting the DR 22WL to a smart phone v...

Страница 34: ...description on operating the Android device are for reference only Please refer to your smart phone s operation manual for more details Connecting the DR 22WL to a smart phone via Wi Fi from second ti...

Страница 35: ...etailed descriptions on the TASCAM DR CONTROL application including the TASCAM DR CONTROL reference manual can be downloaded from the TEAC Global Site http teac global com File transfer from the DR 22...

Страница 36: ...and the computer have been connected once they can be connected again just by selecting the SS ID 1 Press the Wi Fi button of the unit to make the Wi Fi indicator blink A NEW CONNECTION pop up messag...

Страница 37: ...o display the menu screen 2 Press the F1 button to display the SETUP page 3 Use the F2 and F3 buttons to select highlight the Wi Fi item parameters 4 Press the F4 button to display the Wi Fi screen 5...

Страница 38: ...displays the currently loaded audio file 8 8 FORMAT Displays the file type CBR VBR will be displayed for MP3 files CBR Constant Bit Rate VBR Variable Bit Rate 8 8 SAMPLE Displays the file s sampling r...

Страница 39: ...pe This setting is used to display the remaining battery power and to calculate the minimum capacity for normal operation Options ALKAL alkaline batteries default value Ni MH nickel metal hydride batt...

Страница 40: ...ATE or WORD options Options DATE default value dates will be included in file name Example 140101_0000 wav WORD the six characters set in WORD will be included in file name Example TASCAM_0000 wav NOT...

Страница 41: ...B connection formatted the card or when an unformatted card is inserted to the unit Cards must be formatted with the DR 22WL Insert a different card or press the F4 button to start formatting Formatti...

Страница 42: ...Is the monitoring system volume at minimum level Is the OUTPUT LEVEL setting of the unit at minimum level 8 8 The DR 22WL is not recording Check the connection again Check the input settings again Is...

Страница 43: ...ED mass storage class Audio performance 8 8 Frequency response 20 20 kHz 1 3 dB EXT IN to LINE OUT Fs44 1 kHz JEITA 20 22kHz 1 3 dB EXT IN to LINE OUT Fs48kHz JEITA 20 40kHz 1 3 dB EXT IN to LINE OUT...

Страница 44: ...ing JEITA recording time Playback JEITA music playback time Using NiMH batteries eneloop Format Operationtime Note Recorded in WAV 96kHz 24bit About 9 hours Input from the built in microphone Recorded...

Страница 45: ...TASCAM DR 22WL 45...

Страница 46: ...o Churubusco 364 Colonia Del Carmen Delegaci n Coyoac n CP 04100 M xico DF M xico TEAC UK Ltd http tascam eu Phone 44 8451 302511 2 Huxley Road Surrey Research Park Guildford GU2 7RE United Kingdom T...

Отзывы: