background image

You do not need to worry about IP addressing with 

this product. It will by default use DHCP, so your 

DHCP server will allocate its IP address. If there is 

no DHCP Server, it will use “zero config”. In either 

case, it is fully automatic. For more information 

on this topic, please refer to your network 

administrator.

10  PodWare Setup

The PodWare application uses a direct connection 

via Ethernet to communicate with the connected 

devices via the Ethernet Interface. 

Using PodWare V6 or later, it should automatically 

add a Network Bar in the System View.

You can have multiple Ethernet interfaces 

connected to PodWare. The Interfaces will be 

transparent to PodWare and the devices will 

appear under the appropriate Network Bar in the 

System View.

For further information, please refer to Help in 

PodWare. 

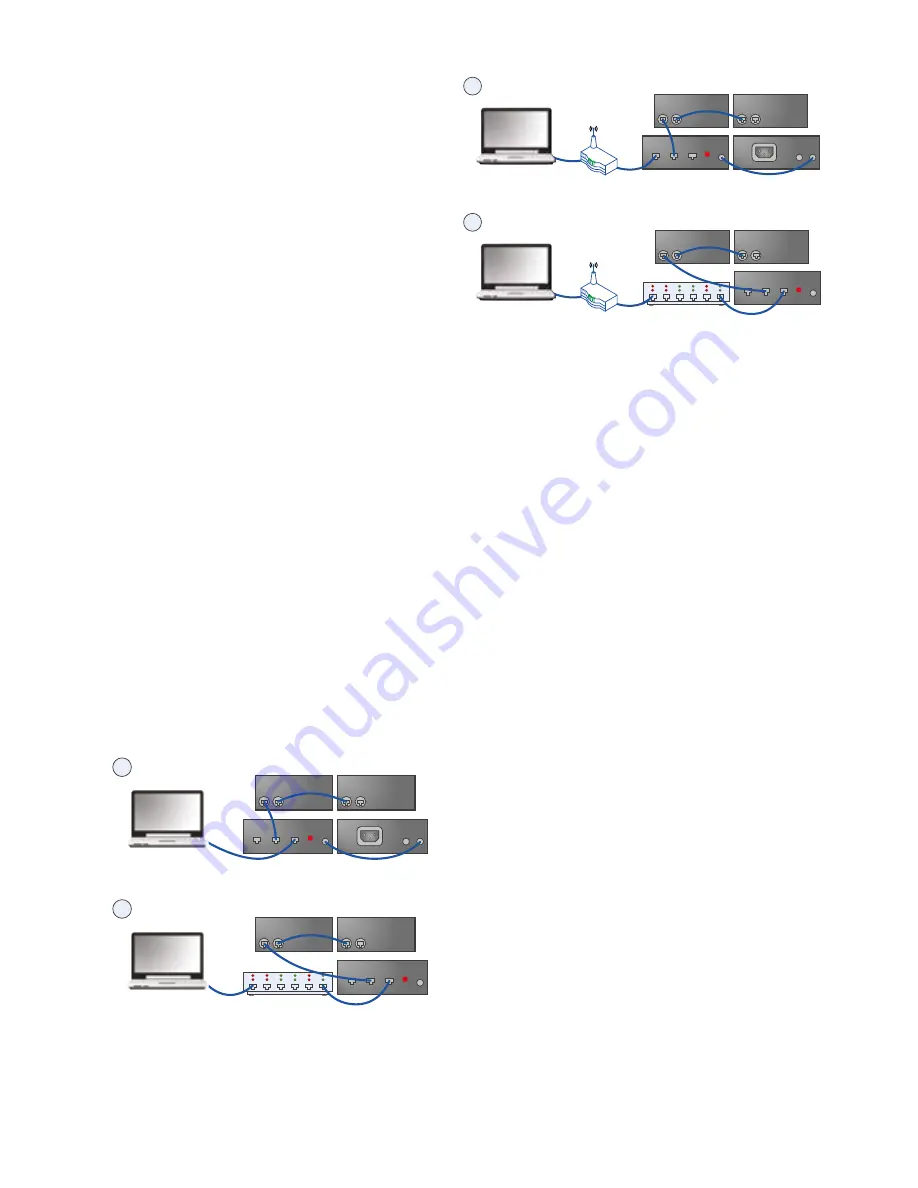
11  Connecting Devices

For VNET devices, connect the VNET Link socket 

on the Ethernet Interface to the VNET In socket of 

the first device you wish to control, then the VNET 

Link socket of this device to the VNET In socket of 

the next device, and so on. The order in which the 

devices are connected is not important. The Link 

socket of the last device in the ‘chain’ need not be 

connected.

1

Computer

Devices

VNET

In Link

VNET

VNET

In Link

In Link

Ethernet

In

IP Reset

EXT

A

B

Ethernet

Ethernet

Interface

Power

supply

2

Computer

Devices

VNET

In Link

VNET

In Link

PoE Ethernet

Interface

Power

supply

VNET

In Link

Ethernet

In

IP Reset

EXT

Ethernet

7  Installation

Because the Ethernet interface uses Ethernet, no 

installation of drivers is necessary.

However, you will need to check the network 

settings on your PC, and install the PodWare 

application in order to control and monitor VNET 

devices.

8  External Power Supply 

This product may be powered from a Power Over 

Ethernet (PoE) Ethernet switch. If such a switch is 

not available, provision is made to power the unit 

from an external VNET interface power supply. 

This can power either one or two compatible 

accessories. Either the A or the B output on 

the Power supply may be used since these are 

identical.

9  Connecting a Computer

You can connect your computer to the Ethernet 

interface in one of two ways:

1. By direct connection from the Ethernet socket of  

  your computer to the Ethernet interface

2. By connecting your computer to an Ethernet  

  Switch, and from the same switch, or from  

  another switch on the same network, to the 

  Ethernet interface.

1

Computer

Devices

VNET

In Link

VNET

VNET

In Link

In Link

Ethernet

In

IP Reset

EXT

A

B

Ethernet

Ethernet

Interface

Power

supply

2

Computer

Devices

VNET

In Link

VNET

In Link

Ethernet

PoE Ethernet

Interface

Power

supply

VNET

In Link

Ethernet

In

IP Reset

EXT

Содержание Vnet

Страница 1: ...Operation Manual VNETtoEthernetInterface ETHERNET INTERFACE POWER VNET ETHERNET EXT PoE DATA LINK DATA ...

Страница 2: ...g this product for your application Please spare a little time to study the contents of this operation manual so that you obtain the best possible performance from this unit 2 ImportantSafetyInstructions Please read carefully and keep the following instructions and safety information Heed all warnings and follow all instructions Do not remove covers There are no user servicable parts inside please...

Страница 3: ...ET In Link In Link Ethernet In IP Reset EXT A B Ethernet Ethernet Interface Power supply 2 Computer Devices VNET In Link VNET In Link PoE Ethernet Interface Power supply VNET In Link Ethernet In IP Reset EXT Ethernet 7 Installation Because the Ethernet interface uses Ethernet no installation of drivers is necessary However you will need to check the network settings on your PC and install the PodW...

Страница 4: ...y removing the two nuts Keep these and the screws and washers 2 Remove the two screws from one side of the Accessory 3 Using the two screws removed in 2 attach one mounting bracket loosely to the side of the Accessory with the ear towards the front pointing outwards 4 Repeat 2 and 3 for the other side Now push the lid towards the back of the unit as far as it will go then align the bracket ears wi...

Страница 5: ...econds in Static IP mode The Ethernet DATA indicator will illuminate when the unit is receiving control data over Ethernet The Ethernet RJ45 socket is the Ethernet connection which should be connected from your computer or Ethernet Switch or Router The VNET In RJ45 socket is the serial VNET network connection which may be used to connect further VNET devices The VNET Link RJ45 socket is the primar...

Страница 6: ...NetworkProperties To access the below panel right click on the Ethernet Interface Network you wish to access and click properties EtherBridge Network Properties Ethernet VNET Interface Device Information Host Name IP Address MAC Address Boot Version Firmware Version Ethernet Mode VNET Rx VNET Tx Online Network Name Use Autolp Use Static IP Static Address EtherBridge455B Device Configuration EtherB...

Страница 7: ...om www tannoypro com For project specific system design assistance contact the AET group via www aetgroup tc Tannoy operates a policy of continuous research and development The introduction of new materials or manufacturing methods will always equal or exceed the published specifications All specifications are subject to change without notice VNET is a trademark of Tannoy Limited All other tradema...

Страница 8: ...development The introduction of new materials or manufacturing methods will always equal or exceed the published specifications All specifications are subject to change without notice Copyright c 2015 Music Group Innovation SC Ltd All rights reserved 6481 0658 231115 ...

Отзывы: