background image

3

Using TANITA Wireless Remote Display (D-1000plus and D-1100plus)

1.Initial Setting (Clock Setting)

Insert batteries into the remote display and then press 

any front panel button to set the clock.

1) Set Hour

Press 

s

/

buttons to set hour and then press SET.

The unit will beep once to confirm.

2)  Set Minute

Press 

s

/

buttons to set minute and then press 

SET. 

The unit will beep twice to confirm the programming.

• 

Resetting Clock

Press the clock button on the bottom of the remote display. 

Then follow the clock setting procedure 1) and 2).

2.Pairing the remote display and the BF-2000 (”platform”)

The platform needs to pair with the applicable remote display before measurements are attempted.

Pairing compatible remote displays:  D-1000plus and D-1100plus

1) Before proceeding,

a) Install the batteries in the platform.

b) Install the batteries and set the clock in the remote display.

c) The platform and the remote display are within 17 feet (5 m) of each other.

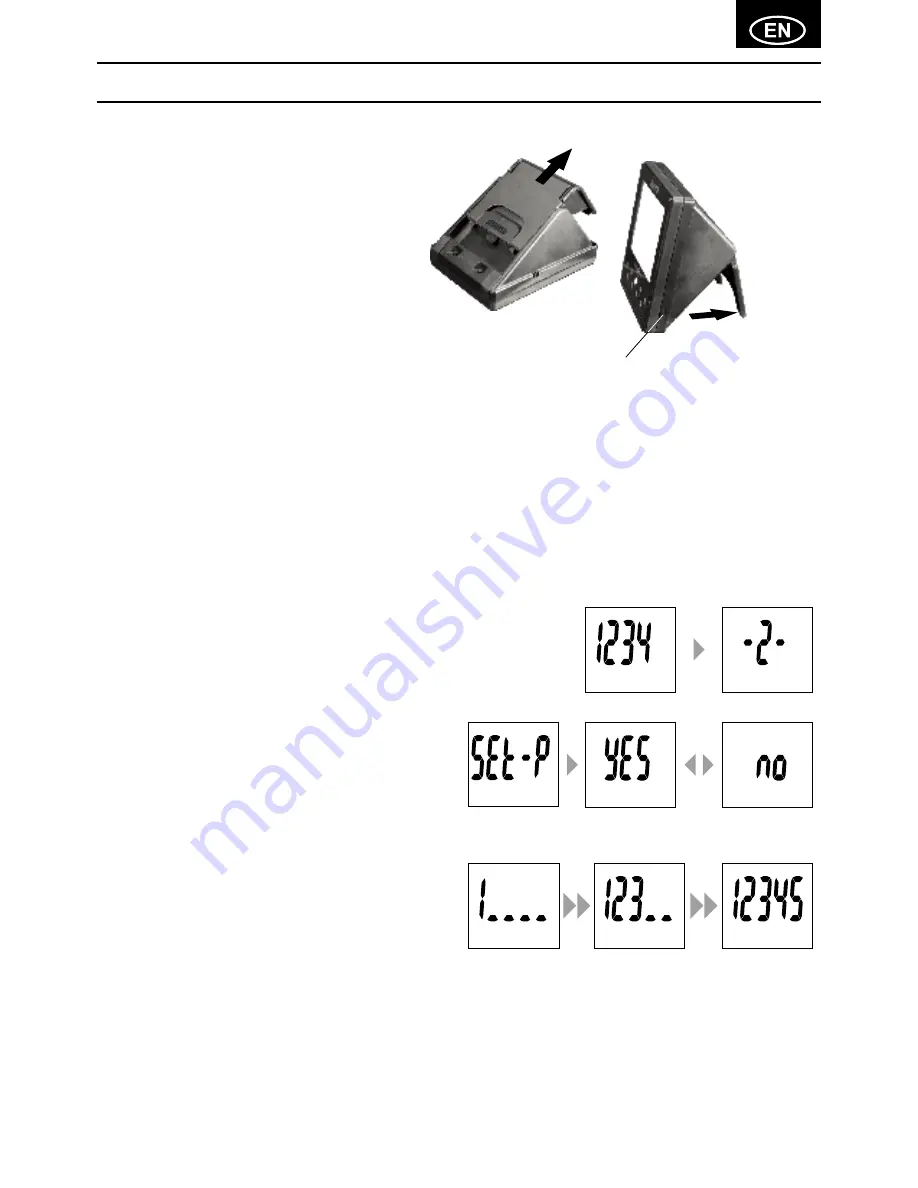
2) Press and hold OFF button for 2 seconds on the 

remote display. The remote display will show 
"1234" for selecting a personal number. Select the 
preferred personal number which will be paired 
with the platform using 

s

/

t


buttons and press 

the SET button to confirm.

3) The remote display will show "SEt-P". Select "YES" 

or "no" using 

s

/

t

 buttons, and press the SET 

button to confirm,

a) "YES": The pairing process will continue to the next step.
b)  "no": The pairing process will be cancelled and then the 

clock will be displayed.

4) Input the 5 digit serial number found on the bottom 

of the platform using 

s

/

t

 buttons and press the 

SET button to confirm.

Cancellation-1:  Press the OFF button to cancel during the pairing process and then the clock will be displayed.
Cancellation-2:  The pairing process will be cancelled if inactive for 1 minute and then the clock will be displayed.

Note :

 • 

“ 00000 ”, “ 000001 ” and more than “ 65535 ”. 

  These serial numbers are not allowed. Please input the correct serial number.
•  The serial number is located on the bottom of the platform.

Continued on the next page. 

t

Backlight Button

Upright Position

Battery Cover

Содержание BF-2000

Страница 1: ...struction Manual Read this Instruction Manual carefully and keep it for future reference Manual de instrucciones Lea detenidamente este manual de instrucciones y guárdelo para futura referencia Radio Wireless Body Fat Monitor ...

Страница 2: ...gs 2 Using TANITA Wireless Remote Display D 1000plus and D 1100plus 3 Troubleshooting 6 Table des matières Introducción 7 Prestaciones y funciones 7 Preparaciones antes del uso 8 Cómo obtener lecturas exactas 8 Utilizando el Display TANITA Remoto Inalambrico D 1000plus y D 1100 plus 9 Resolución de fallos 13 ...

Страница 3: ...e weight function only All other functions are not intended for pregnant women Do not place this monitor on slippery surfaces such as a wet floor Important Notes for Users This Body fat monitor is intended for children ages 5 17 with inactive to moderately active lifestyles The body fat monitor function is not intended for pregnant women professional athletes or bodybuilders Note Body fat percenta...

Страница 4: ... soaps Do not step on the platform when wet Do not drop any objects onto the platform Do not use this scale while operating transmitters such as a cell phone as this may affect your results If not in use for a prolonged period of time it is recommended that you remove the batteries Getting accurate readings To ensure accuracy readings should be taken without clothing and under consistent condition...

Страница 5: ...5 m of each other 2 Press and hold OFF button for 2 seconds on the remote display The remote display will show 1234 for selecting a personal number Select the preferred personal number which will be paired with the platform using s tbuttons and press the SET button to confirm 3 The remote display will show SEt P Select YES or no using s t buttons and press the SET button to confirm a YES The pairi...

Страница 6: ...e clock 4 Taking body composition readings 1 Before proceeding make sure that the platform and remote display are within 17 feet 5 m of each other 2 Press t User button to turn the unit on and then press s t buttons to select personal data number Do not stand on the platform 3 Press the SET button to confirm your personal number 4 When the remote display and platform are paired the platform will b...

Страница 7: ...y 6 Programming The Guest Mode Applicable Age 5 17 Guest mode allows you to program the unit for a one time use without resetting a personal data number Press s button to activate the unit Then follow the steps Set Age Select Female or Male and Specify Height 7 Taking Weight Measurement Only Press the Weight only key Step onto the platform while the Green Indicator Light is blinking After the meas...

Страница 8: ... Body Fat Percentage is more than 75 readings cannot be obtained from the unit Reading cannot be obtained if the weight capacity is exceeded Weight capacity is 330lb 150kg Blinking Red Indicator Light Batteries are low When the Red Indicator Light is blinking replace the batteries immediately since weak batteries will affect the accuracy of your measurements Change all the batteries at the same ti...

Страница 9: ...da para mujeres embarazadas No coloque este monitor sobre superficies resbaladizas como por ejemplo un suelo mojado Tanita no acepta ninguna responsabilidad por ningún tipo de daño material o pérdida causados por este monitor ni por ningún tipo de reclamación presentada por terceros Notas importantes para los usuarios Este analizador de grasa corporal está diseñado para el uso por parte de adultos...

Страница 10: ...te utilizar jabones Evite la humedad al subirse a la plataforma Evite que caiga cualquier objeto sobre el aparato No use esta báscula usando los aparatos de transmisión como un teléfono celular puedan afectar en el resultado de la medición Se recomienda quitarle las baterías si no va a usarse por un largo período de tiempo Cómo obtener lecturas exactas Para asegurar la precisión las lecturas se de...

Страница 11: ...s de realizar cualquier medición Sincronizanizando el Display Remoto D 1000 plus y D 1100plus 1 Preparación a Instalar las baterias en la plataforma b Instalar las baterias en el display configurar el reloj c Colocar la plataforma dentro de un perimetro de 17 pies 5m alrededor del Display Remoto 2 Presione y mantenga presionado el boton OFF del display remoto por 2 segundos El display remoto muest...

Страница 12: ...mparejamiento Presione y sostenga el boton SET por 2 segundos en el display remoto EL display remote muestra 1 Seleccione el número personal usando los botones s t y presione SET para confirmar EL display muestra el número de serie emparejado por 3 segundos se muestra si no hay ningún número de serie guardado para elegir numero personal 3 Configuración y de los datos peronsale en el display remoto...

Страница 13: ...completado bájese con cuidado de la báscula 8 En cualquier momento durante o tras el proceso de visualización automática el usuario puede utilizar los botones s t para desplazar a los distintos resultados Para un desplazamiento avanzado mantiene presionado el botón s t Tras leer las lecturas deseadas suelte el botón para ver el resultado Las lecturas aparecerán durante 30 segundos antes de que la ...

Страница 14: ...la pantalla de resultados actual 6 Programación del modo invitado Aplica para edades 5 17 años El modo invitado le permite programar la unidad para usar una sola vez sin tener que restablecer el número de información personal Pulse el botón s para activar la unidad A continuación siga estos pasos Especifique la edad el sexo y la altura 7 Utilizar solamente la función de peso Pulse la tecla Weight ...

Страница 15: ...nectado el receptor Consulte con el vendedor o con un técnico con experiencia en radio o televisión para que le proporcione ayuda Resolución de fallos No se pare en la plataforma antes de que emita un sonido y el indicador de luz verde este intermitente No se baje hasta escuchar un doble sonido o que la luz verde permanezca fija deje de estar intermitente la medición se toma y las lecturas se mues...

Страница 16: ...K Ltd Unit 301 303 3 F Wing On Plaza 62 Mody Road Tsimshatsui East Kowloon Hong Kong Tel 852 2834 3917 Fax 852 2838 8667 www tanita asia Manufacturer TANITA Corporation 1 14 2 Maeno Cho Itabashi ku Tokyo Japan 174 8630 Tel 81 3 3968 7048 Fax 81 3 3968 2661 www tanita co jp ISO 9001 Certified 2013 TANITA Corporation BF2000 7801 1 1307MA U S Patent No 6 473 641 U S Patent No 6 477 409 U S Patent No ...

Отзывы: