background image

10

 Creating Work Group Tables

Using the above Item and User Tables, it is now possible to create Work Group Tables 
according to the operation process.

 .1

In the main window of 

RTR-600 Settings Utility

, select [Work Group Table] from the [File] 

menu. 

 .1

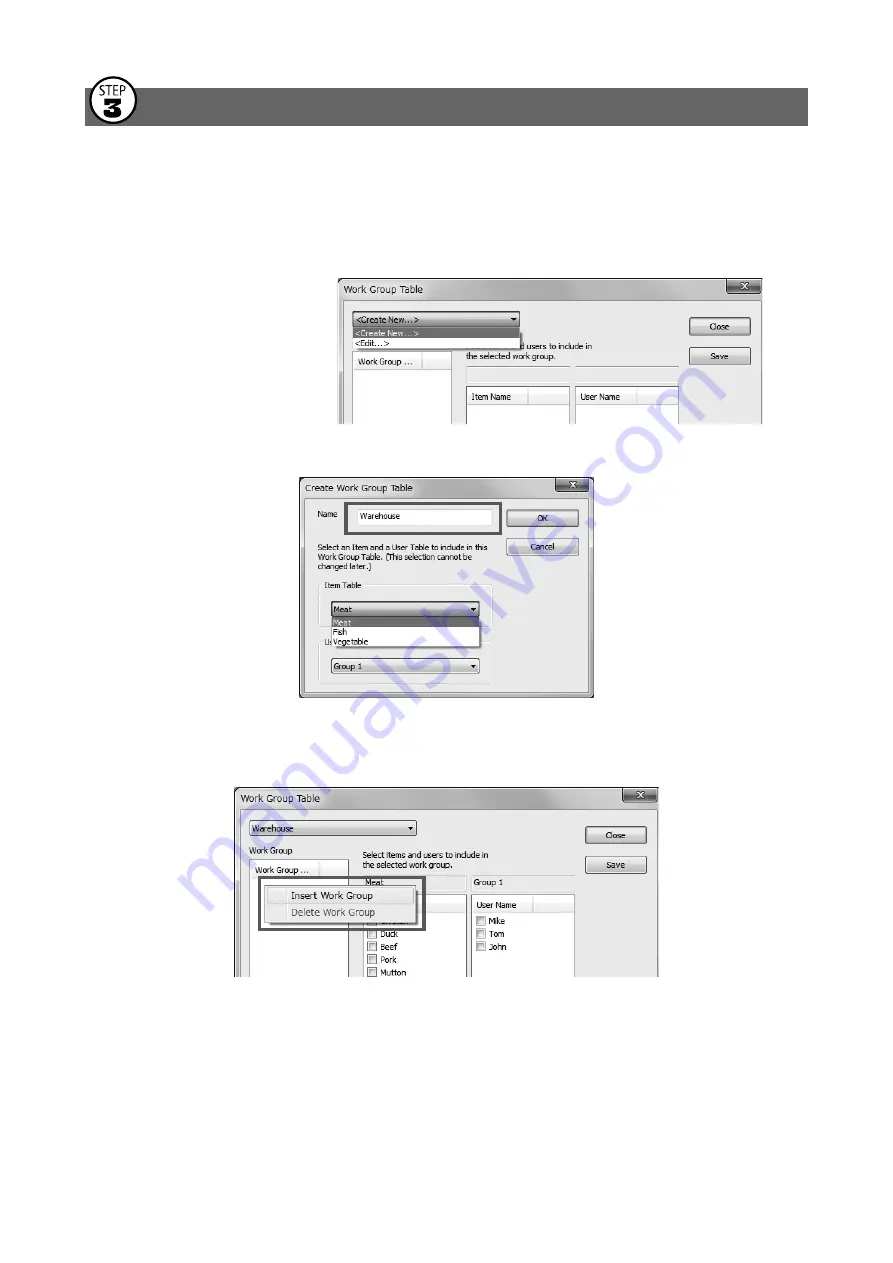
Select <Create New...> from the drop-down list at the top of the Work Group Table window.

The <Edit...> option allows 

you to rename or delete a 

Work Group Table.

 .1

In the displayed window, enter a desired name for the Work Group Table and select the 

Item Table and User Table to be used. Click [OK].

 .1

Select the name of the Work Group Table you just created.

 .1

Right click in the left side box and select [Insert Work Group].  

Set the work group name.

Содержание RTR-600 Series

Страница 1: ...alling the Device 5 Registering a Base Unit to T D WebStorage Service 7 Remote Unit Settings Using RTR 600 Settings Utility 8 Making Clock and Operational Settings 8 Preparing Item and User Tables for Work Groups 9 Creating Work Group Tables 10 Sending Settings to the Remote Unit 11 Data Management and Operation 12 Check Data sent to T D WebStorage Service 12 Manage Data on PC 13 RTR500BW Specific...

Страница 2: ...RTR500BC RTR 500 when used as a Repeater Current Readings The most recent measurements recorded by a Remote Unit Recorded Data Measurements stored in the Remote Unit Current Readings are not available on the RTR 600 Series Getting Ready Installing the Software Download the following software from T D s website and install to your computer Do not connect the Base Unit to your computer until the sof...

Страница 3: ...e settings window does not appear automati cally The USB driver installation may not have been installed correctly Please see Help for Unit Recognition Failure and check the USB driver 4Enter the following information in the Base Unit Settings window Base Unit Name Assign a unique name for each Base Unit Connection Password Enter a password here for connecting to the Base Unit via LAN The factory ...

Страница 4: ...ies does not support this function If you use the RTR500BW with RTR 600 Series only change the Sending Current Readings setting to OFF By default the settings for Auto Transmission of Recorded Data are as follows Transmission Method HTTP Connection Destination T D WebStorage Service It is possible to change the destination of recorded data to any FTP server For the setting items in the FTP Setting...

Страница 5: ...ring via USB Otherwise wireless communication may not be possible due to noise 1Connect the Base Unit to the wired or wireless LAN If the target Base Unit is connected to a PC disconnect the USB cable 2Connect to the power supply using the supplied AC adaptor BLINKING ON ON OFF in about 30 sec You will know network connection was established when ACTIVE on the LED changes from blinking to lit If A...

Страница 6: ...eposition the Remote Unit or add a Repeater If no antenna mark appears a communication error has occurred Try to reposition the Remote Unit or add a Repeater Please refer to section Notes and Precautions for Installing Wireless Communication Devices under RTR500B Series Safety Information By using a Repeater it is possible to extend the wireless communication range For information about the Repeat...

Страница 7: ...t side menu open Device Settings 3In the upper right of the screen click on Device 4Enter the serial number and registration code for the RTR500BW then click Add The serial number and registration code can be found on the supplied Registration Code Label as shown above If you have lost or misplaced the Registration Code Label you can check it by connecting the Base Unit to your computer via USB an...

Страница 8: ...n the target Base Unit and select Base Unit Settings in the pop up menu Enter the password and click OK 4When the Remote Unit Settings window appears select the target Remote Unit and click Clock Settings Make settings and click Apply 5To make or change operational settings select the target Remote Unit click Properties make settings and click Apply If necessary make settings for other Remote Unit...

Страница 9: ...e Item Table as an example 2Right click in the left side box and select Insert Table from the pop up menu Set the table name 3To make or edit the item list for the inserted table right click in the right side box and select from the Insert Item or Delete Item options The item name upper limit and lower limit can be set here If you don t need to set upper and lower limits leave them as they are 4Cl...

Страница 10: ...e menu 2Select Create New from the drop down list at the top of the Work Group Table window The Edit option allows you to rename or delete a Work Group Table 3In the displayed window enter a desired name for the Work Group Table and select the Item Table and User Table to be used Click OK 4Select the name of the Work Group Table you just created 5Right click in the left side box and select Insert ...

Страница 11: ... window select Operation Search Network to search for Base Units on the network 2Right click on the target Base Unit and select Base Unit Settings in the pop up menu Enter the password and click OK 3Select the target Remote Unit from the right hand list and click Send Table Select a Work Group Table to send to the Remote Unit and click Send Receive Table How to select the User and Item on the Remo...

Страница 12: ...ck Download to open the Data Download page Download 2Click the Download button for the recorded data you wish to download If you wish to download multiple recorded data files place a check next to the data and click the Download button The recorded data downloaded and saved on your computer can be viewed using RTR 600 Data Viewer Clicking the file name in the list will open the details of the reco...

Страница 13: ...a window place a check mark next to the target Remote Unit and click Start to start downloading Downloaded data will be saved as a recorded data file in the specified storage folder Recorded data stored in the PC can be viewed using RTR 600 Data Viewer Viewing Recorded Data via RTR 600 Data Viewer RTR 600 Series recorded data is saved as a prz file Use the RTR 600 Data Viewer application to view t...

Страница 14: ...sets of data in one table When the data table is open go to File Open and select the additional file To save these files as one file go to File Save All Data As The saved files are in puw format and can be opened with RTR 600 Data Viewer Saving Data as Text File It is possible to convert recorded data to text format which can be read by common spreadsheet software When the data table is open go to...

Страница 15: ...Time Data Download Time for 16 000 readings Via wireless communication About 2 minutes An additional 30 seconds should be added for each Repeater 2 External Output Terminal PhotoMOS Relay Output OFF State Voltage AC DC 50V or less ON State Current 0 1 A or less ON State Resistance 35Ω Communication Protocol 3 HTTP HTTPS FTP SNTP DHCP Power AC Adaptor AD 05A4 PoE IEEE 802 3af Dimensions H 83 mm x W...

Отзывы: