T&C TCWS.54NG04.C Скачать руководство пользователя страница 6

TCWS.54NG04.C 180208-12

WARNING

This conversion kit 
shall be installed by a 
qualifi ed service agency 
in accordance with the 
manufacturer's instructions 
and all applicable codes 
and requirements of 
the authority having 
jurisdiction. 

If the information in these 
instructions is not followed 
exactly, a fi re, explosion 
or production of carbon 
monoxide may result 
causing property damage, 
personal injury or loss of 
life. 

The qualifi ed service 
agency is responsible for 
the proper installation of 
this kit. 

The installation is not 
proper and complete 
until the operation of the 
converted appliance is 
checked as specifi ed in the 
manufacturer's instructions 
supplied with the kit.

If the unit is to be used on propane convert as follows using the components 
supplied with this burner:

CAUTION

The gas supply and electrical power shall be shut off before proceeding with 
the conversion.

Note: 
Factory supplied components must be used to ensure correct input.  
After conversion confi rm proper manifold pressure.

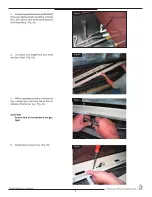
1.  If installed remove the rocks from the  
 burners. 
 

2.  

If installed remove the burner from the 
burner tray by gently lift up the left side 
of the burner and disengage the burner 
tube from the orifi ce. (Fig. #14)

3.  Using a 1/2” wrench, undo the 
 

natural gas burner orifi ce, 

 (marked 

#32

). Apply a small amount  


of pipe joint compound to the threads  


of the propane burner orifi ce 

 (marked 

1.8mm

) to ensure a good  


seal, before screwing it into the fi tting.


Loosen the primary air shutter screw, 
open shutter to give a gap of 13/64” 
(0.2”) and  re-tighten. Repeat on other 
burner. (Fig. #15a)

4.  


With a 7/16” wrench loosen the pilot 
head on the pilot assembly. (Fig. #16)

Fig #15

Fig #16

Fig #14

Fig #15a

6

Propane Conversion

Содержание TCWS.54NG04.C

Страница 1: ...E HOMEOWNER These instructions are supplementary to the Installation and Operating Instructions supplied with the fireplace and should be kept together Refer to the Installation and Operating Instruct...

Страница 2: ...manual prior to burner installation Page 23 1 Attachfuelflexlineandpilotassembly tobulkhead fittings Fig 1 1 BURNER TRAY ASSEMBLY Fig 1 2 3 4 LBS SAND 4 PEBBLE ASSEMBLIES Includes front and rear pebbl...

Страница 3: ...ectrical bulk head fitting Fig 2 3 Tilt burner tray length wise and insert into the firebox Fig 3 4 While supporting one end of the burner tray connect gas line to the tee on the un derside of the bur...

Страница 4: ...uri tube over the orifice Test for connection by lifting at a location pin on the right side of the burner Repeat with left burner Fig 7 CAUTION The burners should be tightly butted up against each ot...

Страница 5: ...rock to align to the tabs on the pebble clusters Fig 11 below 12 Repeat the sequence of placing the front rear and top rocks three more times until the burner is covered 13 Place equalizer rocks eith...

Страница 6: ...the components supplied with this burner CAUTION The gas supply and electrical power shall be shut off before proceeding with the conversion Note Factory supplied components must be used to ensure co...

Страница 7: ...The minimum rate screw is sealed with an O ring Use a thin bladed screwdriver to back the screw out past the limit of the threading At this point a groove on the screw body will be visible just above...

Страница 8: ...protective backing and apply the conversion label directly overthegasspecificationsontherating label 13 Re locate the control box shield and re attach the access panel to the side of the firebox with...

Страница 9: ...ant will be required to ensure a gas tight connection Note To test the gas pressure turn off the gas supply before removing the plug from the supply pressure test port or manifold pressure test port V...

Страница 10: ...flame ap pearance after the fireplace has reached operating temperature See Fig 26 for proper flame pattern Open primary air if the window glass and firebox have carbon accumulation and or the flames...

Страница 11: ...MAIN SUPPLY TUBE 5019 223 4 PILOT TUBE 5019 229 ITEM DESCRIPTION PART NO 5 PILOT ASSEMBLY CONVERTIBLE 5005 025 6 ORIFICE NATURAL GAS 32 5021 332 A 7 PROPANE CONVERSION KIT TC36 LPCSTE01 8 SAND TC42 S...

Страница 12: ...Printed in Canada Technical support 1 877 715 2664 Web site www townandcountryfireplaces net 2975 Allenby Rd Duncan BC V9L 6V8...

Отзывы: