background image

D14274.01—NOVEMBER 2008

47

T1

Administrator Guide

Contents

Introduction

Getting started

About the menus

About the settings

Settings Library

Cameras

Appendices

Contact us

Appendices

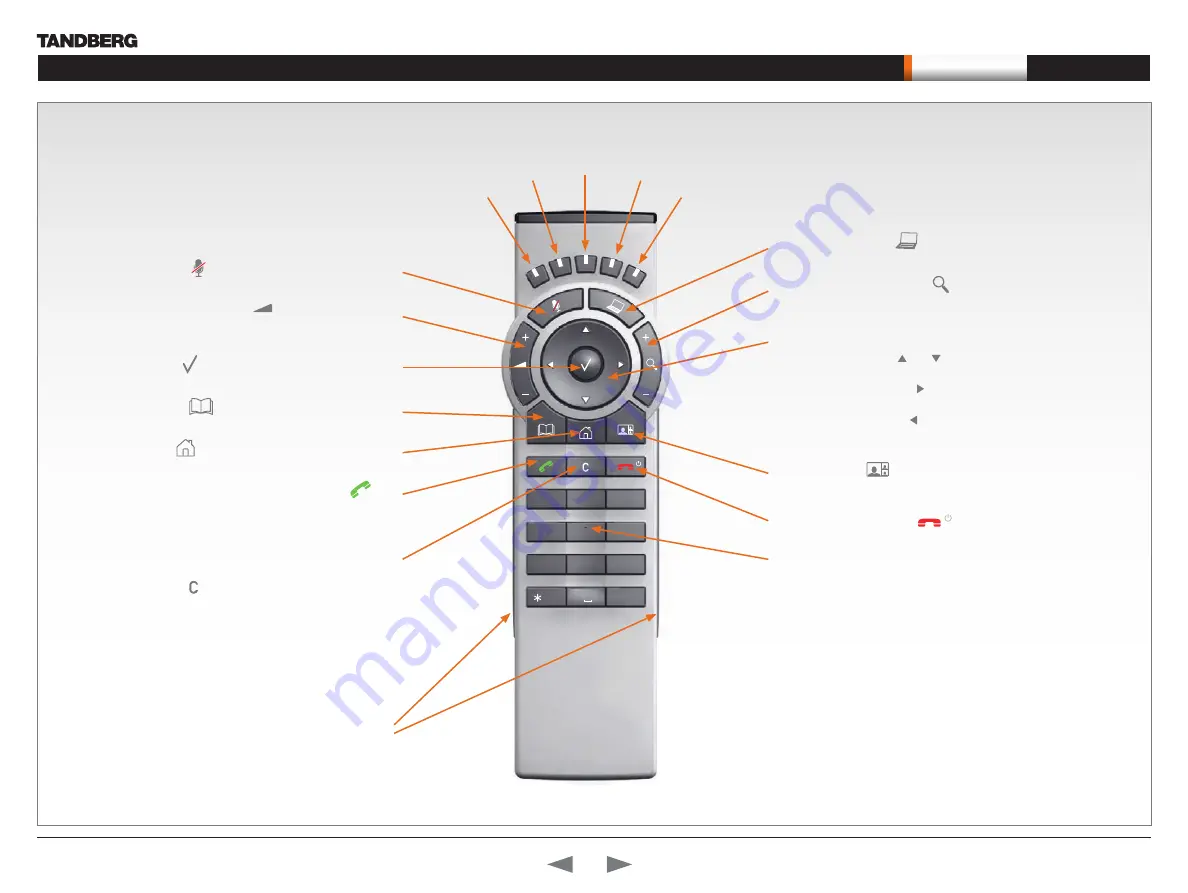
TANDBERG Remote Control TRC5

Microphone:

 Press the 

 key to toggle the microphones on/off.

Volume:

 Press the 

+

 or 

 on the 

 key to adjust the codec 

volume.

OK

/

Select:

 Press the 

 key to confirm your choice or selection.

Phone book:

 Press the 

 key to display the local Phone book.

Home:

 Press the 

 key to key to show the menu on screen.

Call:

 Using the 

 key:  

INITIATE A CALL: Select a name from the Phone book or enter the 

name, number or URI and press the Call key to initiate the call.

SHORTCUT TO RECENT CALLS: Use the Call key as a shortcut to 

Recent Calls when the Call menu is not visible. 

Clear:

 Press the   key to remove characters in a text field. 

4

7

    ghi

    pqrs

6

#

abc/123

9

1


.

@

5

0

8

    jkl

    tuv

    abc

3

    def

    mno

    wxyz

Function keys:

 Represents shortcuts and advanced 

functions. Each key reflects a soft key on screen.

Presentation:

 Press the 

 key to show/hide a presentation.

Zoom:

 Press the 

+

 or 

 on the 

 key to zoom the camera in 

and out.

Arrows:

Up/Down:

• 

 Use the   and   arrow keys to navigate in the 

menu.

Arrow Right:

• 

 Press the   arrow key to expand the selected 

menu item or to move to the right in a text field.

Arrow Left:

• 

 Press the   arrow key to go one step back in 

the menu or to move to the left in a text field.

Layout:

 Press the 

 key to display the Layout menu, then 

select a view in the menu. 

End call/Standby:

 Press the 

 key to end a call, or when 

idle, press and hold the key to go into standby mode.

Alphanumeric keypad:

 Use the keypad in the same way as you 

would use a cellular phone. 

0-9, a-z, period (.), @, space, *:

• 

  Press a key repeatedly to 

toggle between the options displayed on each key. 

abc/123 #:

• 

 Press the # key to toggle between touch tones 

mode (long press), lower case characters and numbers. 

Waking up the system


Grab the remote control and make sure your hand 

touches the rubber line sensors going along both 

sides of the remote control.

or:

 Touch any key on the remote control.

IR transmitter range (DIP switch setting)


The IR transmitter has a short and long range. Open the battery 
cover and remove the batteries to set the DIP switch.

Short range (1 m): Move the DIP switch down.

• 

Longer range: Move the DIP switch up.

• 

Содержание T1

Страница 1: ...D14274 01 NOVEMBER 2008 1 Software version TC1 0 NOVEMBER 2008 TANDBERG T1 Administrator Guide...

Страница 2: ...23 The Conference settings 24 The Do not disturb setting 25 The H323 Profile settings 25 The Network settings 26 The Network services settings 27 The Phone book server settings 29 The Provisioning se...

Страница 3: ...ou need it With optimal camera height a 65 LCD screen and crystal clear video the TANDBERG T1 delivers an unparalleled user experience and enables executives to truly see eye to eye How to read this d...

Страница 4: ...and stereo speaker module with 4x Woofer and 3x Tweeter speaker elements Expandable to eight microphone inputs Status indicators The status indicators are placed off screen which makes them easy to s...

Страница 5: ...t has been made to supply complete and accurate information in this Administrator Guide however TANDBERG assumes no responsibility or liability for any errors or inaccuracies that may appear in this d...

Страница 6: ...h the product with wet hands Cleaning Unplug the apparatus from communication lines mains power outlet or any power source before cleaning or polishing Do not use liquid cleaners or aerosol cleaners U...

Страница 7: ...2 96 EC WEEE Waste Electrical and Electronic Equipment and 2002 95 EC RoHS The primary aim of the WEEE Directive and RoHS Directive is to reduce the impact of disposal of electrical and electronic equ...

Страница 8: ...w Cable configurations Using the remote control Turn on the system Verify IP address settings Setting a static IP address Add the system to the network Verify your settings Time zone settings This cha...

Страница 9: ...tructions of how to assemble the system Codec C90 Codec C90 The Telepresence Engine supporting Full HD video High resolution data sharing Full HD Multisite Rich I O capabilities PrecisionHD 1080p Full...

Страница 10: ...d off and disconnected from the line voltage whenever connecting or disconnecting other equipment Mains Power Cable Main camera Video from PrecisionHD 1080p LAN Ethernet OPTIONAL You may connect addit...

Страница 11: ...z 4 7 ghi pqrs 6 abc 123 9 1 5 0 8 jkl tuv 2 abc 3 def mno wxyz ARROW UP DOWN Use the up and down arrow keys to navigate in the menu OK SELECT Press the OK Select key to confirm your choice or selecti...

Страница 12: ...1 5 0 8 jkl tuv 2 abc 3 def mno wxyz 4 7 ghi pqrs 6 abc 123 9 1 5 0 8 jkl tuv 2 abc 3 def mno wxyz ALPHANUMERIC KEYPAD Use the keypad in the same way as you would use a cellular phone Using the Remot...

Страница 13: ...e up and down in the menus Confirm your choice To confirm your choice press OK on the remote control 1 3 If you need to set a static IP address Go to IP Settings to set static IP addresses Navigate to...

Страница 14: ...e System Information list You do this by accessing the System Information in the same way as you did when you verified you IP address setting Go to System Information to verify the settings Navigate t...

Страница 15: ...s Introduction Getting started About the menus About the settings Settings Library Cameras Appendices Contact us About the menus About the menus In this chapter Explains the menu system Chapter 3 4 7...

Страница 16: ...the camera Open the Settings menu to configure the system The Settings menu The Settings menu lets the user Open the Layout control menu to control the screen layout including selfview Select Wallpape...

Страница 17: ...tion Getting started About the menus About the settings Settings Library Cameras Appendices Contact us Admin Settings menu The Settings menu In this chapter Explaining the administrator settings Chapt...

Страница 18: ...m a drop down list and press the OK button to save or press the left arrow to leave without saving Enter a value text in a value text field Press Save to save the change or Cancel to leave without sav...

Страница 19: ...lained in The settings library section In this guide we will concentrate on what s behind the Administrator Settings menu and leave the other menus to be explained in the Codec C90 User Guide You can...

Страница 20: ...isturb H323 Network Network Services Phone Book Server Provisioning Serial Port SIP Standby System Unit Video Chapter 5 This chapter gives a detailed description of the administrator settings The admi...

Страница 21: ...the Audio Level tabels in the Codec C90 System Integrators Guide for a complete overview of the menu values represented in dB Range 0 to 18 dB Example Audio Input Microphone 1 Level 14 Audio Input Mic...

Страница 22: ...to enable the Audio Line output Off Set to Off to disable the Audio Line output Example Audio Output Line 1 Mode On Audio Output Line 1 3 Type Auto SPDIF Determines if the Audio Line output is an ana...

Страница 23: ...o control the camera brightness manually or to have it automatically adjusted by the system Addresses the specific camera Auto When set to Auto the camera brightness is automatically set by the system...

Страница 24: ...seful in difficult lighting conditions where changes to the the brightness setting does not provide satisfactory results Requires the Gamma Mode to be set to Manual Addresses the specific camera Range...

Страница 25: ...range Firewall administrators should not try to deduce which ports are used when as the allocation schema within the mentioned range may change without any further notice Static When set to Static the...

Страница 26: ...n If the H 323 Gatekeeper Authentication Mode is set to On and a H 323 Gatekeeper indicates that it requires authentication the system will try to authenticate itself to the gatekeeper Requires the Au...

Страница 27: ...fserv Signalling 0 Network 1 1 IPv4 QoS Diffserv Video 0 63 The DiffServ Video setting is used to define which priority Video packets should have in an IP network Enter a priority which ranges from 0...

Страница 28: ...rtant events Can be used to send event created messages to the SNMP agent about different events like system reboot system dialing system disconnecting MCU call packet loss etc Traps can be sent to mu...

Страница 29: ...imum of 255 characters Example Provisioning ExternalManager Path The Phone book server settings Provisioning Mode Off TMS Provides the possibility of managing the codec endpoint by using an external m...

Страница 30: ...be used when registering to a Nortel MCS 5100 or MCS 5200 PBX Microsoft Must be used when registering to a Microsoft LCS or OCS server Cisco Must be used when registering to a Cisco CallManager versi...

Страница 31: ...Input Matrix in the Interfaces section Range 1 5 presentation sources Example Video DefaultPresentationSource 3 Video Monitors Single Dual The codec can be used with more than one monitor and this se...

Страница 32: ...I Video Input Source 2 Connector HDMI HDSDI YPbPr Select which video input connector to be active on connector group 2 HDMI Select HDMI when you want to use the HDMI 2 connector as input HDSDI Select...

Страница 33: ...1920_1080_60 1280_768_60 1360_768_60 1366_768_60 Select the preferred resolution for the monitor connected to video output DVI I 2 or 4 This will force the selected resolution on the monitor Range 640...

Страница 34: ...us Cameras Cameras In this chapter The PrecisionHD 1080p camera Connecting the camera Best view Face recognition Video output formats Cameras in daisy chain Chapter 6 Your TANDBERG PrecisionHD 1080p C...

Страница 35: ...HD SDI can be used simultaneously The maximum resolution is then 1080p30 if you want both to run with the same resolution Kensington lock The Kensington lock may be used to prevent the camera to be m...

Страница 36: ...see the user documentation delivered with the camera for information about the cabling Connecting HDMI HD Video out on camera to HDMI 1 In on the Codec VISCA is a trademark of Sony Corporation Connect...

Страница 37: ...zoom and camera angle will be changed accordingly to obtain an optimal presentation on the screen Kindly observe the following The Best view optimization process may take up to 5 seconds The detection...

Страница 38: ...at for the camera is set by DIP switches The DIP switches are found on the bottom side of the camera The default setting is Auto When using HDMI the video output format is automatically detected See t...

Страница 39: ...is powered up from the codec by the VISCA camera control cable Additional cameras must use the 12V DC Power in Extra camera cable The daisy chained cameras are connected by using the VISCA Extra Camer...

Страница 40: ...ndices Chapter 7 In this chapter General room guidelines Telepresence room setup High end meeting room setup Video input matrix Software upgrade Upload certificates XML files Log files NTP Time Zone e...

Страница 41: ...table should not cover the microphones as this will reduce the audio quality at the far end Position of the system Position the TANDBERG T1 in such a way that all participants attending the meeting a...

Страница 42: ...tact with the far end participants will improve the natural communication between the people Adjust the camera view using zoom in out to allow the participants to be shown in full size on screen and t...

Страница 43: ...same eye level The camera should capture all participants in the room If the participants are sitting too close to the monitor the camera will look down at the participants This may not give a good p...

Страница 44: ...e control the default presentation source is activated The DVI VGA input is compliant with VESA Extended Display Identification Data EDID and will be able to notify the PC of the supported output form...

Страница 45: ...ame eye level The camera should capture all participants in the room If the participants are sitting too close to the monitor the camera will look down at the participants This may not give a good pre...

Страница 46: ...on 3 on the remote control the default presentation source is activated The DVI VGA input is compliant with VESA Extended Display Identification Data EDID and will be able to notify the PC of the supp...

Страница 47: ...on Zoom Press the or on the key to zoom the camera in and out Arrows Up Down Use the and arrow keys to navigate in the menu Arrow Right Press the arrow key to expand the selected menu item or to move...

Страница 48: ...ce and the default presentation source for the system the following setting must be configured Video MainVideoSource 1 Video DefaultPresentationSource 3 Comp 5 and YC 5 are not supported in version 1...

Страница 49: ...he Upgrade tab lets you select the software upgrade file for TANDBERG Codec C90 and install the new software Please follow the procedure described on this page Open a web browser and enter the 1 IP ad...

Страница 50: ...tem For TLS connections a ROOT Certificate CA list can be uploaded from the web interface When the SIP setting TlsVerify is enabled only TLS connections to servers whom x 509 certificate is validated...

Страница 51: ...abling of various features etc The configuration commands are structured in a hierarchy making up a database of system settings Status Status type commands returns information about the system and sys...

Страница 52: ...ppendices Debug log files Select a debug log file by clicking on the name of the file Some of the log files can be opened or saved Log files In the Logs tab you will find debug log files These are TAN...

Страница 53: ...llent quality SEAS Excel series 1 x 25mm dome tweeter 6 ohms nominal high quality Passive crossover filter Frequency range 70 Hz 20 kHz Long time max power 70 Watt Enclosed MDF speaker cabinet RCA aud...

Страница 54: ...a Campo_Grande America Cancun America Caracas America Catamarca America Cayenne America Cayman America Chicago America Chihuahua America Coral_Harbour America Cordoba America Costa_Rica America Cuiaba...

Страница 55: ...ia Harbin Asia Ho_Chi_Minh Asia Hong_Kong Asia Hovd Asia Irkutsk Asia Istanbul Asia Jakarta Asia Jayapura Asia Jerusalem Asia Kabul Asia Kamchatka Asia Karachi Asia Kashgar Asia Katmandu Asia Kolkata...

Страница 56: ...m Europe Tallinn Europe Tirane Europe Tiraspol Europe Uzhgorod Europe Vaduz Europe Vatican Europe Vienna Europe Vilnius Europe Volgograd Europe Warsaw Europe Zagreb Europe Zaporozhye Europe Zurich Fac...

Страница 57: ...n SIP RFC 3263 Locating SIP Servers RFC 3264 An Offer Answer Model with SDP RFC 3311 UPDATE method RFC 3361 DHCP Option for SIP Servers RFC 3420 Internet Media Type message sipfrag RFC 3515 Refer meth...

Страница 58: ...LVD 2006 95 EC EMC 2004 108 EC HARMONIZED STANDARDS Applied in order to verify compliance with directives EN 60950 1 2006 EN 55022 2006 EN 55024 1998 A1 2001 A2 2003 EN 61000 3 2 2006 EN 61000 3 3 199...

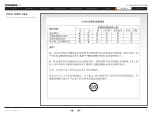
Страница 59: ...08 59 T1 Administrator Guide Contents Introduction Getting started About the menus About the settings Settings Library Cameras Appendices Contact us Appendices China RoHS table This product complies w...

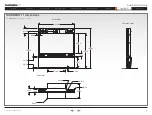
Страница 60: ...ttings Settings Library Cameras Appendices Contact us Appendices TANDBERG T1 dimensions The TANDBERG T1 dimensions in mm Front view Left side view Top view 0 0 6 6 0 4 0 1 0 2 7 1 R 0 2 3 R 0 3 3 R 0...

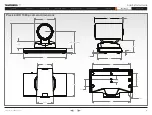
Страница 61: ...n Getting started About the menus About the settings Settings Library Cameras Appendices Contact us Appendices 220 0 105 0 20 5 105 9 eye centre 32 2 148 1 114 6 82 0 79 6 2 5 2 5 62 4 125 4 142 0 4 4...

Страница 62: ...0p60 1280x720 60fps HD720p60 1366x768 60fps WXGA 1280x768 60fps WXGA 1024x768 60fps XGA 1280x1024 60fps SXGA 640x480 60fps VGA 800x600 60fps SVGA 1 x COMPOSITE OUTPUT BNC CONNECTOR supported formats P...

Страница 63: ...ng of picture SYSTEM MANAGEMENT Support for the TANDBERG Management Suite Total management via embedded SNMP Telnet SSH XML SOAP Remote software upload via web server SCP HTTP HTTPS 1 x RS 232 local c...

Страница 64: ...tact us Contact us U S HEADQUARTERS TANDBERG 1212 Avenue of the Americas 24th Floor New York NY 10036 Telephone 1 212 692 6500 Fax 1 212 692 6501 Video 1 212 692 6535 E mail tandberg tandberg com EURO...

Отзывы: