background image

D 13954.01
JUNE 2006

28

TANDBERG 1700 

MXP

USER GUIDE

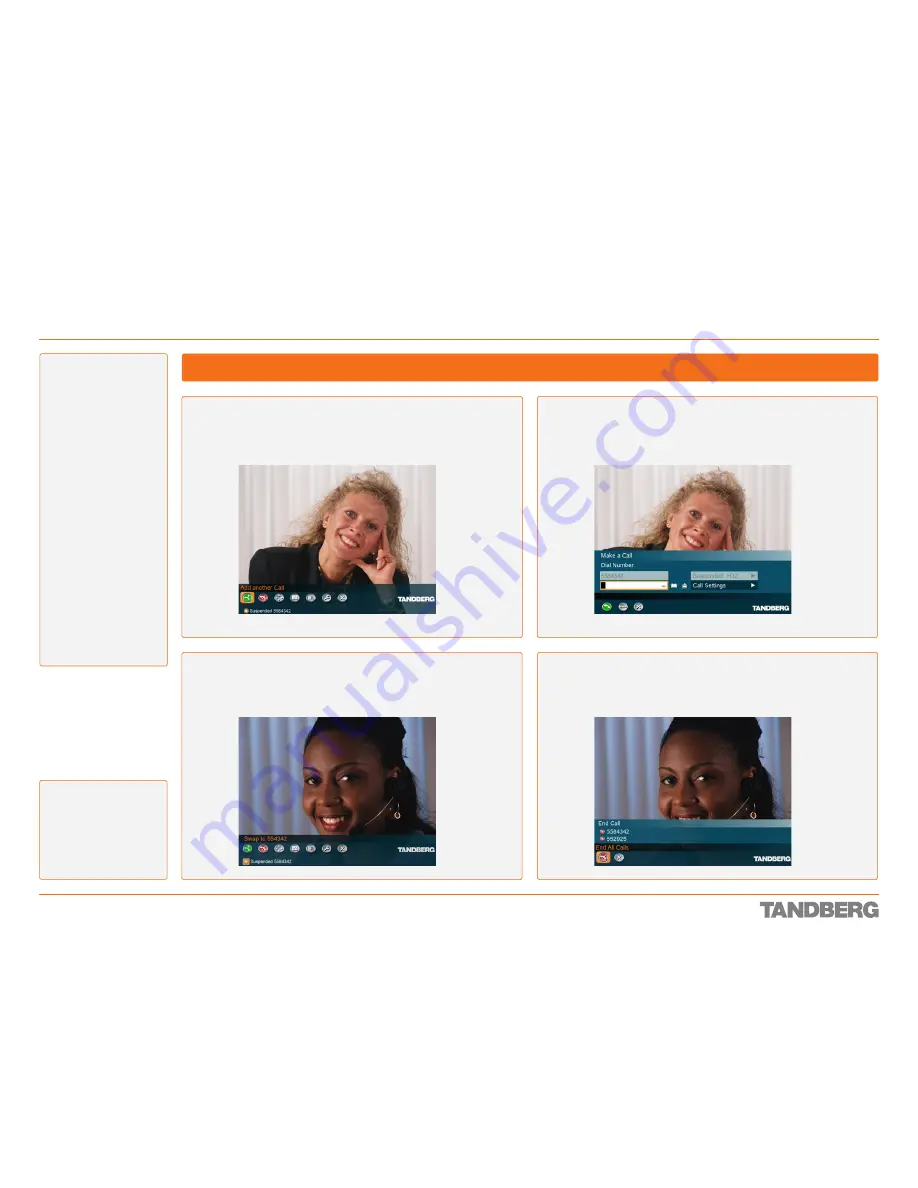
  Assuming you already are in an H.323 or a SIP call, press the 

Call


button on the remote control. Select 

Add another Call

 from the menu. 

The call currently active will be temporarily 

Suspended

, which can be 

seen from the lowermost line of the screen.


Call the second party manually or by means of the phone book in the 

usual manner. Observe that this must also be an H.323 or a SIP call.

  To switch between the two parties, use the 

Suspended

 menu line at 

the bottom of the screen. This line contains the number of the party 
currently 

Suspended

.

  To end any or both of the calls, click the 

End Call 

button on the remote 

control. You will have the option of navigating to any of the numbers 
called to terminate that call or to press the 

End Call 

again to terminate 

both calls simultaneously.

Making Calls with Two Parties at the Same Time (Non-MultiSite Systems Only)

The features described 
here applies to systems 
without the optional Multi-
Site feature installed.

Note!

 The presence of  

MultiSite will disable 
these features.

Call Handling

About this Feature

Non-MultiSite equipped 
systems may call another 
party when already in a 
call. Thus you may have 
two calls running at the 
same time. Note that the 
two parties will not be 
able to communicate with 
each other. The feature 
requires 

H.323

 or 

SIP

 to 

work.
When you make an 
additional call, the 
party called first will be 
temporarily suspended. 
The message 

“Please 

wait”

 will appear on 

the screen of the party 
suspended. 
You may switch between 
the two parties you have 
called by navigating to the 
lowermost line in the main 
menu as shown in the 
Figs. to the right.

Calling Two Parties Simultaneously

Содержание 1700 MXP

Страница 1: ...era Simple user interface Optional MultiSite capabilities Optional presentation and dual video stream capabilities Headset connection for privacy Standards based embedded encryption AES DES Protection against network interruptions with automatic Downspeeding and IPLR Software version F5 D13954 01 JUNE 2006 1700 MXP ...

Страница 2: ...ced stored in a retrieval system or transmitted in any form or by any means electronically mechanically by photocopying or otherwise without the prior written permission of TANDBERG Nationally and internationally recognized trademarks and tradenames are the property of their respective holders and are hereby acknowledged COPYRIGHT 2006 TANDBERG Philip Pedersens vei 22 1366 Lysaker Norway Tel 47 67...

Страница 3: ...ANDBERG TANDBERG reserves the right to amend any of the information given in this document in order to take account of new developments Every effort has been made to supply complete and accurate information however TANDBERG assumes no responsibility or liability for any errors or inaccuracies that may appear in this document nor for any infringements of patents or other rights of third parties res...

Страница 4: ...portions of eCos code are distributed under the terms of the GNU General Public License with a non copyleft excep tion which allows staic links to non copyleft programs Portions of the code are distributed under the terms of various BSD style licenses Copyright 1998 1999 2000 2001 2002 2003 Red Hat Inc Copyright 2002 2003 John Dallaway Copyright 2002 2003 Nick Garnett Copyright 2002 2003 Jonathan ...

Страница 5: ...r own protection please read the overleaf safety instructions completely before operating the equipment and keep this manual for future reference The information in this summary is intended for operators Carefully observe all warnings precautions and instructions both on the apparatus and in the operating instructions Operator Safety Environmental Issues ...

Страница 6: ...rod uct where this action requires a tool This product should always be powered from an earthed power outlet Never connect attached power supply cord to other products In case any parts of the product has visual damage never attempt to connect mains power or any other power source before consulting service personnel The plug connecting the power cord to the product power supply serves as the main ...

Страница 7: ...nerated TANDBERG has implemented necessary process changes to comply with the European RoHS Directive 2002 95 EC and the European WEEE Directive 2002 96 EC Waste Handling In order to avoid the dissemination of hazardous substances in our environment and to diminish the pressure on natural resources we encourage you to use the appropriate take back systems in your area Those systems will reuse or r...

Страница 8: ...mentation depends on what you want to do and how much you already know This User Guide has been divided into several separate sections Each section provides different information Depending on your requirements and your familiarity with the 1700MXP and video meeting systems as such you may find that you use some parts of this User Guide often and others not at all Our objective with this manual has...

Страница 9: ...ns 15 There are Three Ways to Leave a Menu 15 Camera Adjustments 16 About Camera Adjustments 16 Adjusting the Camera 16 The icons Appearing on the Screen 17 About the Icons 17 Dual Video Stream 17 Microphone Off 17 Secure Conference AES 17 Telephone 17 Volume Off 17 Secure Conference DES 17 On Air 17 Not Secure Conference 17 Bad Network 17 Selfview 18 About Selfview 18 Navigation Tools 18 Using Se...

Страница 10: ...Editing Multisite Contacts in the Phone Book 40 Viewing the Participants in a MultiSite Contact 40 Editing the Participants in a MultiSite Contact 40 Deleting a MultiSite Contact in My Contacts 40 Video Meeting Features Features Overview 42 Screen Layout 42 Far End Camera Control 42 Snapshots 42 Presentations 42 Presets 42 Text Chat 42 Dual Video Stream 42 Accessing Far End Video Sources 42 Stream...

Страница 11: ...Settings an Overview 97 Level Settings 98 Headset Output Levels from System 98 Headset Input Levels to System 98 Headset input 98 Headset Output 98 Alert Tones Volumes 99 Graphical View of Settings 100 Video Settings an Overview 101 MCU Status Line 102 Floor to Full Screen 103 Web Snapshot 104 MultiSite Picture Mode 105 Video Name 106 Security Settings an Overview 107 Encryption 108 Network Settin...

Страница 12: ...t documentation php Getting Acquainted with the System Before you start using the system we recommend that you take your time to read through this section of the User Guide to get you up and going This section outlines how to connect the system and the basic operating principles Important video and sound matters are also covered ...

Страница 13: ...ies box Mount the lid as shown The lid will be held in place by magnets Turn the ring to focus the camera To see yourself press the Selfview key on the Remote Control Connecting Cables Camera Matters Connecting Headset Viewing Angle Adjustment Connect cables as shown CAUTION Do not rest the system on the camera or on the screen Use the mirror to locate the connectors Connect the video system to yo...

Страница 14: ...key for 1 second to close the menu Use the Phone Book to store and recall video contacts for easy placement of calls Use the End Call key to end the current call Pressing this key when not in a call will place the system in Standby mode Mic Off turns your microphone on and off Volume and adjusts the volume Press OK to show the menu and select menu items Layout key toggles between full screen and d...

Страница 15: ...nistrator may have password protected the Control Panel However this does not change the principles of operation explained here Touch tones Snapshot Camera Presets Touch tones Snapshot Camera Presets Touch tones Snapshot Camera Presets There are Three Ways to Leave a Menu Cancel Select this icon to leave menu undoing any changes Select this icon to Restore Default Settings Save Select this icon an...

Страница 16: ...leaves us with the following adjustments carried out through the menu system Whitebalance Brightness Backlight Compensation Click OK to enter the Picture Control options and navigate to the Picture Control icon Press OK and navigate to the Camera Control icon Click OK and use the Arrow keys to navigate and adjust or select the settings available Click OK when satisfied navigate to any other settin...

Страница 17: ... given for 1 2 3 or more than 3 participants Icons turn green when a telephone participant has the floor Dual Video Stream Dual video stream activated is indicated by this icon About the Icons To help you immediately realise the present status of important actions states and events taking place there is a number of icons appearing on the screen whenever applicable Some of these may be turned off i...

Страница 18: ...deo Press Selfview again to go back to normal Near end video Black screen logo Touch tones Snapshot Camera Presets Touch tones Snapshot Camera Presets Near end video Far end video Touch tones Snapshot Camera Presets Touch tones Snapshot Camera Presets Touch tones Snapshot Camera Presets Dual video stream Near end video Far end video In a point to point call with a dual video stream the duo video i...

Страница 19: ...which corner the second image is to be displayed Picture outside Picture When Picture Layout is set to POP the Layout key makes it possible to see up to three images in a composition optimized for wide screens The second image can be displayed either as a side by side the main image 1 1 or smaller images next to the main image 1 2 and 1 3 Press the Layout button once to get side by side view 1 1 P...

Страница 20: ... to get a suitable layout when toggling from Local PC Display mode to standard conference mode Use the Selfview key to toggle between Local PC Display mode and standard vide oconference mode An indicator tells you that your PC image is displayed locally Example You are using the system as a PC and get an incoming call When the setting Use Screen as Local PC monitor is On you will keep your PC imag...

Страница 21: ...the Mic Off button An on screen indicator appears in the upper right corner when the microphone is Off In a call if audio is detected the on screen symbol will start to flash Pressing the Mic Off button one more time will activate the microphone again Note Mic Off will mute all microphone inputs but it will not mute audio from any AUX and VCR inputs When an incoming call is answered the microphone...

Страница 22: ...nge to lower or back to upper case letters with the a A key and space with the 0 _ key To write numbers in a text input field repeatedly press the corresponding key a number of times until the digit appears Example How do I write System 123 in the System Name input field in General in Administrator Settings Do as follows Press the 7 key four times to get an S Press the key once to switch between u...

Страница 23: ...he Delay Standby for 1 hour icon and click OK Press OK Menu and navigate to the Standby icon Select Standby from the menu and click OK To Enable Delay Standby Mode for 1 Hour The system will enter Standby Mode in 1 hour from now Navigate to the Delay Standby for 3 hours icon and click OK Press OK Menu and navigate to the Standby icon Select Standby from the menu and click OK To Enable Delay Standb...

Страница 24: ...nd telephone calls as well as video conferences with up to 4 video calls and 3 telephone calls this is called MultiSite This section of the User Guide outlines the call handling procedures and features Please observe that some topics covered apply to point to point call handling only while others apply to MultiSite call handling only In addition some apply to both situations These are all covered ...

Страница 25: ...basis for billing clients or departments Observe that in this case there will be no strict need for installing an Access Code file on your system TMS will still have access to the codes you have as signed to the calls In this case any code entered will be considered valid Of course the two may be combined to form a billing system with call restrictions This will then become a system that acts as f...

Страница 26: ...reen Call key on the remote control Make sure Video Call is selected as shown here If not see below for details Enter the dial number manually using the Numerical Keypad When dialling manually observe the guidelines given in Numerical Keypad Features Use as separator in IP addresses If a system is registered on a gatekeeper or border controller with DNS support there are several ways to call into ...

Страница 27: ...ted contact will be displayed at the bottom line When selecting Phone Book the Phone Book opens showing the folders Placed Calls Missed Calls Received Calls and My Contacts Global Contacts if applicable will be listed below these folders See also Phone Book Features Press the green Call Now key Touch tones Snapshot Presets on the remote control or press the Left Arrow key to select the Call Now ic...

Страница 28: ... terminate that call or to press the End Call again to terminate both calls simultaneously Making Calls with Two Parties at the Same Time Non MultiSite Systems Only The features described here applies to systems without the optional Multi Site feature installed Note The presence of MultiSite will disable these features Call Handling About this Feature Non MultiSite equipped systems may call anothe...

Страница 29: ...Con sultative and Unattended Transfer Consultative transfer takes place when you have called two parties at the same time as discussed on the previous page and decide that you want to connect the two while at the same time disconnecting yourself Unattended transfer takes place when you transfer a call to someone else without already being in a video call with that party Call Transfer applies to SI...

Страница 30: ...ress OK on the remote control To add another participant to the conference start by selecting the Add Another Call icon and press OK The menu will now look like this Enter the number manually or use the Phone Book to select the additional participant Press OK to call that party Repeat until all participants have been called and successfully connected A maximum of 4 video calls and 3 telephone call...

Страница 31: ...gs Call Handling About Call Settings The Call Settings speci fies the quality of the call Each call will be set up with the default call settings if the settings are not altered In this case the field is labeled Default Call Set tings If the settings for some reason are altered for the current participant in the current call the name of the field will be changed to reflect this Usually there will ...

Страница 32: ...rce Auto Enables streaming of both local and far end video Selection of which site to be streamed is done using voice switching the site that speaks is streamed Local Only the local video will be streamed Remote Only the far end video will be streamed Local and far end audio is always streamed Allow Remote Start On Streaming can be started from exter nal user interfaces like the Web browser or Tel...

Страница 33: ... in Control Panel available Your adminstrator may or may not have password protection activated to prevent unauthorized alterations of these and other settings If in doubt consult your adminstra tor Note A message will be sent to the far end whenever you have disabled your microphone and or your camera Tip An alternative to the above could be the use of the Do Not Disturb feature far right Tip Whe...

Страница 34: ... on the remote control Press the OK Menu button on the remote control to display the menu This will produce the End Call dialogue box Use either of the below methods Press the End Call button Touch tones Snapshot Presets on the remote control again Press the OK Menu button to confirm that the call is to be ended Tip Switching off the monitor s using the power button on the monitor will not end a c...

Страница 35: ...res Expand Missed Calls as explained in the Call Log frame to the left Navigate in the menu in the usual manner Use the Left Arrow key to move from the Missed Calls column to the Task column Use Vertical Arrow keys to move up and down in the menu When you have located the icon representing what you want to do press OK Tip Any member of these lists already listed in your Phone Book will appear with...

Страница 36: ...ut The procedure outlined here is to be used whenever you need to refine your search Searching in the Phone Book Call Handling In the Phone Book use the Cursor keys to move to the Task column and then down to the Search icon Searching in the Phone Book Press OK to open the Search dialogue box Enter the search string the name and press the OK key or move down to the OK icon and press the OK key To ...

Страница 37: ...the default settings of Call Type Net Type and Bandwidth if needed If in doubt consult your system admin istrator Navigate down to the bottom of the menu and click Ok to leave menu putting changes into effect Or click on Cancel to leave menu undo ing any changes Call Handling Adding a New Contact Directly from the Call Log In the Phone Book move down to Placed Calls Missed Calls or Received Calls ...

Страница 38: ... is 30 characters If needed edit the number of your new con tact by means of the number keys on the keypad which now enters 123 mode The maximum number length is 60 digits Use as separator in IP addresses To switch to ABC mode press for one second Alter the default setting of Call Type Network and the default setting of Bandwidth if needed Navigate to the OK icon and press OK to save putting chang...

Страница 39: ...te group This group will in turn form a MultiSite Contact When setting up a video conference all members of a particu lar MultiSite Contact will then be connected automatically so you won t have to call them one by one My Contacts can hold up to 50 MultiSites Contacts The TANDBERG 1700MXP sup ports up to a total of 4 video participants and 3 telephone participants per meeting MultiSite Contacts is...

Страница 40: ...in My Contacts Enter the Phone Book and navigate to My Contacts as explained above Press OK and navigate to the MultiSite Contact to be deleted Navigate to the Task Column and select the Delete icon Press OK You will now be prompted to confirm your selections Press OK to delete or Cancel to undo Editing the Participants in a MultiSite Contact Enter the Phone Book and navigate to My Contacts as exp...

Страница 41: ...y to video conferences only while a couple of features apply to both situations This part of the User Guide outlines features applicable to point to point calls only but also features shared by point to point and conferences Features specific to video conferences are treated separately in the section MultiSite Features We recommend that you check out the TANDBERG web site regularly for updated ver...

Страница 42: ...werPoint presenta tion for example Use Presentation outside a call to make a local presentation for the people in your own meeting room Use Presentation when you are in a call to make a presentation for the far end as well For more on this see Presentation Presets The far end may use camera presets to easily vary between predefined camera angles in their own end Thus they eliminate the need to mov...

Страница 43: ...vide far end camera control This feature is not accessible in MultiSite video meetings Far End Presets are described on the following page During a video meeting press Ok to produce the menu and navigate to the Camera Control icon Press Ok to display the menu and navigate to the Far End tab Navigate to the Camera Control icon Press OK to enable Far End Camera Control Observe the four triangles ind...

Страница 44: ...ts have been stored and you try to access far end presets nothing will happen During a video meeting press Ok to produce the menu and navigate to the Camera Control icon Press Ok to display the menu and navigate to the Far End tab Navigate to the Display Presets icon Press OK to enter the Presets menu Navigate to the preset required and press OK again to utilize A total of 15 numbered 0 14 Far End...

Страница 45: ...eo source PC is the default It is possible to change the presentation source in the Presentation menu Choose Presentation from the main menu if you want to select a video source manually The Presentation menu offers you all the available video sources supported by your system Connect the device to act as a source for the presentation PC DVD VCR to the system and select Presentation from the menu f...

Страница 46: ... stream When Dual Stream is closed the bandwidth is returned to the main video Note that when selecting the Document Camera or PC the system will automatically request floor when connected to a MCU conference as MultiSite host or connected to an external MCU The Presentation menu will now be displayed Make sure the DuoVideo tab is selected as shown here and navigate to the source whose contents is...

Страница 47: ...enu line if needed and navigate to the Presentation icon Click OK to display the Presentation menu Navigate to Snapshot tab and then down to the Take New Snapshot icon Click OK to take a snapshot and send it to the far end Displaying a Snapshot Taking a Snapshot Using the Remote Control In a point to point call press the Snapshot key on the Remote Control Note If the Number Key Settings menu has b...

Страница 48: ...nds at the top of both parties screen indicating the input source accessed Example PC If you display the other party in full screen this will be the only indication you get when the other party is accessing one of your video sources If you set the screen to display both parties you will see what the other party sees since both incoming and outgoing video are displayed on your screen In a call clic...

Страница 49: ...0MXP to send and receive text mes sages using the chatting function available All you need is to select the Text Chat function and use the keypad as you would when sending text messages SMS using your cellular phone Note This will not work unless the far side a supports text chat and b has activated that feature Text chatting applies to point to point video meetings only Tip Once you enter Text Ch...

Страница 50: ...DBERG 1700MXP can handle up to 4 IP video calls and 3 IP telephone calls simultaneously To be able to do this the 1700MXP has a built in MCU Multipoint Control Unit called MultiSite This feature turns your TANDBERG 1700MXP into a true video conferencing system This part of the User Guide outlines features specific to video conferencing MultiSite Features ...

Страница 51: ...ants in the conference Request Floor is useful when you want to speak or display something in front of all participants Release Floor when you are done and make the floor avail able for other participants in the conference An indicator appears when you have floor and disappears when you release floor If your system is the one connected to all the other systems you will be the host of the meeting a...

Страница 52: ...ties in the conference Request Floor is useful when you want to speak or display something in front of all participants Click Release Floor when you are done and make the floor available for other parties in the confer ence An indicator appears in the upper right corner when you have floor and disappears when you release floor see the far right screenshot below Automatic Full Screen When Requestin...

Страница 53: ...be the host of the meeting and you will be able to assign the floor to others If two systems both supporting MultiSite both have established a MultiSite call and one of these call the other cascading will take place This means that you may have more participants in total than a single system supports In this case the host will be the one calling the other Automatic Full Screen When Requesting Floo...

Страница 54: ... enter the submenu and navigate to Terminal Names Click OK to display a list of the meeting participants Select Back and click OK to exit in the usual manner About Terminal Names You may want to see a list of all the participants in a MultiSite video meeting For this purpose there is a list of the terminal names available MultiSite Features Displaying Terminal Names ...

Страница 55: ... transmitted to the other participants as a single image and its layout cannot be changed by them However they may configure their own screen using the Layout button on the Remote Control Their choices are the image you send out in full screen or as side by side your image and their selfview The Layout Options Available Auto Split will give you the best screen layout given the number of participan...

Страница 56: ... Control Panel In order to provide you with the expected high level of TANDBERG video conferencing quality the unit needs to be configured properly This section explains the details of the Control Panel Please observe that the Settings may be password protected A password will then be needed to gain access to the settings described in this section ...

Страница 57: ...s and hold the Cancel key for 1 second to close the menu Use the Phone Book to store and recall video contacts for easy placement of calls Use the End Call key to end the current call Pressing this key when not in a call will place the system in Standby mode Mic Off turns your microphone on and off Volume and adjusts the volume Press OK Menu to show the menu and select menu items Layout key toggle...

Страница 58: ...this section Control Panel settings Getting to This Menu Lost in translation Click on the Phone Book icon 5 times followed by pressing the number key 1 on the remote control to reset the menu language to English Press OK to produce the below menu Use the Arrow keys to move to the Control Panel and press OK An Overview of the Control Panel Control Panel The Control Panel will now be displayed Contr...

Страница 59: ...0MXP USER GUIDE An Overview of the Control Panel Settings Control Panel General Settings Menu Settings Presentation Settings Video Settings Restore Default Settings Audio Settings Network Settings Security Settings Call Quality Settings ...

Страница 60: ...s to a Password Protected Control Panel Settings Menu Key in the password If the wrong pin code is entered the mes sage Attention Wrong menu password will appear on the screen You will now be prompted for a password Clear an Existing Password Log in the same way as when gaining access to a password protected Control Panel Settings menu Navigate to the Security Settings menu in the same way as sett...

Страница 61: ... ASCII character text input includes even languages like Norwegian French Polish etc an International Name using standard ASCII characters only must be specified as well If you set the language to e g Korean and input a System Name using Korean characters a second line allowing you to specify the name using standard ASCII character set will appear Phone Book Settings The use of Corporate Directori...

Страница 62: ...ional Korean Japanese and Thai International Name If the System Name contains Asian and non standard ASCII character text input includes even languages like Norwegian French Polish etc an International Name using standard ASCII characters only must be specified as well If you set the language to e g Korean and input a System Name using Korean charac ters a second line allowing you to specify the n...

Страница 63: ...put a System Name using Korean characters the International Name field allowing you to specify the name using standard ASCII character set will appear Entering a system name Whenever alphanumerical entries are expected by the system a small abc appears in the right lower corner of the entry field In this mode entries from the Numerical keypad are automatically interpreted as alphanumeric entries i...

Страница 64: ...atically answer all incoming calls and switch the microphone off when the call is connected Press Mic Off on the Remote Control to switch the microphone back on Off You must manually answer all incoming calls by pressing OK or the Call key on the Remote Control CANCEL Select this icon and press OK to leave the menu undoing any changes RESTORE DEFAULTS Select this icon and press OK to restore the d...

Страница 65: ... cal phone book My Contacts e g for use in your own predefined MultiSite Contacts will not be updated when the Corporate directory is updated by the Mangement System Adminstrator Path The Path to the phone book of the Directory Service Corporate Directory On The Corporate Directory is available in the menu Off The Corporate Directory is hidden from the menu and is unavailable for users IP address ...

Страница 66: ... External Services include any HTTP and HTML based contents your Service Provider may offer This could be stock exchange information news weather forecast etc In addition External Services may include the ability to display scheduled meetings for the video system handy when meetings last longer than scheduled and you need to know whether and if affirmative when the system is booked for other meeti...

Страница 67: ...tions of additional incoming calls and ask you to accept reject the call Off The system will not accept incoming calls when you are in a call Incoming Telephone Calls On The system will accept incoming telephone calls Off The system will not accept incoming telephone calls This may be used to prevent incoming calls from systems other than videoconferencing sys tems Far End Camera Control On The fa...

Страница 68: ... the screen The remote control keypad will be in ABC mode Key in the code and press OK Then dial your number About Access Code Applications As an administrator you may set up the system to request codes to be entered before a call can be made These codes are referred to as Access Codes and can be used to define the types of calls made internal external to an invoicable client etc In this way you m...

Страница 69: ...ded You will get optimized picture layouts for wide screen by pressing the Layout button on the remote Picture in Picture PIP Pressing the Layout button on the remote will result in an extra picture in smaller view Picture in Picture Press the Layout button to move it around in the corners of the screen and finally hide it Pressing and holding Layout for 1 sec ond will hide the small picture direc...

Страница 70: ...enter MultiSite Presenter Bandwidth options 1 2 3 The system has a modular design allowing you to add functionality when you need it This functional expansion requires codes available through your TANDBERG Repre sentative CANCEL Select this icon and press OK to leave the menu undoing any changes RESTORE DEFAULTS Select this icon and press OK to restore the default settings Save Select this icon an...

Страница 71: ...information Time Zone Select the correct time zone for the location of your system Date Format Choose between DD MM YY MM DD YY or YY MM DD as the preferred date format Time Format Select 12h or 24h time format Daylight Savings On Adjust for daylight savings changes Off No adjustments are made for daylight saving changes CANCEL Select this icon and press OK to leave the menu undoing any changes RE...

Страница 72: ...to dial activating Autocomplete will cause the system to complete your input for you based on what is already in your Phone Book Number key Mode Set this to ON to enable a pop up menu letting you choose what to do when pressing a number key choose between Manual Add another Call Dial extension number and Use Presets When set to Manual you will be prompted to choose what to do Power users may want ...

Страница 73: ... you to select language before proceeding See example below When set to On the system will display the language menu as the first menu in Kiosk mode When set to Off the system will display the welcome menu in English default Available Languages In Kiosk Mode the system supports 7 different languages for its simplified on screen menu English German French Norwegian Swedish Italian and Spanish Selec...

Страница 74: ...have the company logo appear in the background of the welcome menu Set to Off to have no logo displayed Note The TANDBERG Logo will be displayed if no other company logo is loaded and logo is enabled CANCEL Select this icon and press OK to leave the menu undoing any changes RESTORE DEFAULTS Select this icon and press OK to restore the default settings Save Select this icon and press OK to leave th...

Страница 75: ...ock indicator is shown during the initialization phase for AES or DES encryption During this period the call is not secure Bad Network This indicator appears if the system de tects network anomalies like packet loss jitter etc during a call Open the menu by pressing the OK Menu button and select the warnings icon too see details Telephone This indicator is shown when there also are telephone only ...

Страница 76: ...Presentation Source is connected to the pres entation button on the Remote Control Pressing the Presentation button on the Remote Control will put the Presentation Source on display Pres entation Source is PC by default snapshot source When you take a Snapshot you get a snapshot of the Snapshot Source auto display snapshot Select Auto to automatically display a received snapshot from the Far End p...

Страница 77: ...3 video To check which options are installed see the System Information menu Manual means that you manually choose to start Dual Stream or not every time you start a presentation To utilize do as follows Auto causes Dual Video Stream to start automatically when you start a presentation i e when you choose a second video source If your system or the far end system cannot handle Duo Video H 239 you ...

Страница 78: ...source you would like to use in a call If you use Main Camera as Call Video Source the system will start with Main Camera every time you make a call regardless of what the previous video source was Tip Why you should set Call Video Source to Main Camera When you are not in a call you can work with the screen as a normal PC screen When you make a video call the system will automatically change to M...

Страница 79: ...Camera Presets Touch tones Snapshot Camera Presets Moving up and down in menu Presentation Source The Presentation Source is connected to the Presentation button on the Remote Control Pressing the Presentation but ton will put the Presentation Source on display Presentation Source is PC by default You can change the Presentation Source to any video source or None Choosing None results in opening t...

Страница 80: ... When you take a snapshot this will be from the Snapshot Source Current is the default Snapshot Source This means that you take a snapshot of the video source that is currently active You can change the Snapshot Source to any video source In this way you can assign the Snapshot key to apply only to PC for instance Press Snapshot and you will get a PC snapshot regardless of what video source that i...

Страница 81: ...uto to automatically display a received snapshot Set Auto Display Snapshot to Manual if you wish not to have them displayed on the screen when they are sent or received The snapshots will be sent and received but not displayed With Auto Display Snapshot set to Manual you must enter the Pres entation menu to display a snapshot Auto A sent or received snapshot will automatically be dis played on the...

Страница 82: ...h the Layout button on the Remote Control at any time Top Right PIP is placed in the Top Right corner Bottom Right PIP is placed in the Bottom Right corner Bottom Left PIP is placed in the Bottom Left corner Top Left PIP is placed in the Top Left corner A Picture in Picture PIP is a smaller picture placed in one of the corners of the screen The PIP enables you to see an extra picture in your video...

Страница 83: ... the VNC software installed To find the IP address of the PC place the mouse pointer on the VNC program icon in the lower right corner of the Windows taskbar You can also select Command Prompt from the Startup menu Run and type cmd then enter This will open a command window and from here type ipconfig and press enter Display Number The display number for VNC is 0 and upwards If you are using WinVN...

Страница 84: ...ht RealVNC Hightlight VNC Server Show User Properties Select Accept Socket Connections Select Auto for Display Number Display Number in the sys tem must then have the value 0 Enter a password in the Password field This must corre spond with the VNC Settings on your system Showing PC Contents Using the PC Soft Presenter VNC Start the VNC software on your PC To use VNC you must configure VNC Setting...

Страница 85: ...eo Quality Settings Main Camera VCR AUX and Split Screen have Motion as default PC Document Camera and VNC have Sharp ness as default default call settings Default Call Settings are connected with Call Settings in the call menu If you leave Call Settings unchanged when making a call the system will use the Default Call Settings in the call audio algorithm The system will automatically select the b...

Страница 86: ...ges into effect Video algorithm The system will automatically select the best video algorithm based on the video source and the capabilities of the remote system Use this menu to disable video algorithms in case you have interoperability issues when calling other systems H 261 Legacy video compression and decompression The system will always have H 261 enabled Consequently there is no way of unche...

Страница 87: ...at 16kbps G 722 High quality audio 7 kHz at 48kbps 56kbps or 64kbps AACLD CD quality audio MPEG 4 Advanced Audio Coding Low Delay 20 kHz stereo at 128kbps mono at 64kbps G 722 1 Compressed high quality audio 7 kHz at 24kbps 32kbps and 48kbps Call Rate vs Audio algorithms selected Modify remove algorithms used by unchecking the different audio algorithms Automatically preferred audio algorithms on ...

Страница 88: ...Presets Moving up and down in menu AAC LD 128 kbps Stereo Audio Specify a call rate for 128kbps AAC LD From this call rate and above 128kbps AAC LD is available On lower call rates 64kbps AAC LD is available Stereo audio requires twice the bandwidth as mono CD quality audio We therefore recommend to enable stereo audio on high call rates only To enable stereo CD qual ity audio you need to specify ...

Страница 89: ...atural Video requires the H 263 and H 263 video protocols Natural video will be disabled in H 323 MultiSite calls and in H 320 Continuous Presence MultiSite calls Auto Natural Video Auto will enable transmission of Natural Video from 768 kbps and above Reception of Natural Video is in this case always enabled Off Natural Video Off will disable both transmission and reception of Natural Video Custo...

Страница 90: ...ou may limit the outgoing bandwidth whilst keeping the maximum incoming bandwidth a feature quite useful for home office applications with different upstream and downstream rates typically ADSL CANCEL Select this icon and press OK to leave the menu undoing any changes RESTORE DEFAULTS Select this icon and press OK to restore the default settings Save Select this icon and press OK to leave the menu...

Страница 91: ...rent video sources need different Video Quality Settings Main Camera VCR AUX and Split Screen have Motion as default PC Document Camera and VNC have Sharpness as default Auto The system chooses the best of Motion or Sharpness depending on picture layout and bandwidth Sharpness Optimized for sharp video 4CIF 4SIF SVGA XGA w720p Motion Optimized for smooth motion video CIF SIF or w288p for low bandw...

Страница 92: ... SIF from NTSC w288p from wide format HD720p input VGA SVGA XGA from PC Digital Clarity At high bit rate 448p will be used from a PAL video input if Natural Video is Off or Auto or if Natural Video is x kbps and the bit rate is lower than x kbps 400p from NTSC if Natural Video is Off or Auto or if Natural Video is x kbps and the bit rate is lower than x kbps iCIF will be used from a PAL video inpu...

Страница 93: ...ault settings Save Select this icon and press OK to leave the menu putting changes into effect Touch tones Snapshot Camera Presets Default Call Settings are connected with Call Settings in the Call Menu If you leave Call Settings unchanged when making a call the system will use the Default Call Settings in the call In addition to the Call Type Net and Bandwidth you also find settings for H 320 Aut...

Страница 94: ...u undoing any changes RESTORE DEFAULTS Select this icon and press OK to restore the default settings Save Select this icon and press OK to leave the menu putting changes into effect Touch tones Snapshot Camera Presets Call Type Call Type can be set to Video Call Telephone Call For MultiSite calls Call Type enables you to specify both telephone calls and video calls in the same conference ...

Страница 95: ...m will select the right net work depending on the entered number If an IP address e g 10 12 34 56 is entered H 323 is selected If the first digits in the number match those set in H 323 Prefix H 323 is selected If a gatekeeper is present it is possible to place IP calls using telephone style numbers e g an E 164 alias according to the numbering plan implemented in the gatekeeper The gatekeeper wil...

Страница 96: ...and press OK to restore the default settings Save Select this icon and press OK to leave the menu putting changes into effect Touch tones Snapshot Camera Presets Bandwidth Determines the quality of the video picture When set to Auto the system will establish a connection using a proper bandwidth for the call typically 384kbps for IP calls When set to Max the system will set up the call with maximu...

Страница 97: ...ress OK to produce the below menu Use the Arrow keys to move to the Control Panel and press OK Use the Arrow keys to move to Audio Settings if applicable Press OK Getting to This Menu Level Settings Lets you set the maximum levels which later can be adjusted using the volume control Alert Tones and Volume Lets you choose among the alert tones available and set the volume Graphical View Provides an...

Страница 98: ...u 0 0 dB 0 2 Vpp 20 4 dBu 38 4 dBu 0 0 dB 80 mVpp 28 8 dBu 46 8 dBu 1 5 dB 0 2 Vpp 18 9 dBu 36 9 dBu 1 5 dB 67 mVpp 30 3 dBu 48 3 dBu 3 0 dB 0 3 Vpp 17 4 dBu 35 4 dBu 3 0 dB 57 mVpp 31 8 dBu 49 8 dBu 4 5 dB 0 4 Vpp 15 9 dBu 33 9 dBu 4 5 dB 48 mVpp 33 3 dBu 51 3 dBu 6 0 dB 0 4 Vpp 14 4 dBu 32 4 dBu 6 0 dB 40 mVpp 34 8 dBu 52 8 dBu 7 5 dB 0 5 Vpp 12 9 dBu 30 9 dBu 7 5 dB 34 mVpp 36 3 dBu 54 3 dBu 9 ...

Страница 99: ...asy to distinguish between incoming video calls and ordinary telephone calls we recommend the use of different ringing tones for video and telephone calls Key Tones To let the unit produce a sound every time a remote control key is pressed set Key Tones to On Alert Volume Set the volume of the Alert signals Touch tones Snapshot Camera Presets Moving up and down in menu CANCEL Select this icon and ...

Страница 100: ...nts will show you the signal flow To play a test tone navigate to any of the Inputs or Outputs and click OK The test signal will then ap pear at the outputs indicated TEST TONE To verify that things actually are con nected and work the way they claim to be connected and work you may use any of the alert signals available as test signal Touch tones Snapshot Camera Presets Moving up and down in menu...

Страница 101: ...ss OK to leave the menu putting changes into effect MCU Status line MultiSite MCU DuoVideo indicators can be displayed whenever applicable not displayed at all or displayed for a short time These indicators provide information about the conference floor to full screen When enabled anyone requesting floor will be seen by all participants as full screen web snapshots The system is able to generate J...

Страница 102: ... settings Save Select this icon and press OK to leave the menu putting changes into effect mcu status line Off The MultiSite MCU DuoVideo indicators will not be displayed On The MultiSite MCU DuoVideo indicators will be displayed and provide information about the conference Auto The MultiSite MCU DuoVideo indicators will be displayed for a few seconds and then timed out When grabbing the remote co...

Страница 103: ...changes into effect floor to full screen When Floor to Full Screen is enabled someone who requests floor will be seen by all participants as full screen When Floor to Full Screen is Off someone who request floor in a MultiSite conference using the 5 1 layout will be seen in the large square rather than full screen Off The participant who has the floor is displayed in the MultiSite layout that is u...

Страница 104: ...eam if transmitting DuoVideo the decoded stream if receiving DuoVideo applying your own logo Go to the folder where your logo is located Type ftp IP address of your local system Go to the user folder type cd user Upload the logo type put logo jpg The new logo will be displayed the next time you restart your system Recommended maximum size is 704 576 file format jpg If the file is too large no logo...

Страница 105: ...o Split displays all participants on the screen simulta neously A MultiSite call with 3 or 4 video participants is displayed with 4 Split A MultiSite call with 5 or 6 video participants is displayed with 5 1 Split Voice Switched mode displays the participant that is speak ing in full screen 4 Split displays the four latest speaking Participants 5 1 Split displays the speaking participant in a big ...

Страница 106: ... Name As a default the video inputs are given the names Main Cam PC Doc Cam VCR AUX or VNC dependent on what video sources are available on your system You may change these to your liking Note however that the video names cannot exceed eight characters The names correspond to the video names in the Pres entation Menu Main Menu Presentation Main Video or Presentation Video pop up menu If video name...

Страница 107: ...articipating have equipment supporting encryption video meet ings may be set up using encrypted commu nication Encryption mode Lets you choose between AES DES or have the system itself find the mode that all parties support passwords Administrator Password IP Access Password Streaming Password VNC Password and Ac cess Code are duplicated from their respective menus Using the Security menu gives yo...

Страница 108: ...mode AES or DES If there is a mix of AES and DES encryption only the symbol for DES encryption single padlock will be displayed The closed padlock will only be displayed on each site when all links in the MultiSite conference are encrypted See Icons for a presentation of the icons Technical encryption information like encryption algorithm and encryption check code used can be found in the Call Sta...

Страница 109: ...le Press OK Getting to This Menu CANCEL Select this icon and press OK to leave the menu undoing any changes lan settings The LAN settings contain IP Settings H 323 Settings SIP Settings Wireless LAN Settings SNMP Settings IP Services Quality of Service 802 1X Settings Network Profiles This menu consists of 7 network profiles a prefix can be added for each profile If you add a prefix to a profile t...

Страница 110: ...nt Note that for IPv6 DHCP is used for NTP DNS Server Addresses DHCP IP address IP subnet mask and Gateway are not used because the DHCP server assigns these parameters Static The system s IP address IP subnet mask and Gateway must be specified in the IP address field IP address IP address defines the network address of the codec This address is only used in static mode In DHCP mode the assigned I...

Страница 111: ...efault settings Save restart Select this icon and press OK to leave the menu restarting the system to put IP Setting changes into effect Save Select this icon and press OK to leave the menu saving the changes Note that restart is needed to put changes into effect here DNS Domain Name DNS Domain Name is the default domain name suffix which is added to unqualified names Example DNS Domain Name is ex...

Страница 112: ...s Valid characters are 0 9 and When using a gatekeeper the system will send a message to the gatekeeper containing both the E 164 address and the H 323 ID of the system H 323 ID The H 323 ID of the system may be specified here The System name is used if no H 323 ID is entered H 323 Call Setup Direct An IP address must be dialled in order to make a H 323 call The system will not use a gatekeeper or...

Страница 113: ...still try a normal registration Authentication ID Authentication Password The system sends the Authen tication ID and Password to a Gatekeeper for authentication The authentication is a one way authentication from the endpoint system to a Gatekeeper i e the endpoint is authenticated to the Gatekeeper If the Gatekeeper indicates that no authentication is required the endpoint will still try to regi...

Страница 114: ... following pages CANCEL Select this icon and press OK to leave the menu undoing any changes RESTORE DEFAULTS Select this icon and press OK to restore the default settings Save Select this icon and press OK to leave the menu putting changes into effect Touch tones Snapshot Camera Presets CallManager IP This is the CallManager IP address that is used if you specify H 323 Call Setup CallManager Touch...

Страница 115: ...oconference Off Resource Reservation Protocol is switched off H 323 Ports Static When selecting static H 323 ports for TCP connec tions the ports 5555 to 5574 will be used for Q 931 and H 245 respectively Dynamic The system will al locate which ports to use when opening a TCP connection The reason for doing this is to avoid using the same ports for subsequent calls as some firewall consider this a...

Страница 116: ...a full name or system name Examples Alice Wonderland System 01 SIP Address The SIP Address is the SIP URI used to address the system Examples alice example com 1234 1234 example com Server Discovery Auto When selected the SIP Server address is obtained using Dynamic Host Configuration Protocol DHCP Manual When selected the manually config ured SIP Server address will be used Server Address The Ser...

Страница 117: ...apabilities in SIP RFC 3890 A Transport Independent Bandwidth Modifier for SDP RFC 3891 The SIP Replaces Header RFC3892 Referred By Mechanism RFC 3960 Early Media RFC 4028 Session Timers in SIP RFC 4145 TCP Based Media Transport in the SDP draft levin mmusic xml media control 03 txt draft ietf mmusic sdp media content 01 txt draft ietf mmusic sdp bfcp 03 txt draft ietf xcon bfcp 06 txt draft ietf ...

Страница 118: ...t Managed Used when communication is made through an access point Make sure the corresponding settings are pro grammed into the access point Press Restart from Control Panel in order to activate the set tings Required cards Compaq WL110 11 Mbps Wireless LAN Lucent Orinoco 11 Mbit s SILVER Lucent Orinoco 11 Mbit s GOLD Cisco Aironet 350 series AIR PCM 350 series Enterasys Networks RoamAbout 802 11 ...

Страница 119: ...Trap Host Identifies the IP address of the SNMP manager SNMP Simple Network Management Protocol SNMP Ver 1 is used to monitor and configure different entities in a network The system s SNMP Agent responds to requests from SNMP Managers a PC program etc SNMP traps are generated by the agent to inform the manager about important events Traps can be sent to multiple SNMP Trap Hosts Enter the IP addre...

Страница 120: ...hanges into effect here NTP IP This is the NTP time server address from which the system can get updated time information This is a requirement for proper operation if H 235 authentication is implemented The Network Time Protocol NTP is used to synchronize the time of the system to a reference time server The NTP IP set ting holds the IP address to a time source where the system can get the exact ...

Страница 121: ...u undoing any changes RESTORE DEFAULTS Select this icon and press OK to restore the default settings Save Select this icon and press OK to leave the menu putting changes into effect QoS Type IP Precedence IP Precedence QoS method is used Please see the following pages for details Diffserv Diffserv QoS method is used Please see the following pages for details Off No QoS is used Touch tones Snapshot...

Страница 122: ...into effect IP Precedence Video Used to define which priority audio video data and signalling should have in the network The higher the number the higher the priority The priority ranges from 0 off to 7 for each type of packets Auto will provide the following priority Audio 4 Video 4 Data 3 Signalling 6 IP Type of Service TOS Helps a router select a routing path when multiple paths are available D...

Страница 123: ...ing any changes RESTORE DEFAULTS Select this icon and press OK to restore the default settings Save Select this icon and press OK to leave the menu putting changes into effect Touch tones Snapshot Camera Presets IP Precedence Telephony Used to define which priority audio should have in the network for telephone calls The higher the number the higher the priority The priority ranges from 0 off to 7...

Страница 124: ...g any changes RESTORE DEFAULTS Select this icon and press OK to restore the default settings Save Select this icon and press OK to leave the menu putting changes into effect Touch tones Snapshot Camera Presets Diffserv Video Used to define which priority Audio Video Data and Signaling packets should have in an IP network The priority ranges from 0 to 63 for each type of packets Recommended value f...

Страница 125: ...ng any changes RESTORE DEFAULTS Select this icon and press OK to restore the default settings Touch tones Snapshot Camera Presets Diffserv telephony Used to define which priority Audio packets should have in an IP network for telephone calls The priority ranges from 0 to 63 for each type of packets Recommended value for telephony is DiffServ Code Point DSCP EF which equals the value 46 Save Select...

Страница 126: ...ng 802 1x Mode to On On 802 1x authentication enabled Off 802 1x authentication disabled Anonymous Identity The 802 1x Anonymous ID string is to be used as unencrypted identity with EAP types that support different tunneled identity EAP PEAP and EAP TTLS The anonymous ID if set will be used for the initial unencrypted EAP Identity Request Identity The 802 1x Username is the username needed for 802...

Страница 127: ...K to restore the default settings Save Select this icon and press OK to leave the menu putting changes into effect This menu consists of 6 network profiles No 2 is not in use a prefix can be added for each profile If you add a prefix to a profile this prefix will automatically be added in front of the number being dialled The three lower profiles Using the profiles Nos 5 6 and 7 you can enter the ...

Страница 128: ... to be connected for data transfer and control purposes Note that when connecting to a PC the connecting cable must be a straight through RS232 cable Set Baud Rate Parity Databits and Stopbits as required for your application A succesful connection of a PC to Data port 1 requires that the PC and the system are identically configured The control interface provided by the data port supports a subset...

Страница 129: ...erver 5 Address IP DNS Domain Name H323Gatekeeper Discovery Auto H323Gatekeeper Address H323Gatekeeper Authentication Mode Off H323Gatekeeper Authentication ID H323Gatekeeper MultipleAlias Off CallManager Address H323CallSetup Mode Direct H323Prefix NAT Mode Off NAT Address 127 0 0 1 IPMedia MaxVideoTXRate 1920 RTP Ports Dynamic RTP MTU 1300 QoS Precedence Telephony Audio Auto QoS Precedence Telep...

Страница 130: ...rce 5 Name PC Video Inputs Source 5 Quality Sharpness Video Inputs Source 6 Name VNC Video Inputs Source 6 Quality Sharpness Video Inputs Source 7 Name HD Cam Video Inputs Source 7 Quality Sharpness Video Outputs ScreenFormatPC 16 9 Video Outputs FormatPCWideScreen Normal Video Outputs DVIResolution Auto Video Outputs AllowHD720p Off Video Outputs AllowWXGA Off MainVideoSource 1 DuoVideoSource 5 S...

Страница 131: ...rd On CorporateDirectory Mode Off CorporateDirectory Address CorporateDirectory Path tms public exter nal phonebook PhoneBookService asmx ExternalServices Mode Off ExternalServices Address ExternalServices Path tms public EndpointServ ice ExternalManager Address ExternalManager Path tms public external management SystemManagementService asmx SIP Mode Off SIP Server Discovery Auto SIP Server Addres...

Страница 132: ...nel and press OK The Control Panel will now be displayed Use the Arrow keys to navigate to the User Guide The On line User Guide serves to help you when you feel stuck and time is short It is not an exhaustive presentation of the system s features but it comes in handy whenever you need to get yourself up and going Control Panel Cancel takes you one step back Next page Previous page Page number to...

Страница 133: ...out the call is available through the Call Status window The menu has two columns one for transmitted and one for received audio video data information If Dual Stream or MultiSite is available on your system and in use pressing the Vertical Arrow keys will show one page per connected site Detailed call status Provides more detailed information on packet loss and jitter System Selftest The system p...

Страница 134: ...all Status System Information Touch tones Snapshot Camera Presets System Information is a two page display providing system information System Information Select System Information to view system numbers line status software version hardware serial number and other useful information Press arrow key up and down to scroll in the System Information list ...

Страница 135: ... Status On line User Guide Call Status Comprehensive information about the call is available through the Call Status window The menu has two columns one for transmitted and one for received audio video data information If Dual Stream or MultiSite is available on your system and in use pressing the UP DOWN keys will show one page per connected site ...

Страница 136: ... GUIDE Control Panel Diagnostics Detailed Call Status Cancel View Adminstrator Settings Detailed Call Status Call Status On line User Guide Detailed call status The detailed call status menu provides detailed information on packet loss and jitter ...

Страница 137: ... 1700MXP USER GUIDE System Selftest Control Panel Diagnostics System Selftest The system performs a check to determine internal hardware integrity System Selftest is useful when you want to check if your network connection is active ...

Страница 138: ...XP USER GUIDE View Adminstrator Settings Control Panel Diagnostics Touch tones Snapshot Camera Presets Adminstrator settings This window displays all the system set tings Use the Arrow keys on the remote control to scroll through the list ...

Страница 139: ... TANDBERG 1700MXP USER GUIDE Control Panel Diagnostics IP Address Conflict Check IP address conflict check The system will give a warning if there is an IP conflict Initiate this check by selecting IP Address Conflict Check ...

Страница 140: ...40 TANDBERG 1700MXP USER GUIDE Warnings Control Panel Diagnostics Warnings Any warnings registered by the sys tem will be displayed in the Warnings menu Open a warning in the list to get more information about the warning ...

Страница 141: ...ERG 1700MXP USER GUIDE Audio Demo Control Panel Audio demo A feature designed to demonstrate the high quality of the TANDBERG audio system Click on the Audio Demo button to demonstrate the high quality of the TANDBERG audio system ...

Страница 142: ......

Отзывы: