Tanco Autowrap 404 EH Скачать руководство пользователя страница 16


16 


Tanco Autowrap 404 EH 

Operators manual  

The Tanco Autowrap Bale Wrap Controller enables the operator to monitor and control the operation of the bale 
wrapper at any stage of the wrapping cycle. The controller is designed for models: 280ARC, 404EH, 580A, and 
1080A table-type wrappers. 
There are 2 main operating modes – Automatic and Manual. The automatic mode permits ‘one-touch wrapping’ to 
ease the workload on the operator. In addition to the standard auto-wrap cycle where the bale load arm is operated 
manually, for the 580A and 1080A wrappers, bale loading and unloading can be incorporated into the standard 
auto-wrap cycle (the ‘AUTOLOAD’ option).  
The controller is fully programmable to optimise wrapping performance. Bale counts are automatically logged in any 
one of 10 selectable memory stores, in addition to a grand total memory store. 


8.1.1 

I

  Please read and understand the instructions for using this controller before operating the machine. 


This controller is fitted with a pushbutton type On/Off Emergency Stop switch. Always ensure the controller 
is switched OFF via this switch before attempting any adjustment or maintenance to the machine. 


The machine is fitted with a safety beacon which is automatically activated when a loading, wrapping or 
tipping operation is initated via the controller. If the beacon is off, do not assume it is safe to move into the 
proximity of the machine unless you have confirmed that the controller is switched off and the machine 
power source is disengaged.


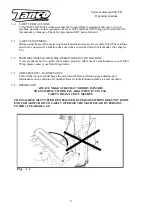
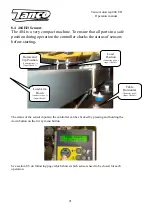
For safety reasons the 280ARC machine beacon will begin flashing 3 seconds before the automatic cycle 
commences, after initiating the wrapping cycle via remote control. If the beacon begins flashing when you 
are in proximity to the machine, then 

immediately

 stand clear.


Please follow ALL other safety instructions given in the manufacturers’ Operator Handbook for the 
machine.


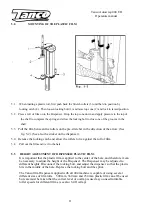
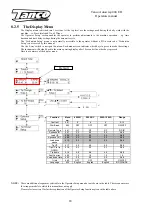
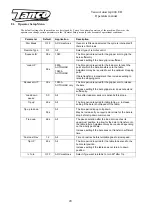
8.1.2     Main operating Functions and Display 

The principal instrument features and operating functions are shown in figure 1 below. 


8.1. Introduction 

8.2 Operation 

Figure 1 

Add 1 wrap  

to current (or next) bale 

(only in automatic mode)

Table - tip up 

in Manual 

mode 

Autotip 

in Automatic mode

Release film grip


Fast wrap / Resume wrap

(after stopping mid-cycle 

using the STOP switch) 

Cut and grip film


Slow wrap


Reverse table 

Select Operating Mode 

Start Automatic cycle 

Includes bale loading if the 

AUTOLOAD option is 

Bale Load Arm down  

/Emergency Stop 
/Emergency Stop 

(Press STOP switch to stop 

during the wrap cycle – switch 

on and  

press         to resume cycle) 

4-way Menu switch to 

  Set No. of wraps 

  Change/reset bale sub-total 

  Access Operator Setup menu 

  Access Technician Setup menu 

Table - tip down 

(in Manual mode)


A 2-line, 32 character dot 
matrix , back-lit display 

shows in the normal 
operating mode: 


Current No. of wraps 


Target No. of wraps 


Wrapping speed (rpm) 


Bale total (10 separate 


Bale Load Arm up 


Содержание 404 EH

Страница 1: ...1 Tanco Autowrap 404 EH Operators manual TANCO AUTOWRAP 404 EH MINI BALE WRAPPER OPERATORS HANDBOOK WD03 404EH M0309 404 EH Trailed with load arm and Automatic Control...

Страница 2: ...ny part not manufactured or having written approval by the sellers have been fixed g Any second hand goods or parts thereof Any allegedly defective part or parts returned to the seller must be sent ca...

Страница 3: ...SETTING UP MOUNTING OF THE MACHINE 10 5 0 MOUNTING OF PLASTIC FILM 11 12 6 0 ADJUSTMENTS OPERATING 13 7 0 OPERATING INSTRUCTION 14 8 0 INSTRUCTIONS CONTROL BOX 15 24 9 0 PERIODIC MAINTENANCE 23 10 0 C...

Страница 4: ...4 Tanco Autowrap 404 EH Operators manual Fig 1 404 EH Model 1 Roller 2 End roller 3 Tilt Frame 4 Film Dispenser 5 Cutter 6 Drawbar 7 Jockey wheel 8 Wheel 9 Load arm 10 Squeeze arm...

Страница 5: ...are a part of the machine Read carefully through this manual and specially chapter 2 0 safety instructions before starting the machine and follow the instructions thoroughly If problems should occur p...

Страница 6: ...s manual See chapter 2 5 2 2 BECOME FAMILIAR WITH THE OPERATIONS OF THE MACHINE If you are unsure how to operate the machine properly either use of or maintenance to your Mini Wrap please contact your...

Страница 7: ...frame on both sides and in the back end of the machine Keep therefore fingers and feet in safe distance Fig 2 2 3 When tipping the turntable the bale will roll free off the machine Staying behind the...

Страница 8: ...ciently around the bale it is stretched before being wrapped so it is somewhat thinner when it is put on the bale With short term storage up to eight weeks it is recommended that bales have a minimum...

Страница 9: ...birds and small rodents If the plastic is pierced it must be sealed with weatherproof hard wearing tape preferably under the outermost layer of plastic Ensure that the hole is adequately sealed 3 6 T...

Страница 10: ...ssure before you connect the oil hoses Use the tractors hydraulic lever Connect the hoses so that the turntable rotates counterclockwise To make sure that the bale wrapper works properly the tractors...

Страница 11: ...the locking catch and allow the rollers to lie against the roll of film 5 4 Pull out the film and tie it to the bale 5 5 HEIGHT ADJUSTMENT OF DISPENSER PLASTIC FILM It is important that the plastic fi...

Страница 12: ...ange of stretch levels on the Film Dispenser If the bolt 1 is fitted in position 2 the top set of gears provide the stretch 55 By removing the bolt from position 2 and fitting it in position 3 the bot...

Страница 13: ...e speed is approx 22 revolutions per minute Just below 3 seconds per revolution and lock the knob in position by tightening the allen headed screw in it 6 5 OVERLAP To control the overlap stop the mac...

Страница 14: ...ngth must be adjusted so ensure the chain tension is tightened before finally the bolts are replaced Remember that a hard and well packed bale will give the best result when wrapping 7 4 START Remembe...

Страница 15: ...__ 16 8 2 1 Operation in Automatic mode ____________________________________________________17 8 2 2 Manually interrupting an automatic wrapping cycle__________________________________17 8 2 3 Manual...

Страница 16: ...do not assume it is safe to move into the proximity of the machine unless you have confirmed that the controller is switched off and the machine power source is disengaged For safety reasons the 280AR...

Страница 17: ...from where it stopped For safety reasons if it is necessary to work on the machine e g in the event of a film break or the film running out then it is strongly recommended that you disengage the mach...

Страница 18: ...r 30 seconds if no other key is pressed Here is a summary of the display menu NOTE There are additional sequences selectable in the Operator Setup menu but not shown in the table These sequences are f...

Страница 19: ...is Store A To select a particular store navigate the display menu using the 4 way switch Press the up down arrow keys to select the store then press the ENTER key to confirm the selection 8 2 7 Resett...

Страница 20: ...OUT 3 0s 1080A AUTOLOAD only The time period required for the gripper arm to release the bale Increase setting if the bale gripper arm does not extend sufficiently Load down pause 0 0 All Time after...

Страница 21: ...The status of the sensor inputs to the controller can be checked by pressing and holding the down button on the 4 way menu button See section 8 5 on following page which shows which sensors need to be...

Страница 22: ...lf 8 5 1 Load arm function The sensor inputs required to enable operation of the load arm are Table Horizontal Turntable in Load Position 8 5 2 Turntable function The sensor inputs required to enable...

Страница 23: ...NOT TIGHT TOO MUCH CAUSE THIS WILL INCREASE THE WEARING OF THE BEARINGS The chains on the square rollers also have to be adjusted There is one chain tensioner on each side 9 4 GEARS The Bevel gears in...

Страница 24: ...ler If the pressure is less than 180 bar when energizing a function there will be less power for the functions OIL AMOUNT The oil amount that the tractor delivers must be minimum 15 liters minute Max...

Страница 25: ...ice BEFORE you make the error larger and more difficult to repair 11 3 LOAD ARM TILT TABLE OR CUTTER DOES NOT FUNCTION The cables have degraded and must be replaced or there is a loose connection some...

Страница 26: ...Tanco Autowrap 404 EH Operators manual There are 3 basics which must ALWAYS be followed if the machine is to function correctly Working Pressure 180 Bar Power Supply 12V Back Pressure Max 10 Bar 140P...

Страница 27: ...27 Tanco Autowrap 404 EH Operators manual 12 0 ELECTRICAL CIRCUIT...

Страница 28: ...28 Tanco Autowrap 404 EH Operators manual 13 0 HYDRAULIC CHART...

Страница 29: ...S Hydraulics Many modern tractors have a Load Sensing LS hydraulic system This is most efficient as the pump remains on standby pumping no oil until it gets a signal from the machine It is possible to...

Страница 30: ...404 EH SERIAL NO D10 xxx To which this declaration relates corresponds to essential requirements of the Directive 89 392 336 EEC as amended To conform to these essential health and safety requirement...

Отзывы: