background image

15

Photo 9A

Photo 9B

Photo 9C

Photo 9D

Ball Jams

Your robot is equipped with a special system 
to detect and react to problems in the ball 
channel. When the system detects a problem, it 
will attempt to automatically clear the ball jam 
by turning the Ball Feed Motor and the wheels 
forward and backward 7-8 times.

If the error can’t be resolved so, all motors stop 
and the system shows an error code on the 
display (Er1 or Er2). Er1 indicates a problem in the base of the robot, and Er2 indicates a problem in the 
head of the robot (see Troubleshooting, p. 17).

To begin troubleshooting, first disconnect power. For an Er2 code, check that a ball is not stuck among 
the 3 wheels (commonly occurs after moving the head height down). If so, simply remove those balls by 
hand and resume normal operations.

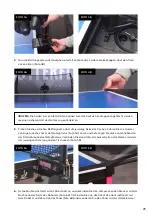
For an Er1 code, remove the head by disconnecting the Head Cable, loosening the large Black Knob on 
the rear of the Ball Tube, and pulling up on the head. Then tilt the entire net system forward to expose 
the access slot on the bottom of the Base (see Photo 10). Take a long rod-like tool (screwdriver, dowel, 
etc.) that is about 30 cm (12 inches) long, insert it into the access slot, and push balls out the top of the 
lower Ball Tube.

Photo 10

Содержание AMICUS START

Страница 1: ...1 AMICUS START Table Tennis Robot Owner s Manual Bedienungsanleitung Manuel d utilisation ...

Страница 2: ... both Adjust height of ball delivery to simulate anything from low serves to high lobs Regulate all functions with the Control Panel located on the player s end of the table Covered by a full 2 year Manufacturer s Warranty and a 5 year guarantee of parts and service avail ability See full warranty information on page 20 CAUTIONS Please read this Owner s Manual carefully before using the machine Th...

Страница 3: ... Head Height 8 Starting Your Robot 8 Balls Thrown To One Placement 8 Balls Thrown To 2 Or More Placements 9 Random Controls 10 The Remote Switch optional 10 Linking the Remote Switch to the Robot 11 Changing The Battery In Your Remote 11 Take Down Storage Transport 12 4 Maintenance Repair 13 Cautions 13 Checking Adjusting Wheel Clearance 13 Replacing The Wheels 14 Ball Jams 15 Other Maintenance 16...

Страница 4: ...he end of the table Gently let go of the base and the robot will hang by its own weight as seen in Photo 2 Please note that AMICUS robots are designed to fit onto 25 mm 1 in thick tops If your top is less than 25 mm thick you will need to adjust the support legs using the height adjusting screws Turn the screws inward until the thickness difference between 25 mm and your particular table surface i...

Страница 5: ...lp the brackets stay down and stabilize the entire net 5 Pull a Side Net along the side line of the table and pass its thick rubber band over the top of the table s net standard see Photo 5A Then loop the rubber band around the Clamp Screw that holds the net onto the table Attach the Side Net s Velcro tab to its matching piece located on the Corner Bracket as seen in Photo 5B Photo 5A Photo 5B 6 P...

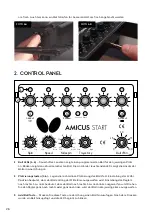
Страница 6: ...2 1 4 0 25 50 75 100 Ball Min Place Scatter 1 2 3 4 5 6 Random Erase Ball Add Ball Back Top More Less 1 2 3 5 6 7 8 4 9 10 1 Ball LEDs 1 6 When lit and solid indicates a ball is programmed for that spot A flashing light indicates the Current Ball Number of lit LEDs indicates the number of balls in your Exercise 2 Placement Knobs 1 6 Sets the left right placement for that ball Setting at the 12 00 ...

Страница 7: ... indicate lower positions 10 Ball Min knob Decreases or increases ball frequency Balls per Minute Frequency ranges from about 6 to over 100 balls per minute 60 is the average topspin counter rate 30 45 is often used for beginner novice training Lower settings can be used for serve return 3rd ball attack other specialized drills 3 Operation Nomenclature To assist in clearly communicating the variou...

Страница 8: ...rab your racket and prepare to return balls from your robot Turn all knobs in middle position then turn the Ball Min knob to your desired setting and observe where the balls land in relation to the centerline If balls are delivered either left or right of the centerline then stop ball delivery At the robot loosen the large Black Knob on the rear of the Ball Tube see Photo 6B and rotate the head in...

Страница 9: ... liking turn up Ball Min to have the robot deliver your chosen ball type to your chosen location at the desired frequency If it is not what you want turn Ball Min to 0 and change the settings until you get the type of shot you want Then try again Although you may find it easiest to stop play to make changes to the settings you can also change settings on the fly without stopping play Balls Thrown ...

Страница 10: ... in diameter But with Random Scatter balls are delivered in an enlarged area of approximately 40cm 16in diameter Random Place requires at least 2 Balls in an Exercise If there is only a single Ball the Place LED will not light up With Random Place on the robot will randomly select one of the Placements programmed for the Exercise and throw the ball there in an unpredictable order E g let s say an ...

Страница 11: ...the linking process is ended 2 During the countdown press any one of the buttons on the remote switch 3 The linking is completed The robot will automatically end the linking process and resume normal operation 4 Test your remote by pressing the A button to see if your robot begins throwing balls Changing The Battery In Your Remote The Remote is powered by two 3V CR2016 button cell batteries After ...

Страница 12: ... 5 Stand your robot upright on the floor off to the side of your table or in a nearby closet When you re ready to train again it s a quick easy matter to set your robot back up on your table If you re removing the robot for transport or long term storage we recommend placing your robot into the included Carrying Case with these additional steps 6 Loosen the Black Knob on the rear of the Ball Tube ...

Страница 13: ... robot in a hot car or trunk 6 Use only 40 or 40 balls in your robot The better ball you use 3 star are best the more consistent your robot can throw that ball Checking Adjusting Wheel Clearance AMICUS wheels are very durable at least 1000 hours But eventually these wheels will wear down after long or intense use As the wheels wear down the space among the 3 wheels enlarges causing the wheels to l...

Страница 14: ...onto the motor shaft until the position of the original wheel is reached Tighten the setscrew Now manually spin the wheel to be sure it is not rubbing on any surface If so loosen the setscrew and slightly move the wheel s position on the shaft and try again until the wheel no longer rubs on any surface Lastly tighten the setscrew securely For the upper motors the procedure is a little bit differen...

Страница 15: ... head of the robot see Troubleshooting p 17 To begin troubleshooting first disconnect power For an Er2 code check that a ball is not stuck among the 3 wheels commonly occurs after moving the head height down If so simply remove those balls by hand and resume normal operations For an Er1 code remove the head by disconnecting the Head Cable loosening the large Black Knob on the rear of the Ball Tube...

Страница 16: ...or Support Legs point towards net A Loosen the large Black Knob on the rear of the Ball Tube then rotate head 180 so head points away from net Grasp Support Legs and rotate them away from net p 4 2 The robot does not function No lights no sound no movement A Control Panel Cable loose or unattached Check connection at Control Panel Base B Plug Power Supply into power outlet and connect other end to...

Страница 17: ...d dry before placing back into robot D Is a foreign object or ball preventing the Ball Stirring Springs from moving If so remove that foreign object or ball E Was Black Knob tightened too much denting the upper Ball Tube Disconnect the head and roll a ball up and down the Ball Tube to check if it is obstructed If so call an AMICUS service center F Bad Ball Feed Motor broken gears or motor support ...

Страница 18: ...motors 13B Right top shooting motors 13LO Lower shooting motor 14 Throwing wheels 15 Throwing motor cover 16 Ball placing head 17 Placing motor right left 18 Placing motor high low 19 Deflector 20 Placing motor cover 21 spacer tubes and screws 22 Power electronic 23 Power electronic cover plate 24 Extension cord Start Expert 25 Control box hanger 26 AMICUS Start controlbox 27 AMICUS Expert control...

Страница 19: ...19 ...

Страница 20: ...manship for a period of 2 years from date of purchase Should this product become defective due to material or workmanship during the warranty period contact your AMICUS support describing the problem Always provide your serial number and dated proof of purchase We will provide you with return authorization and shipping instructions or provide a replacement part and instructions for replacement If ...

Страница 21: ...21 Owner s Manual Bedienungsanleitung Manuel d utilisation AMICUS START Tischtennis Roboter ...

Страница 22: ...möglicht flache Aufschläge bis hohe Lobs Alle Einstellungen können per Control Panel von der Spielerseite verändert werden 2 Jahre Herstellergarantie sowie 5 Jahre Ersatzteilverfügbarkeit und Serviceversprechen Vollständige Informationen zur Garantie finden Sie auf Seite 41 HINWEISE Bitte lesen Sie die Bedienungsanleitung aufmerksam vor Inbetriebnahme durch Der Roboter darf nur mit Spannungen zwis...

Страница 23: ...ehrere Platzierungen 29 Random Funktion 30 Die Fernbedienung Optional 31 Verbindung der Fernbedienung mit dem Control Panel 31 Wechseln der Batterie Ihrer Fernbedienung 32 Abbau Lagerung Transport 32 4 Wartung und Reparatur 33 Warnungen Vorsichtsmaßnahmen 33 Überprüfung und Anpassung des Radabstands 33 Ersetzen der Räder 34 Ballstau 35 Andere Wartungen 36 5 Fehlerbehebung 37 6 Liste der Ersatzteil...

Страница 24: ...sicher gehalten wird Foto 2 Die AMICUS Roboter sind von Werk aus auf Tische mit 25mm Oberfläche voreingestellt Um auch bei dünneren Oberflächen einen idealen Halt und eine senkrechte Position des Auswurf kopfes zu gewährleisten sind die Haltehaken an ihrem oberen Ende mit einer Höhenverstellung versehen Drehen Sie hierzu die Verstellköpfe so weit nach oben dass die Differenz der Oberfläche gegenüb...

Страница 25: ...Tisches Führen Sie die Gummi schlinge zunächst unter der Netzgarnitur Foto 5A durch und befestigen Sie diese anschließend an der Stellschraube des Netzpfostens Verbinden Sie den Klettverschlussstreifen des Netzes mit dem der jeweiligen Halterung an den Tischecken Foto 5B Foto 5A Foto 5B 6 Schließen Sie das Netzteil ans Stromnetz an und verbinden Sie den entsprechenden Stecker mit der Buchse an der...

Страница 26: ...ken zeigt den aktuell selektierten Ball Die Anzahl der leuchtenden LEDs zeigt die Anzahl der Bälle in einer Übung an 2 Platzierungstasten 1 6 Legen die rechte linke Platzierung des Balls fest Einstellung der 12 Uhr Position bedeutet dass der Ball entlang der Mittellinie ausgeworfen wird Einstellung des Reglers nach rechts bzw links bedeutet dass der Ball nach rechts bzw nach links ausgeworfen wird...

Страница 27: ...tionen 10 Ball Min Regler Erhöht oder verringert die Ballfrequenz Ball pro Minute Die Frequenz geht von 6 100 Bälle pro Minute 60 ist die durchschnittliche Topspin Konter Rate 30 45 wird oft für Anfän gertraining verwendet Niedrigere Einstellungen können für Aufschlag Rückschlag für den dritten Ball oder andere spezielle Übungen verwendet werden 3 Betrieb Nomenklatur Um die vielfältigen Funktionen...

Страница 28: ...Min Regler auf die ge wünschte Einstellung Sie werden hören wie die Räder sich beginnen zu drehen und die Bälle gelangen in die Ballmaschine Nach ein paar Sekunden erreicht der erste Ball das Ende der Röhre Stellen Sie den Ball Min Regler auf 0 um den Vorgang anzuhalten Nehmen Sie ihren Schläger und bereiten Sie sich für die Rückschläge vor Drehen Sie zunächst alle Regler in die Mitte Die ersten B...

Страница 29: ...ie Platzierung 2 bestimmen den rechten bis zum linken Landepunkt des Balls Die 12 Uhr Einstellung entspricht der Mittellinie des Balls Einstellungen nach rechts entsprechen einer zu nehmenden Landung in Richtung der rechten Tischecke Einstellungen nach links entsprechen einer zunehmenden Landung in Richtung der linken Tischecke Einstellung der Frequenz des Balls Die Ball Min Taste 10 verringert od...

Страница 30: ...AMICUS START bietet 3 Typen von zufälliger Steuerung zufällige Streuung zufällige Platzierung und die Kombination der zufällige Streuung und Platzierung Zum aktivieren müssen Sie die Random Taste drü cken Beim ersten Tastendruck wird die zufällige Streuung ausgewählt Die Streuungs LED leuchtet auf Drücken Sie die Random Taste ein zweites Mal es leuchtet die Platzierungs LED auf die Streuungs LED g...

Страница 31: ...e Das Spiel kann durch Drücken der Stop Taste angehalten werden 3 Drücken der Taste während des Spielst erhöht die Ballfrequenz Drücken der Taste senkt diese entsprechend Verbindung der Fernbedienung mit dem Control Panel Jede Fernbedienung ist mit einem individuellen Control Panel verbunden Diese Verbindung wird bei der Produktion gefertigt und jedes Control Panel mit der dazugehörigen Fernbedien...

Страница 32: ...nnen Sie die Gummibänder die die Seitennetze mit dem Tisch verbinden Legen Sie die Seiten netze in die Ballschale des Hauptnetzes 3 Klappen Sie das Hauptnetz bis zum ersten Anschlag des Klappmechanismus hoch Hängen Sie den Roboter von dem Tisch ab und stellen Sie ihn mit der offenen Seite zu Ihnen gerichtet auf den Tisch 4 Legen Sie die aufgerollten Kabel das Control Panel und die Halterung für da...

Страница 33: ...uen Butterfly Bällen nicht nötig Halten Sie Ihre Spielfläche sauber um zu verhindern dass durch die Bälle die auf dem Boden waren Schmutz in die Maschine gelangt 4 Die Räder haben eine besondere Beschichtung um die Lebenszeit dieser zu verlängern Bitte ver suchen Sie nicht die Räder mit Chemikalien zu reinigen da diese für die Beschichtung schädlich sein können 5 AMICUS Roboter sind für saubere un...

Страница 34: ... Durchmesser von 37 38mm ein wandfrei Ersetzen der Räder Wenn die Räder nicht mehr angepasst werden können oder die spezielle Beschichtung abgenutzt ist sollten die Räder ersetzt werden Starten Sie mit dem unteren Rad Lösen Sie mit einem 2mm Sechs kantschlüssel die kleine Schraube Foto 9A die die jeweilige Schussrolle auf ihrem Motor fixiert und entfernen sie die drei Kreuzschlitzschrauben die Sch...

Страница 35: ...robleme im Ballkanal er kennt und darauf reagiert Wenn das System ein Problem erkennt versucht es den Ballstau auto matisch zu beheben indem es den Zuführmotor und die Räder 7 8 Mal vor und zurückdreht Wenn das Problem so nicht gelöst werden kann stoppen alle Motoren und die LEDs blinken Um mit der Fehlerbehebung zu beginnen trennen Sie zuerst die Stromversorgung Um heraus zufinden ob das Problem ...

Страница 36: ...Min Regler aufgedreht wird Ohne irgendwelche Bälle in der Maschine sollte sich die Spin del ca 11 12 Mal drehen bevor sie automatisch stoppt Wenn dies so ist füllen Sie wieder Bälle in die Maschine und nehmen Sie den normalen Betrieb wieder auf Wenn dies nicht der Fall ist deutet es auf ein Problem mit dem Zuführmotor hin und oder dem Ballsammelmechanismus Bitte setzen Sie sich in diesem Fall mit ...

Страница 37: ...Sie die Gummibänder und die blaue Schaumstof funterlage von der Deflektorplatte entfernt Wenn nicht entfernen Sie diese damit die Deflektorplatte sich frei be wegen kann Diese Teile werden nur während des Transports benötigt B Ist Random aktiviert Wenn ja schalten Sie es aus S 30 C Ziehen Sie alle 3 Kabelverbindungen ab und schließen Sie sie erneut an Schließen Sie das Kabel zu letzt an das Contro...

Страница 38: ...re Ballröhre eingedrückt Trennen Sie den Kopf ab und rollen Sie einen Ball hoch und herunter um zu prüfen ob Sie blockiert ist Wenn dies der Fall ist wenden Sie sich an ein AMICUS Service Center F Möglicherweise ist der Zuführmotor defect bitte wenden Sie sich an ein AMICUS Service Center G Auswurfmotor defekt Bitte wenden Sie sich an den AMICUS support H Überhitzte Elektronik Schalten Sie den Str...

Страница 39: ...Unterer Motor 14 Schussrollen 15 Abdeckung Schussmotor 16 Platzierungskopf 17 Platzierungsmotor links rechts 18 Platzierungsmotor auf ab 19 Deflektorplatt 20 Abdeckung Platzierungsmotor 21 Abstandsstücke Schrauben 22 Stromversorgungsplatine 23 Abdeckung Stromversorgungsplatine 24 Verbindungskabel START EXPERT 25 Bedienpultaufhängung 26 Control Panel START 27 Conrol Panel EXPERT 28 7 Zoll Tablet PR...

Страница 40: ...40 ...

Страница 41: ... Wenn das Produkt während der Garantiezeit aufgrund von Material oder Verarbeitungsfehlern defekt sein sollte kontaktieren Sie den AMICUS Support amicus butterfly tt und beschreiben Sie das Problem Geben Sie immer Ihre Seriennummer an Wir werden Ihnen eine Rücksendegenehmigung und eine Versandanweisung geben oder ein Ersatzteil mit einer Anleitung zum Austauschen zukommen lassen Wenn Sie aufgeford...

Страница 42: ...42 ...

Страница 43: ...43 AMICUS START Robot de Tennis de Table Owner s Manual Bedienungsanleitung Manuel d utilisation ...

Страница 44: ...bution de la balle pour simuler des trajectoires basses ou plus hautes Réglez toutes les fonctions avec le panneau de commande situé à l extrémité du lecteur Couvert par une garantie constructeur complète de 2 ans et une garantie de 5 ans sur la disponibilité des pièces et du service Voir les informations complètes sur la garantie à la page 63 ATTENTION Veuillez lire attentivement ce mode d emploi...

Страница 45: ...te 50 Distribution des balles 51 Type de balle lancé à 2 et à plus d emplacements 52 Réglages aléatoires 52 La télécommande en option 53 Connecter la télécommande au robot 53 Changer les piles de la télécommande 54 Démontage stockage et transport 54 4 Entretien et réparations 55 Précautions 55 Vérification et réglage de l espacement des roues 56 Remplacer les roues 56 Bourrage des balles 58 Entret...

Страница 46: ...ers le bas glissez les sous l extrémité de la table et poussez le robot au bout de la table Lâchez doucement la base et le robot pendra par son propre poids comme indiqué sur la photo 2 Veuillez noter que les robots AMICUS sont conçus pour s adap ter à des plateaux d une épaisseur de 25 mm Si le plateau fait moins de 25 mm d épaisseur vous devrez ajouter une entretoise au bas de la table pour que ...

Страница 47: ...upports à rester en place et stabiliser l ensemble du filet 5 Tirez le filet latéral le long de la ligne sur le côté de la table et passez son élastique épais sur le pla teau de la table voir la photo 5A Puis bouclez l élastique autour de la vis de serrage qui maintient le filet sur la table Fixez ensuite la languette Velcro du filet latéral à la pièce correspondante située sur le support d angle ...

Страница 48: ...nt de commencer à jouer retirez les bandes de caoutchouc et le tampon de mousse bleue sur la tête qui aide à protéger la plaque de déflecteur pendant l expédition Photo 6A Photo 6B 2 Panneau de commande 60 30 0 30 45 45 15 15 60 Left Right Speed Spin 4 19 1 7 16 10 13 22 Sidespin Low High Trajectory 3 4 2 1 0 5 6 3 2 1 4 0 25 50 75 100 Ball Min Place Scatter 1 2 3 4 5 6 Random Erase Ball Add Ball ...

Страница 49: ...a vitesse de la balle 8 Sidespin Knob Décale l orientation du sidepsin vers la gauche ou la droite 0 signifie pas sidespin Les positions à gauche sélectionnent des degrés croissants de gauche Les positions vers la droite sélectionnent des degrés croissants du côté droit 9 Trajectory Knob Augmente ou diminue des trajectoires plus courbes ou plus tendues angle de projection 0 indique le point centra...

Страница 50: ... tube si vous le serrez trop Si vous ne réglez pas correcte ment la hauteur de la tête vous risquez de provoquer des bourrages des doubles lancers des lancers ratés et d autres problèmes de distribution Mise en route Placez au moins 50 balles 40 ou 40 dans le bac Le voyant Ball 1 doit clignoter en orange et le voyant Start Stop doit s afficher en rouge sur votre panneau de commande Appuyez sur Sta...

Страница 51: ...orientation du sidespin sur la balle Le réglage du zéro signifie qu il n y a pas de sidespin sur la balle Chaque réglage marqué représente un changement d orientation de 15 sauf pour la première marque qui est de 30 Les réglages à droite de zéro sont des degrés à droite et les réglages de gauche sont des degrés à gauche Le bouton Speed réduit ou augmente la vitesse de la balle Il y a 22 réglages d...

Страница 52: ... balle 1 Il continuera dans cet ordre des balles lancées jusqu à ce que vous appuyiez sur Stop Si vous voulez que l exercice commence avec une balle particulière à chaque fois assurez vous de désactiver la distribution lorsque la DEL de la balle désirée clignote Dans l exemple ci dessus si vous vouliez que l exercice commence avec la balle 1 au lieu de la balle 2 arrêtez l exercice lorsque la ball...

Страница 53: ...ances sur 4 qu une balle soit livrée en revers Enfin alors que Random Place doit avoir au moins 2 balles dans l exercice Random Scatter peut être utilisé avec des exercices à une seule balle La télécommande en option La petite télécommande sans fil ressemble à une clef de voiture a une portée de 4 5 m et a les fonc tions suivantes 1 Si Ball Min sur le panneau de commande est réglé sur 0 appuyez su...

Страница 54: ...llique en forme de U autour de l extérieur du boîtier supérieur Ensuite placez le boîtier inférieur sur le dessus et appuyez sur les boîtiers supérieur et inférieur ensemble en commençant à l extrémité étroite et en allant vers la partie large jusqu à ce que les boîtiers s enclenchent Démontage stockage et transport À la fin de votre séance d entraînement éteignez votre robot en le débranchant du ...

Страница 55: ...en place avec les 2 sangles situées au bas du boîtier 4 Entretien et réparations Précautions 1 Avant d effectuer toute opération de maintenance ou de réparation débranchez votre robot du secteur 2 Assurez vous qu aucun objet comme des balles des cheveux des ficelles etc ne tombe dans le filet et ne pénètre dans la machine où ils peuvent causer des bourrages ou interférer avec le bon fonctionnement...

Страница 56: ...ent elles serrent fermement la jauge alors le réglage de la roue est nécessaire Pour ajuster les roues poussez la jauge dans l extrémité du tube à balles à l endroit où la balle sort pour la maintenir fermement en place Ensuite utilisez la clé hexagonale de 4 mm trouvée dans les accessoires pour desserrer la vis hexagonale près du couvercle du moteur voir la photo 8B Maintenant déplacez le moteur ...

Страница 57: ...oteur en utilisant les mêmes procédures que celles décrites ci dessus pour la roue inférieure Il se peut que la roue ne soit pas aussi facile à retirer de l arbre ou à remettre sur l arbre en raison de la proximité du panneau de tête et du couvercle du moteur à oscillation et trajectoire Mais parce que les roues sont en mousse la roue peut être enlevée et remplacée avec un peu de force pour plier ...

Страница 58: ...lles commencent à être expulsées par le tube inférieur cela indique que le problème est probablement réglé Entretien et réparations Après une utilisation intensive la bande blanche située sur la surface supérieure de la plaque de dé flecteur peut s user et la machine devient imprécise Dans ce cas sans démonter la plaque déflectrice nettoyez la bande blanche avec de l alcool isopropylique pour élim...

Страница 59: ...cées aux mau vais endroits A Avez vous retiré les bandes élastiques autour de la plaque déflectrice et le coussinet en mousse bleue au dessus de la plaque déflectrice Si ce n est pas le cas retirez ces pièces pour que la plaque déflectrice puisse bouger librement Ces pièces sont utilisées uniquement pendant le transport B Est ce aléatoire Si c est le cas éteignez le page 52 C Débranchez les 3 conn...

Страница 60: ...upé rieur du ballon Débranchez la tête et faites rouler une balle dans le tube à balles pour vérifier si elle est obstruée Si c est le cas appelez un centre de service AMICUS F Mauvaise alimentation des balles engrenages cassés ou sup port moteur Appelez le centre de service AMICUS G Défaut du moteur de distribution des balles Le remplacer H Électronique surchauffée Éteignez l alimentation et atte...

Страница 61: ...au sommet 13B Moteurs d éjection supérieur 13LO Moteur d éjection inférieur 14 Roues d éjection 15 Couvercle du moteur de lancement 16 Tête d éjection 17 Mise en place du moteur droite gauche 18 Moteur haut débit 19 Déflecteur 20 Placer la couverture du moteur 21 tubes et vis d espacement 22 Alimentation électrique 23 Protection de l alimentation électrique 24 Cable de commande 25 Support de boite...

Страница 62: ...62 ...

Страница 63: ...mpter de la date d achat Si ce produit devient défectueux en raison de matériel ou de fabrication pendant la période de garantie contactez un centre de service AMICUS en décrivant le problème Fournissez toujours votre numéro de série Nous vous fournirons une attestation en retour et des instructions d expédition ou fournirons une pièce de rechange et des instructions pour le remplacement Si vous ê...

Страница 64: ...Tamasu Butterfly Europa GmbH Kommunikationsstr 8 47807 Krefeld Germany amicus butterfly tt 49 2151 9356 0 ...

Отзывы: