background image


36 

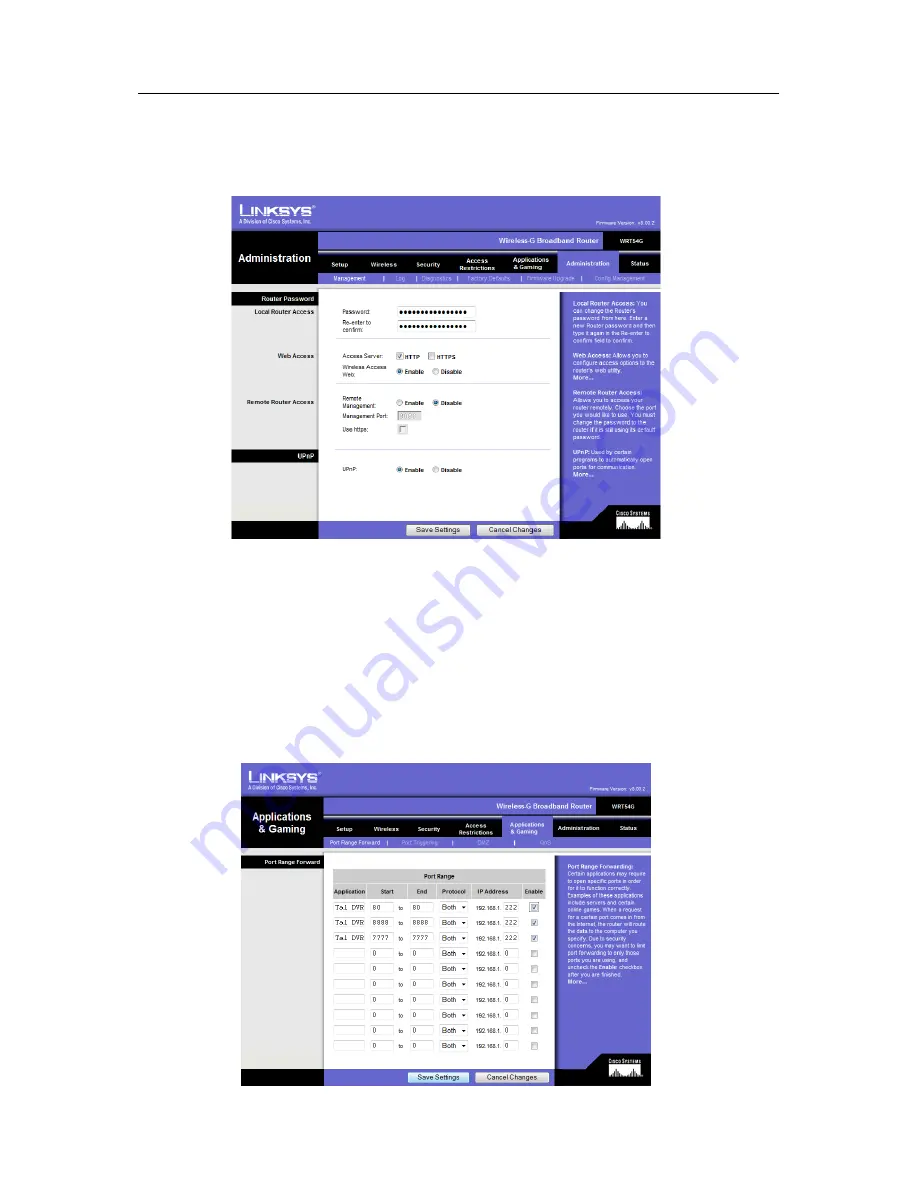
4.2.3.2 Administration tab


Click:

 Administration tab 

Remote Management:

 Click disable 


4.2.3.3  Applications & Gaming tab 


Application:

 Enter a name to identify the application, I.E.: Tal DVR 

Start:

 Enter the staring port for a range of ports to forward. 7777 for DVR video streaming, 80 for 

http: access from the internet, and 8888 for the mobile port. 

END:

 Enter the ending port for a range of ports to forward. It is OK to have the same port number in 

both start and end. 

Protocol:

 select "Both" 

IP Address:

 Enter the IP address you assigned your DVR in network setup. 

Enable:

 Click to enable the port. 

Close your web browser. 


Содержание DR4000

Страница 1: ...DR4000 DR8000 DR1600 H 264 Networkable DVR USER MANUAL...

Страница 2: ...bench or kitchen table and inventory items Connect cameras to the DVR video inputs a monitor or TV to the DVR video output and then connect power to the cameras Turn the DVR on the cameras will be vi...

Страница 3: ...ATION ______________________________________________________ 29 Installing Client Viewer Software ________________________________________________________ 29 Log into Client Viewer Software __________...

Страница 4: ...USB interface USB 2 0 for data backup USB 2 0 for mouse operation Support one 3 5 SATA HDD Special file system for security 16 bit color translucent user friendly GUI with notes for selected menu ite...

Страница 5: ...prolong life of this device please pay attention to the following When installing this device please comply with all the electrical product safety criteria Do not drop liquid on DVR or insert any obje...

Страница 6: ...ress to exit menu or sub menu 10 Cursor navigation Move the cursor up down left right or select 11 USB Flash drive for file backup 12 Power Turns the unit ON OFF 2 1 2 Rear Panel 16 Channel DVR Shown...

Страница 7: ...ive into the DVR 1 Remove the cover from the DVR and locate the four screw holes and ventilation slots 2 Remove the four screws and foam isolation pads from the accessory box see photo below 3 Remove...

Страница 8: ...ew holes and isolation pads as shown below 5 Insert the screws through the bottom of the chassis through the isolation pads and into the mounting screw holes of the hard drive NOTE After installation...

Страница 9: ...n split screen double click on a channel to view the selected channel in full screen double click the channel again to return to split screen view Right Button Click to open a Sub Menu Scroll Wheel No...

Страница 10: ...ack speed Move cursor in menus down Channel down OK In menus press to confirm selections 9 In menus press to adjust values 10 RECORD Press to start manual recording 11 STOP Press to stop manual record...

Страница 11: ...U TREE Use the mouse to control the DVR and navigate the menus The tree diagram below is a quick reference to help keep track of menu levels and functions The menu functions are explained on the follo...

Страница 12: ...2 SYSTEM LOGIN By default passwords are disabled on the system you do not need to enter a password when accessing any system menus However for security purposes it is highly recommended to enable pass...

Страница 13: ...04 Click to select the channel to change settings CHN NAME Click to enter channel description names into the system POSITION Click to switch name location there are 5 options COLOR Click to enter came...

Страница 14: ...g disabled BITRATE Click to select the bitrate for best data compression RESOLUTION Click to select the resolution of recorded video D1 720 x 480 Half D1 720 x 240 CIF 352 x 288 FRAME RATE Click to se...

Страница 15: ...tings 3 4 2 3 NETWORK SETUP Click the NETWORK to enter network settings interface TYPE Two options DHCP and Static IP address STATIC TYPE Select Static to set your preferred DVR IP address on your net...

Страница 16: ...g DDNS or Close if you are not using DDNS service with your DVR SERVICE The DVR supports 3 DDNS services 3322 dyndns and perfecteyes HOST NAME Input the host name you created when you opened your DDNS...

Страница 17: ...y the recording status for that date the search result will be displayed in the detail files screen DAY Will show all the recording status of the day to playback the recorded file click the correspond...

Страница 18: ...to a USB thumb drive by clicking Backup 2 Select the channels you wish to view and click Apply to move to the playback screen If all channels have recorded files the DVR will playback all channels sim...

Страница 19: ...checked Click Backup to begin exporting files to the USB flash drive If the backup files are larger than available space on the flash drive the DVR will display Space no enough You can remove the flas...

Страница 20: ...ted HDD an H will be displayed on the live view You can reformat the HDD from this menu OVERWRITE Two options available for recording to the HDD ENABLE allow the DVR to overwrite older files with newe...

Страница 21: ...s is only applicable if HDD Overwrite is enables VIDEO LOSS Select Open to display video loss in live view when a channel has no video ALARM CONTRL Controls the alarm buzzer output and duration associ...

Страница 22: ...value Sender E mail Enter your e mail address Sender PWD Enter your e mail password Receiver E mail Enter the e mail address of the intended recipient PTZ SETUP Click PTZ to enter the PTZ settings in...

Страница 23: ...t the iris aperture of an equipped camera Speed Set the PTZ camera control speed Channel select Select the channel of the PTZ camera to control CruiseSet Turn on the preset auto cruise Exit Return to...

Страница 24: ...must be forwarded in your router Please note that the DVR server port is not the same value as the mobile server port NETWORK Select the mobile network 2 5G 2 7G 3G or WIFI MOTION DETECT Click MOTION...

Страница 25: ...egment green indicates the cursor is on a specific grid segment left click to activate the segment When set up is complete select exit to return to the previous menu screen Remark IR Operation press M...

Страница 26: ...MAT Click to choose your preferred time format 12 Hours or 24 Hours DST Click to select Daylight Saving Time as applicable to your region Click Apply to save the new settings PASSWORD Click PASSWORD t...

Страница 27: ...lick to select the video resolution for the VGA output 1024 768 1280 1024 1920 1080 1440 900 VOLUME Click Volume to enter settings for the volume level Reboot the DVR after making changes to the Audio...

Страница 28: ...setting interface AUTO MAINTAIN Click to set the DVR for auto maintenance Close turns off auto maintenance Open turns on auto maintenance and allows you to schedule regular system reboots UPDATE Click...

Страница 29: ...ient Software allows you to operate the DVR from your PC 4 1 1 Install NVClient software The Client Software can be found on the CD included in the accessory box 4 1 1 1 Load the CD into your CD DVD d...

Страница 30: ...our DVR You will use this name and password each time you launch NVClient in the future Username Enter a username that you will use each time you launch NVClient Password Enter a password that you wil...

Страница 31: ...e Select Main Stream Enable Auto Logon Click to allow NVClient to log into the DVR Channel Num Select the active number of channels in the DVR User Name Enter the user name used to log into the DVR Pa...

Страница 32: ...on the NVClient shortcut on your PC desktop to launch NVClient User Name Enter the user name you chose for NVClient in step 4 1 2 Password Enter the user name you chose for NVClient in step 4 1 2 4 2...

Страница 33: ...t the location the DVR will be running The IP address of your current location is shown below the IP Address field We recommended you set up your DYN account using a PC connected to the network the DV...

Страница 34: ...with automatically assigned addresses DHCP from the router I E 192 168 1 222 NETMASK Enter the Netmask settings this is normally a default setting GATEWAY Enter the Gateway settings this is the addre...

Страница 35: ...rward ports in your router 4 2 3 1 Log into your router Use a web browser like Internet Explorer to access the router setup interface Address Enter the IP address of your router then press enter I E 1...

Страница 36: ...aring port for a range of ports to forward 7777 for DVR video streaming 80 for http access from the internet and 8888 for the mobile port END Enter the ending port for a range of ports to forward It i...

Страница 37: ...ut on the PC desktop 4 2 5 Local setup Click Local Setup to enter into the server settings interface Server Manage Under the server manage tab click on Add to enter the Add Server menu Server Type Cli...

Страница 38: ...server functions Enable Sync Time On Server Open Check On Start App Auto Open Server Check On Check Camera Select Open Image at Free Position On Open Server Select Auto Open Camera Enable Back Connect...

Страница 39: ...s to the PC 4 3 1 Launch Internet Explorer Address Bar Enter the DVR IP address or Host Name into the address bar I E http 192 168 1 222 or http talosdvr dyndns tv IP Address The IP address must match...

Страница 40: ...t IE Click OK then Apply then OK Close Internet Explorer to save the new set up 4 3 2 3 Reset Default Security After you successfully log into the DVR for the first time you will want to restore Inter...

Страница 41: ...nternet WAN or the DVR IP address over your network LAN Username Enter the user name you have set in your DVR I E admin Password Enter the password you use to log into your DVR The DVR will load the L...

Страница 42: ...le in the center to stop ZOOM Click to zoom out or in Click to focus far or near Click to close or open the iris aperature PTZ PRESET To save a camera view type a location number into the box to the r...

Страница 43: ...e local PC Note While the video file is playing the system won t allow you to download video files After viewing the selected file click DOWNLOAD to save the file to the local PC When download is comp...

Страница 44: ...tting and System information seven menus ENCODE SETTING Video Parameters setting allows you to change the way the DVR encodes video to maximize storage space and video streaming AV Channel Bind settin...

Страница 45: ...e the video and color levels making camera images look more natural and easier to see Note you can copy settings to any or all channels using the COPY SETTINGS TO button RECORD SETTING Click Record Se...

Страница 46: ...ng to enter the Alarm Setting interface Device Alarm allows you to set the DVR to monitor the hard drive for low available space or hard drive failure Click Enable On or OFF Channel Alarm allows you t...

Страница 47: ...onnection you will use with your DVR DHCP or Static IP Address allows you to set a specific address on your network Preferred DNS allows you to use the DVR with an external IP address and Domain Name...

Страница 48: ...TTING Click Mobile to enter the mobile settings interface Port is the port on your router used for streaming to a Smartphone Network Type allows you to choose the type of network used by your Smartpho...

Страница 49: ...Time Zone allows you to set the time zone the DVR will operate in with reference to GMT Daylight Savings Time DST allows you to tune daylight savings time ON or OFF DST Mode allows you to choose betwe...

Страница 50: ...to toggle ON or OFF Mode allows you to set the frequency of auto maintenance reboots the DVR Time allows you to set the time of day for auto maintenance Setup allows you to save the settings Refresh s...

Страница 51: ...o set the account number for a user 1 5 Enable allows you to turn an account ON or OFF accounts 2 5 User Name allows you to assign a user name to an account Password allows you to assign a password to...

Страница 52: ...g video recorded from the DVR server to the local PC Frame Save Path allows you to set a path to a folder for saving an image captured from the DVR server to the local PC File Save Path allows you to...

Отзывы: