background image

– 13 –

4. Auto-cutter 

settings 

“Cut On” menu will be selected automatically when the auto-cutter is 
installed; thus, the printer can be used without adjustment. However, some 
printers may not have the “AutoConfigure” function. In this case, select the 
“After Print” menu of the menu setup mode, and the “Cut On” menu on the 
“Function Select” menu. If the printer has the “AutoConfigure” function, the 
“AutoConfigure” menu will be printed out in front of “Function Select” menu 
when you print the “Current Setup”. 

Note


See the printer’s User’s Manual (CD-ROM) for details on “Print Menu 
Settings”. 

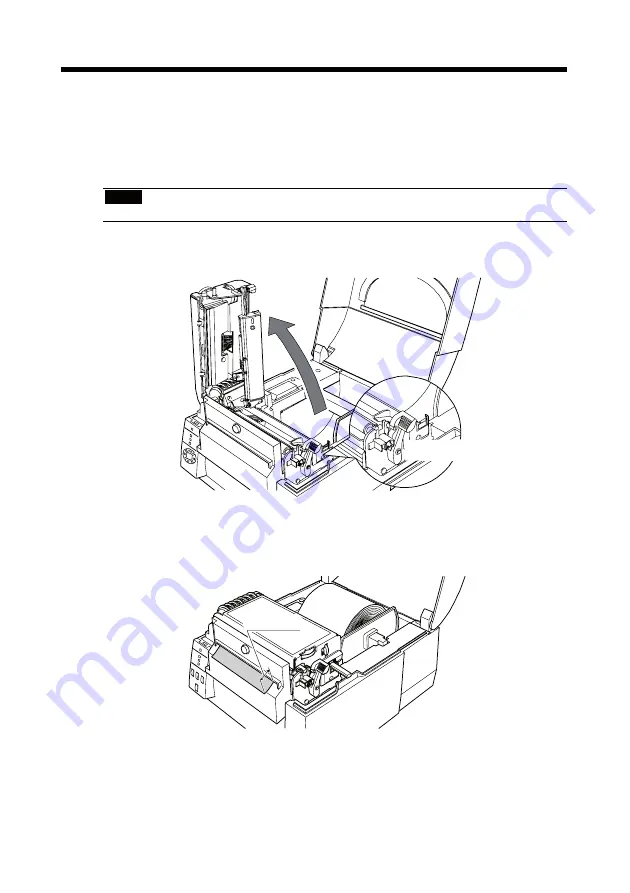
Loading Media 

(1) 

Press the printhead lever, and then open the head unit and sensor arm. 

(2) 

With scissors, cut the end of the media loaded in the media holder. 

(3) 

Feed the end of the media through the cutter assembly until the end 
extends 10mm past the cutter cover. 

(4) 

Close the head unit and sensor arm. 

(5) 

The cutter will operate one time when the FEED key is pressed. 

Approx.10mm

Printhead lever

Содержание 7206 Series

Страница 1: ...1 Installation and 7106 7206 User Guide Auto Cutter...

Страница 2: ...2 August 2010 DASCOM Europe GmbH...

Страница 3: ...ck to make sure that the printer s power switch is turned off then disconnect the power cord 2 Open the top cover 3 Lift and remove the front cover from the printer Keep the removed cover in a safe pl...

Страница 4: ...hat it lies along the printer s case When replacing the connector cover and the motor cover take care that the covers do not pinch the cable 8 Set the cutter stand unit to the front of the printer wit...

Страница 5: ...r cover Take care that the screw does not fall inside the printer chassis 5 Remove the screw 1 fastening the optional unit connector cover and then remove the optional unit connector cover 6 Plug the...

Страница 6: ...nit does not pinch the cable 11 After the cutter unit is installed reinstall the motor cover and the optional unit connector cover on the printer Note Be very careful as the motor may be hot 12 Close...

Страница 7: ...strictly observed 10 1 Function 11 2 Main specifications of auto cutter 11 3 Checking items inside the accessory box 12 4 Auto cutter settings 13 5 Cut position 14 6 Cut settings 15 7 Auto cut length...

Страница 8: ...contents of this manual without prior consent is strictly prohibited 5 We are not liable for any damage resulting from the use of this manual regardless of omissions errors or misprints 6 We are not l...

Страница 9: ...n turn off the power to the printer and remove the power cord from the outlet and then consult your supplier Do not open the auto cutter during operation The cutting blade can be very dangerous Also t...

Страница 10: ...This can cause damage to the cutter Use the standard media paper Otherwise problems such as paper jams may occur Remove any dust or particles from the paper guide and path periodically When auto cutt...

Страница 11: ...number of cuts can vary according to the quality of the paper Media and paper types Roll or label continuous die cut fanfold tag and ticket However the following paper cannot be used Paper with thickn...

Страница 12: ...ailable for the printer with the peeler You should check that all of the following items are inside the accessory box If any are missing please contact your supplier Cutter Stand Unit 1 piece Cutter U...

Страница 13: ...he AutoConfigure menu will be printed out in front of Function Select menu when you print the Current Setup Note See the printer s User s Manual CD ROM for details on Print Menu Settings Loading Media...

Страница 14: ...entative Never attempt to repair the auto cutter yourself it could result in a risk of injury 5 Cut position The following diagram gives the distance from the media sensor and the thermal printhead to...

Страница 15: ...the auto cutter or the peeler which are normally set in memory Examples n 1 The auto cutter is set in the on state n 0 The auto cutter is set in the off state Note See the Command Reference manual fo...

Страница 16: ...r Therefore use a cut length of 25 4mm 1 0 in or longer when setting the media cut length Note Media is fed and not cut when its media cut length is 12 7mm 0 5 in or less However if the total length o...

Страница 17: ...ove the platen 1 Push the head open lever downwards to open the head unit and sensor arm 2 Grasp the mounting device of the platen and lift it up as shown in the figure 3 Remove the gear side of the p...

Страница 18: ...not cut the media well The blade of the cutter may be worn out or covered by a label glue Above error condition is occurred r o r r E n o i t i d n o C t n i r P r o r r E LED LED LED Media Out Off O...

Страница 19: ...19...

Страница 20: ...August 2010 DASCOM Europe GmbH v1 0...

Отзывы: