background image

E V E R Y   C A L L   C O U N T S

4 3

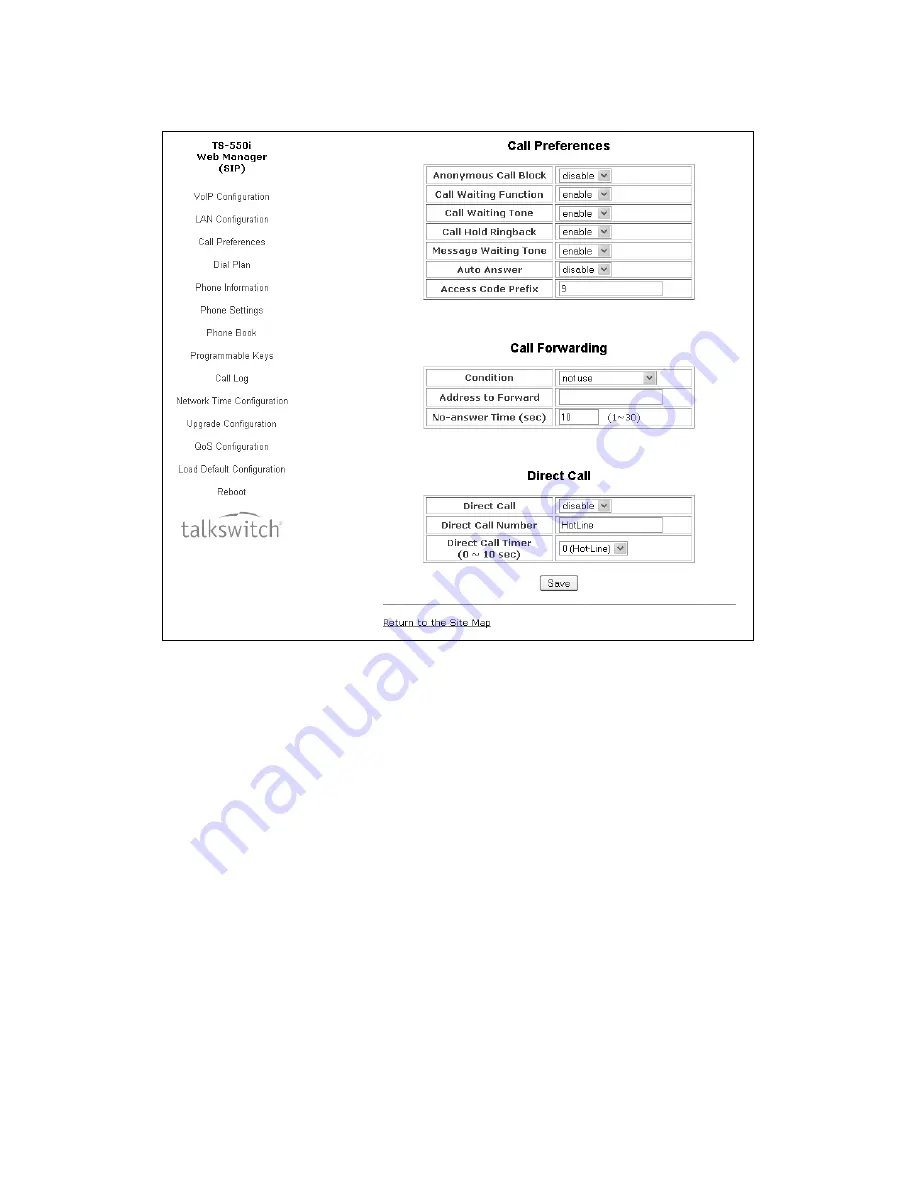
CALL PREFERENCES 

Most of the call preference parameters can be altered according to the user’s requirements.

Call Preferences

Anonymous Call Block:

 When enabled, the phone blocks incoming calls with an anonymous Caller ID.

Call Waiting Function:

 When enabled, the phone will accept additional calls and notify the user 

visually of the incoming call while in a conversation. If disabled, no additional calls are accepted and 
the system will follow the busy response configuration.

Call Waiting Tone:

 When enabled, a tone is played to the user along with Caller ID information to 

announce the new call.

Call Hold Ringback:

 When enabled, the phone rings if the user has taken a 2nd call then terminated 

the call with another caller still on hold. 

Message Waiting Tone:

 When enabled, a stutter dial tone is played when first going off-hook and a 

new message is waiting. The visual LED notification is always enabled for voicemail notification. 

Auto Answer:

 When enabled, it will automatically activate the speakerphone or headset when an 

incoming call is received.

Access Code Prefix:

 To simplify dialing from the Phonebook or Call Logs, enter a hunt group (9, 81-88) 

that you would like the phone to use as aprefix to place calls using the specified hunt group. If direct 
line access is enabled for the extension, then leave blank.

Содержание TS-550i

Страница 1: ...A N S W E R S W I T H I N T E L L I G E N C E T A L K S W I T C H U S E R G U I D E TALKSWITCH TS 550i TELEPHONE CT TS005 015601 ...

Страница 2: ...nslation without prior written permission is prohibited except as allowed under the copyright laws Information in this guide is subject to change without notice and does not represent any commitment on the part of TalkSwitch No part of this guide may be reproduced or transmitted in any form or by any means electronic or mechanical including photocopying recording or information storage and retriev...

Страница 3: ...ring Values with the Dial Pad and Softkeys 8 Setting a Hunt Group as an Access Code Prefix 8 Configuration Overview 9 Network Configuration 9 Network Mode 9 IP Address 10 Subnet Mask 10 Default Gateway 10 Primary DNS Address 10 Secondary DNS Address 11 MAC Address 11 VLAN Settings 11 VLAN Priority LAN 11 VLAN ID LAN 12 VLAN Priority PC 12 VLAN ID PC 13 CDP 13 SIP Configuration 14 SIP Configuration...

Страница 4: ... module is installed 25 Pairing a Bluetooth headset 25 Bluetooth Headset Status Indicators 26 Connecting or Disconnecting a Paired Headset 26 Deleting a Headset from the Paired List 26 Bluetooth Module Information 27 Connect Mode 27 Call Preferences 27 Do Not Disturb 27 Call Waiting 28 Call Waiting Tone 28 Call Hold Ringback 28 Message Waiting Tone 28 Auto Answer 29 Anonymous Call Block 29 Access ...

Страница 5: ...ormation 49 Phone Settings 50 Phone Settings 50 Functions 51 Ring Settings 51 User Define Rings RTTTL 51 Phone Book 52 Loading a contact list using a web browser 53 Downloading the phone book to a file on a PC using a web browser 53 Programmable Keys 54 Call Log 55 Network Time Configuration 56 Configurable Parameters 56 Upgrade Configuration 58 QoS Configuration 60 Diffserv Configuration 60 IEEE ...

Страница 6: ...ating the Firmware 69 Checking for Updates 69 Internet Update 70 After the Update 70 Using the TalkSwitch IP Phone Update Utility 70 TROUBLESHOOTING 71 Information 71 Troubleshooting Guide 72 APPENDIX A SPECIFICATIONS TS 550i 73 Hardware Specifications 73 APPENDIX B CHARACTER TABLE FOR DIAL PAD MODEL 74 REGULATORY AND SAFETY NOTICES 75 Radio Frequency Emissions 75 FCC Compliance Statement 75 Canad...

Страница 7: ...0 Ethernet switch Lets you share a connection with your computer Inline PoE support eliminates the need for power adapters Optional Bluetooth module compatible with supported headset models Using two TS 50e expansion modules REQUIREMENTS SIP based phone system such as the TalkSwitch series of phone systems or a VoIP service provider account Ethernet or fast Ethernet network for connection 10 100 M...

Страница 8: ...ress to go back to previous menus while in the configuration menus Right use to see additional menu items when appears in LCD menu Up use to view Call Log when phone is idle Down use to access Phone Book while phone is idle OK center button use to select current item or save value in LCD menu Configuration Pressing this button accesses the menu for making changes to the IP phone configuration Voic...

Страница 9: ...s a PC is connected to the PC port of the IP phone Bluetooth icon indicates the optional Bluetooth module is properly installed with no headsets paired to the phone When blinking rapidly the TS 550i is searching or attempting to pair with a headset Bluetooth paired icon indicates one or more maximum 5 headsets are paired with the module but none are active When blinking rapidly the TS 550i is atte...

Страница 10: ... port the IP Phone derives power from the port If the LAN port does not support PoE use the AC DC adaptor sold seperately The handset connects to the base with the coiled handset cord Figure 2 IP Phone Connections Wiring Chart 1 LAN Connect the IP phone LAN port to the LAN wall jack with the provided Ethernet cable 2 PC Optionally connect the IP phone PC port to your desktop PC with an Ethernet ca...

Страница 11: ... the tabs on the stand with the notches in the base of the phone 3 Push the stand upward in the slot as far as it can go until properly attached 55 angle 30 angle Figure 3 Installing the Foot Stand 4 Headset Optionally connect a headset to the RJ22 headset jack on the phone We strongly recommend the use of an amplified headset 5 Handset Connect the handset cord to the handset and the handset jack ...

Страница 12: ... phone when mounting on a wall Remove the handset hook from the phone as shown in the figure below Reverse the hook and re install in the phone so that the hook catches the groove in the handset receiver Complete all wiring Figure 4 TS 350i TS 550i Wall Mount Installation PROVISIONING THE TS 550i WITH TALKSWITCH If using the phone with TalkSwitch please refer to Adding IP Phones to TalkSwitch incl...

Страница 13: ...wo methods are available for manual configuration The LCD Configuration Menu permits local configuration using the dial pad and softkeys The second method employs the TS 550i Web Manager which allows access to the IP phone configuration using a Web browser If configuring the phone for the first time it is recommended that you use the Web browser as it will save considerable time for the setup proc...

Страница 14: ...ht of the LCD above the softkeys as for numeric for upper case characters for lower case characters and for special characters To enter characters with the dial pad use the digit with the desired character Press the same digit repeatedly until the desired character appears in the LCD After entering a character pause to allow the cursor to move to next character position Other special entries inclu...

Страница 15: ...rameters for the phone Network Mode The phone is capable of obtaining all of its IP configuration data from a DHCP server When a DHCP server is not available static address parameters can be used Selecting Static requires the manual entry of other several network parameters including IP address of the phone Default gateway IP address Subnet mask DNS address To set the Network Mode Press the button...

Страница 16: ...on To enter the Subnet Mask Press the button then select 1 Network Configuration then 3 Subnet Input the Subnet Mask using the dial pad and press the OK softkey to save the changes Default Gateway Selecting static addressing for the Network Mode requires manual entry of a default gateway address The IP Phone requires a valid default gateway address for proper operation To assign the Default Gatewa...

Страница 17: ...s with the assigned ID are accepted and all SIP and voice frames sent by the TS 550i include the VLAN ID assigned to the LAN port TalkSwitch phone systems do not support VLAN tagging so this should not be used with TalkSwitch phone system deployments VLAN Priority LAN The VLAN Priority LAN establishes the priority for Ethernet frames from the LAN port including signaling and voice packets Setting ...

Страница 18: ...the phone will use only standard Ethernet frames To assign the VLAN Priority for the PC port Press the button then select 1 Network Configuration then 8 VLAN Select 3 VLAN Priority PC Input the VLAN Priority for the PC port using the dial pad and press the OK softkey to save your entry Changing the VLAN Priority requires a reboot of the IP phone When you leave the menu you will receive a reboot no...

Страница 19: ...tocol to determine if VLANs are to be used and the associated VLAN ID The CDP selection displays only if function_cdp is enabled in the configuration file As a default the CDP parameter is disabled since TalkSwitch does not use VLAN tagging To set the CDP status Press the button then select 1 Network Configuration then 9 CDP Select the desired softkey Yes or No to enable or disable CDP Changing th...

Страница 20: ...ers Assign parameters in this section for each SIP line SIP Server Address The SIP Server Address is the IP address or FQDN of the SIP server or PBX Different SIP servers can be defined for each line To assign the Call Server address Press the button then select 2 SIP Configuration then 1 Line Configuration Enter the line button number or move the cursor using the Down softkey and press the Select...

Страница 21: ...then 1 Line Configuration Enter the line button number or move the cursor using the Down softkey and press the Select softkey to select a line Select 3 Display Name Input the Display Name using the dial pad and press the OK softkey to save your entry User Name A User Name extension or phone number is required for proper operation and must match the user ID or account assigned in the SIP server Thi...

Страница 22: ...IP server using the dial pad and press the OK softkey to save your entry Authentication Password Authentication of the line with the SIP call server requires an Authentication Password in conjunction with the User Name To assign the Authentication Password Press the button then 2 SIP Configuration then 1 Line Configuration Enter the line button number or move the cursor using the Down softkey and ...

Страница 23: ...to the associated phone In addition the status of an active or held private line call displays only at the associated phone Only the active user may transfer or conference calls on a private line A BLA appears at line buttons of more than one phone All phones with an appearance can access incoming and held calls on the BLA and receive status information for the call Note for proper operation assig...

Страница 24: ... be defined so that the phone sends all SIP requests to the proxy instead of the SIP server configured in the section SIP Server Address on page 14 The address can be an IP address or FQDN To assign an Outbound Proxy Address Press the button then select 2 SIP Configuration then 2 Outbound Proxy Addr Input the Outbound Proxy Address using the dial pad and press the OK softkey to save your entry Out...

Страница 25: ...tion Backup Proxy Address on page 19 To assign the Backup Proxy Port Press the button then select 2 SIP Configuration then 5 Backup Proxy Port Input the Backup Proxy Port using the dial pad and press the OK softkey to save your entry Local UDP Port The Local UDP Port defines the port normally 5060 that the phone uses to send and receive SIP signaling packets In some instances particularly when beh...

Страница 26: ... by the server To enable Proxy Registration Press the button then select 2 SIP Configuration then 8 Proxy Registration To enable registration press the Yes softkey To disable SIP registration press the No softkey Registration Expiry To ensure a regular connection the phone periodically re registers with the proxy or SIP server Unless defined by the host server during registration the Register Expi...

Страница 27: ...one To assign the Domain Press the button then select 2 SIP Configuration then 11 Domain Input the Domain name using the dial pad and press the OK softkey to save your entry STUN Server When the phone is located behind NAT and a STUN server is required enter a STUN server IP address or FQDN to enable this feature that helps traverse firewalls in limited conditions To assign a STUN server Press the...

Страница 28: ...r inbound calls The Default Ring Tone is used when a ring tone is Set as Default or not defined for a line or phone book record In quieter environments it might be useful to delay the ring signal on incoming calls Ringing can be delayed by up to 10 seconds The LED light associated to your extension will flash immediately for all incoming calls Default Ring Type To change the Default Ring Type for ...

Страница 29: ...ds in 1 second increments 0 provides no delay the ring signal is immediate Press the OK softkey to save the delayed ring setting To configure another parameter press the Back softkey to continue or press the button to exit the configuration menu Disable Ringer The TS 550i can be programmed not to ring when an incoming call is received It will still light up the LCD light up the Incoming Call Indic...

Страница 30: ...s that supports up to 80 entries Each phone book record includes a speed dial number consisting of two 2 digits Dialing the speed dial number 00 79 then pressing the Dial softkey places a call using the contact information from the associated phone book record To enable disable Speed Dial Number operation Press the button then select 3 Phone Settings then 8 Speed Dial Number Press the On softkey t...

Страница 31: ...es and other wireless devices in close proximity Headsets must support Bluetooth v1 2 or higher Stereo headsets are not supported We recommend headsets with a built in volume control We recommend headsets with echo cancellation technology to ensure optimum quality If used in noisy environments a headset with noise cancellation technology is also recommended Pairing a Bluetooth headset A Bluetooth ...

Страница 32: ...headset to an alternate headset the presently active headset must be disconnected deactivated prior to connecting the new headset The following procedure describes the steps required to connect or disconnect a headset that is already paired to the TS 550i To connect a paired headset and disconnect an active headset Press the button Dial 3 to access 3 Phone Settings then dial 12 to access 12 Blueto...

Страница 33: ...ff for 2 3 minutes so feature can be enabled or disabled 2 Press the button 3 Dial 3 to access 3 Phone Settings then dial 12 to access 12 Bluetooth 4 Dial 3 to access 3 Connect Mode 5 Press the On or Off softkey 6 Press the button to exit the menu CALL PREFERENCES Call Preferences define various call handling features of the phone Do Not Disturb When the DND Do Not Disturb feature is active the ph...

Страница 34: ...ne Call Waiting must also be enabled To enable disable Call Waiting Tone Press the button then select 4 Call Preferences then 3 Call Waiting Tone Press the On softkey to enable Call Waiting Tone or press the Off softkey to disable Call Waiting Tone Press the Back softkey or the button to exit the menu Call Hold Ringback With Call Hold Ringback enabled the phone rings if the first call is placed on...

Страница 35: ... Back softkey or the button to exit the menu Access Code Prefix The TS 550i phone can automatically prepend digits to a phone number dialed from the Missed Calls log Received Calls log or Phone Book For example you should program a Hunt Group ie 9 if you normally dial 9 to reach an outside line This will ensure that calls placed from the Call Logs or Phone Book are properly dialed out of the syste...

Страница 36: ...ber field cannot contain spaces dashes decimals or other characters Only use numbers If a single digit is specified under the SpeedNumber column then it will automatically be prepended with 0 Example 1 will be stored as speed dial 01 The number of entries cannot exceed 80 An optional header can be included at the beginning of the csv file as shown above It is not required To load a csv file to a p...

Страница 37: ...e Book list Editing a Contact If logged in via the web interface then click the Modify button next to the contact you wish to edit then change the information as required and save To edit a Phone Book contact from the phone Press the button then select 5 Directory then 1 Phone Book Select a contact to edit using the Up and Down navigation keys Press the Right navigation button to scroll to the add...

Страница 38: ...es the record from the Phone Book Deleting All Records To delete all Phone Book records Press the button then select 5 Directory then 1 Phone Book Press the Right navigation button to scroll to the additional softkey options Press the DelAll softkey Press the Yes softkey to confirm deletion of all contacts or No to retain the contacts and return to the Phone Book Searching the Phone Book To search...

Страница 39: ...ey to place the call Call Log The phone stores logs to track inbound and outbound calls There are 3 separate logs that support 100 entries each The memory for the logs is circular so if the logs are not cleared when the capacity reaches 100 the oldest entries are automatically overwritten by new entries Missed Calls stores any calls that were unanswered Received Calls stores calls that were answer...

Страница 40: ...ntry To delete all entries While viewing an entry press the Right navigation button twice then press the Del All softkey Press Yes to delete the entire log or No to keep the log Saving an Entry to the Phone Book To save an entry to the phonebook While viewing an entry press the Right navigation button then press the Save softkey Press OK to store the current name or edit add a name then press OK C...

Страница 41: ...OK Confirm the password then press OK Store the password somewhere for future reference Once assigned select 7 Lock Unlock Config to lock the config To unlock the config press the button then select 7 Lock Unlock Config Enter the password then press OK Defaulting the phone requires a reboot When you leave the menu press the Back softkey you will receive a reboot notice Press the Yes softkey to reb...

Страница 42: ...meters Press the button to exit the menu REBOOT After changing certain parameters the phone will require a reboot to utilize the settings These settings include the following Network Configuration settings TFTP Server Address settings Software Update settings Default settings After a TalkSwitch phone system firmware update new features might be enabled so a reboot is a good idea to ensure consiste...

Страница 43: ...witch phone system or other system which automatically provides the configuration for the phone then many key parameters should not be changed as they will revert to their preconfigured settings after the phone is rebooted and retrieves a configuration file LOGIN SITE MAP Point your browser at the IP address currently assigned to the TS 550i phone Example http 150 150 255 251 To confirm the addres...

Страница 44: ...in the following Site Map page is loaded The Site Map page is divided into 2 sections the left hand navigation menu and page content on the right side for the various sections Select the desired page from either the navigation menu or the site map ...

Страница 45: ...op of the VoIP Configuration page is a table indicating the SIP lines available Selecting a line from the list will display the characteristics assigned for the line If the phone is provisioned with a TalkSwitch system these values will automatically be assigned ...

Страница 46: ... 0 no delay to 10 seconds Auto Answer If enabled the phone will automatically enter speakerphone mode for incoming calls on this line Registration Status Shows the registration status of the phone Refresh the page if it doesn t match the status indicated on the phone General Parameters Outbound Proxy Address The IP address or FQDN of the outbound proxy server to receive SIP requests in place of th...

Страница 47: ...n that provides a location for BLF Busy Lamp Field indications for all DSS line types If enabled enter the URL of BLF server where the status information will be retrieved Options Timer This timer sets the SIP options interval STUN Server Address If required enter a STUN server IP address or FQDN MWI Usage Enable for indication of new messages for the registered voicemail system When done press th...

Страница 48: ...AC address of the phone LAN port Not editable Primary DNS IP address of the primary DNS server Secondary DNS IP address of an auxiliary DNS server Optional Domain Name Domain name for the LAN Optional CDP Enable or disable for the use of the Cisco Discovery Protocol used for VLAN ID When complete select the Save button to store the new values to the phone The MAC address is fixed and cannot be mod...

Страница 49: ...long with Caller ID information to announce the new call Call Hold Ringback When enabled the phone rings if the user has taken a 2nd call then terminated the call with another caller still on hold Message Waiting Tone When enabled a stutter dial tone is played when first going off hook and a new message is waiting The visual LED notification is always enabled for voicemail notification Auto Answer...

Страница 50: ...tline operation set the timer to zero 0 seconds To modify parameters on the Call Preferences screen Select the desired parameter and enter or select the new values When complete select the Save button to save the new values to the phone DIAL PLAN The phone incorporates a dial plan which monitors the user dialed digits for patterns matching the dial plan number If a match occurs the phone modifies ...

Страница 51: ...r additional digits After the pause if no additional digits are dialed the phone places a call to the Operator In addition after the user dials any seven digits the call is processed Complex Dial Plan Customer requirements Process the call after the local Operator at 0 long distance Operator at 00 a four digit local extension number starting with 3 4 or 5 a seven digit local number prefixed by an ...

Страница 52: ...elect Routing Table under the Dial Plan Type Enter the desired values into the respective boxes Select the Add Entry button To delete an entry from the Current Routing Table Select the checkbox in front of the desired entry Click the Delete Entry button To delete all the entries Enter all as the index Click the Delete Entry button Number TRNC Pre Post Pause Extra 9 0 NULL NULL 0 0 0 0 ...

Страница 53: ...lude TRNC Defines the number of digits to delete truncate from the number dialed Pre Defines the digits to insert in front of the number including if truncated Post Defines the digits to insert at the end of the number including if truncated x matches any single digit 0 to 9 T inserts a timed pause for additional digits matches any number of occurrences of a digit including zero occurrences and in...

Страница 54: ... prefixed by an 8 two digit number preceded by star a ten digit long distance number prefixed by 91 or an international number starting with 9011 is dialed Digit map routing entry The dial plan for this is 0T 00T 3 5 xxx 8xxxxxxx xx 91xxxxxxxxxx 9011x T 2nd Dial Tone A second 512 character string map is employed to provide 2nd Dial Tone Customer requirements To provide second dial tone after a 9 i...

Страница 55: ... for the TS 550i phone In addition it is possible to change the Web Manager password from this page To change the phone name Enter the desired name When complete press the Save button To change the password Enter the existing password Enter the new password then confirm When complete press the Save button ...

Страница 56: ...F signaling in band out of band or negotiate Do not change this value if you do not understand the settings DTMF Payload Configure the payload type for DTMF signals according to RFC 2833 Do not change this value if you do not understand the settings DTMF Duration Configure the duration of DTMF signals sent from the phone in milliseconds Do not change this value if you do not understand the setting...

Страница 57: ... line button is pressed The call does not connect to the speakerphone or handset unless the button is pressed a second time Display DTMF If disabled digits entered after a call is placed will not appear This is useful for security purposes where a PIN code or Access Code is required to gain access to external lines or features Ring Settings Ringer Type Sets the default ring type from one of 14 rin...

Страница 58: ... To add a Phone Book entry Click the Add button and enter the new values Information is purely an optional field For example you might enter company names or e mail addresses if desired When complete select the Save button to store the record To modify an entry Select Modify for the desired record and enter the new values in the Phone Book Entry screen When complete select Save to store the modifi...

Страница 59: ...gle digit is specified under the SpeedNumber column then it will automatically be pre pended with 0 Example 1 will be stored as speed dial 01 The number of entries cannot exceed 80 An optional header can be included at the beginning of the csv file as shown above It is not required Downloading the phone book to a file on a PC using a web browser To backup the phone book to a file Press the Downloa...

Страница 60: ...phone or web interface and will not be overwritten when a configuration file is loaded onto the phone via the TalkSwitch system To change key functions Select the function from the drop down menu next to the key For a Speed dial key enter the contact number For a Message key enter the phone number of the voicemail server When complete press the Save button To delete the functions assigned to all f...

Страница 61: ...Book To add a number from the Call Log to the Phone Book list Select the Add button If an Access Code Prefix such as a Hunt Group has been programmed into the phone then it will be inserted when an outbound call is placed from the Phone Book Do not add to the phone book entry To delete all Call logs Select the ClearAll button CAUTION selecting the ClearAll button will delete all records in the Cal...

Страница 62: ...intenance of the time and date on the phone If provisioned by TalkSwitch nothing needs to be changed on this page Configurable Parameters SNTP Server Address Enter the URL or IP address of the SNTP server that will be used to synchronize the date and time for the phone Example time nrc ca Time Zone Select the time zone that matches the location of the phone ...

Страница 63: ... shown on the LCD of the phone DST Configuration If DST is enabled then rules for when it is engaged and disengaged need to be configured DST can be configured to start and end on specific dates or switch according to a day of the week in a certain month typically used in North America Known public SNTP servers that can be used ntp nasa gov clock via net tick ucla edu time nrc ca To modify paramet...

Страница 64: ...ge the results of the most recent download attempt are displayed at the top In addition the following parameters can be modified TFTP HTTPS Select the protocol that will be used to connect to the server where configuration and software files are stored TFTP Server Address Enter the IP address or FQDN of the TFTP server where configuration and firmware files are located Select the Received by DHCP ...

Страница 65: ...is not available in the phone memory paste the Root CA in this area of web page File to Upgrade Select the S W checkbox if the phone should check for new firmware files on bootup Select the Configuration checkbox if the phone should check and download during bootup We recommend you leave both enabled If no new files are found no changes are made Decryption Key If required enter the hexadecimal key...

Страница 66: ...AN voice ports use separate VLAN tags With a VLAN ID assigned only frames with the ID are accepted and frames sent from the phone include the LAN port ID and priority In addition the PC LAN ports and the default gateway must be assigned to employ the VLAN tags for proper operation Jitter Buffer Configuration A jitter buffer stores incoming packets to allow for re sequencing of packets received out...

Страница 67: ...ues To set the phone to the default configuration Select the Load button Note All settings will be lost The phone will load the default configuration and automatically reboot Modifications made to the IEEE 802 1p Q configuration require a reboot of the phone If CDP is enabled manual VLAN settings are overwritten during a reboot of the phone To use manually defined VLAN settings disable CDP ...

Страница 68: ...6 2 T S 5 5 0 i U S E R G U I D E REBOOT To reboot the phone Select the Reboot button The phone will reboot ...

Страница 69: ... hook This is similar to a mobile phone The phone supports a technique called store and forward dialing After you dial a digit the IP phone waits about 5 seconds for additional digits If you do not dial additional digits the phone sends the digits you dialed to the phone system for processing When done dialing press the Dial softkey or key to place the call immediately To place a call Lift the han...

Страница 70: ...active call Press the button or the Transfer softkey The active call status changes to hold and you receive dial tone to dial an alternate extension number Dial the extension or phone number or press a preprogrammed flexible key linked to an extension Wait for the remote party to answer and announce the transfer Hang up the handset to complete the transfer or press the EndCall softkey to cancel th...

Страница 71: ...he line button flashes and a beep tone is played to you over the active conversation to indicate the new call In addition the LCD displays the incoming Caller ID so you know who is calling before deciding to interrupt the current call To answer an incoming call while on a call Press the Answer softkey The first call will be placed on hold and you will be connected to the second caller REDIAL The T...

Страница 72: ...om incoming calls Calls will be routed according to the settings programmed for your extension or service To activate DND While the phone is idle press the button When active the button LED illuminates red and Do not disturb is displayed on the LCD To deactivate DND Press the illuminated button again MUTING A CALL Mute toggles the microphone of the handset speakerphone and headset off or on When m...

Страница 73: ...y associated with the extension you wish to call For privacy lift the handset or press the button To blind transfer a call Press the flexible key associated with the extension The phone will transfer the call To answer a call ringing at a monitored extension Press the flexible key associated with the extension that is ringing flashing green For privacy lift the handset or press the button HOTLINE ...

Страница 74: ...ller on hold Press the button or press the flashing key associated with the call on hold Answer queued call Press the flashing key associated with the call in the queue Otherwise dial 7 to retrieve the next caller in your queue Answer TalkSwitch call waiting Press the Answer softkey or press the flashing line appearance key Screened transfer Press the button extension or outside number To complete...

Страница 75: ... Vmail softkey or the button Access Mailbox Remotely Press mailbox number Change greeting options Dial 2 Change personal options password date stamp remote notification options Dial 3 MESSAGE PLAYBACK CONTROLS Rewind 10 seconds Dial 1 Go to beginning Dial 1 1 Skip ahead 10 seconds Dial 3 Skip to end of message Dial 3 3 Check time and date stamp Dial 5 Forward message Dial 6 Delete message Dial 7 S...

Страница 76: ...s 3 for Phone Settings then select 7 Firmware Update Press 2 to access the TFTP Server Address Enter the IP address that was previously entered to point the phone back to your TalkSwitch phone system Once changed the phone will request a reboot Select Yes Using the TalkSwitch IP Phone Update Utility If your phones are on a closed network no Internet access or you are having problems with updating ...

Страница 77: ...ess and subnet mask server IP addresses SIP servers TFTP server and SNTP server results of the last file download attempt boot version and hardware and firmware version This information may be useful if calling TalkSwitch Support Press the button then select 8 Information Press the Up or Down softkeys to scroll through the parameters Press the button to exit the menu ...

Страница 78: ... having the DHCP server assign an IP address No audio during a call If the phone is outside the LAN where the phone system resides then ensure the proper ports are open on the firewall to ensure calls can make it through The phone has locked up or the screen is blank but there is power A phone lock up may be caused by a communications error during a firmware upgrade To correct this problem 1 Disco...

Страница 79: ...ter LED Indicators Message Indicator Speakerphone Mute DND Headset Red LEDs 22 Programmable Buttons with Multi colored LEDs LCD 240 x 56 dot graphic Physical Size H x W x D 20 8 x 22 3 x 10 5 cm 8 1 x 9 25 x 2 inches Weight 1 3 Kg AC DC Adapter Output 48VDC 0 3A max Input 100 240 VAC 50 60 Hz Operation Temperature 0 40 C Storage Temperature 20 60 C Operation Humidity 10 85 RH non condensing Audio ...

Страница 80: ...special character mode for enterning non numeric characters The table below covers all possible character options Digit DIal Pad Mode Upper Case A Lower Case a Symbols 1 2 A B C a b c 3 D E F d e f _ 4 G H I g h i 5 J K L j k l 6 M N O m n o 7 P Q R S p q r s 8 T U V t u v 9 W X Y Z w x y z 0 Space Space ...

Страница 81: ... that interference will not occur in a particular installation If this equipment does cause harmful interference to radio or television reception which can be determined by turning the equipment off and on the user is encouraged to try to correct the interference by one of the following measures Reorient or relocate the receiving antenna Increase the separation between the equipment and the receiv...

Страница 82: ...e with IEC for Electrical Equipment IECEE Safety of Information Technology Equipment CAN CSA C22 2 No 60950 1 UL 60950 1 E 911 AND USE OF THE TS 550i WITH MULTI LINE TELEPHONE SYSTEMS Please note the use and operation of this phone as part of a multi line telephone system MLTS may be subject to state and or federal E 911 MLTS laws that require the MLTS to provide a caller s telephone number extens...

Страница 83: ...uipment of any particular telephone company This warranty does not extend to damage to products resulting from improper installation or operation alteration accident neglect abuse misuse fire or natural causes such as storms or floods after the telephone is in your possession TalkSwitch shall not be liable for any incidental or consequential damages including but not limited to loss damage or expe...

Отзывы: