Talex SPRINTER 1500 Скачать руководство пользователя страница 53


Page  

53

 of  

129


SELF-LOADING BALE WRAPPER  
                   SPRINTER 1500 

7.4


Adjusting the tension of the belts  


The belts (1) are subject to stretch in the course of the bale wrapper's use. When their lower position is 
visibly evident, you must adjust the tension. 


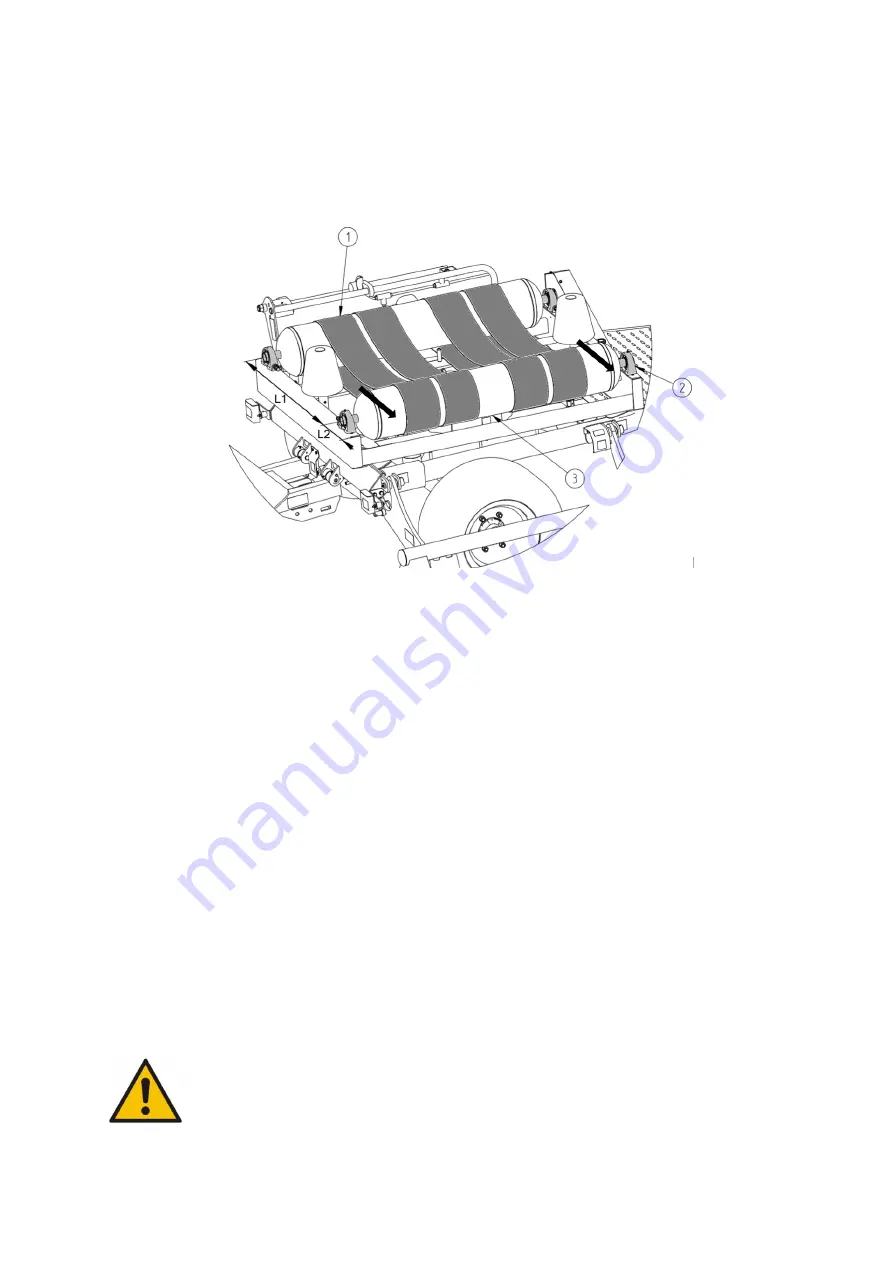
Figure 37 Adjusting the tension of the belts  

(1) belts, (2) bearings, (3) idle table roller, (L1) distance between table rollers, (L2) distance between the 
roller centreline and frame edge  

Follow the procedure for tensioning the belts: 

1.


Loosen the bearing nuts (2) which lock the idle table roller (size 21 wrench). 

2.


Move the bearings of the idle table roller outwards, as per the arrows (size 19 wrench). 

3.


Tighten the bearings which hold the roller in place.  

4.


Check the L1 distance on both sides of the table rollers.  

5.


Check the L2 distance on both sides of the table rollers.  


If the distances L1 and L2 on both sides are equal, this means that the table rollers are 
positioned correctly, i.e. parallel to each other, which extends the life of the belts.  


If the distances L1 and L2 are different, the bearing position must be readjusted. 

6.


 The adjustment of the driving table roller must be carried out in the same way, considering the 
chain tension (see Section 7.2).  
 

CAUTION 

If the stretch of the belts is greater than the adjustment range, the belts must be replaced. 


All repairs, adjustments and maintenance works must be carried out when the machine is 
stationary and secured. 

Содержание SPRINTER 1500

Страница 1: ...NTER 1500 TALEX Sp z o o ul Dworcowa 9c 77 141 Borzytuchom Phone number 59 821 13 40 e mail biuro talex sj pl www talex sj pl ORIGINAL USER MANUAL SPARE PARTS CATALOGUE WARRANTY Self loading bale wrapper SPRINTER 1500 Borzytuchom 2020 Revision 02 ...

Страница 2: ...Repairs Service The repair performance date is included in the WARRANTY CERTIFICATE Machine parts and components which are subject to wear in normal operating conditions are not covered by the warranty regardless of the warranty period In Warranty repairs cover only instances such as mechanical damages not caused by the user manufacture defects of parts etc The machine shall not be covered by the ...

Страница 3: ...9 5 3 6 Hydraulic system 32 6 Machine operation 34 6 1 Installing the bale wrapper 35 6 2 Connecting bale wrapper to a tractor 35 6 3 Levelling the bale wrapper 36 6 4 Transport position 36 6 4 1 Principles for driving on public roads 38 6 5 Switching between methods for unloading bales 40 6 6 Bale grab adjustment 41 6 6 1 Displacement of the tractor s drive centreline in relation to the bale 42 6...

Страница 4: ...yres and steel rims 60 8 Control system 61 8 1 Control unit 61 8 1 1 Description of functions of the control unit 62 8 2 Operating modes 64 8 3 Control panel operation 64 8 3 1 AUTO mode 65 8 3 2 SEMI AUTO mode 66 8 3 3 MANUAL Mode 67 8 4 Menu 68 8 4 1 Changing the operating mode 68 8 4 2 Changing the bale weight 69 8 4 3 Statistics 69 8 5 Changing speed in automatic and semi automatic modes 72 8 ...

Страница 5: ...r post set 110 12 18 Film dispenser set 112 12 19 Dispenser roller No 1 113 12 20 Dispenser roller No 2 114 12 21 Table rollers 115 12 22 Idle table roller set 116 12 23 Driving table roller 117 12 24 Bale grab set 118 12 25 Bale tipper set 119 12 26 Tipper cradle set 120 12 27 Adjustable arm set 121 12 28 Hydraulic system 122 13 Warranty 126 14 List of warranty repairs 127 15 Warranty form 128 16...

Страница 6: ...inimise or avoid risks This manual also contains principles of correct use of the machine and specifies the maintenance jobs to be carried out If you do not understand any information contained herein please contact the manufacturer directly CAUTION Read the Instructions Manual before use CAUTION This symbol indicates a hazard The warning symbol indicates a piece of important hazard information gi...

Страница 7: ... Machine identification Each bale wrapper has its rating plate containing the most important identification data The plate is affixed on the front beam of the machine bottom frame Figure 1 Rating plate The rating plate includes full name of the manufacturer ...

Страница 8: ...00 bale wrapper serial number machine code CE marking weight quality control sign date of manufacture Figure 2 Rating plate of the running axle The serial number and type of running axle are stamped on the rating plate attached to the running axle beam ...

Страница 9: ...ding parts etc During the use of the equipment exercise particular caution when moving close to the above mentioned critical spots and obligatorily use the following personal protection equipment protective clothing protective gloves hearing protection safety footwear It is forbidden to carry persons or objects on the machine Persons who have not read the Instructions Manual are not allowed to ope...

Страница 10: ...chine If you loan the machine for use ensure that it is in good technical condition and that it is complete with the Instructions Manual Do not attach additional transport means to the machine During commissioning check the machine functions and make the initial adjustments Due to the natural wear and tear the state should be controlled using the recommendations described in Section 9 MaintenanceM...

Страница 11: ...above rules 3 2 Residual risk assessment Talex has made every effort to ensure that the design of the machine and its intended use do not pose any risk to persons or the environment Due to the nature of work being done by the bale wrapper and for example the inability to completely cover the machine s working unit certain risk factors may occur No Risk Risk source cause Protection measures against...

Страница 12: ...itable work clothes beverages creams with sunscreens proper rest reading the Instructions Manual 9 Noise Too high rotational speed of the machine damaged loose or vibrating parts Operation of the machine in good technical condition inspections on a regular basis proper rotational speed reading the Instructions Manual 10 Impact to the head trunk lower limbs and hand cuts Impact by moving parts of t...

Страница 13: ... the engine and remove the ignition key before any maintenance or repair procedures 1 3 Danger of limb injuries Do not reach for the cutting blade 1 4 Maintain a distance of at least 50 metres from the working machine 1 5 Danger of crushing Do not stand in the area occupied by the folding bale grab arm 1 6 Do not touch the machine components until fully stopped ...

Страница 14: ...d exposure to liquids flowing under pressure Read the Instructions Manual and learn about the maintenance works 1 9 Wrapping film installation method 1 10 Direction of table rotation 1 11 Lifting hook location during transport 1 12 Information on sensor adjustment 1 13 Maximum tyre pressure symbol 1 14 Grease nipple symbol denoting the grease lubrication point ...

Страница 15: ...PRINTER 1500 1 15 Warning about pressure present in the hydraulic system 1 16 Use a protective coverall 1 17 Use safety gloves 1 18 Use a protective helmet 1 19 Use hearing protectors 1 20 Use safety glasses Table 2 Safety signs on the machine ...

Страница 16: ...Page 16 of 129 SELF LOADING BALE WRAPPER SPRINTER 1500 Figure 3 Signs on the machine ...

Страница 17: ...Page 17 of 129 SELF LOADING BALE WRAPPER SPRINTER 1500 Figure 4 Signs on the machine ...

Страница 18: ...ys be observed Intended use involves the observance of the correct and safe operation and maintenance of the machine This is why the user is obliged to Read and follow the contents of the INSTRUCTIONS MANUAL Understand the operating principle of the machine and the safe and correct use of the bale wrapper Observe the general safety regulations during work Observe the scheduled maintenance and adju...

Страница 19: ... the bale tipper captures them and positions them with precision as required In the front part of the bale wrapper there is a film dispenser on a post adapted to unwind 500 or 750 mm wide film A film cut and hold is mounted on the side of the rotary frame to cut off and hold the film for subsequent cycles automatically The basic version of the machine offers three operating modes Auto mode Semi au...

Страница 20: ...specification The main components of the bale wrapper are shown in the figure below Figure 5 Bale wrapper main components 1 Bottom frame 2 Turntable slide base 3 Film cut and hold 4 Rotary frame 5 Dispenser post 6 Film dispenser 7 Table rollers 8 Bale grab 9 Bale tipper ...

Страница 21: ...ity kg 1100 8 Permissible speed of the turntable rpm 30 9 Required tractor power kW HP 35 48 10 Hydraulic motor oil demand min max l min 14 5 23 11 System max pressure Bar MPa 160 16 12 Hydraulic sockets As per ISO 7421 1 13 Oil type SUPER UDT API GL 4 14 Required tractor hitch Single axle trailer hitch 15 Electrical system voltage V 12 16 Connection sockets 7 pole ISO 1724 cigarette lighter socke...

Страница 22: ...t layers of film which one after the other are rolled out from the film dispenser 5 This unit is placed on a rotary frame 3 driven by a chain drive to rotate the bale After the wrapping is complete the rotary frame 3 is hinged out the cut and hold 6 cuts off the film the bale tipper 7 captures the bale and then puts it down in a vertical or horizontal position Figure 6 Bale wrapper operating princ...

Страница 23: ...raper actuator The dispenser is adapted for film with a width of 500 or 750 mm It is installed on the dispenser post 7 and adjusted with screw with handle 8 The film roll is mounted between the conical holders 3 and 4 The film layer is threaded through the knurled rollers 1 and 2 Figure 32 which are fixed to the frame 9 and fastened with tensioning gears 6 The tension is also adjusted by the posit...

Страница 24: ...he horizontal movement of bales is also achieved thanks to the rotation of the table through a bevel gear mounted in its central part connected by a shaft with the chain drive 1 which transmits the drive to the driving table roller 2 which sets the belts 4 in motion The bale is held in the correct position by the side bumpers 6 and the correct tension of the belts see Section 7 4 Figure 37 For bal...

Страница 25: ...lly activated when the bale is unloaded from the rotary frame moves the cradle frame The foot plate 4 is lowered which is caused by the unloading movement of the rotary frame and the movement of the bumper mounted on the outer frame 1 under the turntable slide base The adjustable arm 3 on the right hand side of the bale tipper can be set in two positions Figure 10 If set to the position A the bale...

Страница 26: ...tal tipping B set for vertical tipping For a description of how to change the bale tipper settings see Section 6 5 It is important that the unloading movement from the tipper is as smooth as possible regardless of the weight of the wrapped bale For a description of the drop speed control see Section 7 3 5 3 4 Cut and hold ...

Страница 27: ... to the profile of the rotary frame The film is cut and held in place by the automatically controlled hydraulic system The piston in the actuator 7 is pushed out by means of the pressure in the hose 6 while the hydro accumulator 2 is used to push it in The blade 3 is used for cutting when the film is pressed against it by means of rubber buffers 4 and 5 The hydraulic fluid in the hydraulic accumul...

Страница 28: ... of the blade 1 by using the guard 2 The guard 2 is removed and replaced by fixing the guard 2 to the plate 4 using the screws 3 Any preparations fitting dismantling or adjustment can be performed only after the drive has been switched off the engine stopped the vehicle immobilised and when all the moving parts of the machine have stopped Before you start wrapping the blade guard in Figure 12 must...

Страница 29: ...n tail lamp 2 warning plate reflective triangle The electrical system of the bale wrapper is designed to be powered from a 12 V DC source The electrical system of the bale wrapper s lights should be connected to the tractor via a suitable 7 pin plug connection wire An overview diagram of the electrical system of the bale wrapper is shown in Figure 14 ...

Страница 30: ...m GP 7 pin plug connector LP right multifunction tail lamp LL left multifunction tail lamp Designation Function 31 Ground Power supply 12 V L Left direction indicator 54 Brake light 58L Tail light left 58R Tail light right R Right direction indicator Table 4 Symbols for socket connections ...

Страница 31: ...le unloading position C5 Table tilt C6 Bale tipper table bottom position 1A 1B Solenoid valves for bale grab actuator 2A 2B Solenoid valves for turntable s hydraulic motor 3A 3B Solenoid valves for table tilt bale tipper scraper 4A 4B Solenoid valves for film cut and hold W1 Proportional solenoid valve W2 Balanced solenoid valve Table 5 Symbols for control system power supply from tractor socket H...

Страница 32: ...on of return by one extra line of a so called free drain The hydraulic system is under high pressure during the operation of the bale wrapper so the condition of the connections and hoses must be checked regularly Operation with a leaking or damaged system is not permitted In case of a malfunction the machine must be taken out of service until it is repaired Before carrying out repair or maintenan...

Страница 33: ...ve the gears activating the rotation of the rotary frame and the table rollers assembly SECTION III It is used to move three actuators film dispenser actuator which pulls the film to be cut off telescopic tilt actuator for the rotary frame bale tipper actuator used for capturing and putting bales down SECTION IV It drives the cut and hold actuator which is designed to perform two functions cut off...

Страница 34: ...tened Table e check the condition and pressure of tyres f check the appropriateness of wheel mounting g check the painting coating condition h check the overall condition of the machine with regard to any damage caused during transport loading or due to other circumstances breakage indentations cracks punctures etc i check all lubrication points whether there are lubrication signs if needed lubric...

Страница 35: ... up to the bale wrapper on the reverse gear slowly reverse towards the bale wrapper s hitch 1 ensuring nobody is standing between the machine and the tractor or in the immediate surrounding of the machine when reversing move the tractor s hitch 4 as close as possible to the bale wrapper s hitch stop the tractor and prevent its accidental movement connect the machine s hitch to the tractor s hitch ...

Страница 36: ...on of the drawbar hitch and if necessary adjust it to the mounting height on the tractor This job requires the drawbar hitch 2 to be removed by unscrewing the fixing screws 1 together with the sleeves 3 using a wrench in size 24 Then set the drawbar eye at the height of the hitch on the tractor and fix it to the machine with the bolts 1 remembering to install the spacer sleeves 3 beforehand 6 4 Tr...

Страница 37: ...INTER 1500 Figure 20 Mechanical grab lock 1 pin 2 locking pin 3 locking flat bar Figure 21 Grab securing in the working position 1 Locking flat bar 2 locking pin After hitching the machine with the tractor inst 6 2 lift the support foot Figure 22 ...

Страница 38: ... to the work site secure the grab arm with a flat bar and a locking pin see Figure 20 Attach a warning triangle for distinguishing a slow running vehicle for the time of driving on public roads see Figure 23 In case of insufficient visibility attach a red light and reflective element on the rear part of the bale wrapper It is forbidden to carry persons on the machine Only disconnect the machine fr...

Страница 39: ... 1 warning plate 2 plate holder Caution Any preparations fitting dismantling or adjustment can be performed only after the drive has been switched off the engine stopped the vehicle immobilised and when all the moving parts of the machine have stopped Caution Driving the bale wrapper on public roads with a bale loaded is not allowed ...

Страница 40: ...oll down behind the machine while the second one involves standing the bale vertically on its bottom to the tipper s left The way to unload is switched over by selecting the position of the adjustable arm 1 Rolling the bale behind the bale wrapper Figure 24 Unloading setting 1 Adjustable arm 2 Tipping the bale to the side bottom to the left of the bale wrapper Figure 25 Unloading setting 1 Adjusta...

Страница 41: ...ustable arm the cradle frame needs to be lifted and the adjustment pin removed 6 6 Bale grab adjustment Figure 26 Bale grab arm adjustment 1 frame 2 buffer 3 adjustable arm 4 lock screw 5 buffer fixing Customise the bale grab arm to the size of the baled crop Setting the adjustable arm 3 ensures the proper loading of the bales onto the table roller assembly Depending on the length of the bales set...

Страница 42: ...esired position 7 Re install and tighten the buffer mounting bolts When moving the bale wrapper for bale grab adjustment ensure no unauthorised persons stand in the immediate surrounding of the machine 6 6 1 Displacement of the tractor s drive centreline in relation to the bale The determination of the position depends on the position of the adjustable bale grab arm relative to the tractor axle Ad...

Страница 43: ...red at the edge of the bale must be within the range shown in Table 6 Film size mm Film layer width mm 55 70 500 380 420 700 580 620 Table 6 55 70 pre tension dimensions The pre tension check can be done in two ways The first way involves measuring the film width at the bale edge and adjusting the tension until the desired narrowing is achieved depending on the manufacturer s recommendations The r...

Страница 44: ... 28 Tension check method two Caution The dimensions of the film are approximate and are given by the manufacturer of the 70 extensible film Before you start operating the bale wrapper read the film manufacturer s instructions for setting the pre tension carefully ...

Страница 45: ...the current degree of film tension by ways described in Section 6 6 1 1 Loosen the jam nut 2 on the pressure screw 1 2 Adjust the screw pressure by checking the film resistance 3 If the film tension is too high lower the screw by turning the lever 1 to the left If the film tension is too weak lift the screw by turning the lever 1 to the right 3 Tighten the jam nut 2 4 Check the tension of the film...

Страница 46: ...priate height The optimised dispenser position is when the centre of the film is at the same height as the centre of the bale To adjust the height of the dispenser use the dispenser post turn lever 1 to move the dispenser unit 2 to the optimum position Figure 30 The dispenser height should be adjusted after the first bale is loaded Figure 30 Dispenser height adjustment 1 dispenser post turn lever ...

Страница 47: ...oosen the jam nut 2 Lower the lower holder cone 4 by removing the pressure screw 3 Position the film roll onto the holder cones 4 and 5 starting from the upper cone 5 The roll must be aligned with the cone centreline Move the lower holder 4 by screwing the screw 3 upwards Secure the position of the pressure screw 3 with the jam nut 2 Unroll the initial section of the film Turn the roller unit 1 in...

Страница 48: ... Figure 31 When mounted correctly the film 3 is unwound to be wrapped around roller I 1 first and then routed behind roller II 2 and tied on the first bale to be wrapped For installing the 750 mm wide film you need to adjust the film dispenser to this type of rolls The use of the wider film requires changing the gear ratio of the turntable For details refer to Section 7 5 ...

Страница 49: ...or of the turntable slide base Figure 33 Locking the rotary frame Caution All maintenance works must be carried out with the rotary frame locked with a rod Turn off the engine of the vehicle and secure it against rolling down Figure 34 Adjusting the chain tension of the rotary frame 1 bolts 2 motor plate 3 tensioner screw 4 tensioner nut Follow the procedure for tensioning the chain of the rotary ...

Страница 50: ...o 5 mm 4 Fix the motor plate 2 5 Fold the protection rod and lower the table 6 Carry out the test start of table rotation Note that the table movement should be smooth without jamming or unnatural gear noise The first adjustment should be made after 20 cycles and then check every 200 cycles The chain tension must always be checked if the gear is not working properly or noisy If chain tension adjus...

Страница 51: ...s 3 Loosen the bearing fixing nuts on the driving table roller size 21 wrench 4 Loosen the jam nuts on the adjustment screw size 19 wrench 5 Screw in the screw to move the bearings away until the required chain tension is reached while ensuring a uniform setting is achieved 6 Once the correct tension is achieved on the chain tighten the bearings starting from the one on the sprocket side 7 Tighten...

Страница 52: ... flow controller 2 controller knob 3 scale Turn the controller knob to increase or decrease the speed of the cradle drop of the tipper The bale tipper is lifted at a constant speed and the speed does not depend on the controller setting Turn to the right to reduce the speed of the drop Turn to the left to increase the speed of the drop ...

Страница 53: ...as per the arrows size 19 wrench 3 Tighten the bearings which hold the roller in place 4 Check the L1 distance on both sides of the table rollers 5 Check the L2 distance on both sides of the table rollers If the distances L1 and L2 on both sides are equal this means that the table rollers are positioned correctly i e parallel to each other which extends the life of the belts If the distances L1 an...

Страница 54: ...he settings is currently mounted on the bale wrapper The bale wrapper is designed to suit the 750 mm film as standard The choice of sprockets according to the film width is shown in Table 7 If the sprocket needs to be changed proceed with the following If the sprocket does not need to be changed check the chain tension and fit the guard 4 Loosen the bearing fixing nuts size 21 wrench and the beari...

Страница 55: ...1 Table 7 Choosing a sprocket and chain length according to film width 7 5 2 Changing the lower holder position of the film dispenser post Figure 39 Adjusting the film height settings 1 film dispenser 2 bottom holder 3 jam nut 4 pressure screw Changes in the holder position are made when a new roll of film is installed or when it is necessary to adjust the film tension To do this push back the fil...

Страница 56: ...or play and adjust if necessary Works to be assigned to specialist workshops are Replace grease in the bearings of the running axle Replace the bearings hub seals 7 6 1 Checking the running axle bearings for play Figure 40 Jacking points 1 Running axle 2 bolt 3 bottom frame Preparatory activities Connect the bale wrapper to the tractor engage the tractor s parking brake to prevent any movement Dri...

Страница 57: ...gs must be replaced with new ones or cleaned and lubricated again Check the condition of the hub cap and replace it if necessary The bearing play check can only be carried out when the bale wrapper is connected to the tractor Ensure there is no load on the machine Checking the running axle bearings for play after riding the first 1 000 km before any intensive use of the bale wrapper every 6 months...

Страница 58: ...ntling wheel checking nuts for tightness Dismantling the wheel Put wedges under the wheel that will not be dismantled Make sure that the bale wrapper is properly secured and will not roll when the wheel is dismantled Loosen the wheel nuts according to the order shown in Figure 42 Place the jack under and lift the bale wrapper Remove the wheel Mounting the wheel Clean the studs of the running axle ...

Страница 59: ...d is not as precise as when using a torque wrench Check the tightening of the wheels of the running axle after the first time you use the bale wrapper after the first run with a load after riding the first 1 000 km every 6 months of use or every 25 000 km In the case of intensive use the check should be carried out at least every 100 km Repeat the whole procedure if the wheel was disassembled The ...

Страница 60: ...e the bale wrapper wheel and is 4 7 bar Damaged tyres or rims can cause a serious accident When checking the pressure pay attention to the condition of the rims and tyres too Look closely at the tyre side surfaces check the tread condition In case of mechanical damage consult your nearest tyre service centre and check if the defect qualifies for a replacement Rims must be checked for deformation m...

Страница 61: ...e to be plugged into the box located on the bale wrapper as per the procedure in Figure 15 and Section 5 3 5 The next step is to connect the power cable of the control unit to the tractor power supply CAUTION Before connecting electrical cables make sure that they are not damaged and secure them properly if necessary 8 1 Control unit Figure 43 Control unit 1 emergency push button 2 fuse 10 A 3 dis...

Страница 62: ... functions of the control unit NO KEY DESCRIPTION 1 Confirms selection 2 Cancels selection and exits the selected screen 3 Moves cursor up 4 Moves cursor down Inserts a dot 5 Moves cursor left 6 Moves cursor right 7 Lifts the bale grab Enters 1 8 Lowers the bale grab Enters 6 ...

Страница 63: ...in the opposite direction Enters 7 11 Tilts the table bale unloading Enters 3 12 Lowers the table Enters 8 13 Cuts and holds the film Enters 4 14 Releases the film Enters 9 15 Goes to the menu Enters 5 16 Lists recent faults Enters 0 17 Display keys Table 9 Description of functions of the control unit ...

Страница 64: ...ation is terminated at any time after removing the finger from the button MANUAL Mode In the MANUAL mode all operations are confirmed by the operator who holds down a control button for the section required Removing your finger from the button terminates the operation of the section 8 3Control panel operation The control unit is switched on automatically as soon as the power is connected The scree...

Страница 65: ...u can change the number of bale wraps to 16 24 or choose custom number of turns To execute a change set the selected quantity using the arrows and confirm with Resetting number of rotations Current operation mode Stopping the operation Number of rotations set Starting the cycle Setting the number of rotations Number of rotations completed Resuming the operation of the section after the stopping Se...

Страница 66: ...performed by the sensors If executing an action is not possible it will be indicated by a message informing about the positions of the sensors If the display shows that a section is not in a position declared for its sensor the controller will prevent the operation of the section until it is correctly set 8 3 2 SEMI AUTO mode Select the SEMI AUTO mode to operate the machine in two ways First one i...

Страница 67: ...omes with a positioning key POSITION Select it to rotate the rotary frame to move it to the next sensor in an anticlockwise direction Pausing or stopping the operation will pause the counting of wraps and using the key will resume it 8 3 3 MANUAL Mode In the MANUAL mode all operations are confirmed by the operator who holds down a control button for the section required Removing your finger from t...

Страница 68: ... all sections altogether 8 4Menu By selecting on the panel you access basic settings to be changed and more information It is available only after the system has been stopped Menu screen To enable the selection of options in this mode press the key and then use the arrows to select the items and press to confirm 8 4 1 Changing the operating mode To change the operating mode move to the menu by pre...

Страница 69: ...00 kg It is possible to set the bale weight only when the adaptation feature is disabled When enabled the adaptation feature automatically adjusts the parameters to the operator s selected operating speed regardless of the bale weight 8 4 3 Statistics To view or restart the Statistics move to the menu by pressing and highlight the cursor by pressing use arrows to select the Statistics item and tou...

Страница 70: ... After selecting the restart only the day s count of bales can be reset Confirm the restart with the key on the screen The number of cycles completed on a given day and all the cycles the machine has ever completed After selecting the restart only the day s count of cycles can be reset Confirm the restart with the key on the screen Cycle times ...

Страница 71: ...of 129 SELF LOADING BALE WRAPPER SPRINTER 1500 The average time from the last 5 complete cycles is given Runtime Time left before inspection An approximate time before the next machine inspection is also given ...

Страница 72: ...arted for the next inspection Confirming the inspection requires a service password 8 5Changing speed in automatic and semi automatic modes You can change the speed over 3 basic settings slow medium fast or choose custom settings Changing the speed in AUTO and Auto Manual modes to custom settings requires a password ...

Страница 73: ...assword and confirming involves the risk of exceeding the safe operating speed of the machine so it is forbidden for an unauthorised person to change parameters Caution The manufacturer s approval is required for changing the setpoints on your own Custom mode setpoints ...

Страница 74: ... telephone 8 7Date and time settings To set the date and time move to the menu by pressing and highlight the cursor by pressing use arrows to select the Godzina i data item and touch to confirm The highlighted cursor will hover over the items and if you need to adjust them touch use arrows to select a digit to be changed and indicate its value using arrows or selecting the numbers from the control...

Страница 75: ...update To make an update move to the menu by pressing and highlight the cursor by pressing use arrows to select the Aktualizacja item and touch to confirm The screen will prompt you to use the screen keys to confirm or reject that you want to update the application If you confirm but the card is missing or a reading error occurred the following message will be displayed If the process is correct t...

Страница 76: ...the machine s safety sensors Possible alarm messages displayed on the screen No alarm Grab lifting time exceeded No info on whether the grab is lowered No item to unload found No signal from the load sensor No info on the rising action of the table tilt No info on the lowering action of the table tilt Number of rotations exceeded Grab lowering time exceeded No info on whether bale tipper is lowere...

Страница 77: ...77 If the messages are displayed set the items to the required position If the item is correct but the error is still displayed check the sensor for offset range or damage ...

Страница 78: ...g damage remove any mechanical residues of an old painting degrease and then apply a primer coat When the primer coat is dry apply the paint coat Replace damaged and worn out parts with new ones Check all the screwed joints tighten the loose screws and nuts according to Table The manufacturer of the machine Talex provides all spare parts Caution Nuts with polyamide insert self locking jam are disp...

Страница 79: ...ore commencement of lubrication works the point to be lubricated should be cleaned from any dirt and residues of previous grease layers and the grease nipple should be checked for damage Replace the grease nipple if damaged After the lubrication has been performed excessive grease should be removed in order to limit dirt adherence All maintenance works should be done with the switched off engine o...

Страница 80: ...e grease 4 Lower spindle 10 hrs or at least 1x a year Machine grease 5 Tipper bushings Pre seasonally every 10 hours of work or 1x a year Machine grease for heavy duty components 6 Bale grab pin Pre seasonally every 10 hours of work or 1x a year Machine grease for heavy duty components 7 Bale grab pin Pre seasonally every 10 hours of work or 1x a year Machine grease for heavy duty components ...

Страница 81: ...grease 10 Film scraper actuator fasteners Pre seasonally every 10 hours of work or 1x a year Machine grease 11 Tilt actuator Pre seasonally every 10 hours of work or 1x a year Machine grease 12 Bale tipper actuator Pre seasonally every 10 hours of work or 1x a year Machine grease 13 Bale tipper actuator Pre seasonally every 10 hours of work or 1x a year Machine grease ...

Страница 82: ...ubricant 17 Dispenser rollers Pre seasonally every 10 hours of work or 1x a year Silicone spray lubricant Table 11 Lubrication schedule Machine grease for chain drives FUCHS LAGERMEISTER TS grease Machine grease FUCHS RENOLIT MOLITEN 2 grease 9 3 Storage All the tasks listed in Section 9 1 9 1 Maintenance after work are to be carried out during storage It is recommended that the machine be kept in...

Страница 83: ... and the wire in a domestic environment during periods of downtime Store the controller and the wire in a domestic environment Exposing the controller to weather factors may cause permanent damage 9 4 Troubleshooting FAULT CAUSE REPAIR Controller does not start No power supply Check the connection between the controller and the relay box Check the fuses on the tractor and on the controller Check t...

Страница 84: ...ve chain stretch too high Replace the chain Gear system contamination Check bearings clean and lubricate chains or replace them in the event of excessive wear Unnatural noise from the running axle during ride Worn bearing Replace the bearing Bearing play Adjust the bearing Hub component damaged Replace the damaged component Film tension too low Lower roll holder height adjusted incorrectly Adjust ...

Страница 85: ...nd hold blade Cut and hold does not hold film or lets it go too fast Film does not hit the correct grab position Adjust the position of the cut and hold frame on the turntable Film is released before a new cycle begins Check the hydraulic accumulator pressure and adjust if necessary 10 Disassembly disposal and environment protection In the event the machine is worn to the extent which prevents its...

Страница 86: ...ed parts removed during repair disassembly should be stored in a separate location with limited access for persons and animals Worn out metal parts must be delivered to the scrap metal collection points Worn out plastics must be delivered to the chemical waste collection disposal points When filling up or replacing the oil avoid its spillage Store the waste oil in sealed containers and periodicall...

Страница 87: ...t with the manufacturer Table 12 presents additional equipment EQUIPMENT VERSION STANDARD PREMIUM Additional film dispenser NO YES Work cycle auto start NO YES Workstation lighting NO YES Turning support wheel NO YES Radio control NO YES Additional film storage NO YES Table 12 Refitting options for the premium version ...

Страница 88: ... only the original spare parts provided by the manufacturer to guarantee safe and reliable operation of the machine The use of not original spare parts or parts which have been repaired will void the warranty The manufacturer reserves its right to make changes in the construction of parts presented on the particular assembly drawings in this spare parts catalogue Such changes may not always be upd...

Страница 89: ...89 12 1 General design ...

Страница 90: ... frame set 1 P810075 12 14 Rotary frame set 4 OW 04 00 00 00 Film cut and hold 1 P810119 12 16 Film cut and hold set 5 OW 05 00 00 00 Dispenser post 1 P810135 12 17 Dispenser post set 6 OW 06 00 00 00 Film dispenser 1 P810184 12 19 Film dispenser set 7 OW 07 00 00 00 Table rollers 1 P810202 12 22 Table rollers set 8 OW 08 00 00 00 Bale grab 1 P810147 12 25 Bale grab set 9 OW 09 00 00 00 Bale tippe...

Страница 91: ...91 12 2 Bottom frame set ...

Страница 92: ...rease nipple Straight grease nipple M6x1 2 T000645 14 Spring type straight pin fi6x45 Spring type straight pin fi6x45 St 4 T002777 15 OW 01 00 00 04 Slide base pin 2 P810004 16 Vibration damper moc led Vibration damper 4 T000231 17 OW 01 00 00 08 Lamp fixing 2 P810007 18 Flat washer Φ 8 galv Flat washer Φ 8 galv 10 T000471 19 Hex nut M8 8 galv self lock Self locking nut 8 T000256 20 OW 01 00 00 07...

Страница 93: ...itle Quantity Index Section No 1 OW 01 02 00 00 Drawbar 1 P810040 2 Hex nut M16 8 galv self lock Hex nut M16 8 galv self lock 10 T000294 3 Washer Φ 16 galv Washer Φ 16 galv 20 T000460 4 Hex screw M16x50 8 8 galv Hex screw M16x50 8 8 galv 10 T000781 ...

Страница 94: ...ng 1 P810050 2 Hitch eye Hitch eye 1 T002574 3 Washer Φ 16 galv Washer Φ 16 galv 8 T000460 4 Hex screw M16x170 8 8 galv Hex screw M16x170 8 8 galv 2 T002772 5 OW 01 03 00 01 Hitch fixing spacer 2 P810005 6 Self locking nut M16 Self locking nut M16 4 T000294 7 Hex screw M16x50 8 8 galv Hex screw M16x50 8 8 galv 2 T000781 ...

Страница 95: ...rweight set Item Part No Title Quantity Index 1 OW 01 04 01 00 Counterweight 1 P810056 2 OW 01 04 00 01 Lid 1 P810055 3 Round head bolt M6x10 galv Round head bolt M6x10 galv 4 T000940 4 Lock wash Φ 6 galv Lock wash Φ 6 galv 4 T002773 ...

Страница 96: ...m Part No Title Quantity Index 1 OW 01 05 00 00 Support foot 1 P810061 2 Hex screw M12x40 8 8 galv Hex screw M12x40 8 8 galv 4 T000757 3 Hex nut M12 8 GAL self cl Hex nut M12 8 GAL self cl 4 T000291 4 Washer Φ 12 galv Washer Φ 12 galv 8 T000458 ...

Страница 97: ...Safety arm set Item Part No Title Quantity Index 1 OW 01 06 01 00 Safety arm 1 P810064 2 Hex nut M14 8 galv self lock Hex nut M14 8 galv self lock 1 T000293 3 Chain Chain 1 T000167 4 Double locking pin Double locking pin 1 T000987 ...

Страница 98: ...ty Index 1 OW 01 07 00 00 Manifold fixing 1 2 Bush Bush 2 T002414 3 Washer Φ 10 galv Washer Φ 10 galv 1 4 Hex screw M10x25 8 8 galv Hex screw M10x25 8 8 galv 3 5 Hex nut M10 8 GAL self cl Hex nut M10 8 GAL self cl 1 T000292 6 Lock washer Φ 10 galv Lock washer Φ 10 galv 5 ...

Страница 99: ...Quantity Index 1 OW 01 09 00 00 Film storage 1 P810068 2 Pipe caps Pipe caps 3 T002648 3 Hex screw M8x25 8 8 GAL Hex screw M8x25 8 8 GAL 1 T000805 4 Washer Φ 8 galv Washer Φ 8 galv 2 T000471 5 Nut M8 galv self lock Self locking nut 1 T000256 ...

Страница 100: ...Item Part No Title Quantity Index 1 OW 01 00 00 02 Platform 1 P810002 2 Round head bolt M8x25 galv Round head bolt M8x25 galv 9 T000806 3 Washer Φ 8 galv Washer Φ 8 galv 18 T000471 4 Nut M8 galv self lock Nut M8 galv self lock 18 T000256 ...

Страница 101: ...101 12 11 Turntable slide base set ...

Страница 102: ... M10 Self locking nut M10 2 T000292 10 Washer Φ 10 Washer Φ 10 2 T000456 11 Bumper Bumper 2 T002706 12 Washer Φ 20 Washer Φ 20 4 T000462 13 Bolt M20x150 np gw Bolt M20x150 np gw 1 T000790 14 Slide base actuator Slide base actuator 1 T002597 15 Bolt M20x130 np gw Bolt M20x130 np gw 1 T002109 16 Self locking nut M20 Self locking nut M20 2 T000255 17 Self locking nut M16 Self locking nut M16 6 T00029...

Страница 103: ...ing Bearing 2 T002621 5 Washer mb12 Washer mb12 1 T002630 6 Shim Φ 30 Shim Φ 30 T002789 T000514 7 Nut KM12 Nut KM12 1 T002630 8 SCW Cone wheel small 1 T002594 9 Washer Φ 25 Washer Φ 25 1 T000464 10 Nut M24x1 5 low Nut M24x1 5 low 1 T000281 11 Self locking nut M16 Self locking nut M16 6 T000294 12 Washer Φ 16 Washer Φ 16 12 T000460 13 Key 8x7x25 Key 8x7x25 1 T002774 14 Bolt M16x90 Bolt M16x90 6 T00...

Страница 104: ...sher Φ 8 Lock washer Φ 8 1 T000455 7 Bolt M8x25 Bolt M8x25 1 T000805 8 Bolt M12x45 Bolt M12x45 2 T000758 9 Washer Φ 12 Washer Φ 12 2 T000458 10 Self locking nut M16 Self locking nut M16 5 T000291 11 Washer Φ 16 Washer Φ 16 10 T000294 12 Bolt M16x45 Bolt M16x45 4 T002565 13 Self locking nut M12 Self locking nut M12 2 T000291 14 Motor Motor 1 T002686 15 Motor valve Motor valve 1 T003002 16 Bolt M16x...

Страница 105: ...105 12 14 Rotary frame set ...

Страница 106: ...0323 17 Circlip Z30 Circlip Z30 3 T000410 18 Carriage bolt M12x45 Carriage bolt M12x35 4 T002771 19 OW 03 00 00 03 Frame rotation chain guard 1 P810078 20 Nut M10 self locking Nut M10 self locking 12 T000292 21 Washer Φ 10 Washer Φ 10 12 T000456 22 Belt guiding sleeve Belt guiding sleeve 12 P810080 23 Button screw M10x90 Button screw M10x90 12 T002769 24 Nut M12 Nut M12 4 T000291 25 Bolt M12x70 Bo...

Страница 107: ... Part No Title Quantity Index 1 OW 03 03 01 00 Guard rear wall 1 P810103 2 OW 03 03 02 00 Chain guard 1 P810106 3 Washer Φ 6 Washer Φ 6 10 T000469 4 Lock washer Φ 6 Lock washer Φ 6 10 T002773 5 Bolt M6x16 Bolt M6x16 10 T000800 ...

Страница 108: ... gw Bolt M16x90 np gw 4 T000785 6 Bolt M12x35 Bolt M12x45 4 T000756 7 Washer Φ 12 Washer Φ 12 8 T000458 8 Self locking nut M16 Self locking nut M16 7 T000294 9 Self locking nut M12 Self locking nut M12 4 T000291 10 Bolt M16x80 np gw Bolt M16x80 np gw 1 T000784 11 Film cut and hold complete actuator Film cut and hold complete actuator 1 T002719 12 OW 04 00 00 05 Guide sliding sleeve 1 P810124 13 Ci...

Страница 109: ...asher Φ 6 2 T002773 18 Nut M24 Nut M24 1 T000290 19 OW 04 00 00 08 Blade guard 1 P810340 20 Wing bolt M6x10 Wing bolt M6x12 2 T000940 21 Spring Spring 1 T000674 22 OW 04 00 00 06 Bumper pin 1 P810125 23 Rubber bumper Rubber bumper 2 T000328 24 OW 04 00 00 03 Film scraper 1 P810122 ...

Страница 110: ...110 12 17 Dispenser post set DISPENSER POST SET Item Part No Title Quantity Index 1 OW 05 01 00 00 Welded dispenser post 1 P810159 2 OW 05 02 00 00 Film puller arm 1 P810170 ...

Страница 111: ...16 Self locking nut M16 12 T000294 15 Film scraper actuator Film scraper actuator 1 T002756 16 OW 05 00 00 05 Spring washer Φ 50 1 P810332 17 Spring Corner closing spring 1 T000674 18 OW 05 00 00 08 Arm actuator pin 1 P810155 19 OW 05 00 00 02 Plate of dispenser post 2nd clamp 2 P810150 20 OW 05 00 00 01 Plate of dispenser post 1nd clamp 2 P810149 21 Bolt M16x140 np gw Bolt M16x140 np gw 6 T000776...

Страница 112: ...1 21 3 OW 06 02 00 00 Gear cover 1 P810190 4 spring 5223 89 036 0 spring 5223 89 036 0 2 T000677 5 Bolt M6x45 Bolt M6x45 2 T000801 6 Nut M12 Nut M12 6 T000291 7 Washer Φ 12 Washer Φ 12 9 T000458 8 Bolt M12x35 Bolt M12x35 1 T000756 9 Nut M6 self locking Nut M6 self locking 2 T000297 10 OW 06 03 00 00 Dispenser roller No 1 1 Size 11 20 11 Bolt M12x40 Bolt M12x40 1 T000757 ...

Страница 113: ...m Part No Title Quantity Index 1 Dispenser roller Dispenser roller 1 P810194 2 OW 06 03 00 05 Gear wheel big 1 P810199 3 Lock washer Φ 6 Lock washer Φ 6 1 T002773 4 Bolt M6x16 Bolt M6x16 2 T000800 5 Bolt M6x45 Bearing 2 T000801 6 Circlip W42 Circlip W42 2 T002778 ...

Страница 114: ...art No Title Quantity Index 1 Dispenser roller Dispenser roller 1 P810200 2 OW 06 04 00 01 Gear wheel small 1 P810201 3 Lock washer Φ 6 Lock washer Φ 6 1 T002773 4 Bolt M6x16 Bolt M6x16 2 T000800 5 Bolt M6x45 Bolt M6x45 2 T000801 6 Circlip W42 Circlip W42 2 T002778 ...

Страница 115: ...ollers TABLE ROLLERS SET Item Part No Title Quantity Index 1 OW 07 01 00 00 Idle table roller set 1 Size 11 23 2 OW 07 02 00 00 Driving table roller set 1 Size 11 23 3 Belt 3226x200x5 Rubber belt conveyor belt 4 T002625 ...

Страница 116: ...T Item Part No Title Quantity Index 1 OW 07 01 01 00 Idle table roller 1 P810204 2 Table roller bearing 209 Table roller bearing 2 T001012 3 Washer ф 14 Washer ф 14 4 T000459 4 Lock washer ф 14 Lock washer ф 14 4 T000452 5 Bolt 14x30 Bolt 14x30 4 T000765 ...

Страница 117: ...ub 1 P810338 4 OW 07 02 00 01 Gear wheel 3 4 Z21 interchangeable with OW 07 02 00 02 1 P810339 5 OW 07 02 00 02 Gear wheel 3 4 Z35 interchangeable with OW 07 02 00 01 1 P810223 6 Bolt M8x35 Bolt M8x35 1 T001369 7 Key 10x8x28 Key 10x8x28 1 T001118 8 Self locking nut M8 Self locking nut M8 1 T000256 9 Bolt 14x30 Bolt 14x30 4 T000765 10 Lock washer ф 14 Lock washer ф 14 4 T000452 11 Washer ф 14 Washe...

Страница 118: ...ng nut M12 Self locking nut M12 4 T000291 6 Washer Φ 12 Washer Φ 12 8 T000458 7 Self locking nut M24 Self locking nut M24 1 T000290 8 Washer Φ 25 Washer Φ 25 2 T000464 9 Locking pin Locking pin 6 0 27 32 2 T000986 10 Grab sliding sleeve Grab sliding sleeve 2 T002782 11 Grab actuator sliding sleeve Grab actuator sliding sleeve 1 T002587 12 OW 01 10 00 00 Grab actuator pin 1 P810325 13 Bolt M24x160 ...

Страница 119: ... 4 T002565 7 Washer ф 16 Washer ф 16 8 T000460 8 OW 09 00 00 01 Actuator pin short 1 P810249 9 Nut M16 self locking Nut M16 4 T000294 10 OW 09 03 00 00 Bale tipper resistance 1 P810302 11 Bale tipper actuator Bale tipper actuator 1 T002687 12 OW 09 00 00 02 Actuator pin long 2 P810248 13 Tipper nylon washer Tipper nylon washer 2 P810154 14 Nut M10 self locking Nut M10 self locking 1 T000292 15 Was...

Страница 120: ...9 02 03 00 Cradle pin 1 P810297 8 Bolt M10x30 Bolt M10x30 1 T000741 9 Vibration damper 50x21 D Vibration damper 50x21 D 2 T000011 T002706 10 Tension spring fi6xfi60x250_r Tension spring fi6xfi60x250_r 1 T000661 11 OW 09 02 00 01 Spring pin 1 P810267 12 Nut M24 self locking Nut M24 self locking 1 T000290 13 Cradle pin sliding sleeve Cradle pin sliding sleeve 2 T002785 14 Grease nipple M6x1 Grease n...

Страница 121: ...LE ARM SET Item Part No Title Quantity Index 1 OW 09 04 01 00 Adjustable arm 1 P810308 2 OW 09 04 00 02 Arm disc 1 P810307 3 OW 09 04 00 01 Arm disc pin 1 P810306 4 Spring type straight pin fi8x40 Spring type straight pin fi8x40 1 T000083 ...

Страница 122: ...122 12 28 Hydraulic system ...

Страница 123: ... 5 2SN DN10 L 1930 Scraper return hoses 1 T002714 10 P51 P52 18x1 5 2SN DN10 L 1760 Scraper supply hoses 1 T002715 11 P51 P51 18x1 5 2SN DN10 L 570 Tipping hose 1 T002716 12 P51 P52 18x1 5 2SN DN10 L 730 Tipping actuator hose 1 T001246 13 P51 P52 18x1 5 2SN DN10 L 2550 Tipper actuator hose 1 T002717 14 P51 P52 18x1 5 2SN DN10 L 3050 Cut and hold hose 1 T002904 15 P51 P52 18x1 5 16x1 5 DN8 L 2110 C...

Страница 124: ...18 Rotary joint 1 T002636 27 DN 147 M18 1 5 12L T connection 4 T001045 Other 28 4 section BH 42861400 Manifold 1 T002779 29 ZBMR 200 Hydromotor 1 T002686 30 HD 069 168 OD1 Filter 1 T002780 31 VBPSE 3 8L4VIE Lock 2 T001451 32 VU Directional valve 1 T001006 33 VURF 140 Throttling valve 1 T002740 34 VRFB90 3 8 Throttling valve 1 T000994 35 V 0 75 l 75 bar Hydro accumulator 1 T002739 36 OW 02 02 01 00...

Страница 125: ...5 BB Straight coupling 2 T000578 6 M18x1 5 AB Curved connector 2 T002730 7 Elbow coupling M18x1 5 AB Elbow coupling 6 T001032 8 T connection M18x1 5 BAB T connection 1 T002900 9 M18x1 5 AB Straight connector 2 T002731 10 G3 8 M18x1 5 BA Straight connector 2 T000577 11 G3 8 M18x1 5 BB Straight coupling 4 T000582 12 Stopper M18x1 5 Stopper 1 T001467 13 G1 4 M18x1 5 BB Straight coupling 6 T000580 14 ...

Страница 126: ... is valid if it has the signature of the seller and the date of sale confirmed by the official stamp of the dealer It must not contain deletions and amendments made by unauthorised persons A duplicate of the warranty certificate may be issued upon a written request after a presentation by the user of the proof of purchase In the case of an unjustified service call to warranty repair the related co...

Страница 127: ...mplaint resolution _______________ Warranty extended until ____________ ________________________ signature and stamp of the service Date of complaint submission ________________ Scope of repair and parts replaced _________ _____________________________________ _____________________________________ _____________________________________ Date of complaint resolution _______________ Warranty extended ...

Страница 128: ...dress Complaint submission method Name of the subject of complaint Name of the dealer Proof of purchase VAT invoice No dated 20 Description of fault damage The agreed date for the complaint resolution Method and time of the complaint resolution Date the fault occurred was discovered 20 Date full name ...

Страница 129: ... with the requirements of the directives and standards has been ascertained based on the tests conducted by The tests were carried out by Zbigniew Myszka M Sc Eng expert of the Association of Polish Mechanical Engineers Technicians No 9763 11 Borzytuchom Karol Jaworski place date Full name the signature of the authorised person Standard number Standard title PN EN ISO 4254 1 2006 Agricultural mach...

Отзывы: