1
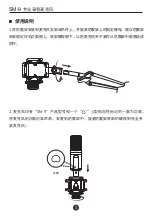
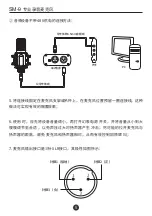
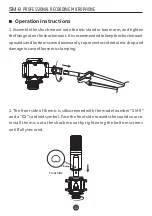
. Assemble the shock mount onto the mic stand or boom arm, and tighten
the fixing nut on the shock mount. It is recommended to keep the shock mount
upwards and bottom screw downwards, to prevent accidental mic drop and
damage in case of loose mic clamping.
Operation Instructions
2
. The front side of the mic is silkscreened with the model number SM-9
"
"
and a
cardioid symbol. Face the front side towards the sound
"
"
source.
Install the mic onto the shock mount by tightening the bottom
screws
until fully secured.
11
Front Side
SM-9
PROFESSIONAL RECORDING MICROPHONE
Содержание SM-9
Страница 1: ...Professional Recording Microphone SM 9...
Страница 2: ...SM 9 4006828333 34mm 1 SM 9 1 1 2 1 1 1...
Страница 4: ...1 2 SM 9 3 SM 9...
Страница 5: ...3 4 48V 48V 48V DC 48V 4V 2 8mA 20 48V 4 PC USB SM 9...
Страница 6: ...48V 5 6 7 XLR 5 3 1 2 48V 3 5mm PC SM 9...
Страница 7: ...1 2 3 4 5 6 7 6 2000 2000m SM 9...
Страница 9: ...8 SM 9...
Страница 18: ...17 SM 9 PROFESSIONAL RECORDING MICROPHONE...
Страница 19: ......
Страница 20: ......


