background image

Getting Started


17 

If you want to 

Action 

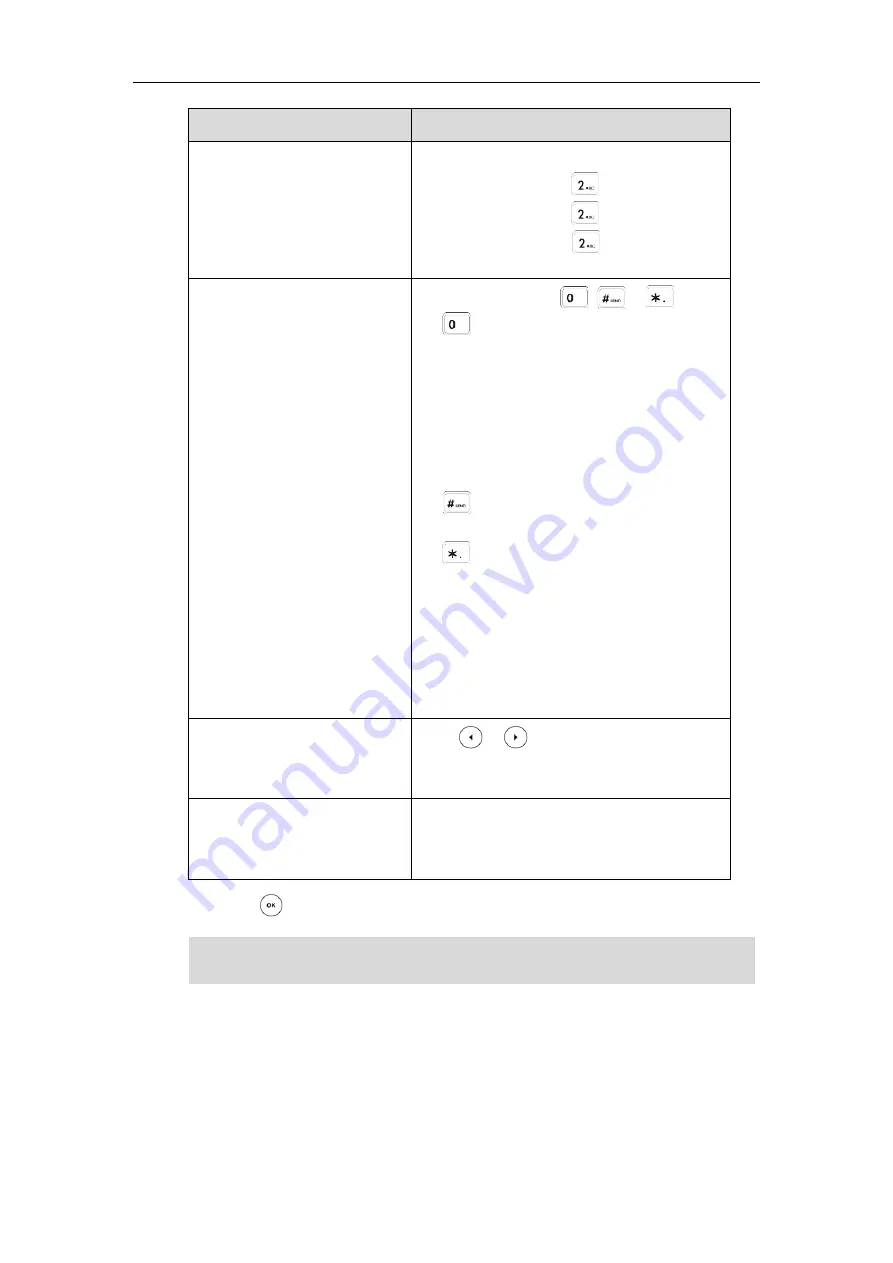
For example, if the input mode is ABC: 

-


To enter “A”, press     once. 

-


To enter “B”, press     twice quickly. 

-


To enter “C”, press      three times 
quickly. 

Enter special characters. 

Press the keypad key     ,     or     . 

For        key: 

If it is the uppercase (ABC soft key) or 
lowercase (abc soft key) input mode, it will 
provide the space character. 

If it is the numeric (123 soft key) or 
alphanumeric (2aB soft key) input mode, it will 
only provide the digit 0. 

For     key: it only provides the pound 
character (#). 

For       key: 

If it is the uppercase (ABC soft key), lowercase 
(abc soft key) or alphanumeric (2aB soft key) 
input mode, it will provide the following 
special characters: . * : / @ + - $ [ ] 

If it is the numeric (123 soft key) input mode, it 
will only provide the asterisk character (*). 

Delete text you entered. 

Press     or     to position the cursor to the 
right of the text you want to delete, and then 
tap the Delete soft key. 

Delete an entire field of data. 

Swipe your finger to the left or right to select 
the entire field of data, so that the data is 
highlighted, and then tap the Delete soft key. 

3.


Press      or tap the Save soft key. 

Note 

Phone Status 

You can view phone status via phone user interface or web user interface. 

Available information of phone status includes: 

When the phone is in the pre-dialing screen, characters can be entered using the 
on-screen keypad.


Содержание T48G/S

Страница 1: ...Tadiran T48G S IP Phone User Guide Document Edition 3 1...

Страница 2: ...ified or altered publication Warranty THE SPECIFICATIONS AND INFORMATION REGARDING THE PRODUCTS IN THIS GUIDE ARE SUBJECT TO CHANGE WITHOUT NOTICE ALL STATEMENTS INFORMATION AND RECOMMENDATIONS IN THI...

Страница 3: ...rference to radio or television reception which can be determined by turning the equipment off and on the user is encouraged to try to correct the interference by one or more of the following measures...

Страница 4: ...experience and newly developed industrial designs with a large touch screen for easy and efficient use This guide provides everything you need to quickly use your new phone First verify with your sys...

Страница 5: ...GETTING STARTED 7 Packaging Contents 7 Optional Accessories 8 Phone Installation 10 Phone Initialization 12 Registration 13 Touch Screen Display 13 Navigating Menus and Fields 15 Entering Data and Ed...

Страница 6: ...ering Calls 35 Ending Calls 36 Redialing Numbers 37 Call Mute 37 Call Hold Resume 38 Do Not Disturb DND 38 Call Transfer 39 Conference 40 REGULATORY NOTICES 43 Service Agreements 43 Limitations of Lia...

Страница 7: ...ent Instructions Icon Descriptions LED Descriptions User Interfaces Documentation If you require additional information or assistance with your new phone contact your system administrator Hardware Com...

Страница 8: ...ey Accesses voice messages REDIAL Key Redials a previously dialed number Position the cursor within text you re updating Enable or disable fields Turn pages or scroll through values for a field Scroll...

Страница 9: ...Register failed Flashing Registering Hands free speakerphone mode Handset mode Headset mode Multi lingual lowercase letters input mode Multi lingual uppercase letters input mode Alphanumeric input mod...

Страница 10: ...icon LED Descriptions Power Indicator LED LED Status Description Solid red The phone is initializing Fast flashing red The phone is ringing Slow flashing red The phone receives a voice mail Off The p...

Страница 11: ...can customize your phone by tapping the Menu soft key to access the phone user interface The Advanced option is only accessible to the administrator and the default administrator password is admin cas...

Страница 12: ...basic call features On the website English Aeonix Configuration Guide for End Users Phone web interface settings for advanced features On the website English Note You can also download the latest doc...

Страница 13: ...include Packaging Contents Phone Installation Phone Initialization Registration Touch Screen Display Navigating Menus and Fields Entering Data and Editing Fields Phone Status If you require additional...

Страница 14: ...able Quick Start Guide Check the list before installation If you find anything missing contact your system administrator Optional Accessories The following items are optional accessories for your T48G...

Страница 15: ...Getting Started 9 Wall Mount Bracket Power Adapter Headset Wireless Headset Adapter EHS36 Bluetooth USB Dongle BT40...

Страница 16: ...r the optional wall mount bracket 2 Connect the handset and optional headset 3 Connect the network and power 1 Attach the stand or the optional wall mount bracket Desk Mount Method Wall Mount Method O...

Страница 17: ...ect the AC power 1 Connect the DC plug on the power adapter to the DC5V port on the phone and connect the other end of the power adapter into an electrical power outlet 2 Connect the included or a sta...

Страница 18: ...h screen displays Initializing Please wait during the initialization DHCP Dynamic Host Configuration Protocol The phone attempts to contact a DHCP server in your network to obtain valid IPv4 network s...

Страница 19: ...has successfully started up the idle screen will be displayed The following figure is an example of what is displayed on the touch screen No Name Description 1 Status Bar Displays the phone s default...

Страница 20: ...ess to the line key screen Then you can tap the desired line key to configure it 7 Wallpaper Shows the specified wallpaper which can be customized For more information refer to Wallpaper on page 19 8...

Страница 21: ...enu item to enter the corresponding feature configuration screen 4 Configuration Area Displays configuration items of the highlighted menu item in the menu tree area You can configure feature settings...

Страница 22: ...for a field From the pull down list tap the value or scroll to the value and then press Entering Data and Editing Fields You can enter data and edit fields using the keypad on the phone To enter or ed...

Страница 23: ...y or alphanumeric 2aB soft key input mode it will provide the following special characters If it is the numeric 123 soft key input mode it will only provide the asterisk character Delete text you ente...

Страница 24: ...ddress Phone status e g device model hardware version product ID and device certificate status Account status e g register status of SIP accounts Note To view the phone status via phone user interface...

Страница 25: ...customizing your phone Topics include General Settings Audio Settings System Customizations If you require additional information or assistance with your new phone contact your system administrator Ge...

Страница 26: ...is inactive You can select a low intensity or turn off the backlight Backlight Time The delay time to change the intensity of the LCD screen when the phone is inactive You can select a desired time to...

Страница 27: ...comfortable level on the phone Ensure that the expansion module has been connected to the phone before configuration To configure the contrast via phone user interface 1 Tap Basic Settings Display Co...

Страница 28: ...tly engaged audio devices handset speakerphone or headset when the phone is in use To adjust the volume when the phone is idle 1 Press to adjust the ringer volume Note To adjust the volume when the ph...

Страница 29: ...call the call is connected to your headset automatically For more information on using the headset to answer a call refer to Answering Calls on page 35 With the handset on hook enter the desired numbe...

Страница 30: ...matically The LCD screen displays the Bluetooth device information device name and MAC address Before you pair a Bluetooth headset check the indicator on the Bluetooth headset to make sure that the Bl...

Страница 31: ...r phone If there is no Bluetooth devices found on the touch screen tap the Scan soft key to search for the Bluetooth device 3 Enter the PIN in the prompted Password field The default PIN is 0000 4 Tap...

Страница 32: ...For more information refer to the documentation from the Bluetooth headset manufacturer Auto connection feature enables or disables the phone to connect with the Bluetooth headset automatically This f...

Страница 33: ...vice has the highest priority If there is no Bluetooth headset connected the phone will automatically connect to a Bluetooth headset with the highest priority You can disconnect the Bluetooth headset...

Страница 34: ...t from your phone When you delete the Bluetooth headset it disappears from the Bluetooth Devices list To connect it to your phone again you need to scan it first and then connect it again To delete yo...

Страница 35: ...Bluetooth icon disappears from the touch screen If a Bluetooth headset is paired and connected and then you deactivate the Bluetooth mode it will disappear from the Bluetooth Devices list The Bluetoo...

Страница 36: ...n directly To assign functionality to a line key via phone user interface 1 Tap Features DSS Keys 2 Tap the desired line key 3 Select the desired key type from the Type field 4 Optional Select the des...

Страница 37: ...mize the soft keys navigation keys and function keys To customize programmable keys via the Aeonix Portal 1 Refer to Aeonix Configuration Guide for End Users for details on how to customize soft keys...

Страница 38: ...sic operating instructions for the T48G S IP phone Topics include Placing Calls Answering Calls Ending Calls Redialing Numbers Call Mute Call Hold Resume Do Not Disturb DND Call Transfer Conference Re...

Страница 39: ...e way you want to speak to the other party During a call you can alternate between Speakerphone Headset and Handset modes by pressing the Speakerphone key the HEADSET key or by picking up the handset...

Страница 40: ...d number using the keypad Press or tap the Send soft key To place a call using the headset Do one of the following With the optional headset connected press to activate the headset mode Tap the line k...

Страница 41: ...desired call and then tap the Resume soft key to retrieve it Note Answering Calls When you are not in another call you can answer a call in one of three ways Using the handset Using the speakerphone...

Страница 42: ...headset mode deactivated tap the line key the line key illuminates green To answer a call using the headset Do one of the following Press With the headset mode activated tap the Answer soft key With...

Страница 43: ...led number from your phone 1 Press when the phone is idle 2 Tap the desired entry from the placed calls list Call Mute You can mute the microphone of the active audio device during an active call so t...

Страница 44: ...the call is on hold The phone will beep softly every 30 seconds to remind you that you still have a call on hold To resume a held call 1 Press or tap the Resume soft key Multiple Calls on Hold If mult...

Страница 45: ...he number of missed calls will appear on the touch screen Note Call Transfer You can transfer a call to another party in one of three ways Blind Transfer Transfer a call directly to another party with...

Страница 46: ...ocal conference or create a conference with multiple participants which is called network conference Note The T48G S IP phone supports up to 3 parties including yourself in a conference call This is t...

Страница 47: ...he second call using account 2 2 Tap the desired call for conference and ensure that the call is active for example tap the call on account 1 3 Tap the Conference soft key to join the two calls in the...

Страница 48: ...Basic Call Features 42 Tap to forbid the desired party from speaking The muted party can hear everyone but no one can hear the muted party Tap the End Call soft key to drop the conference call...

Страница 49: ...uctions Save these instructions Read these safety instructions before use The following basic safety precautions should always be followed to reduce the risk of fire electrical shock and other persona...

Страница 50: ...any cable make sure that your hands are completely dry Do not spill liquid of any kind on the product or use the equipment near water for example near a bathtub washbowl kitchen sink wet basement or n...

Страница 51: ...Regulatory Notices 45 Keep the power plug clean and dry Using a dirty or wet power plug may lead to electric shock or other perils...

Страница 52: ...23 Headset Mode Activation Deactivation 23 I Icon Instructions 3 In This Guide Error Bookmark not defined K L LED Instructions 4 Limitation of Liability 43 Line Keys 30 M N Network Connection 10 P Pac...

Страница 53: ...Index 47...

Отзывы: