


3-4
Coral IPx 800 Installation Manual
Po
wer Sup
ply T
est
3
0
1.
Verify that the ground wires and the power wires are properly connected.
See
and
page 2-22, Wiring DC Powered Systems
.
2.
Turn ON the external 48VDC Main Power Supply (MPS) or battery charger and
close any fuse or circuit breaker required to supply 48 VDC to the Coral
IPx 800cage.
3.
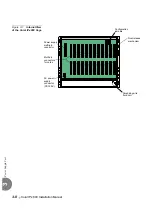
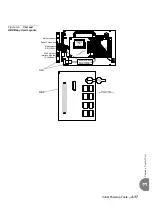
Open the DC Power cover on the rear panel of the cage.
4.
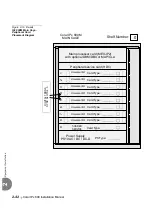
Measure the DC voltage entering the power input terminals. See figures on
page 2-22, DC Power Terminal Interconnection
page 2-23, Coral IPx 800 Power Wiring for One Cage
page 2-24, Coral IPx 800 Power Wiring for One Rack
Measure the voltage as follows:
Connect the positive lead of the DMM to the 48V RTN IN terminal.
Connect the negative lead to the –48V IN terminal.
Verify that the reading is 48 volt DC.
5.
Verify that the PS19 DC-D power switch is turned OFF (downwards).
3
PS19 DC-D Powered System
Electrical Hazard. Electrical currents in the system could cause shock, burn, or death.
Exercise extreme caution while opening the DC power cover and while performing the
power checks that follow.
If a minus sign (–) appears in the meter display, the polarity of the 48VDC power to the
cage is reversed. Verify the meter settings and connections. If the meter is properly set
and connected, carefully examine the wiring between the external 48VDC power supply
and/or batteries, determine the location of the polarity reversal, and correct the wiring
error before continuing.
Do not insert or remove the power supply unit from the cage when turned ON.
Sudden power surges could damage system components.
Содержание Coral IPx 800 Series
Страница 2: ......
Страница 4: ......
Страница 10: ...vi...
Страница 16: ......
Страница 22: ......
Страница 28: ......
Страница 32: ...1 4 Coral IPx 800 Installation Manual Document Description 1 NOTES...
Страница 34: ...1 6 Coral IPx 800 Installation Manual Special Symbols Used in this Document 1 NOTES...
Страница 40: ......
Страница 48: ...2 8 Coral IPx 800 Installation Manual Site Inspection 2 NOTES...
Страница 90: ......
Страница 116: ...3 26 Coral IPx 800 Installation Manual Shared Service and Peripheral Card Test 3 NOTES...
Страница 118: ...3 28 Coral IPx 800 Installation Manual Installation Wrap up 3 NOTES...
Страница 120: ......
Страница 126: ......
Страница 142: ...5 16 Coral IPx 800 Installation Manual Protection Devices 5 NOTES...
Страница 150: ...5 24 Coral IPx 800 Installation Manual Terminal Data Communication Ports RS 232E 5 NOTES...
Страница 182: ...5 56 Coral IPx 800 Installation Manual I O RJ 45 Connections Via Rear Panel For Coral Interface Cards 5 NOTES...
Страница 242: ......
Страница 278: ...6 38 Coral IPx 800 Installation Manual Cage Description and Installation 6 NOTES...
Страница 292: ...6 52 Coral IPx 800 Installation Manual Coral IPx 800X Expansion Cage Description 6 NOTES...
Страница 312: ...6 72 Coral IPx 800 Installation Manual System Configuration Options Coral IPx 800 6 NOTES...
Страница 313: ...Coral Cor IPx 800 Installation Manual Chapter 7 Power Supplies 7 1 PS19 DC 7 1 7 2 PS19 DC D 7 17 7 3 PS19 AC 7 39...
Страница 314: ......
Страница 352: ...7 38 Coral IPx 800 Installation Manual PS19 DC D Power Supply Unit with Duplication 7 NOTES...
Страница 368: ......
Страница 372: ...8 4 Coral IPx 800 Installation Manual Common Control Cards 8 NOTES...
Страница 382: ...8 14 Coral IPx 800 Installation Manual Software Authorization Unit SAU 8 NOTES...
Страница 384: ...8 16 Coral IPx 800 Installation Manual MAP 8 NOTES...
Страница 386: ...8 18 Coral IPx 800 Installation Manual LIU 8 NOTES...
Страница 392: ......
Страница 396: ...8 26 Coral IPx 800 Installation Manual HDC Card High Density Control 8 NOTES...
Страница 399: ......