


13
12
TM
FASTENING TOOLS
FOR THE PROFESSIONAL
•
Use appropriate detectors to determine if any utility lines are
hidden within the work area or call your local utility company
for assistance.
Should electric lines be damaged this could lead to
fire and electric shock. Damaged gas lines could lead to explosions.
Penetrating a water line can cause property damage.
•
When using the power tool hold it in such a manner that your
head and/or body cannot be injured by the tool suddenly kicking
back due to a malfunction of the battery or from objects in the
work area.
•
Do not attempt to open the battery pack.
There is a danger of
short-circuiting.
•
Protect the battery against heat (continuous intense sunlight),
fire, water and moisture.
There is a danger of explosion.
•
A damaged battery or one that is subject to improper use can
emit vapours.
Ventilate the area and seek medical help if needed.
The vapours can irritate the respiratory system.
•
Only use the battery in conjunction with your Tacwise power
tool.
This will protect it against overloading.
•
Use only original Tacwise batteries with the voltage listed on the
nameplate of the power tool.
There may be a danger of injury as
well as property damage through exploding batteries that are
imitations, reconditioned or other brands.
• The electric motor has been designed for one voltage only.
Always check that the battery pack voltage corresponds to the
voltage on the rating plate. Also make sure that the voltage of your
charger corresponds to that of your mains.
Model and Serial No.
The model number of this tool will be found on a label located on the
tools magazine channel and the serial number is inside the body of the
tool that houses the battery. Please record the model number and serial
number in the space provided below. Please always give the following
information when contacting us:
MODEL NUMBER .........................................................
SERIAL NUMBER .........................................................
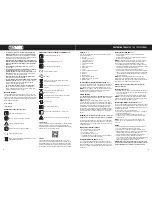
Explanation of Label on Power Tool
Read instruction manual before use
Wear CE approved safety goggles at all times
Contains chemicals that explode
Wear CE approved ear defenders at all times
Conforms with EC directives
Dispose of electrical equipment and batteries in accordance
with environmental legislations
Explanation of Labels on Charger and Battery Pack
Service Parts
These tools contain two main service parts (Bungee Cords and the Driver
Blade Assembly). These parts are easily replaced by following the
instructions on page 14 of this manual. For additional information please
follow the QR code below or visit our website.
Service
Any servicing over and above the replacement of the “Service Parts”,
requires specialist tools and knowledge and should be performed only
by a qualified Tacwise Service Engineer or appointed Service Agent. We
strongly recommend that the main housing of the tool is not opened, as
such action may result in injury and may compromise the tool warranty.
Li-ion
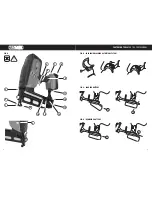
Features
(Fig. A)
Your 18V 16G Finish Nailer has been designed for driving fasteners
into wooden work pieces.
1. Nose piece
2. Working contact element
3. Quick release nose gate
4. Depth adjustment dial
5. Trigger actuation system
6. Trigger
7. Battery release button
8. Battery pack
9. Handle
10. Storage for rubber nose protector
11. Belt hook
12. Magazine
13. Magazine slider
14. Release button for loading
15. Rubber nose for surface protection
16. Magazine spring
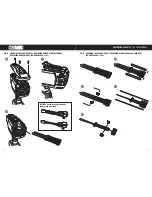
Locking and Unlocking the Actuation System
(Fig. B)
Lock the actuation system and remove the battery before making any
adjustments, changing accessories, or placing the power tool aside.
This safety measure prevents accidental starting of the power tool.
NOTE:
To use the actuation system, push and hold the switch pin on
the trigger
1
whilst moving the pin head
2
on the opposite side to
either the ‘lock’ or ‘unlock’ position as required.
Battery Charging
Use only the battery charger that comes with the product.
Only the
battery charger that is matched to the lithium ion battery should be
used in your machine.
NOTE:
The battery is supplied partially charged. To ensure full
capacity of the battery, completely charge the battery in the battery
charger before using your power tool for the first time. The lithium ion
battery can be charged at any time without reducing its service life.
Interrupting the charging procedure does not damage the battery.
The “Electronic Cell Protection (ECP)” protects the lithium ion battery
against deep discharging. When the battery is discharged, the power
tool is switched off by a protective circuit: Fasteners can no longer
be shot.
WARNING!
After the automatic shut-off of the power tool, do not
continue to press the trigger. The battery could become damaged.
The battery is equipped with a NTC temperature control which allows
charging only within a temperature range of between 0°C and 40°C. A
long battery service life is achieved in this manner. Observe the notes
for “battery disposal”.
LED Functions of Battery Charger
• Green LED flashing = charger connected
• Red LED on = charging/battery low
• Green LED on = charged
• Red LED flashing = charger too hot
• Green and Red LED on = fault with charger (contact your Tacwise
Service Engineer or appointed Service Agent).
Loading/Removing the Battery
(Fig. C & D)
To load, slide battery down into battery housing until it clicks. The
battery (8) has two locking levels, which are designed to prevent the
battery from falling out in case of vibrations from intensive use. Press
battery release button (7) and pull the battery up and out completely,
toward the rear.
Loading the Tool with Nails
(Fig. E)
• Before loading the magazine see “Locking and Unlocking the
Actuation System”.
• Clean the magazine slider (13) as required and make sure that the
magazine (12) is not dirty/soiled.
NOTE:
A lock function of the magazine slider prevents the power tool
from being started with an empty magazine. The working contact
element cannot be pressed in and blank firing is thus prevented.
• Insert a fitting nail strip in the T-slot at the end of the magazine (12).
• Push the nail strip in the magazine toward the front until the last nail
is positioned in front of the magazine spring (16).
• Press the release button (14) on the magazine slider (13).
• While pressing the release button (14) carefully guide the magazine
slider (13) toward the nail strip until the slider makes contact with
the nails. Gently releasing the slider will push the nail strip to the
front of the magazine.
NOTE:
The magazine slider must slide back with only low force
(finger-pressure). Do not let the magazine slider snap back without
guiding it. Otherwise, the magazine slider could become damaged, and
there is danger of your fingers being caught or pinched.
NOTE:
We strongly recommend that you only use approved/
genuine Tacwise nails.
Unloading the Tool
(Fig. F)
• Hold down the release button (14) and pull the magazine slider (13)
to the rear of the magazine release the button and allow the slider
it to lock into position.
• Hold tool upside down, and the nails will drop out of the magazine
NOTE:
Do not let the magazine slider snap back without guiding it.
Otherwise, the magazine slider could become damaged, and there is
danger of your fingers being caught or pinched.
Spare Non-Marking Nose/Tip Protector
(Fig. H)
This tool is supplied with a removable rubber nose protector (15), which
prevents the tool from marking the surface of the work piece. This tool
is designed to be used both with and without the rubber nose protector
according to the application.
The nose protector can be removed and replaced.
• Before removing or replacing the nose protector see “Locking and
Unlocking the Actuation System”.
• Pull the nose protector from the working contact element.
• To replace, push the new nose protector back over the working
contact element.
NOTE:
A spare nose protector is located at the side/rear of the
magazine (10). To order additional nose protectors, please quote
code: 1264.
Nailing
• Use genuine Tacwise fasteners of the type specified for the tool.
• Choose the appropriate material or fastener length.
• Before firing see “Locking and Unlocking the Actuation System”.
• Firmly position the rubber nose protector (15) against the workpiece
until the working contact element (2) is fully depressed.
• Briefly press trigger (6) and release again. A nail is discharged.
• Allow the power tool to bounce back from the workpiece.
• You must release the trigger and working contact element after each
nail to reset the tool. The tool will not fire another nail until the
trigger and working contact element are released.
WARNING: If the trigger (6) and the working contact element (2)
are pressed and held longer than 1 second after firing a nail, it is
possible that further nails are fired due to a kickback-effect.
Read instruction manual before use
Do not charge damaged battery packs
Do not incinerate the battery pack
Conforms with EC directives
Recyclable
Dispose of electrical equipment in accordance with
environmental legislation
Dispose of batteries in accordance with environmental
legislation
Always observe the safety instructions and
applicable regulations
Electrical safety; make sure the voltage of your charger
corresponds to that of your mains
Use indoors only
Do not expose to rain or water
Charge at temperatures between 0°C and 40°C only
Donates the risk of electric shock if not used properly