APPLICATION:
The Taco SmartPlus is designed to increase hot water comfort while con-
serving water and energy. By recirculating “cooled” hot water back to the
water heater, the wait for hot water is decreased to seconds.
BENEFITS:
• Water Conservation:
The average residence can save up to 33 gal-
lons of water per day (12,000 gallons per year).
• Comfort and Convenience:
Hot water is always available in seconds.
• Efficiency:
“Smart/Learn” operation control maximizes hot water
comfort and energy savings.
• Reliability:
The SmartPlus provides whisper quiet operation and
industry leading electronics with Taco’s “00” circulator proven perfor-
mance and dependability.
PUMP CONTROL OPTIONS:
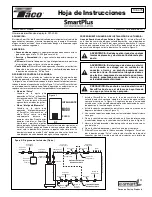
The SmartPlus has a “Mode Select” toggle switch that allows for 2 opera-
tion modes. “Pulse” or “Smart” mode can be selected using the toggle
switch located on the capacitor base mounted electronic control board (see
Figure 1). A yellow LED indicates which mode is selected. All operation is
automatic, no manual timer or temperature setting is required.
•
“Pulse” Mode
When set for “Pulse” operation, the
SmartPlus will run for 150 seconds
every 10 minutes to maintain hot
water at all fixtures.
•
“Smart/Learn” Mode
When set for “Smart/Learn” opera-
tion, the SmartPlus will run in
“Pulse” mode as above for the first
7 days. During the first 7 days, the
SmartPlus will monitor and record
the home’s hot water usage pat-
tern. For the next 7 days, the
SmartPlus will then use the pre-
ceding week’s usage pattern to
cycle the pump. This process will
be repeated every 7 days. The pump will run in “Pulse” mode from 1
hour before to 1 hour after each recorded hot water demand.
SUGGESTED PLUMBING INSTALLATION PROCEDURE:
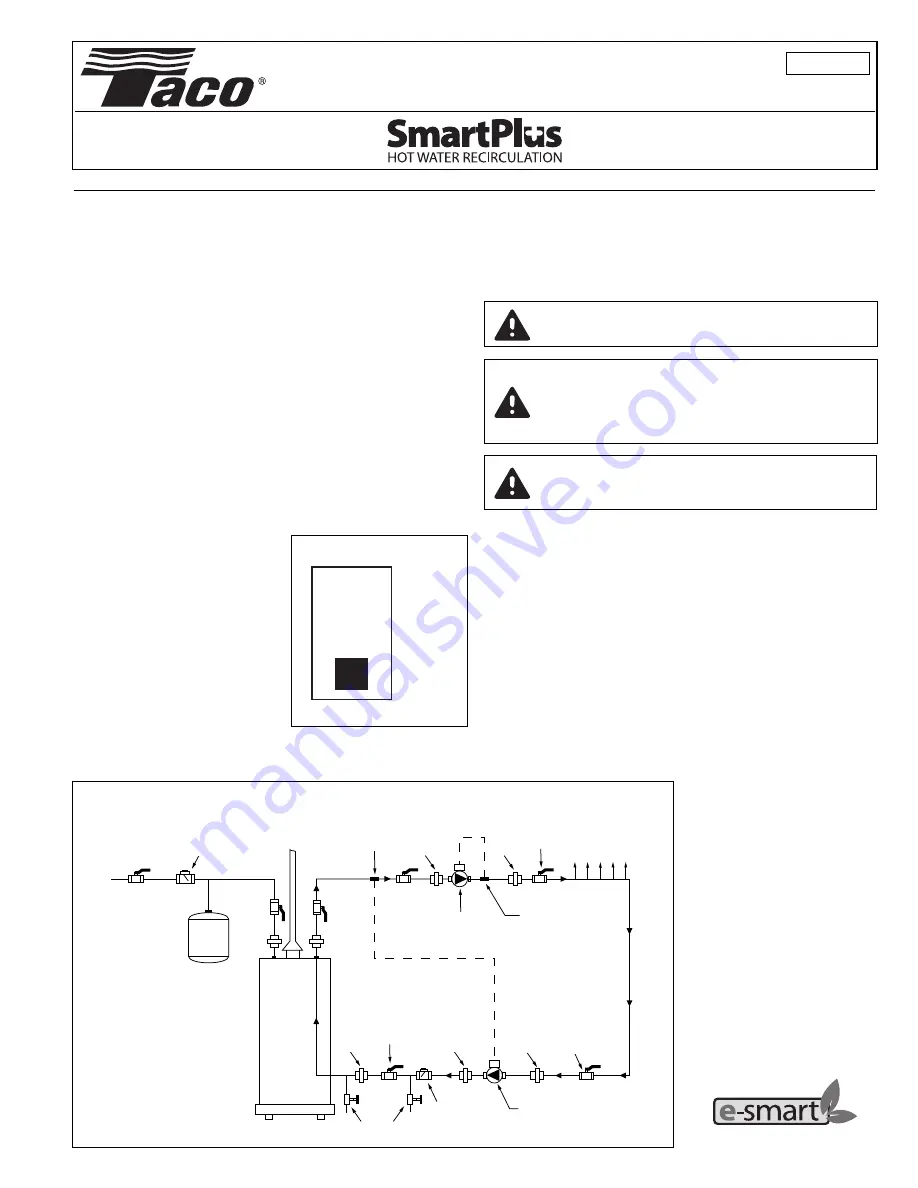
Hot Water Supply Line (Option No. 1) -
Install the SmartPlus on the
domestic hot water (DHW) supply line pumping away from the DHW
source. The external sensor provided with the SmartPlus should be
installed on the DHW supply line. Refer to Figure 2.
1. Install the SmartPlus in-line on the DHW supply line downstream of
the hot water source as shown in Figure 2. Be sure the directional
arrow on the casing is installed with the arrow pointing away from the
hot water source.
2. Install all other system components as shown in the piping diagram
(see Figure 2).
3. When all components are installed, fill system with water.
4. Close the isolation valve on the return line between the water heater
and the flow check valve (see Figure 2).
5. Open the drain valve and drain water until all air is purged from the line.
6. Close drain valve and open isolation valve.
7. The SmartPlus is shipped from the factory in “Smart” mode. To
switch the pump to “Pulse” mode, remove the 2 capacitor cover
screws and cover. Change the position of the toggle switch on the
circuit board to “Pulse” (see Figure 1). Install the capacitor cover and
secure with 2 screws.
Instruction Sheet
102-475
SUPERSEDES: New
EFFECTIVE: January 1, 2012
Plant ID# 001-4050
Backflow
Preventer
Thermal
Expansion
Tank
Temperature
Sensor
Fixtures
Isolation
Valve
Union
Isolation
Valve
Union
Flow
Check
Valve
Drain
Valve
Isolation
Valve
Hot
Supply
Cold
Supply
H
o
t
R
e
tu
rn
Isolation
Valve
Isolation
Valve
Union
Union
Union
Union
Isolation
Valve
HOT WATER
SUPPLY LINE
HOT WATER
RETURN LINE
Temperature
Sensor
S1
SMART
MODE
PULSE
Figure 1
CAUTION: Do not plug in the SmartPlus power
cord until the system is filled with water and
purged of air.
WARNING: All local plumbing and electrical codes
should be followed when installing this product.
WARNING: Risk of electrical shock. This pump is
supplied with a grounding conductor and ground-
ing-type attachment plug. To reduce the risk of
shock, be certain that it is connected only to a
properly grounded grounding-type receptacle.
Resource Saving Products
Figure 2: Installation Diagram (Typical)
®


