Applications Menu
At the bottom of your home screen is the Applications Launcher icon .
Touch the icon to open a menu of all your installed apps and widgets. To open an
app just tap it once and it will launch. You will have to swipe left or right between
screens to see all the apps installed on the @Tab.
For more information about the applications and widgets see Chapter 9 of the
manual.
Files and Folders
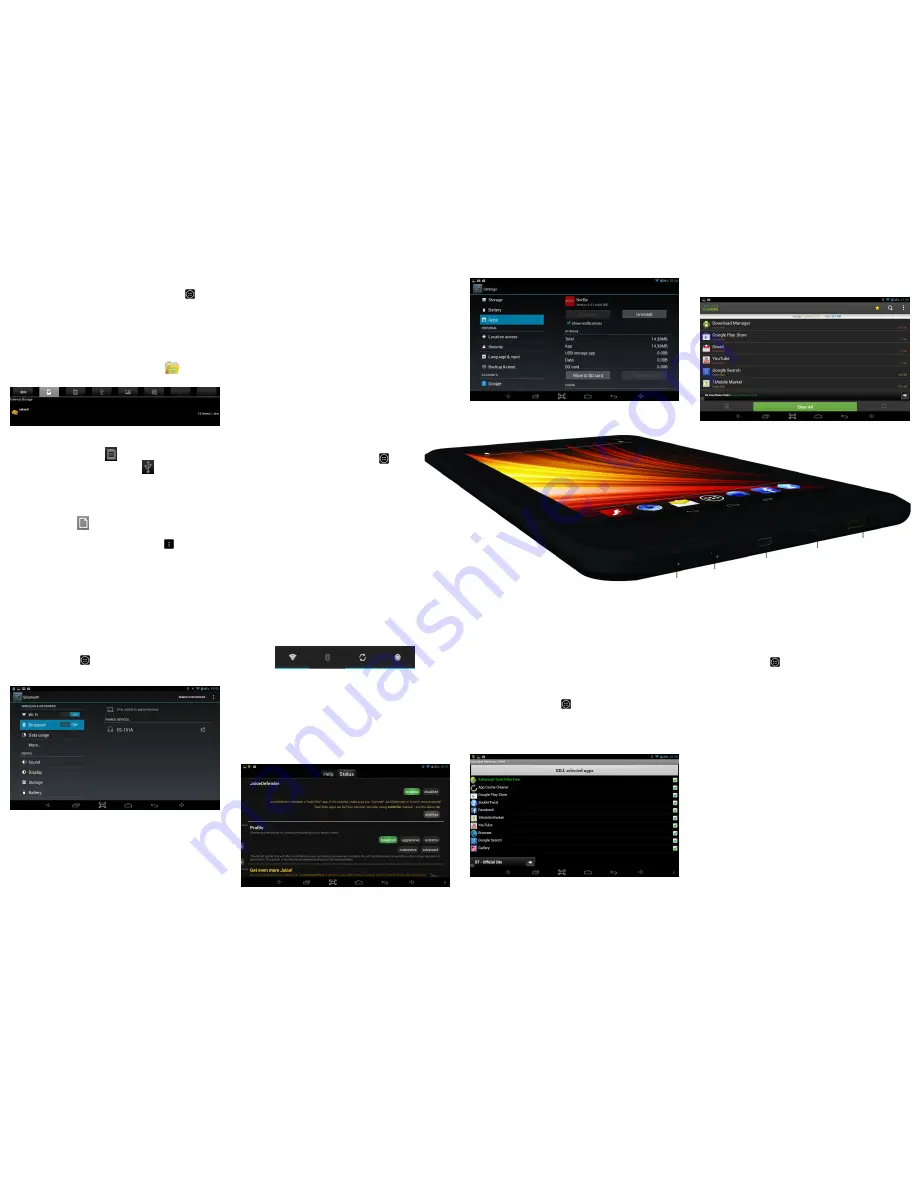
To browse your files and folders touch the File Manager icon on the home
screen. When File Manager opens it will show all the main storage locations.
You can navigate through folders just by touching them and select files by also
touching them.
To access a micro SD card, touch the menu option.
To access an external USB storage device touch the menu option.
To copy and paste files from one folder to another, tap and hold the original file
until a menu appears with file options to
Delete, Rename, Copy, Move(Cut)
,
or send by Bluetooth
. Tap
Copy File
to create a duplicate of the file or
Move(Cut)
to
move the original file to a new location. You can then navigate to the destination
folder where you want to copy the file.
Tap the
File
menu option found at the top right hand corner of the menu,
select
Paste
and the file Copy / Move will complete.
To create a new folder for your own files, tap the menu icon and select the
New Directory
option and use the virtual keyboard to type the folder name.
To access Pictures and Movies taken with the built-in camera, touch the DCIM
folder and then the Camera folder.
There are Music and Movies folders already created to store your media files in.
Storage & Expansion
You can expand the @Tab’s 16GB of internal storage using the micro SD Card
Slot. Capacities up to 32GB are supported allowing you to store your favourite
music, movies and photos.
Insert the card with the metallic connectors facing the front of the @Tab, until you
feel a click which will lock the card into place. To remove the card, push the card
gently inwards until you hear a click and then it will pop out.
Freeing up Storage Space
Your @Tabs storage is split into two parts, the Internal Storage where Android and
any Apps you download are installed and the NAND Flash where pictures, music
and movies are stored.
If you download a lot of Apps, you may get to a point where you see a
Storage
space running out
message. This means that the Internal Storage is almost full and
this may cause issues with downloading new Apps or updates to existing Apps.
To resolve this situation you can move Apps from the Internal Storage to either the
NAND Flash or to an external microSD Card which has been inserted into the
tablet.
To move Apps between storage locations, you will need to access
the settings menu. Tap the Applications Launcher icon at
the bottom of the home screen. Tap on the
Settings
icon from
the Application page.
On the left hand side menu options scroll down by sliding your
finger upwards until you can see the
Apps
option, then tap on this.
Select an App from the list (the example to the right shows Netflix).
Tap on the
Move to SD card option
.
The app will take a short period of time to move over and you will be informed
once the operation has been completed.
The total size of the app on the Internal storage will have reduced greatly and
storage space will have been freed up.
Note: Only Apps which have been installed by you can be moved in this way and
some Apps may not be able to be moved because they must reside on internal
storage.
Another way of freeing up storage space on your @Tab is to use the pre-installed
app
App Cache Cleaner,
which can be found on from
the Applications page
.
This is a quick tool for clearing application cached files. Over time these files can
increase in size and take up a large part of your @Tabs storage
Open the app and tap on the
Clear all
button to remove all uneccessary cache
files.
Bluetooth
Bluetooth is a wireless technology that allows accessories like Headsets, Keyboards
etc. to be connected to the @Tab without using cables. To connect to a Bluetooth
device, the @Tab will need to be paired with it, which sets up a connection that
will be remembered by both devices.
To access Bluetooth settings, you will need to access the settings menu. Tap the
Applications Launcher icon at the bottom of the home screen. Tap on the
Settings
icon from the Application launcher page.
Tap on the
Bluetooth
menu option on the left hand side menu.
To enable Bluetooth:
1.
Slide the switch to the right, into the
On
position.
2.
Once Bluetooth has been turned on, the @Tab will automatically scan for
available Bluetooth devices and display the names of those it finds.
3.
Find the device you want to connect to and select it by touching the entry.
Some Bluetooth devices require a four digit pairing code to be entered to
allow the connection to complete. If this is the case, a window will popup
allowing the code to be entered. You should refer to the instructions that
came with the device for this pairing code, but the most common codes are
0000 or 1234.
The device should now be paired and will start to work with the
@Tab.
Battery Life
To increase the battery life of your @Tab, there are a few things you can do:
Use the Power Control Widget which can be found on the home screen to the left
of the main home screen (swipe your finger from left to right to switch to this
screen).
This widget allows the functions that drain the most battery on the @Tab to be
controlled including Wi-Fi, Bluetooth, Sync, and screen Brightness.
We highly recommend turning off Wi-Fi, Bluetooth, and Sync when they are not
being used. You can also manage the screen Brightness using this widget. Disabling
Wi-Fi is ideal when watching pre-recorded movies, reading eBooks and is
especially useful when playing games, because it will disable in-game adds.
Alternatively you can use the pre-installed app
JuiceDefender
to optimise battery
consumption by automatically managing the most power-draining components of
your @Tab, so that they are used only when needed, rather than left running all
the time for no particular purpose. So if your @Tab is not being used, it will turn
off unused functionality and make the processor idle to conserve the battery.
To use JuiceDefender, open the app from the Applications Launcher and set it to
enabled. More information about this app is available from the help section tab.
Performance
As with any advanced Operating System, Android performance can deteriorate
over time, if the device is not restarted fairly regularly. There are some things you
can do to keep your @Tab running as fast as possible without restarting it.
If you ever find your @Tab is running slowly, it will probably be because of
applications which have not been closed properly and are still running in the
background. Most applications will close correctly if you use the back option to
exit out of the application and select yes when it asks if you want to close the app
(just keep pressing the Back button until you get to this option).
If an application doesn’t close properly or any time your @Tab seems to be
running slowly, run
Advanced Task Killer
from within the Application launcher.
Tap the Applications Launcher icon at the bottom of the home screen. Tap on
the Advance Task Killer icon.
When Advanced Task Killer runs, it will show a list of all the currently open
applications. You can kill any application by making sure it has a green tick to the
right of it in the list and then clicking on the
Kill selected apps
button at the top of
the screen.
Security
The Security option allows you to setup how secure you want your @Tab to be.
You may want to set some form of automatic screen lock to prevent unauthorized
access. If a screen lock has been set, the screen locks when your tablet's display
goes to sleep.
To access security settings, you will need to access the settings menu. Tap the
Applications Launcher icon at the bottom of the home screen. Tap on the
Settings
icon from Application page.
On the left hand side menu options scroll down by sliding your finger upwards until
you can see the
Security
option, and then tap on this.
To adjust your tablet's lock settings:
1.
Touch
Screen lock.
2.
Touch the type of lock you want and follow the onscreen instructions.
If you have previously set a lock, you must enter the pattern, PIN, or password to
unlock the lock settings before you can make any changes.
You can choose among these lock options, listed in approximate order of strength:
Slide
Provides no protection, but lets you get to the Home screen
quickly, or open Camera and start taking pictures immediately.
This is the default setting.
Pattern
Let’s you draw a simple pattern with your finger to unlock the
tablet.
PIN
Requires four or more numbers. Longer PINs tend to be more
secure.
Password
Requires four or more letters or numbers. This is the most
secure option, as long as you create a strong password.
Note
If you forget your Pattern / PIN / Password, the only way to gain access to the
device is via a factory reset. Please follow the procedure outlined in the
Troubleshooting Guide which was supplied with this @Tab.
If you have misplaced the Troubleshooting Guide, a copy can be downloaded from
the @Tab website www.theattab.com. For more help please contact our Support
Team.
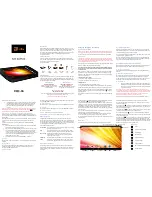
HDMI
Port
Micro SD
Card Slot
3.5mm
Audio Jack
Micro USB
Port
Power
Port


