Synology RT6600ax Скачать руководство пользователя страница 4

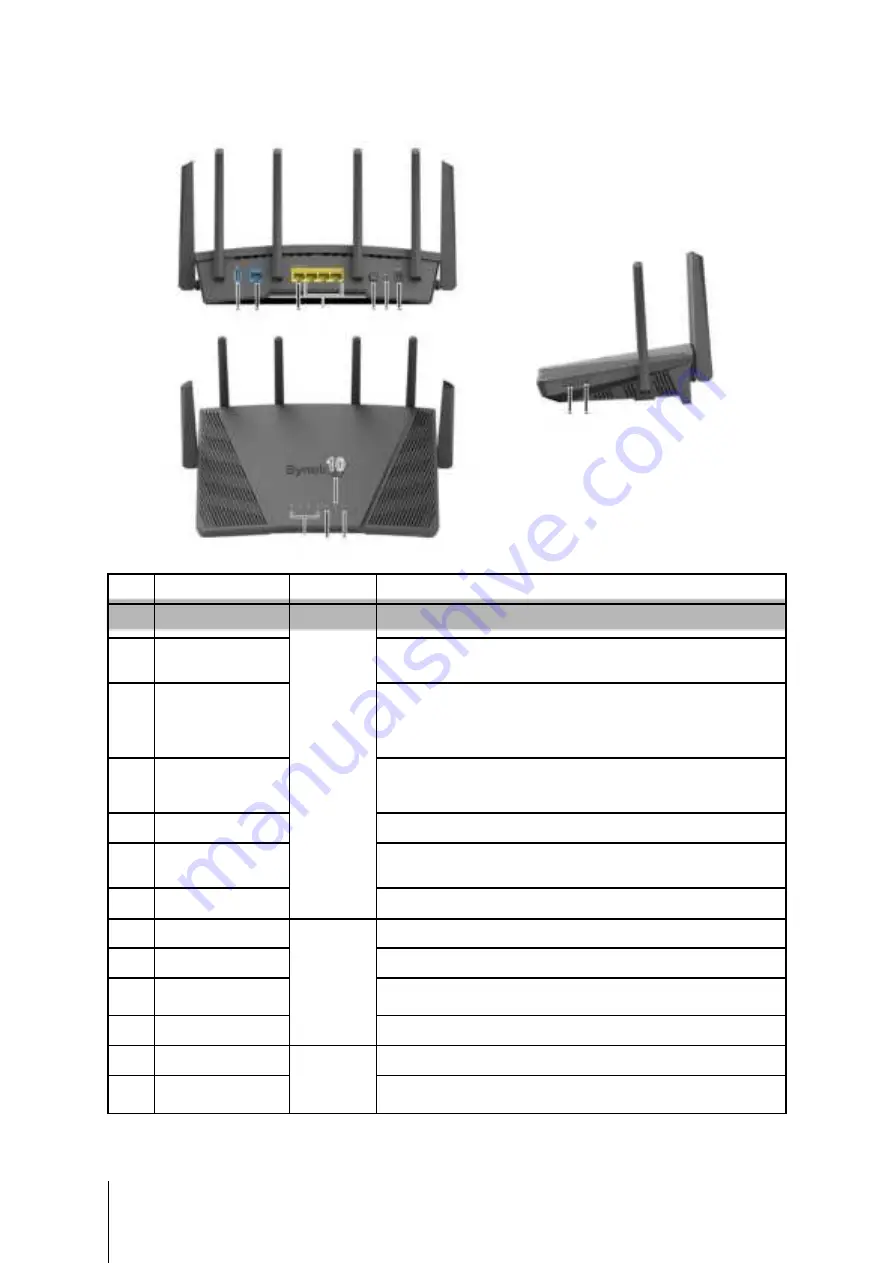
Synology RT6600ax at a Glance 


1  2 

3  4 

5 6 7 


1213 


10 


8  9 11 


No. 

Article Name 

Location 

Description 


USB 3.0 Port 


Connect an external drive, USB printer, or other types of USB 


devices here. 


WAN Port 


Connect a network cable from the ISP modem into this port to 


establish WAN connection. 


1. Connect a network cable from the ISP modem into this port to 

2.5G WAN/LAN Port 


establish WAN connection. 


2. Connect network cables into these ports to establish LAN 


Rear Panel 

connection. 


LAN Port 

Connect network cables into these ports to establish LAN 


connection. 


Power Button 


Press to power on/off the Synology Router. 


RESET Button 


Press and hold for four seconds (Soft Reset) or for ten seconds 


(Hard Reset). 


Power Port 


Connect the AC power adapter here. 


LAN Indicator 


Displays the status of LAN connection. 


WAN Indicator 

Front Panel 

Displays the status of WAN connection. 


10 

Wi-Fi Indicator 

Displays the status of Wi-Fi connection. 


11 

STATUS Indicator 


Displays the status of the system. 


12 

WPS Button 

Right Panel 

Press to start WPS. 


13 

Wi-Fi Button 

Press to turn on/off the Wi-Fi network. 


Chapter 1: Before You Start 

Содержание RT6600ax

Страница 1: ...Synology Router RT6600ax Hardware Installation Guide...

Страница 2: ...ynology RT6600ax at a Glance 4 LED Indicator Table 5 Hardware Specification 6 Safety Instructions 7 Chapter 2 Hardware Setup Adjust Antennas 8 Position Your RT6600ax 8 Connect to Your RT6600ax 9 Set u...

Страница 3: ...ontents to verify that you have received the items below Also make sure to read the safety instructions carefully to avoid harming yourself or damaging your expansion unit Note All images below are fo...

Страница 4: ...r Panel connection 4 LAN Port Connect network cables into these ports to establish LAN connection 5 Power Button Press to power on off the Synology Router 6 RESET Button Press and hold for four second...

Страница 5: ...Fi active Wi Fi Blinking WPS connecting Off No Wi Fi Green Static Network connected WAN Blinking Data transmitting Off Network disconnected Green Static Gigabit 2 5G connection Blinking Gigabit 2 5G d...

Страница 6: ...less Operation Modes Wireless Router Wireless AP Access Point 64 128 bit WEP WPS support WPA2 Personal WPA WPA2 Personal Wireless Security WPA2 Enterprise WPA WPA2 Enterprise Opportunistic Wireless En...

Страница 7: ...wer cord must plug into the correct supply voltage Ensure the supplied AC voltage is correct and stable Warning electric shock hazard To remove all electrical current from the device ensure that all p...

Страница 8: ...ons Close to the center of the area where the wired wireless client devices are placed and within a visible distance from the wireless devices In a position where few walls and ceilings are between yo...

Страница 9: ...t for up to two minutes until the STATUS and WAN LED indicators turn green 2 Connect wireless client devices to your RT6600ax When the Wi Fi indicator has turned static green RT6600ax is ready to conn...

Страница 10: ...ed client devices to your RT6600ax Use network cables to connect devices to the LAN ports The corresponding LAN LED indicators should turn orange green to indicate successful connection 10 Chapter 2 H...

Страница 11: ...nd join the Wi Fi network SSID Synology_ Serial Password synology 2 Open a web browser and enter either URL into the address bar http router synology com http 192 168 1 1 8000 3 Once connected click S...

Страница 12: ...M so that only external access via the HTTP S port e g 8000 8001 can reach SRM 7 Choose an Internet connection type PPPoE Choose this option if you have obtained PPPoE credentials from the ISP Manual...

Страница 13: ...Above is a general demonstration of the SRM setup steps The steps and available options may somewhat vary depending on your device type e g PC or wireless device access type LAN WAN or Wireless LAN an...

Страница 14: ...mmunications However there is no guarantee that interference will not occur in a particular installation If this equipment does cause harmful interference to radio or television reception which can be...

Страница 15: ...radiation exposure limits set forth for an uncontrolled environment This equipment should be installed and operated with minimum distance 21cm between the radiator your body Note The country code sel...

Страница 16: ...nds 5250 5350 MHz and 5470 5725 MHz shall be such that the equipment still complies with the e i r p limit iii for devices with detachable antenna s the maximum antenna gain permitted for devices in t...

Страница 17: ...ce de la p i r e applicable au masque d l vation nonc e la section 6 2 2 3 doivent tre clairement indiqu s Radiation Exposure Statement This equipment complies with ISED radiation exposure limits set...

Страница 18: ...antenne num r s ci dessous et ayant un gain admissible maximal Les types d antenne non inclus dans cette liste et dont le gain est sup rieur au gain maximal indiqu pour tout type figurant sur la liste...

Отзывы: