background image


  7 

Chapter 2: Hardware Setup 


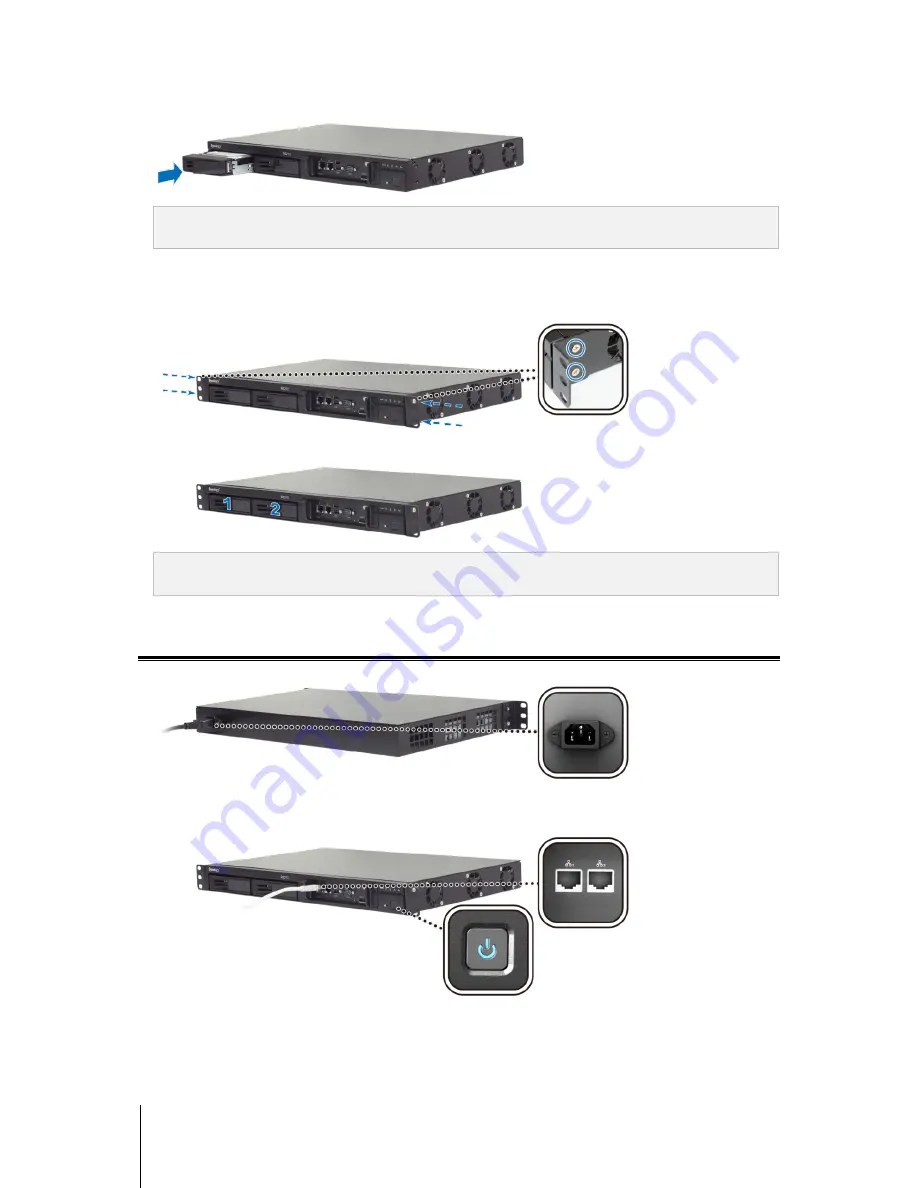
Insert the loaded hard drive tray into the empty hard drive bay. 


Important: 

Make sure the tray is pushed in all the way. Otherwise, the hard disk might not be able to function 

properly. 

Press the handle in flush with the front panel to hold the hard drive tray in place. 

Repeat the steps above to assemble the other hard disk you have prepared.  

Fix the two rack mount kits on both sides with their screws provided. 


The disks’ positions are numbered as shown below. 


Note:

 If you want to set up a RAID set, it is recommended that all installed hard disks are of the same size to make 

the best use of hard disk capacity. 

Start Up Your RackStation 

Connect one end of the power cord to the power port of RackStation, and the other to the power outlet. 


Use the LAN cable to connect RackStation to your switch/router/hub. 

Press and hold the power button to turn on your RackStation. 


Your RackStation is now online and detectable from a network computer. 

Содержание RackStation RS212

Страница 1: ...Synology RackStation RS212 Quick Installation Guide Synology_QIG_RS2Bay_20110914...

Страница 2: ...5 Chapter 2 Hardware Setup Tools and Parts for Hard Disk Installation 6 Install Hard Disks 6 Start Up Your RackStation 7 Replace Motherboard 8 Chapter 3 Install DSM on RackStation Install from Windows...

Страница 3: ...hat you have received the items below Please also read the safety instructions carefully before use to prevent your RackStation from any damages Package Contents Main Unit x 1 AC power cord x 1 Instal...

Страница 4: ...k or Synology Expansion Unit1 6 to Synology RackStation Console Port Front Panel This port is used for manufacturing purpose only 7 USB Ports Front Panel The Synology RackStation offers USB ports for...

Страница 5: ...the power cord first Wipe Synology product with damp paper towels Do not use chemical or aerosol cleaners to clean it Do not place the Synology product on a cart table or desk which is not stable to...

Страница 6: ...k that contains data the system will format the hard disk and erase all data If you need the data in the future please back it up before installation Install Hard Disks 1 Pull the hard drive tray hand...

Страница 7: ...ack mount kits on both sides with their screws provided 7 The disks positions are numbered as shown below Note If you want to set up a RAID set it is recommended that all installed hard disks are of t...

Страница 8: ...good one 1 Press and hold the power button until you hear a beep sound to shut down your RackStation Disconnect all cables connected to your RackStation to prevent any possible damages 2 Unscrew the s...

Страница 9: ...h a web browser Install from Windows 1 Insert the installation disc into your computer and click Start Follow the onscreen instructions to complete the setup process 2 Synology Assistant will be insta...

Страница 10: ...ersion of DSM from Synology Download Center 4 Follow the onscreen instructions to complete the setup process After the installation process is finished you can manage your RackStation with Synology Di...

Страница 11: ...evaluation purpose only Install and Run Synology Assistant You can install and run Synology Assistant using the command lines or the GUI If you want to install using the command lines Run the script...

Страница 12: ...want to install using the GUI 1 Go to usr local and usr local bin and delete the following folders if any Synology SynologyAssistant 2 Insert the installation disc into your computer and then double c...

Страница 13: ...ologyAssistant double click SynologyAssistant and then select Run in Terminal in the dialog box that appears Install DSM on RackStation When you have activated Synology Assistant follow step 2 to 4 of...

Страница 14: ...Max Supported IP Cameras 8 File System EXT4 EXT3 FAT NTFS External disk only Volume Type Basic JBOD RAID 0 RAID 1 Agency Certifications FCC Class A CE Class A HDD Hibernation Yes Deep Sleep No Schedul...

Страница 15: ...1 Blinking Volume degraded or crashed No volume LAN 1 LAN 2 Green Static Gigabit Link Blinking Network is active Off Network is down Orange Static 10 100MB Link Blinking Network is active Off Network...

Страница 16: ...o control access to the components features or functions of the Product or Software Section 6 Open Source The Software may contain components licensed to Synology under the GNU General Public License...

Страница 17: ...the United States except as otherwise provided below In such cases the arbitration will be conducted before a single arbitrator and will be limited solely to the dispute between you and Synology The a...

Страница 18: ...n accordance with Section 2 4 The foregoing sets forth Synology s entire liability and Customer s sole and exclusive remedy for any breach of warranty under Section 2 1 or any other defect or deficien...

Страница 19: ...imitation of liability will apply to the maximum extent permitted by applicable law The laws of some states jurisdictions do not allow exclusion or limitation of certain damages To the extent that tho...

Страница 20: ...rohibit or restrict Synology from seeking injunctive relief or seeking such other rights and remedies as it may have at law or equity for any actual or threatened breach of any provision of this Warra...

Отзывы: