13
Chapter 2: Hardware Setup
Add a Memory Module to Synology NAS
Optional Synology memory modules are designed to expand the memory of your Synology NAS. Follow the
steps below to install, check, or remove a memory module on your Synology NAS.
To install the memory module
1
Shut down your Synology NAS. Disconnect all cables from your Synology NAS to prevent possible damage.
2
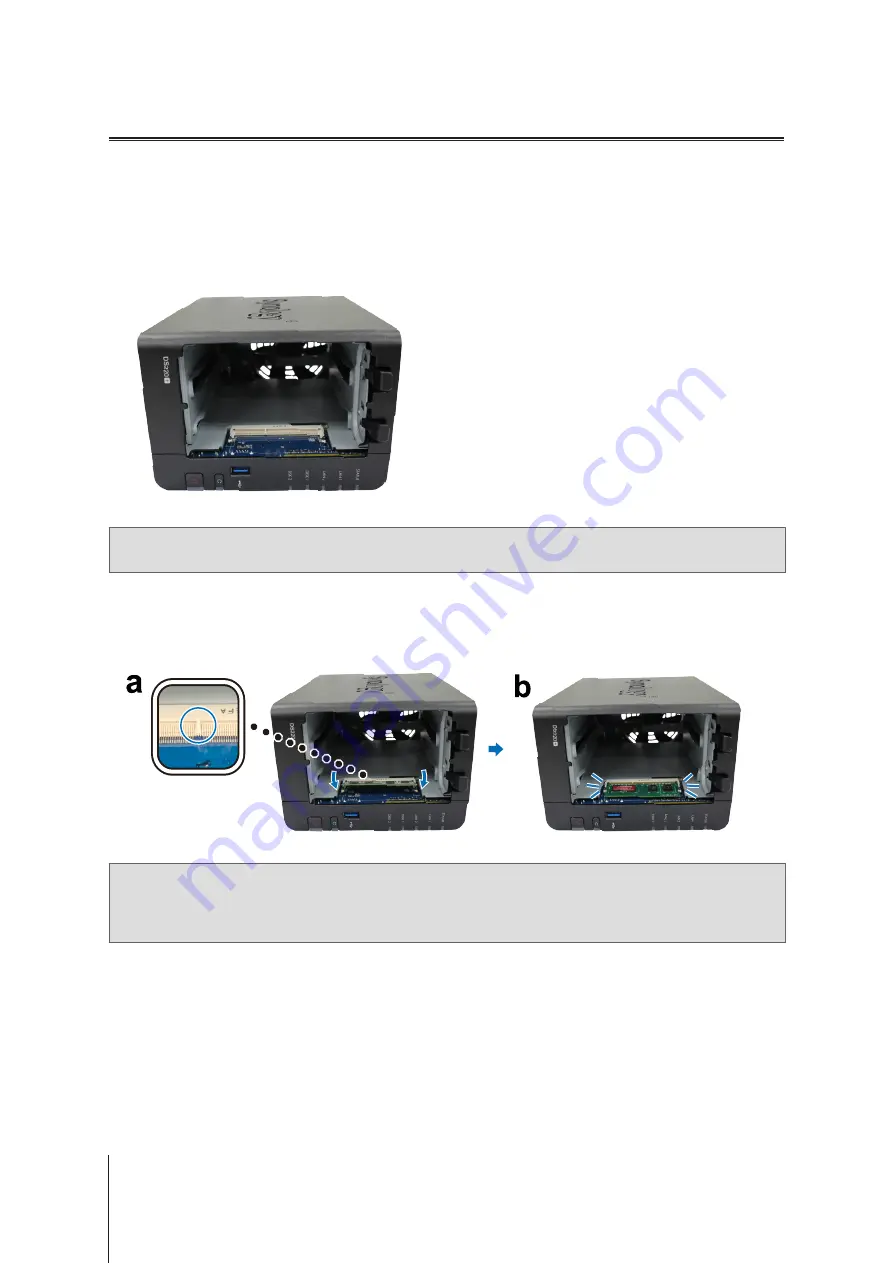
Remove the hard drive trays from the drive bays. An empty memory slot is located on the inner right side of
your Synology NAS.
Note:
When you remove the drive trays, sensitive internal components are exposed. Avoid touching anything other
than the memory assembly when removing or adding memory.
3
Insert the new memory module into the empty slot:
a
Align the small gap between the gold connectors of the memory module with the notch on the empty slot.
Insert the memory module into the slot. Make sure that the module is properly inserted.
b
Gently push down the memory module until you hear a click.
Note:
• Hold the memory module by its edges and avoid touching the gold connectors.
• Synology will not provide full product warranty or technical support if a non-Synology memory module is used for
memory upgrade.
4
Insert the drive trays back into the drive bays.
5
Reconnect the cables removed in step 1, then press the power button to turn on your Synology NAS.
To make sure your Synology NAS recognizes the new memory capacity
1
Install DiskStation Manager (DSM). Please see
for more information.
2
Sign into to DSM as
admin
or a user belonging to the
administrators
group.
3
Go to
Control Panel
>
Info Center
and check
Total Physical Memory
.
If your Synology NAS does not recognize the memory or does not start up successfully, please make sure that
the memory module is installed correctly.
Содержание NAS DS220+
Страница 1: ...Synology NAS DS220 Hardware Installation Guide...
Страница 23: ...B VCCI B...


