Synology DS620slim Скачать руководство пользователя страница 11


11

  Chapter 2: Hardware Setup

Place the bottom panel back

 by

 slid

ing

 in the front bottom panel first as illustrated below. Place back and tighten 

the 4 screws you removed in step 3.

Reconnect the cables you removed in step 1, and then press and hold the power button to turn on your 
Synology NAS.

To make sure Synology NAS recognizes the new memory capacity:

Install DiskStation Manager (DSM). See Install DSM on Synology NAS for more information.

Log in to DSM as 

admin

 or a user belonging to the 

administrators

 group.

Check 

Total Physical Memory

 in 

Control Panel

 > 

Info Center

.

If your Synology NAS does not recognize the memory or does not start up successfully, make sure that the 

memory is installed correctly.

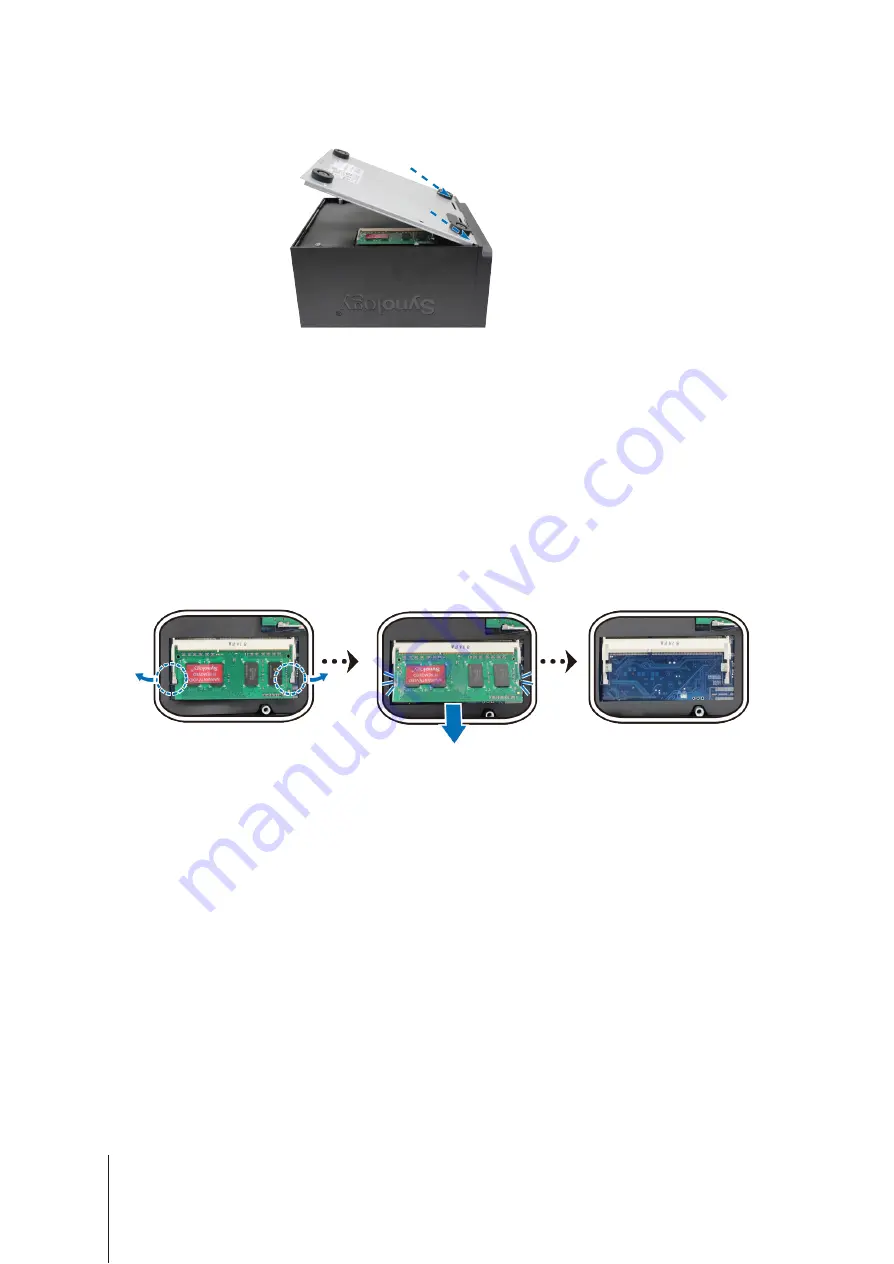
To remove the RAM Module:

Follow step 1 to 3 of the "To install a RAM module:" section to shut down your Synology NAS, disconnect the 

cables, and then remove the bottom panel.

Push the levers on both sides of the memory module outwards. The module will be released from the slot.

Hold the memory module by its notches and remove it from the slot.

Place the bottom panel back. Place back and tighten the screws removed in step 1.

Содержание DS620slim

Страница 1: ...Synology NAS DS620slim Hardware Installation Guide...

Страница 2: ...hapter 2 Hardware Setup Tools and Parts for Drive Installation 8 Install Drives 8 Add a RAM Module on Synology NAS 10 Start Up Your Synology NAS 12 LED Indicator Table 13 Chapter 3 System Maintenance...

Страница 3: ...ke sure to read the safety instructions carefully to avoid harming yourself or damaging your Synology NAS Note All images below are for illustrative purposes only and may differ from the actual produc...

Страница 4: ...ation see LED Indicator Table 6 Drive Tray Lock Lock or unlock drive trays 7 Drive Tray Install drives hard disk drives or solid state drives here 8 Power Port Back Panel Connect the AC power cord her...

Страница 5: ...ogy Hybrid RAID 2 Disk Fault Tolerance Agency Certifications FCC Class B CE Class B BSMI Class B HDD Hibernation Yes Scheduled Power On Off Yes Wake on LAN Yes Language Localization Environment Requir...

Страница 6: ...r cord Wipe with damp paper towels Do not use chemical or aerosol cleaners To prevent the unit from falling over do not place on carts or any unstable surfaces The power cord must plug in to the corre...

Страница 7: ...out compatibility and stability Visit www synology com compatibility for more information Memory Module Model Name Picture Description D3NS1866L 4G D3NS1866L 4G DDR3L 1866 unbuffered SO DIMM 204pin 1...

Страница 8: ...ou install a drive that contains data the system will format the drive and erase all existing data Please back up any important data before installation Install Drives 1 Pull and remove one of the dri...

Страница 9: ...ray is completely inserted Otherwise the drive might not function properly 4 Repeat the steps above to install all prepared drives 5 Drives are numbered as illustrated below Note If you want to create...

Страница 10: ...You will see a pre installed 2G RAM module Important When you remove the panel the sensitive internal components are exposed Avoid touching anything other than the memory assembly when you remove or a...

Страница 11: ...or a user belonging to the administrators group 3 Check Total Physical Memory in Control Panel Info Center If your Synology NAS does not recognize the memory or does not start up successfully make su...

Страница 12: ...adapter to the power port of the Synology NAS Connect the other end to a power outlet 2 Connect at least one LAN cable to one of the LAN ports of the Synology NAS Connect the other end to your switch...

Страница 13: ...ed Blinking Network active Off No network Disk 1 6 Green Static Drive ready and idle Blinking Accessing drive Orange Static Drive error Port disabled1 Off No internal drive Advanced HDD Hibernation No...

Страница 14: ...off the Synology NAS and remove the power cord 2 Turn to the back of the Synology NAS Lift and open the fan case with a flathead screwdriver 3 Find the power cord of the fan and carefully unplug it 4...

Страница 15: ...stant will be launched in your web browser It will search for and find the Synology NAS within the local network The status of the Synology NAS should be Not installed 5 Click Connect to start the set...

Страница 16: ...y permitted by applicable law notwithstanding this limitation d adapt modify alter translate or create any derivative works of the Software e remove alter or obscure any copyright notice or other prop...

Страница 17: ...roducts Any such transfer or assignment in violation of the foregoing restriction will be void Section 17 Applicable Law Unless expressly prohibited by local law this EULA is governed by and construed...

Страница 18: ...grades to such software Section 2 Warranty Period a Warranty Period The warranty period commences on the purchase date shown on the purchase receipt or invoice to be presented by Customer and ending 1...

Страница 19: ...wise fails to conform to the Product specifications and such failure is attributable to causes not within or under Synology s control Further the foregoing warranties will be void if 1 Customer disass...

Страница 20: ...N Convention on Contracts for the International Sale of Goods or any successor thereto does not apply 5 5 Dispute Resolution Any dispute controversy or claim arising out of or relating to this Warran...

Страница 21: ...orce and effect 5 9 Entire Agreement This Warranty constitutes the entire agreement and supersedes any and all prior agreements between Synology and Customer related to the subject matter hereof No am...

Страница 22: ...es with Part 15 of the FCC Rules Operation is subject to the following two conditions 1 this device may not cause harmful interference and 2 this device must accept any interference received including...

Страница 23: ...B VCCI B...

Отзывы: