Synetica enLink OAQ Скачать руководство пользователя страница 11

SYNETICA enLink OAQ 

Quick Start Guide Rev 1.5 


CO

2

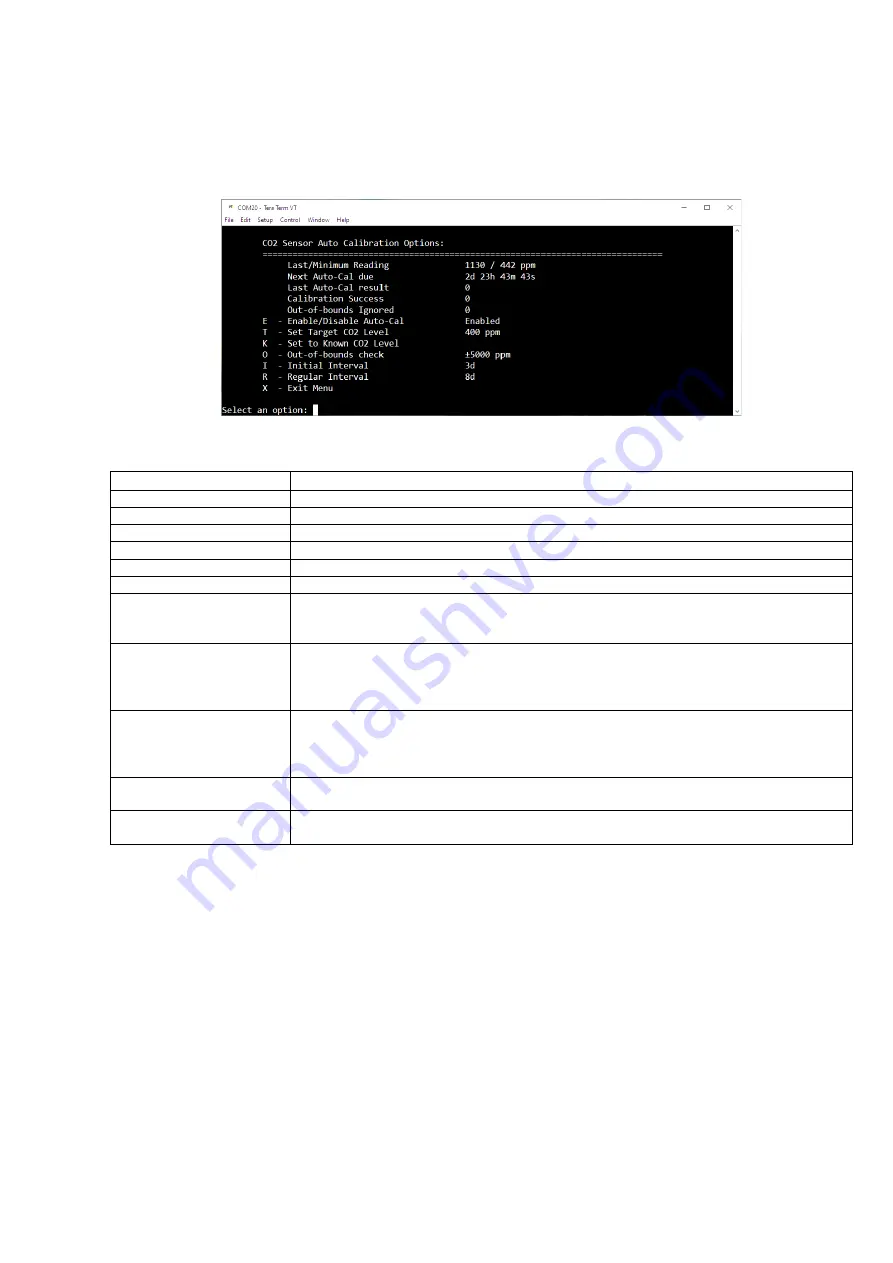
 Sensor Auto Calibration Configuration 

 
To view and set CO

2

 sensor calibration information, enter 

and the screen below will show. 


Please see the table below for information on each menu item. 


Menu Item 

Description / details 

Last/Minimum Reading               


Shows the last CO

2

 value read and the minimum CO

2

 value read since the last auto calibration. 

Next Auto-Cal due 

Shows when the next autocalibration routine will occur 

Last Auto-Cal result 

Shows the value of the last auto calibration result. Used internally by the sensor. 

Calibration Success 

This shows the total number of successful auto calibrations since the device was powered up. 

Out-of-bounds Ignored 

Shows the number of times that auto calibration did not run due to the Out Of Bounds setting. 

E  - Enable/Disable Auto-Cal 

Enables or disables the auto calibration routine.  

T  - Set Target CO2 Level 

This is the known CO

2

 corresponding to the minimum value the sensor has read since power-up or 

last calibration. It is normally 'fresh air' or the lowest level when the building is unoccupied 
overnight or at weekends. Typically this is 400 ~ 450 ppm. 

K  - Set to Known CO2 Level 

This will re-calibrate the zero point of the sensor to a known gas concentration. The sensor should 
be placed in this gas concentration and allowed to stabilise. 
This command runs in the background and will take 8 to 10 seconds to complete. 
As an example, fresh air is typically around 400 ~ 450 ppm. 

O  - Out-of-bounds check 

The Out-of-bounds value is used to ignore the calibration if the minimum value the sensor has read 
is not within a sensible range of the target concentration level. 
So, if the target concentration level is 400, the Out-of-bounds value is ±50 and the minimum 
reading is 451 (or more), the calibration routine is ignored. 

I  - Initial Interval 

It is possible for the first auto-calibration to take place more quickly than the regular auto-
calibration events. This can be useful to stabilise the readings quickly after installation. 

R  - Regular Interval 

This is the standard calibration interval, it is set to 8 days by default to accommodate a week long 
period where the minimum sensed CO

2

 level should have fallen to background levels. 


The CO

2

 sensor needs to be exposed to fresh, clean air periodically for the auto calibration to be successful. Most 

occupied areas are unoccupied for some time during a week-long period, typically at night, or at the weekend and 
therefore the auto calibration runs every 8 days by default. Background CO

2

 levels are typically around 400-450 ppm, if 

the background CO

2

 level is known to be a different value then this can be set in the 

Set Target CO

2

 Level

 parameter 

 
If a unit is placed in an area where the CO

2

 level may not fall below a certain level, e.g. 450ppm, during the calibration 

interval 

then the “Out

-of-

bounds check” parameter can be set so that the auto calibration routine does not run. As an 

example, if an area is continuously occupied for a long period and the minimum CO

2

 reading does not fall below, say 

450ppm, then it is undesirable to run the autocalibration routine based on a target of 400ppm. In this case, if the 

Set 

Target CO2 Level

 is set to 400ppm and the 

Out-of-bounds 

check” 

value is set to +/-50 ppm then the autocalibration 

routine will not run unless the minimum read value falls below 451ppm in the interval. 


Содержание enLink OAQ

Страница 1: ... including Temperature Humidity VOC s Carbon Dioxide Particulate Matter PM1 PM 2 5 PM4 PM10 EPA AQI based on O3 and NO2 Sound Level Barometric Pressure Ozone Formaldehyde Carbon Monoxide Nitrogen Dioxide Hydrogen Sulphide Sulphur Dioxide and Oxygen Readings are transmitted to the cloud using long range LoRa wireless where the data can be displayed and analysed A built in USB port allows all parame...

Страница 2: ... secure and flexible method The OTAA configuration requires the following parameters to be correctly set DevEUI End device Identifier It is unique for every device and is set at device manufacture AppEUI JoinEUI Application Identifier Used to identify the end application AppKey Application key Used to create the session keys Note In LoRaWAN 1 1 AppEUI was renamed to JoinEUI For many applications S...

Страница 3: ...present in the QR code The DevEUI can be used to identify the device once joined to the network To power the device ON first remove the sensor cartridge from the housing by removing the three screws from the bottom of the unit Once the sensor cartridge is removed install batteries and slide the power switch to BATT or apply external power 12V 24V DC to the unit and slide the power switch to EXT Mo...

Страница 4: ...enLink device will send a Join request message to the gateway The Status LED will blink RED as shown below whilst the Join process is taking place Depending on factors such as signal strength RF interference etc the Join process may take several seconds to complete BATT EXT USB Connector ...

Страница 5: ...Rev 1 5 Blinking Red LED Attempting Join When the device has successfully joined the network the Mode LED will blink GREEN for several seconds to show that the Join has been completed The LED s will then switch off to conserve the batteries ...

Страница 6: ...cally once the enLink OAQ unit is in wireless range and powered on The DevEUI is always set at device manufacture and is unique The device AppEUI and AppKey can easily be set via the USB connection as detailed below Once the sensor cartridge is removed connect a micro USB cable to the enLink unit There are two USB connectors on the enLink OAQ so be sure to connect to the correct USB port USB2 as s...

Страница 7: ...yed DevEUI in the screen below this is 1e51 enLink logon screen The screen below will show with the enLink Main Menu options Enter Q to enter the Quick Start Menu enLink Main Menu The Quick Start Menu contains only the parameters that normally need to be configured to setup the device and join the LoRa network From the Quick Start Menu you can change the AppEUI and AppKey Quick Start Settings Menu...

Страница 8: ...ich you can then edit Press Enter when the key is correctly entered to return to the Quick Start Settings Menu AppKey setting Press X from the Quick Start Settings Menu to return to the enLink Main menu The header will show Reboot Required as shown below The new key settings will not take effect until the enLink device is restarted Enter r to reboot followed by OK The device will restart with the ...

Страница 9: ...elow will show The sensors will vary according to the enLink OAQ model and the installed sensors Live Display Configuration Menu The enLink OAQ configuration menu allows you to view current sensor readings and also to change various functions of their behaviour such as calibration data To enter the Configure Device menu press c from the main menu A screen similar to the one below will show The exa...

Страница 10: ...SYNETICA enLink OAQ Quick Start Guide Rev 1 5 ...

Страница 11: ...ensor has read is not within a sensible range of the target concentration level So if the target concentration level is 400 the Out of bounds value is 50 and the minimum reading is 451 or more the calibration routine is ignored I Initial Interval It is possible for the first auto calibration to take place more quickly than the regular auto calibration events This can be useful to stabilise the rea...

Страница 12: ...nded setting for most applications The fan run time may be extended for certain applications however this will have an impact on the battery life of the unit The particulate sensor has a self cleaning function which runs the fan at high speed to clean away any dust build up in the measurement chamber By default this cleaning cycle operates every 7 days but may be changed if required Reducing the c...

Страница 13: ...teries in an explosive gas atmosphere When installing batteries do not snag the battery terminal on the clip or the battery may be damaged Do not apply excessive force Do not drop Dropping the battery may cause damage If a battery is dropped do not install the dropped battery into the unit Dispose of dropped battery promptly per local regulations or per the battery manufacturer s recommendations G...

Страница 14: ... from any exhaust ducts or flues Mounting guidelines for OAQ Units Do not expose to direct sunlight Do not mount on facades with a lot of ascending heat Do not attach to walls in front of a chimney Do not mount on eaves or a balcony Do not place over windows Do no mount over ventilation shafts Do not paint over sensors Mount sensors in an accessible location to allow easy inspection and maintenanc...

Страница 15: ...cket using suitable pan head screws and then slide the OAQ onto the screws Weight without batteries 180g Weight with batteries 250g Technical Support For technical assistance please visit the downloads section of our web site at www synetica net or email us at support synetica net ...

Отзывы: