background image

P.1

< Part 1 > 
< 1.1 > Package Content  

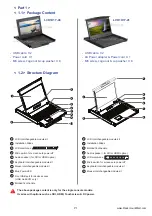
< 1.2 > Structure Diagram 

The above package content is only for the single console models.
It varies with options such as SDI, HDMI, Touchscreen & DC power.

-  USB cable  X 2
-  Power cord  X 1
-  M6 screw, cage nut & cup washer  X 8

3

1

4

5

6

2

10

8
9

7

10

9

8

7

6

5

4

3

1

LCD interchangeable module kit

Installation Slides 

LCD membrane

Micro switch for screen auto power o


Audio speaker ( for SDI or HDMI option )

Keyboard interchangeable module kit

Mouse interchangeable module kit

Blue Power LED

Front USB port for device access 
( USB Hub KVM only )

Molded front handle

2

6

4

5

8

2

1

3

7

1

8

7

6

5

4

3

LCD interchangeable module kit

Installation Slides 

Molded front handle

Audio speaker ( for SDI or HDMI option )

LCD membrane

Micro switch for screen auto power o


Keyboard interchangeable module kit

Mouse interchangeable module kit

2

-  USB cable  X 2
-  4A Power adapter & Power cord  X 1
-  M6 screw, cage nut & cup washer  X 8

www.RackmountMart.com

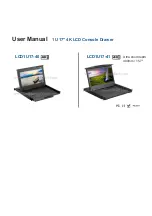
LCD1U17-40

LCD1U17-41

Содержание LCD1U17-40

Страница 1: ...7ROO UHH 7HO D PDLO VDOHV 5DFNPRXQW0DUW FRP...

Страница 2: ...User Manual 1U 17 4K LCD Console Drawer LCD1U17 40 LCD1U17 41 Ultra short depth 400mm 15 7...

Страница 3: ...ssis Opening it yourself could damage the equipment and invalidate its warranty If any part of the equipment becomes damaged or stops functioning have it checked by qualified service personnel What th...

Страница 4: ...e Specifications P 12 2 3 On screen Display Operation OSD P 15 Part 3 Option 3 1 3G HD SD SDI Broadcast grade input P 18 3 2 HDMI 2 0 video input P 19 3 3 17 Touchscreen Resistive 1 point touch P 20 3...

Страница 5: ...d monitor screens can scratch the LCD display or strip o the finish Do not spray any kind of liquid directly onto the screen or case of your monitor Spraying liquids directly onto the screen or case c...

Страница 6: ...o Audio speaker for SDI or HDMI option Keyboard interchangeable module kit Mouse interchangeable module kit Blue Power LED Front USB port for device access USB Hub KVM only Molded front handle 2 6 4...

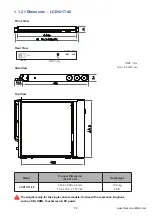
Страница 7: ...h accessories options such as SDI HDMI Touchscreen DC power UNIT mm 1mm 0 03937 inch Model Product Dimension W x D x H Net Weight 441 6 x 480 x 44 mm 17 4 x 18 9 x 1 73 inch 10 9 kg 24 lb AC Input 100...

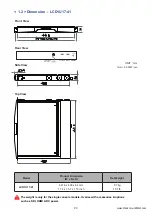
Страница 8: ...th accessories options such as SDI HDMI DC power UNIT mm 1mm 0 03937 inch Model Product Dimension W x D x H Net Weight 441 6 x 400 x 44 mm 17 4 x 15 7 x 1 73 inch 8 7 kg 19 1 lb Rear View Mouse Keyboa...

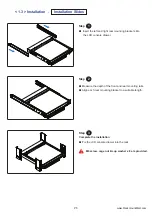
Страница 9: ...the installation Step 3 Insert the left and right rear mounting brackets into the LCD console drawer Step 1 Step 2 Measure the depth of the front and rear mounting rails Align each rear mounting brack...

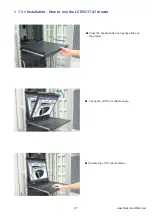
Страница 10: ...P 6 Hold the handle and slide out the drawer Operate the LCD console drawer Flip up the LCD to a suitable angle www RackmountMart com 1 3 Installation How to use the LCD1U17 40 drawer...

Страница 11: ...P 7 Press the handle button and gently slide out the drawer Flip up the LCD to a suitable angle Operate the LCD console drawer www RackmountMart com 1 3 Installation How to use the LCD1U17 41 drawer...

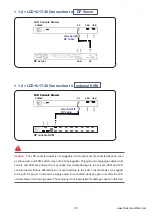
Страница 12: ...we suggest turning o the power to all devices Apply power to connected devices again only after the LCD console drawer is receiving power The company is not responsible for damage caused in this way...

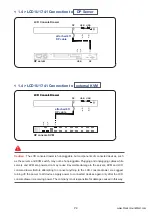
Страница 13: ...CD console drawer we suggest turning o the power to all devices Apply power to connected devices again only after the LCD console drawer is receiving power The company is not responsible for damage ca...

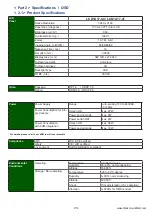
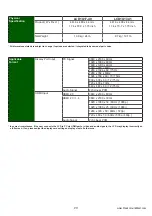
Страница 14: ...on operating Temperature 20 to 60 C degree Humidity 5 90 non condensing Altitude 40 000 ft Shock 10G acceleration 11ms duration Vibration 5 500Hz 1G RMS random LCD Panel Native Resolution 3840 x 2160...

Страница 15: ...20 x 50 60Hz 720p 720 x 480 x 50 60Hz 576p 480p Audio Signal 2ch Linear PCM In some circumstances if the user connects the LCD to PC via HDMI port or video and audio signals the LCD may display incorr...

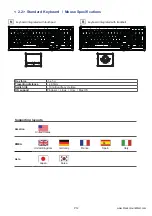
Страница 16: ...ime OS support Windows Linux Unix Mac OS 2 2 Standard Keyboard Mouse Specifications Supporting layouts America United States EMEA United Kingdom Germany France Spain Italy Asia Japan Korea www Rackmou...

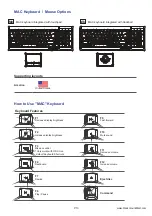
Страница 17: ...brightness F10 Mute sound F3 Mission control Only works with OS X Lion default Keyboard Shortcuts F11 Decrease volume F4 Dashboard F12 Increase volume F7 Rewind Eject disc F8 Play Pause Command Suppo...

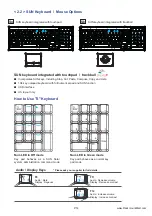
Страница 18: ...pad mode Num Caps Scro ll Comp ose Num Caps Scro ll Comp ose Incorporates SUN keys including Stop Cut Paste Compose Copy and Help 104 key notepad keyboard with full numerical pad and SUN function USB...

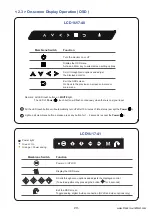
Страница 19: ...input All the LED touch buttons will automatically turn o after 10 minutes of idle status except the Power Light up all membrane buttons please press any button for 1 2 seconds except the Power 1 2 2...

Страница 20: ...r Warm Cool 5400k mode and Red Green Blue color balance Sharpness Adjust the image from weak to sharp Hue Adjust the screen hue value Saturation Adjust the saturation of the image color Dynamic lumino...

Страница 21: ...Large Huge PIP position Adjust the position of the Sub screen Top Left Top Right Bottom Left Bottom Right Swap Swap the input signal of PIP PBP sub screen 6 MISC Signal source Select the signal source...

Страница 22: ...4 4 4 60 50Hz 4 4 4 HD SDI 1080p 1080i 720p 30 25 24Hz 4 2 2 60 50Hz 4 2 2 60 50Hz 4 2 2 SD SDI 480i 60Hz 4 2 2 ITU R BT 656 576i 50Hz 4 2 2 Max Transmission Distance 75 ohm coaxial cable 3G SDI 150m...

Страница 23: ...rectly on a full screen If so please adjust the display card setting on display size to fix the issue HDCP 2 2 HDMI 2 0 3 2 Options HDMI Mouse Keyboard Power 12 VDC attached 6ft DP cable attached 6ft...

Страница 24: ...uch Point Single Input Type Finger or Stylus Resolution 2048 x 2048 Response Speed 15 ms Activation Force 50 g Surface Hardness 3H Light Transmission 80 3 Haze 8 3 Durability 10 million touches Top La...

Страница 25: ...lick the Setup exe Step 3 Follow the installation instruction to finish the setup Step 4 After installation run the TouchKit program the 4 point calibration Please follow the below steps to setup the...

Страница 26: ...1220 mA 460 mA Output rating Output voltage 12 Volt 12 Volt 12 Volt 12 Volt Output current 4 16A 4 16A 4 16A 4 16A E ciency 84 88 90 89 3 4 Options DC Power 1 If the unit with LCD earthing may be requ...

Страница 27: ...with the screws below 6 32 3 5 mm screw x 8 only for front 6 32 4 5 mm screw x 6 only for rear Step 2 Attach the set of 4 mini brackets to the 2 post rack M6 screw set is not provided Step Insert the...

Страница 28: ...emote 8 port 0 0 LCD1U17 40 8HD 4K 60Hz KVM Remote 8 port www RackmountMart com The company reserves the right to modify product specifications without prior notice and assumes no responsibility for a...

Отзывы: