background image

P.10

Remarks :

   The above connection is only for the LCD keyboard without KVM switch built-in.

   For the LCD keyboard drawer with KVM switch built-in, please refer to attached KVM switch user manual. 

1.12   “LCD1U17-13 / 19-04” Series (Single console) 


Chapter 1


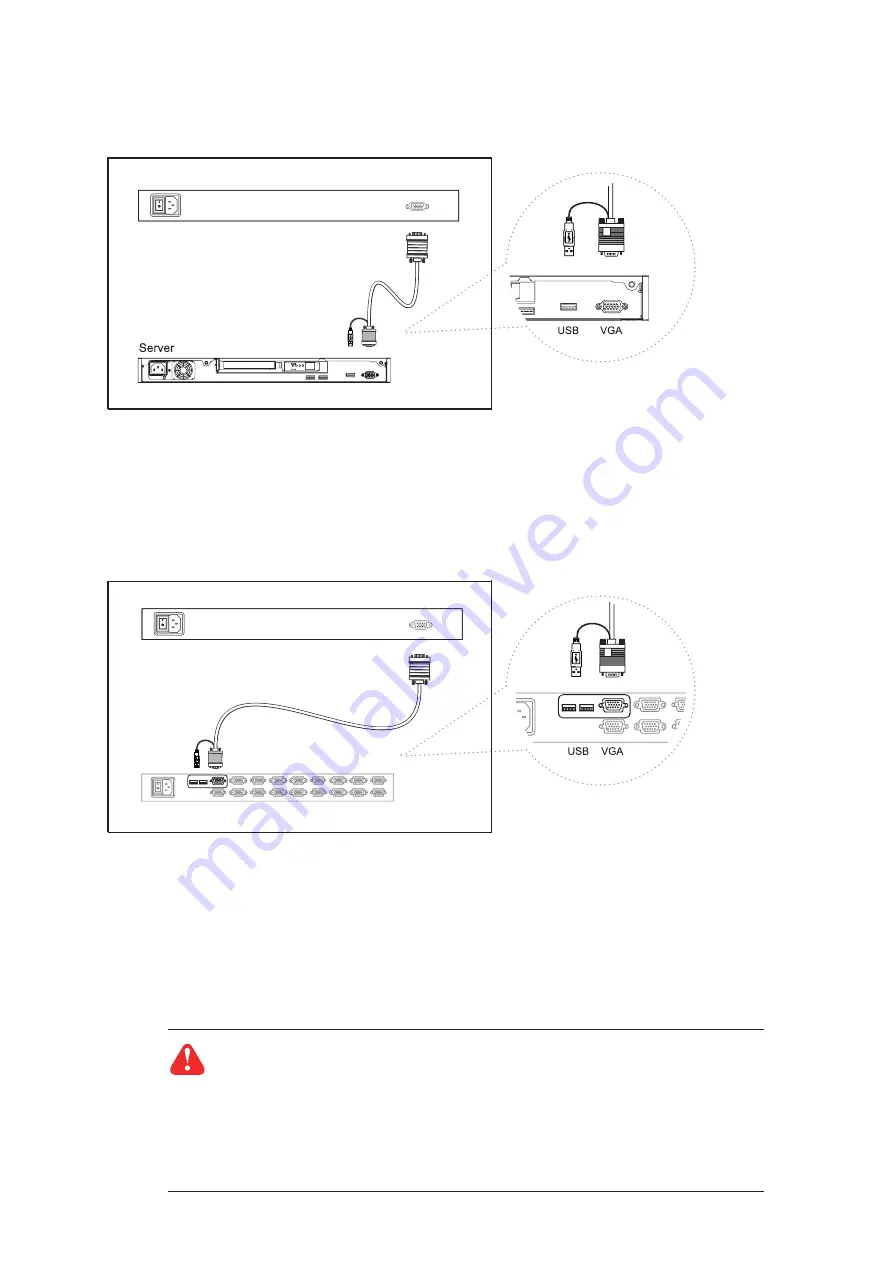
- Use LCD-A1014 to connect to server via USB interface  


Figure 7.

Caution :

 The LCD keyboard drawer is hot-pluggable, but components of connected de-

vices, such as the servers and KVM switch, may not be hot-pluggable. Plugging and un-
plugging cables while servers and KVM are powered on may cause irreversible damage to 

the servers, KVM and LCD keyboard drawer. Before attempting to connect anything to the 

LCD keyboard drawer, we suggest turning off the power to all devices before connecting 
them. Apply power to connected devices again only after the LCD keyboard is receiving 
power. The company is not responsible for damage caused in this way.

1.13   “LCD1U17-13 / 19-04” Series (Single console)  


Figure 8.

KVM

LCD1U15-04/17-01/19-01
LCD1U15-11/17-06/19-02
LCD1U17-13/19-04

LCD-A1014 6-FT USB CABLE

LCD-A1014 6-FT USB CABLE

 Example of connecting LCD-A1014 2-in-1 USB KVM cable to server via USB interface

- Use LCD-A1014 to connect to KVM via USB interface  

 Example of connecting LCD-A1014 2-in-1 USB KVM cable to KVM via USB interface

Содержание LCD1U15-04 Series

Страница 1: ...Toll Free 1 888 865 6888 Tel 510 226 8368 Fax 510 226 8968 Email sales RackmountMart com...

Страница 2: ...17 19 screen size Models LCD1U15 04 17 01 19 01 Series Models LCD1U15 11 17 06 19 02 Series Short depth version Without KVM options With KVM options Models LCD1U17 13 19 04 With KVM options 1U 17 19...

Страница 3: ...Single console Use LCD A3001 to connect to KVM via PS 2 interface 11 1 16 LCD1U15 04 17 01 19 01 15 11 17 06 19 02 Series Single console Use LCD A3001 to connect to server via USB interface 12 1 17 LC...

Страница 4: ...of nature unauthorized product modifi cation or failure to follow instructions supplied with the product Repair or attempted repair by anyone not authorized by us Any damage of the product due to shi...

Страница 5: ...wer outlet to prevent being damaged by transient over voltage Keep all liquids away from the equipment to minimize the risk of accidental spillage Liquid spilled on to the power supply or on other har...

Страница 6: ...ble x 1 pc for LCD1U15 04 15 11 17 01 17 06 19 01 19 02 series User manual x 1 pc Power cord x 1 pc Auto switch power adapter for external power version x 1 pc Mounting bracket x 2 pcs M6 15mm screw x...

Страница 7: ...n the package contents Check and make sure they are included and in good condition If anything is missing or damage contact the supplier immediately 1 5 Unpacking 1 4 Before Installation Chapter 1 P 4...

Страница 8: ...15 8 port KVM Combo DB 15 16 port KVM PS 2 DB 15 KVM 1 8 Structure Diagram Carry handle to release the 2 pt lock LCD interchangeable module kit One Man Installation Slides LCD membrane 1 2 3 5 6 7 Mem...

Страница 9: ...eaving the screws slightly loose until you complete the installation in step 2 Pick up the LCD keyboard drawer Insert the LCD keyboard drawer into the mounting bracket Pull and hold the left right bla...

Страница 10: ...s of the LCD keyboard drawer to vertical mounting rails M6 screw and cup washer x 2 pcs included Complete the installation LCD1U15 04 17 01 19 01 LCD1U15 11 17 06 19 02 LCD1U17 13 19 04 PT BK N 01 is...

Страница 11: ...eyboard drawer to unlock shown in Figure 2 Figure 1 L L I L I A black arrow release button is located on the outside of each slide shown in Figure 1 Push the LCD keyboard drawer into the rack shown in...

Страница 12: ...in Figure 4 Figure 4 Sliding out the LCD keyboard drawer by pressing the carry handle button first Operate the LCD keyboard drawer shown in Figure 6 Figure 6 Operating the LCD keyboard drawer Figure 5...

Страница 13: ...use irreversible damage to the servers KVM and LCD keyboard drawer Before attempting to connect anything to the LCD keyboard drawer we suggest turning off the power to all devices before connecting th...

Страница 14: ...ing to the LCD keyboard drawer we suggest turning off the power to all devices before connecting them Apply power to connected devices again only after the LCD keyboard is receiving power The company...

Страница 15: ...way Remarks The above connection is only for the LCD keyboard without KVM switch built in For the LCD keyboard drawer with KVM switch built in please refer to attached KVM switch user manual Chapter 1...

Страница 16: ...D and video options only Scrolls through menu options and adjusts the displayed control To auto adjustment by pressing the button for 5 seconds Display the OSD menu Power on off LCD Power light Green...

Страница 17: ...er into the auto adjust H position V position phase and clock Video To enter into the colour tint sharpness noise reduction DCDi and TV Setup Audio To enter into volume bass treble balance AVL and mut...

Страница 18: ...68 60 70 75 Hz 1152 x 864 60 70 75 Hz 1280 x 720 60 70 75 Hz 1280 x 720 60 75 Hz 1280 x 1024 60 70 72 75 Hz 1280 x 1024 60 70 75 Hz 1152 x 900 66 76Hz Plug Play DDC EDID 1 3 Console Port Combo DB 15 c...

Страница 19: ...e Chapter 3 N keyboard integrated with trackball B N keyboard integrated with touchpad N Supporting layouts For LCD1U15 04 17 01 19 01 15 11 17 06 19 02 series LCD1U15 04 17 01 19 01 LCD1U15 11 17 06...

Страница 20: ...full numerical pad and SUN function USB interface SUN keyboard integrated with touchpad Incorporates SUN keys including Stop Cut Paste Compose Copy and Help 104 key notepad keyboard with full numerica...

Страница 21: ...is system administration command mode Num LED in Green color Key pad behaves as a normal key pad mode Three Audio Display keys are located in the upper right corner of the NS keyboard Audio Mute decre...

Страница 22: ...udes 1 x 6ft S Video cable 3 in 1 VGA KB mouse console port S Video BNC Our KVM is designed to seamlessly integrate into the rear of our full range of LCD drawer solutions For KVM operation please ref...

Страница 23: ...18V 18 36V 36 75V Input current No load 50 mA 50 mA 50 mA Full load 4950 mA 2450 mA 1220 mA Output rating Output voltage 12 Volt 12 Volt 12 Volt Output current 4 16A 4 16A 4 16A Efficiency 84 85 85 Re...

Страница 24: ...0 million touches Operating system Windows 98 2000 ME XP NT CE DOS Linux e Resistive Remarks The height of LCD1U17 01 19 01 17 06 19 02 will be increased from 1U to 1 5U USB touchscreen package includ...

Страница 25: ...power 3 Screen image is not centered or sized properly Press the button for two seconds to automatically adjust the image Adjust the H position and V position settings via On screen menu 2 How do I a...

Страница 26: ...LCD1U15 11 442 x 480 x 44 mm 17 4 x 18 9 x 1 73 15 kg 33 lb LCD1U17 06 442 x 480 x 44 mm 17 4 x 18 9 x 1 73 16 kg 35 lb LCD1U19 02 442 x 480 x 44 mm 17 4 x 18 9 x 1 73 17 kg 37 lb P 23 LCD1U15 04 17...

Отзывы: