background image

– 8 –

EN

0C28

– 8 –

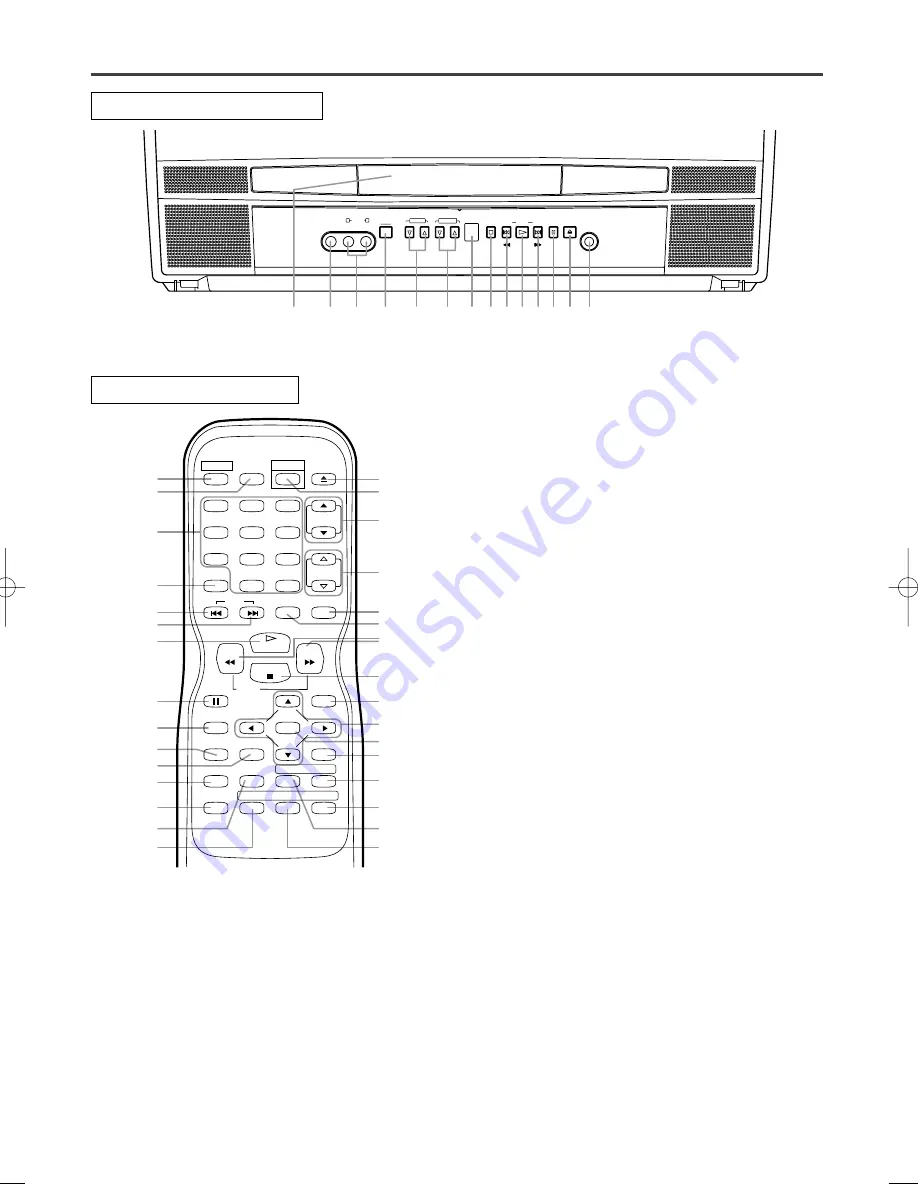
7.

Remote Sensor Window

8.

STOP Button [page 20]

Stops operation of the disc.

9.

SKIP 

H

Button  [page 22]

Plays back from the beginning of the current chapter
or track. 

SEARCH (REV) 

E

Button (Front Panel)

[page 21]

During playback or in the pause mode, press and
hold the button down for a few seconds to change
reverse playback speed.

10.

PLAY Button [page 20]

Starts playback of the disc contents.
Press to change to DVD mode when in TV mode.

11.

SKIP 

G

Button [page 22]

Plays back from the beginning of the next chapter or
track.

SEARCH (FWD) 

D

Button (Front Panel)

[page 21]

During playback or in the pause mode, press and
hold the button down for a few seconds to change for-
ward playback speed. 

12.

PAUSE Button [page 21]

Pauses the current disc operation.

13.

OPEN/CLOSE Button [page 20]

Press to insert discs into or remove them from the
tray.

14.

HEADPHONE Jack

To connect headphone (not supplied) for personal
listening.

15.

MODE Button [pages 23-25]

Activates program playback or random playback mode
when playing CDs or MP3.

16.

Number Button
TV Mode: [page 15]

Press two digits to directly access the desired channel.
Remember to press a "0" before a single digit chan-
nel.

+100 Button–

Press to select cable channels which are equal or
greater than number 100.

DVD Mode: [page 22]

Press to enter the desired number.

+10 Button–

Press to enter the desired numbers which are equal
or greater than number 10.

OPERATING CONTROLS AND FUNCTIONS

TV/DVD FRONT PANEL

REMOTE CONTROL

1.

Disc loading tray

2.

VIDEO input Jack [page 11]

Connect to the video output jack of a video 
camera or VCR.

3.

AUDIO L/R input Jacks [page 11]

Connect to the audio output jacks of a video 
camera or VCR.

4.

POWER Button [page 13]

Press to turn the power on and off.

5.

VOLUME 

K

/

L

(VOL.

X

/

Y

) Buttons

Press to control the volume level for the DVD and TV.

6.

CHANNEL 

K

/

L

(CH.

K

/

L

) Buttons [page 13]

Press to select memorized channel.
Press to change to TV mode when in DVD mode.

VIDEO

AUDIO

POWER

VOLUME

CHANNEL

STOP

SKIP

SKIP

PLAY

PAUSE OPEN/CLOSE HEADPHONE

–SEARCH–

L

R

7

4

2

8 9 10111213 14

6

5

3

1

26

27

16

17

9

11

12

23

20

22

15

25

24

21

10

28

29

30

33

35

5

6

13
34

19
18

8

31

32

4

36

REV

SLOW

PLAY

STOP

FWD

ENTER

PAUSE

DISC

MENU

RETURN

TITLE

SETUP

A-B

REPEAT

SEARCH MODE

CLEAR

MODE

ANGLE

SUBTITLE

AUDIO

DISPLAY

SKIP

SELECT

POWER PICTURE

OPEN/

CLOSE

CH.

VOL.

MUTE

V.SURR

SLEEP

1

2

3

4

5

6

7

8

9

0

+10

+100

T9009CK.QX33  04.3.9  9:32 PM  Page 8

Содержание CSC520DE

Страница 1: ...ency ENERGY STAR is a U S registered mark If you need additional assistance for set up or operating after reading owner s manual please call TOLL FREE 1 800 242 7158 Or visit our WEB SITE at http www funai corp com Please read before using this equipment SUPPLIED ACCESSORIES Batteries Remote Control Unit 2 AA Batteries NE220UD Owner s Manual 0EMN02494 Owner s Manual ...

Страница 2: ...inet and the back or bottom are provided for ventilation and to ensure reliable operation of the TV DVD and to protect it from overheat ing and these openings must not be blocked or covered The openings should never be blocked by placing the TV DVD on a bed sofa rug or other similar surface This TV DVD should never be placed near or over a radiator or heat register This TV DVD should not be placed...

Страница 3: ...m might be fatal 16 Overloading Do not overload wall outlets and extension cords as this can result in a risk of fire or electric shock 17 Object and Liquid Entry Never push objects of any kind into this TV DVD through openings as they may touch dan gerous voltage points or short out parts that could result in a fire or electric shock Never spill liquid of any kind on the TV DVD 18 Servicing Do no...

Страница 4: ... VISIBLE AND INVISIBLE LASER RADIATION WHEN OPEN AND INTERLOCK DEFEATED DO NOT STARE INTO BEAM LOCATION INSIDE NEAR THE DECK MECHANISM This Class B digital apparatus complies with Canadian ICES 003 PRECAUTIONS The serial number of this product may be found on the back of the unit No other TV DVD has the same serial number as yours You should record the number and other vital information here and r...

Страница 5: ...r is spilled on your unit unplug the power cord immediately and take the unit to our Authorized Service Center for servicing Do not put your fingers or objects into the TV DVD disc loading tray Do not place anything directly on top of the unit WARNING Moisture condensation may occur inside the unit when it is moved from a cold place to a warm place or after heating a cold room or under conditions ...

Страница 6: ... 19 PLAYABLE DISCS 19 DISC TYPES 19 C PLAYING A DISC 20 BASIC PLAYBACK 20 GENERAL FEATURES 20 DISC MENU 20 TITLE MENU 20 RESUME 21 PAUSE 21 STEP BY STEP PLAYBACK 21 FAST FORWARD REVERSE SEARCH 21 SLOW FORWARD SLOW REVERSE 21 C SEARCH FUNCTION 22 TRACK SEARCH 22 TITLE CHAPTER SEARCH 22 TIME SEARCH 22 MARKER SETUP SCREEN 22 C SPECIAL PLAYBACK FUNCTION 23 REPEAT 23 PROGRAM 23 RANDOM PLAYBACK 23 C PLA...

Страница 7: ...ol level to limit playback of discs which may not be suitable for children Automatic detection of discs This TV DVD automatically detects if the loaded disc is DVD audio CD or MP3 disc On screen display Information about the current operation can be displayed on a TV screen allowing you to confirm the currently active functions such as program playback on the TV screen using the remote control Sea...

Страница 8: ...directly access the desired channel Remember to press a 0 before a single digit chan nel 100 Button Press to select cable channels which are equal or greater than number 100 DVD Mode page 22 Press to enter the desired number 10 Button Press to enter the desired numbers which are equal or greater than number 10 OPERATING CONTROLS AND FUNCTIONS TV DVD FRONT PANEL REMOTE CONTROL 1 Disc loading tray 2...

Страница 9: ...y to change the reverse speed of slow motion FWD g Button page 21 Press to fast forward the Disc Press PAUSE then press this button to begin slow motion playback Press this button repeatedly to change the forward speed of slow motion 19 V SURR VIRTUAL SURROUND Button page 25 Press to set virtual surround on off 20 SETUP Button pages 13 27 29 Press to enter or exit the TV menu or DVD setup mode 21 ...

Страница 10: ... Box Bent pin Cable Plug Needs to be straightened Straight pin VHF UHF Antenna Not supplied VHF UHF Combiner Not supplied Flat twin lead cable UHF Antenna Not supplied VHF Antenna Not supplied From Cable System 75 ohm Coaxial Cable Not supplied Satellite Box or Cable Box Not supplied From Cable System or Satellite Dish or or or VHF UHF COMBINED ANTENNA A VHF UHF 75 ohm combination antenna can be c...

Страница 11: ...output jack Front of the TV DVD CONNECTING TO AN AMPLIFIER EQUIPPED WITH DIGITAL INPUT JACKS MD DECK OR DAT DECK for DVD only Use an audio coaxial digital cable available at retail for the audio connections NOTES The audio source on a disc in a 5 1 channel Dolby Digital surround format cannot be recorded as digital sound by an MD or DAT deck Be sure to turn off the power to all components in the s...

Страница 12: ...other component Refer to the Owner s Manuals for the components to be connected to the TV DVD If connected to a Dolby Digital decoder set DOLBY DIGITAL to ON for audio output in the setup mode See page 28 to set DOLBY DIGITAL to ON Unless connected to a Dolby Digital decoder set DOLBY DIGITAL to OFF for audio output in the setup mode Playing a TV DVD using incorrect settings may generate noise dis...

Страница 13: ...ust select the TV DVD channel selector to the output channel of the cable box or satellite box Ex CH3 Then select the channel to be viewed on the Cable Box or Satellite Box Make sure Press POWER to turn on the TV DVD 1 Select CHANNEL SET UP Press SETUP on the remote control Press Arrow K L to point to CHANNEL SET UP Then press ENTER 2 Begin auto ch programming Press Arrow K L to point to AUTO CH P...

Страница 14: ...ngle digit channel numbers with a zero Example 02 09 When selecting cable channels which are higher than 99 press 100 first then press the last two digits Example to select channel 125 first press 100 then press 2 and 5 4 Delete or add it from into memory Press ENTER The channel number changes to light red The channel is deleted from memory To delete another channel repeat steps 3 and 4 If you pre...

Страница 15: ...e TV channels Even if you turn off the TV DVD in the DVD mode when you turn it on again it will go into the TV mode TV PICTURE CONTROL The TV DVD s picture controls BRIGHT CON TRAST COLOR TINT and SHARPNESS are preset to factory specifications Although they are usually the best you may need to make some further adjustments for a natural looking image Make sure TV DVD power must be turned on 1 Sele...

Страница 16: ...h closed captions Your television is designed to provide error free closed captions from high quality antenna cable and VCR signals Conversely poor quality signals are likely to result in caption errors or no captions at all Common signal conditions which may cause captions errors are listed below Automobile ignition noise Electric motor brush noise Weak snowy reception on TV screen Multiplex sign...

Страница 17: ... children under 14 TV MA Mature audience only When you select a rating category and turn it BLOCK the higher rating will turn BLOCK automatically Also the lower rating will turn VIEW automatically When you turn TV Y to VIEW all ratings will turn to VIEW automatically TV SETUP CHANNEL SET UP B V CHIP SET UP LANGUAGE ENGLISH CAPTION OFF ACCESS CODE _ _ _ _ B TV Y VIEW TV Y7 VIEW TV G VIEW TV PG VIEW...

Страница 18: ...V CHIP SET UP LANGUAGE ENGLISH CAPTION OFF V CHIP SET UP TV RATING B MPAA RATING CHANGE CODE G VIEW PG VIEW PG 13 VIEW B R BLOCK NC 17 BLOCK X BLOCK ACCESS CODE _ _ _ _ CHANGE ACCESS CODE To change access code follow the steps 1 Select V CHIP SET UP Press SETUP on the remote con trol Press Arrow K L to point to V CHIP SET UP Then press ENTER 2 Enter 4 digit access code Press the number buttons The...

Страница 19: ...ith region codes other than 1 or ALL DVD ROM DVD RAM Never play back otherwise malfunc tion may result CD ROM VSD CDV Only plays back the audio part CD G Only plays back the sound CD I Never play back otherwise malfunction may result SACD Photo CD Never play back otherwise malfunc tion may result Video CD Never play back otherwise malfunc tion may result Any other discs without compatibility indic...

Страница 20: ...may stop for a moment This happens when the 1st layer switches to the 2nd layer This is not a mal function GENERAL FEATURES DVD may contain menus to navigate the disc and access special features Press appropriate number but tons or use Arrow K L s B to highlight your selection in the DVD main menu and press ENTER to confirm NOTES Select DVD mode by pressing SELECT on the remote control Then press ...

Страница 21: ...eed appears on the screen For DVDs fast forward reverse search speed is dif ferent depending on the disc Approximate speed is 1 2 2 8 3 50 and 4 100 For audio CDs approximate speed is 16 For MP3 approximate speed is 8 When you use buttons on the main unit use SKIP G SEARCH g or SKIP H SEARCH h 3 To return to normal playback press PLAY MP3 CD DVD V FAST FORWARD REVERSE SEARCH SLOW FORWARD SLOW REVE...

Страница 22: ...or Track Press CLEAR to erase the incorrect input For single digit chapters titles press 0 first DVD V _ 2 TIME SEARCH 1 During playback press SEARCH MODE three times CD twice to display the Time Search on the TV screen 2 Within 30 seconds enter a desired disc time using the number buttons on the remote control Playback will start at the specified time Press CLEAR to erase the incorrect input When...

Страница 23: ...osen end point A B appears briefly on the TV screen and the repeat sequence begins 3 To exit the sequence press REPEAT A B NOTES The repeat A B section can only be set within the cur rent title for DVDs or current track for audio CDs RepeatA B is not available with some scenes in DVD To cancel the A point which was set press CLEAR Repeat A B playback does not function during title chapter track or...

Страница 24: ...P3 disc to play in a desired sequence 1 In stop mode press MODE The PROGRAM screen will appear 2 Select a desired track using Arrow K L s B Then press ENTER Press B when you want to go to the next hierarchy Press s when you want to go back to the previous hierarchy Press CLEAR to erase the most recently entered pro gram 3 Repeat step 2 until you have selected all the Tracks you want to play in the...

Страница 25: ...t shown after pressing SUBTITLE several times the disc does not have subtitles in that language If you choose a Language that has a 3 letter language code the code will be displayed every time you change the Subtitle language setting If you choose any other languages will be displayed instead Refer to page 27 DVD V SUBTITLE LANGUAGE CAMERA ANGLE Some DVD discs contain scenes which have been shot s...

Страница 26: ...ck to show the current Track The elapsed and remaining playing time of the cur rent track will be displayed 2 Press DISPLAY again to show current Total Track The elapsed and remaining playing time of the cur rent track will be displayed 3 Press DISPLAY again to exit the display You can check the information about the current disc by pressing DISPLAY on the remote control MP3 CD DVD V 9 49 0 00 00 ...

Страница 27: ... 4847 Basque 5167 Bengali Bangla 4860 Bhutani 5072 Bihari 4854 Bislama 4855 Breton 4864 Bulgarian 4853 Burmese 5971 Byelorussian 4851 C E Cambodian 5759 Catalan 4947 Chinese CHI 7254 Corsican 4961 Croatian 5464 Czech 4965 Danish DAN 5047 Dutch DUT 6058 English ENG 5160 Esperanto 5161 Estonian 5166 F H Faroese 5261 Fiji 5256 Finnish FIN 5255 French FRE 5264 Frisian 5271 Galician 5358 Georgian 5747 ...

Страница 28: ...the TV screen 1 Press SETUP twice in STOP mode so that the DVD SETUP menu appears If the menu does not appear press PLAY STOP then SETUP twice 2 Press Arrow L to select CUSTOM then press ENTER CUSTOM mode will appear 3 Press Arrow K L to select DISPLAY then press ENTER to confirm 4 Press Arrow K L to select the below items then press ENTER TV MODE Press Arrow K L for an item selection then press E...

Страница 29: ...t PARENTAL LEVEL then press ENTER 6 Press Arrow K L to select the desired level then press ENTER 7 Press SETUP to exit NOTES When doing this for the first time enter any 4 digits except for 4737 That number will be used as the password from the second time onward To change the password press Arrow K L to select CHANGE at step 5 then press ENTER Enter the four digit password then press ENTER With s...

Страница 30: ...enna is being used check for broken wire Check for local interference Weak Picture Try a new channel if OK then possible station trouble Is antenna connected to terminal on the back of the set If outside antenna is being used check for broken wire Adjust CONTRAST BRIGHT control Sound OK Picture Poor Try a new channel if OK then possible station trouble Is antenna connected to terminal on the back ...

Страница 31: ...ons will be lost My TV DVD screen shows a black You are in the TEXT mode Select CAPTION mode or CAPTION box on certain channels OFF Problem Corrective Action No picture Connect the video cables firmly Insert a correct video disc that plays on this TV DVD Press SELECT on the remote control to select DVD mode Next press PLAY or OPEN CLOSE Then try other DVD feature Disc cannot be played Insert the d...

Страница 32: ...V DVD still does not perform properly when it is operated while referring to the relevant sections and TROUBLESHOOTING GUIDE in this Owner s Manual the laser optical pickup unit may be dirty Consult your dealer or an Authorized Service Center for inspection and cleaning of the laser optical pickup unit Use discs which have the following logos on them Optical audio digital discs Handle the discs so...

Страница 33: ... is a discrepancy between languages the default language will be English TV DVD GENERAL SPECIFICATIONS ELECTRICAL SPECIFICATIONS Sound output 2 speakers 1W 8 ohm OTHER SPECIFICATIONS Terminals Antenna input VHF UHF CATV 75 ohm unbalanced F type Video input RCA connector 1 Audio L R input RCA connector 2 Headphone 1 8 stereo 3 5 mm Coaxial digital audio output only DVD One pin jack 500m Vpp 75 ohm ...

Страница 34: ...ident misuse abuse mishandling misapplication alteration faulty installation improper main tenance commercial use such as hotel rental or office use of this product or damage which results from fire flood lightning or other acts of God THIS WARRANTY DOES NOT COVER PACKING MATERIALS ANY ACCESSORIES EXCEPT REMOTE CONTROL ANY COSMETIC PARTS COMPLETE ASSEMBLY PARTS DEMO OR FLOOR MODELS FUNAI CORP AND ...

Страница 35: ...déposée aux Etats Unis Veuillez lire ce guide avant d utiliser cet appareil Si apres la lecture de ce manuel vous avez besoin d une aide supplementaire pour l installation ou le fonctionnement de cet appareil veuillez composer LE NUMERO D APPEL GRATUIT 1 800 242 7158 Ou consultez notre SITE INTERNET http www funai corp com 2 piles AA NE220UD Guide d utilisation 0EMN02494 ACCESSOIRES AVEC L APPAREI...

Страница 36: ...rvent à la ventilation et à garantir le fonctionnement fiable de l appareil de TÉLÉ DVD en le protégeant de la surchauffe il est interdit de boucher ou de couvrir ces ouvertures Ne bouchez jamais ces ouvertures en plaçant l appareil de TÉLÉ DVD sur un lit un canapé un tapis ou une surface similaire Ne placez jamais cet appareil de TÉLÉ DVD à proximité ou au dessus d un radiateur ou d un registre d...

Страница 37: ...Ne surchargez pas les prises et les rallonges pour éviter de provoquer un incendie ou une électrocution 17 Pénétration de liquide ou d objet Ne faites jamais pénétrer d objet quel qu il soit dans l appareil de TÉLÉ DVD à travers les ouvertures car il pourraient toucher ses pièces sous tension ou causer des courts circuits susceptibles de provoquer un incendie ou une électrocution Ne versez jamais ...

Страница 38: ...destinée à l usage domestique et d autres visionnements limités seulement à moins d une autorisation spéciale de la Macrovision Corporation Les applications techniques inversées ou le démontage sont strictement interdits SÉCURITÉ DU LASER Cet appareil utilise un laser Seul un technicien qualifié est autorisé à enlever le capot pour réparer ce dispositif car il risque de blesser les yeux PRUDENCE E...

Страница 39: ...z le par la fiche Si vous renversez par erreur de l eau sur l appareil débranchez le immédiatement et apportez le au service après vente pour le faire réparer N introduisez pas ni doigts ni objets dans le plateau de l appareil de TÉLÉ DVD Ne placez aucun objet directement au dessus de l appareil AVERTISSEMENT Des condensats peuvent se produire à l intérieur de l appareil si vous transportez l appa...

Страница 40: ...S DES DISQUES 19 DISQUES POUVANT ÊTRE JOUÉS 19 TYPES DE DISQUES 19 C LECTURE D UN DISQUE 20 LECTURE DE BASE 20 CARACTÉRISTIQUES GÉNÉRALES 20 DISC MENU 20 TITLE MENU 20 REPRISE 21 PAUSE 21 LECTURE PAS À PAS 21 RECHERCHE RAPIDE AVANT ARRIÈRE 21 AVANCE LENTE RECUL LENT 21 C FONTION RECHERCHE 22 RECHERCHE DE PISTE 22 RECHERCHE PAR TITRE CHAPITRE 22 RECHERCHE HORAIRE 22 ECRAN DE CONFIGURATION DU MARQUE...

Страница 41: ...Détection automatique des disques Ce TÉLÉ DVD détecte automatiquement si le disque placé sur le plateau est un DVD un cédé musical ou un MP3 Affichage à l écran Vous pouvez afficher les informations sur le mode de fonctionnement en cours sur l écran de télé afin de confirmer éventuellement les fonctions activées comme la lecture programmée sur l écran à l aide de la télécommande Recherche Recherch...

Страница 42: ...es ayant un nombre égal ou supérieur à 100 Mode DVD page 22 Appuyez dessus pour saisir le numéro voulu Touche 10 Appuyez dessus pour sélectionner les numéros égaux ou supérieurs à 10 17 Touche SLEEP page 16 Appuyez sur la touche SLEEP pour afficher la minuterie de veille et démarrer la fonction Vous pouvez définir le délai de coupure automatique à l aide du nombre de pressions exercées sur cette t...

Страница 43: ...la touche PAUSE puis sur cette touche pour commencer la lecture au ralenti Appuyez plusieurs fois sur cette touche pour changer la vitesse arrière du ralenti Touche FWD g page 21 Appuyez dessus pour faire avancer le disque rapidement Appuyez sur la touche PAUSE puis sur cette touche pour commencer la lecture au ralenti Appuyez plusieurs fois sur cette touche pour changer la vitesse avant du ralent...

Страница 44: ...ite Broche pliée Câble Fiche doit être redressée Broche droite COAXIAL ANT ANT IN OUT Antenne VHF UHF non fournie Multiplexeur VHF UHF non fourni Câble plat à deux conducteurs Antenne UHF non fournie Antenne VHF non fournie A partir du réseau câblé Câble coaxial de 75 ohm non fourni Boîtier satellite ou Boîtier câble non fournis A partir du réseau câblé ou de l antenne parabolique ou ou ou ANTENNE...

Страница 45: ...ÉRIQUES MAGNÉTOPHONE MD OU MAGNÉTOPHONE AUDIONUMÉRIQUE À TÊTE ROTATIVE uniquement pour le DVD Utilisez les câbles son numériques coaxiaux en vente dans le commerce pour les connexions son REMARQUES La source son d un disque en format Dolby Digital canal 5 1 ne peut pas être enregistrée comme son numérique par un magnétophone audionumérique à tête rotative ou un magnétophone MD Assurez vous d avoir...

Страница 46: ...omposants à brancher sur l appareil de TÉLÉ DVD Si l appareil est branché sur un décodeur Dolby Digital configurez DOLBY DIGITAL sur ON comme sortie son en mode configuration Cf la page 28 pour configurer Dolby Digital sur ON Sauf si l appareil est branché sur un décodeur Dolby Digital configurez DOLBY DIGITAL sur OFF comme sortie son en mode configuration En fonctionnant avec des configurations i...

Страница 47: ... êtes en mesure de capter dans votre région REMARQUE La programmation du syntonisateur de cet appareil n est pas nécessaire lorsque vous utilisez un convertisseur décodeur du câble ou de l antenne parabolique Il vous suffit de syntoniser à partir du TÉLÉ DVD le même canal que celui que syntonise le convertisseur décodeur par exemple le canal 3 Puis sélectionnez le canal de votre choix à partir du ...

Страница 48: ...canaux de cable supérieurs à 99 appuyez d abord sur 100 puis sur les deux derniers chiffres Exemple pour sélectionner le canal 125 appuyez d abord sur 100 puis sur 2 et 5 Vous pouvez faire précéder les numéros de canaux à un chiffre d un zéro Exemple 02 09 4 Effacement ou ajout de la mémoire Pressez ENTER Le numéro de canal passe au rouge clair Le canal est effacé de la mémoire Si vous désirez eff...

Страница 49: ...ous appuyez sur la touche CHANNEL CH K L en mode DVD vous pouvez changer de chaîne télé Même si vous éteignez l appareil de TÉLÉ DVD en mode DVD lorsque vous le rallumez il se met en mode télé TV s B LUMINOSITÉ pour diminuer pour augmenter la luminosité la luminosité CONTRASTE pour diminuer pour augmenter le contraste le contraste COULEUR pour éclaircir pour intensifier TEINTE vers le rouge vers l...

Страница 50: ...visées ne sont pas diffusées avec des sous titres Cet appareil a été conçu pour vous offrir des sous titres de qualité sans erreur en autant que ceux ci proviennent d une antenne d un système de câblodistribution ou d un signal vidéo d un magnétoscope de bonne qualité Par conséquent si le signal reçu est mauvais il est fort probable que les sous titres contiendront des erreurs ou qu il n y ait pas...

Страница 51: ... Y à VISION tous les classements tournent automatiquement à VISION CODE DE ACCèS _ _ _ _ RÉGLAGE CIRCUIT V B COTE TV COTE MPAA CHANGEMENT CODÉ Quand vous sélectionnez TV Y7 TV PG TV 14 ou TV MA et pressez ENTER les sous cotes apparaissent sur l écran Si vous sélectionnez une des catégorie de classement exemple TV PG et que vous la tourniez sur BARRÉ ou VISION les sous classements exemple V pour vi...

Страница 52: ...ressez ENTER RÉGLAGE DES TV RÉGLAGE DES CANAUX B RÉGLAGE CIRCUIT V LANGAGE FRANÇAIS S TITRES HF RÉGLAGE CIRCUIT V COTE TV B COTE MPAA CHANGEMENT CODE CODE DE ACCèS _ _ _ _ CHANGEMENT DE CODE D ACCES Procédez comme suit pour changer de code d accès 1 Sélectionnez RÉGLAGE CIRCUIT V Pressez SETUP sur la télécommande Pressez la flèche K L pour qu elle pointe sur le mot V CHIP SET UP Puis pressez ENTER...

Страница 53: ...res que 1 et ALL DVD ROM DVD RAM Interdiction de les lire peuvent provoquer des dysfonctionnements CD ROM VSD CDV Ne reproduisez que la partie son CD G Ne reproduisez que le son CD I Interdiction de les reproduire peuvent provoquer des dysfonctionnements SACD CD Photo Interdiction de les reproduire peuvent provoquer des dysfonctionnements CD vidéo Interdiction de les reproduire peuvent provoquer d...

Страница 54: ...ctionnement CARACTÉRISTIQUES GÉNÉRALES Les DVD contiennent parfois des menus permettant de naviguer à l intérieur du disque et d accéder à certaines fonctions Appuyez sur les touches numériques à cet effet ou utilisez les touches directionnelles K L s B pour surligner votre sélection dans le menu principal du DVD et appuyez sur ENTER pour confirmer REMARQUES Sélectionnez le mode DVD en appuyant su...

Страница 55: ...sse de recherche rapide avant arrière varie selon les disques La vitesse approximative est 1 x2 2 x8 3 x50 et 4 x100 La vitesse approximative pour les cédés musicaux est de x16 La vitesse approximative pour MP3 est de x8 Si vous opérez sur l unité principale utilisez la touche SKIP G SEARCH g ou SKIP H SEARCH h 3 Pour revenir en lecture normale appuyez sur la touche PLAY MP3 CD DVD V RECHERCHE RAP...

Страница 56: ...er les erreurs de saisie Pour les numéros à un seul chiffre tapez d abord sur 0 DVD V _ 2 RECHERCHE HORAIRE 1 Pendant la lecture appuyez trois fois sur la touche SEARCH MODE CD deux fois pour afficher la recherche Horaire sur l écran de télé 2 Vous disposez de 30 secondes pour saisir l horaire du disque voulu à l aide des touches numériques de la télécommande La lecture commence à l horaire indiqu...

Страница 57: ...e CD DVD V PROGRAMME Vous pouvez configurer l ordre de lecture des pistes 1 En mode stop appuyez sur la touche MODE L écran PROGRAMME s affiche 2 Appuyez sur la touche directionnelle o p pour sélectionner une piste puis sur la touche ENTER Appuyez sur la touche CLEAR pour effacer le dernier programme saisi 3 Répétez le point 2 jusqu à ce que vous ayez sélectionné toutes les pistes de votre program...

Страница 58: ...n MP3 pour le lire dans la séquence voulue 1 En mode stop appuyez sur la touche MODE L écran PROGRAMME s affiche 2 Sélectionnez la piste voulue à l aide des touches directionnelles K L s B Appuyez ensuite sur la touche ENTER Appuyez sur la touche B pour aller à la prochaine hiérarchie Appuyez sur la touche s pour aller à la hiérarchie précédente Appuyez sur la touche CLEAR pour effacer le dernier ...

Страница 59: ...appuyé plusieurs fois sur la touche SUBTITLE le disque ne dispose pas de sous titrage dans cette langue Si vous choisissez une langue ayant un code d identification de 3 lettres le code s affiche chaque fois que vous changez la configuration de la langue du sous titrage Si vous choisissez une autre langue s affiche à la place Consultez la page 27 DVD V LANGUE DU SOUS TITRAGE ANGLE DE LA CAMÉRA Cer...

Страница 60: ...ecture pour voir la piste en cours Le temps écoulé et restant de la piste en cours s affiche 2 Appuyez encore sur la touche DISPLAY pendant la lecture pour voir la piste totale en cours Le temps écoulé et restant de la piste totale en cours s affiche 3 Appuyez encore sur la touche DISPLAY pour sortir de l affichage Vous pouvez contrôler les informations sur le disque en cours en appuyant sur la to...

Страница 61: ...ous titrage à la page 25 Si vous choisissez une autre langue c est qui s affiche les codes formés de 3 lettres sont entre parenthèses Langue Code A B Abkhazian 4748 Afar 4747 Afrikaans 4752 Albanais 6563 Amharique 4759 Arabe 4764 Arménien 5471 Assamais 4765 Aymara 4771 Azerbaïdjan 4772 Bashkir 4847 Basque 5167 Bengali Bangla 4860 Bhutan 5072 Bihari 4854 Bislama 4855 Breton 4864 Bulgare 4853 Birman...

Страница 62: ...ETUP en mode STOP pour faire apparaître le menu configuration du DVD Si le menu n apparaît pas appuyez encore sur la touche PLAY sur la touche STOP puis deux fois sur la touche SETUP 2 Appuyez sur la touche directionnelle L pour sélectionner CUSTOM puis sur la touche ENTER Le mode CUSTOM s affiche 3 Appuyez sur les touches directionnelles K L pour sélectionner AFFICHAGE puis sur ENTER pour confirm...

Страница 63: ...rtir de la deuxième utilisation Pour modifier le mot de passe appuyez sur les touches directionnelles K L pour sélectionner CHANGEMENT au point 5 puis appuyez sur la touche ENTER Saisissez votre mot de passe de 4 chiffres et appuyez sur la touche ENTER SETUP CUSTOM LANGUE AFFICHAGE SON PARENT SI VOUS OUBLIEZ LE CODE D ACCÈS 1 Tapez sur les touches numériques 4 7 3 et 7 au point 4 Puis saisissez vo...

Страница 64: ... antenne extérieure vérifiez s il y a un conducteur cassé Contrôlez s il y a des interférences locales Image faible Essayez une autre chaîne si tout est OK c est la station qui a des problèmes Est ce que l antenne est bien branchée sur la borne au dos de l appareil Si vous utilisez l antenne extérieure vérifiez s il y a un conducteur cassé Réglez le contrôle CONTRASTE et LUMINOSITÉ Son OK Image ma...

Страница 65: ...e DVD figée Image du DVD en mosaïque Pas de reproduction du DVD Mode DVD REMARQUES Certaines fonctions ne sont pas disponibles dans certains modes mais ce n est pas un dysfonctionnement Lisez les descriptions de ce manuel de l utilisateur pour avoir de plus amples détails sur la façon correcte de procéder La lecture à partir d une piste voulue et la lecture aléatoire ne sont pas possibles pendant ...

Страница 66: ...eil de TÉLÉ DVD avec un chiffon imbibé d eau tiède et séchez N utilisez jamais ni solvant ni alcool Ne pulvérisez pas d insecticide à proximité de l appareil de TÉLÉ DVD Ces produits chimiques risquent d endommager et décolorer les surfaces exposées RÉPARATIONS Si votre TÉLÉ DVD devient inopérant n essayez pas de corriger le problème vous même Il n y a pas de pièces entretenables par l utilisateur...

Страница 67: ...is En cas de désaccord entre les langues la langue par défaut est l anglais TÉLÉ DVD CARACTÉRISTIQUES GÉNÉRALES CARACTÉRISTIQUES ÉLECTRIQUES Sortie son 2 hauts parleurs 1 W 8 ohm AUTRES CARACTÉRISTIQUES Bornes Entrée antenne VHF UHF Chaînes câblées 75 ohm dissymétrique Type F Entrée vidéo Connecteur RCA 1 Entrée son G D Connecteur RCA 2 Casque d écoute 1 8 po stéréo 3 5 mm Sortie son numérique coa...

Страница 68: ...ation erronée d une modification d une installation incorrecte d une maintenance incorrecte d un usage commercial par exemple dans un hôtel en location ou dans un bureau de ce produit ou de dommages dus à un incendie une inondation la foudre ou d autres actes de Dieu CETTE GARANTIE NE COUVRE PAS LES MATERIAUX D EMBALLAGE LES ACCESSOIRES SAUF LA TELECOMMANDE LES PARTIES ESTHETIQUES LES PIECES D ASS...

Отзывы: