76
TimeSource 3100
Installation
097-72020-01 Issue 9: November 2003
S
S
S
S
S
S
S
S
S
S
S
S
S
S
S
S
S
S
S
S
S
S
S
S
S
S
S
S
S
S
S
S
S
S
S
S
S
S
S
3
End of Procedure
Figure 24. RS-422 to RS-232 TOD Converter Mounting Plate
Procedure D. RJ-45-to-DB-25 TOD Converter Installation
Step
Procedure
1
Secure the provided mounting plate to the RS-422–to–RS-232 TOD converter using the
two provided screws. The plate may be attached to the top or front of the converter,
depending on the desired surface (for example, a rack or cabinet) to which the converter
will be mounted (see Figure 24).
Notes:
1. Due to distance constraints, the converter must be placed no more than 305 m from the
TimeSource 3100 Shelf, and no more than 15 m from the device receiving the time code.
2. The converter dimensions are 7.5 cm by 3.8 cm by 2.5 cm.
3. The mounting plate dimensions are 7.5 cm by 5 cm.
2
Secure the converter to the desired surface, using the slots in the plate and user-supplied
bolts.
3
Install a user-supplied Category 5 four-pair RS-422 cable with RJ-45 connectors on each
end, between the TimeSource 3100 Shelf and the converter (see Figure 25).
4
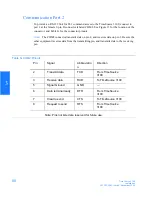
Install a user-supplied RS-232 cable, with DB-25 connectors on each end, between the
converter and the device receiving the time code (see Figure 25). See Table D for the DB-
25 connector pinouts.
Содержание TimeSource 3100
Страница 1: ...TimeSource 3100 GPS Primary Reference Source 097 72020 01 Issue 9 November 2003 ...
Страница 49: ...3 Chapter Installation This chapter provides the steps required for installation and power up ...
Страница 109: ...Chapter 4 TL1 Reference This chapter provides information for using the TL1 language ...
Страница 203: ...Chapter 6 Specifications This chapter provides equipment specifications ...


