2 of 4
QUICK START GUIDE:
T-5 Touchscreen
www.symetrix.co
|
+1.425.778.7728
Software Installation
Composer is the software that provides real-time set-up
and control of the T-5 Touchscreen from a Win dows PC
environment.
Use the following procedure to install Composer on your
computer.
From the Symetrix web site (http://www.symetrix.co):
1. Download the Composer software installer from the Symetrix
web site.
2. Double-click on the file you just downloaded and follow the
on screen directions to install.
After installing the software, refer to the Help File for full
connection and configuration information.
Network Setup
About DHCP
T-5 Touchscreen boots with DHCP enabled by default. This
means that as soon as you connect it to a network, it will look
for a DHCP server in order to obtain an IP address. If a DHCP
server is present, T-5 Touchscreen will obtain an IP address
from it. This process may take several minutes. With your PC
attached to the same network, and thus getting its IP address
from the same DHCP server, all will be ready to go.
If your network does not have a DHCP server, T-5
Touchscreen will not be able to obtain an IP address. While
waiting, T-5 Touchscreen will default to a private IP address in
the range of 169.254.x.x where x.x is the last four alphanumeric
characters of T-5 Touchscreen’s MAC address (MAC address
hex value is converted to decimal for IP address). T-5
Touchscreen’s MAC address can be found on a sticker on the
bottom of the hardware.
When there is no DHCP server present to assign IP addresses
to the T-5 Touchscreen, or your PC, you may need to configure
your PC with a static IP in the range of 169.254.x.x with a
Subnet Mask of 255.255.0.0 in order to communicate with
T-5 Touchscreen in a direct connect mode. However, if your
PC is using the default network settings, it should also have
automatically self-assigned a similar private IP address in the
range of 169.254.x.x, and if this is the case, you should be able
to connect to T-5 Touchscreen directly.
Even if the PC’s default settings have been changed, T-5
Touchscreen will try to establish communications by setting
up appropriate routing table entries to reach devices with
169.254.x.x addresses.
Connecting to Radius NX, Radius, Prism, and Edge from a
host computer on the same LAN
The Radius NX, Radius, Prism, Edge, and the host computer
require the following 3 items:
1. IP Address - The unique address of a node on a network.
2. Subnet Mask - Configuration that defines which IP
Addresses are included in a particular subnet.
3. Default Gateway (optional) - The IP address of a device that
routes traffic from one subnet to another. (This is only needed when
the PC and Radius NX, Radius, Prism, or Edge are on different
subnets).
If you are putting Radius NX, Radius, Prism, or Edge on an existing
network, a network administrator will be able to provide the above
information or it may have been provided automatically by a DHCP
server. For security reasons, it is not recommended to put Radius
NX, Radius, Prism, and Edge directly on the Internet. If you do, a
network administrator or your Internet Service Provider can provide
the above information.
If you are on your own private network, directly or indirectly
connected to Radius, Prism, or Edge, you may allow Radius NX,
Radius, Prism, or Edge to choose an automatic IP address or you
may choose to assign it a static IP address. If you are building
your own separate network with static assigned addresses, you
may consider using an IP Address from one of the ”Private-Use”
networks noted in RFC-1918:
1. 172.16.0.0/12 = IP Addresses 172.16.0.1 through
172.31.254.254 and a Subnet Mask of 255.240.0.0
2. 192.168.0.0/16 = IP Addresses 192.168.0.1 through
192.168.254.254 and a Subnet Mask of 255.255.0.0
3. 10.0.0.0/8 = IP Addresses 10.0.0.1 through
10.254.254.254 and a Subnet Mask of 255.255.0.0
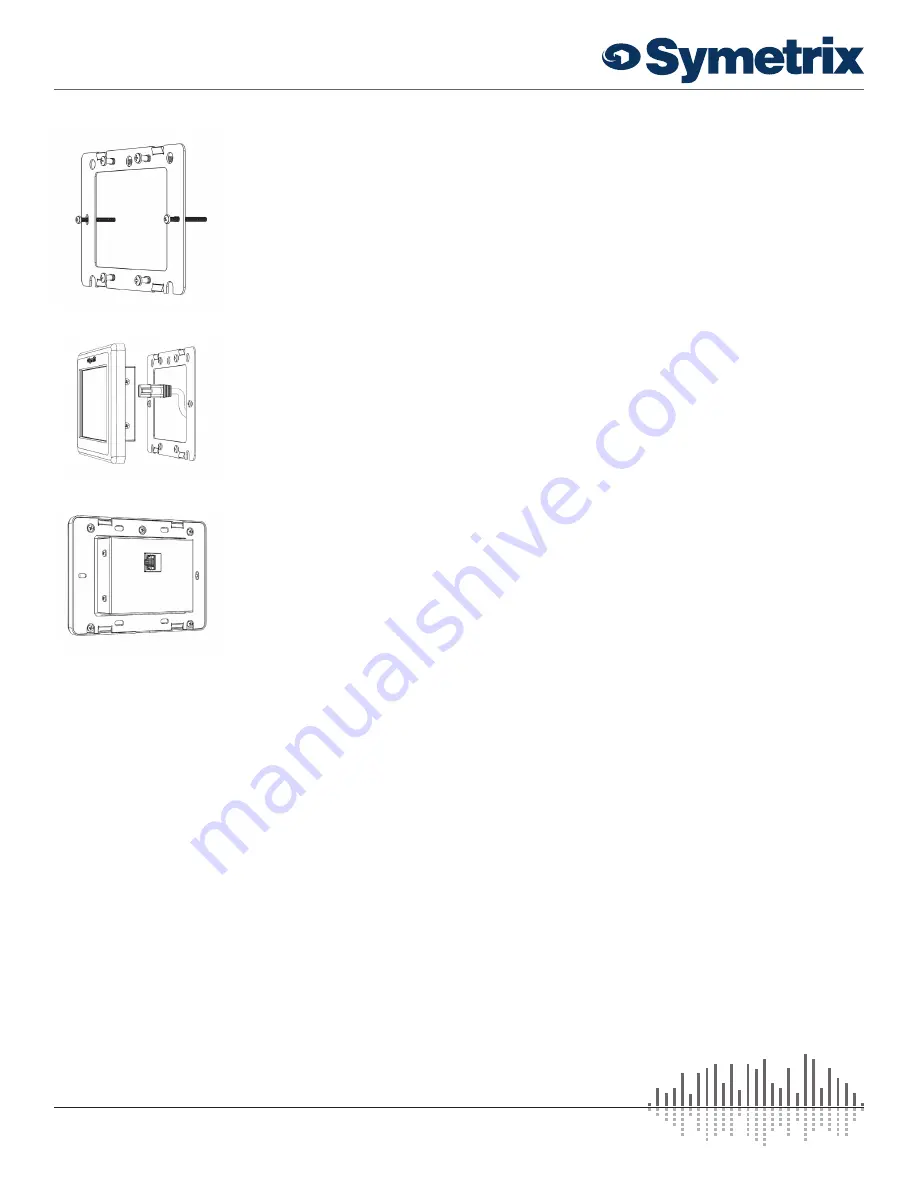
Hardware Installation
1
Screw the universal flush
mount bracket into the wall
mounted back box. *Note
proper flush mount bracket
orientation, with the three
holes positioned on the top.
2
Connect the CAT5/6 cable(s)
to the T-5 Touchscreen.
3
Snap the T-5 Touchscreen
onto the universal flush mount
bracket.


