Sylvania ValueLED Скачать руководство пользователя страница 4


3989108 


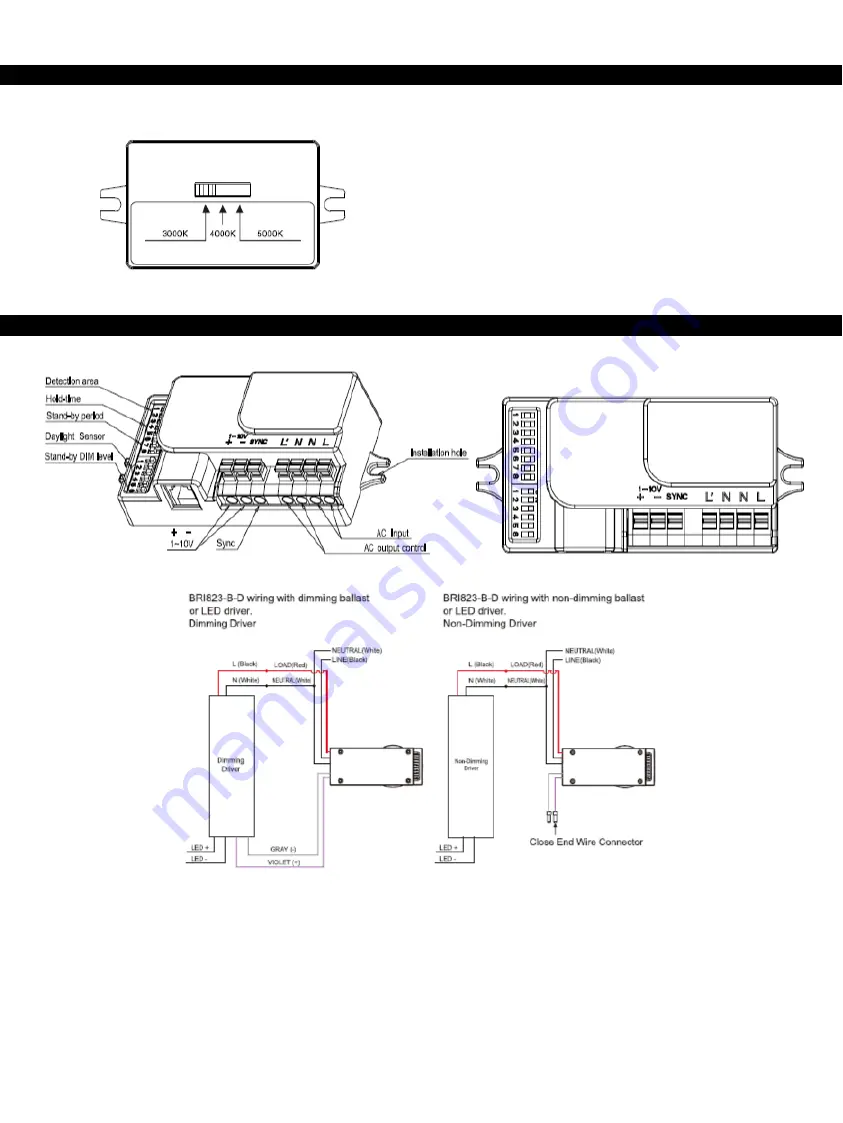
ADJUSTING THE COLOR TEMPERATURE : 


The correlated color temperature of ValueLED™ Garage luminaire can be adjusted by toggling between the switch located 

on the inside of the luminaire. Use the sliding switch to select the desired correlated color temperature.


WIRING DIAGRAMS : 


Содержание ValueLED

Страница 1: ...OCK OR COMPONENT DAMAGE DISCONNECT POWER BEFORE ATTEMPTING INSTALLATION OR SERVICING DO NOT USE A GENERATOR TO TEST THIS LUMINAIRE THIS PRODUCT MUST BE INSTALLED IN ACCORDANCE WITH THE NATIONAL ELECTR...

Страница 2: ...e 3 4 plug on the top of the driver box cover Figure 2 3 Fix the driver box cover on the pipe Figure 3 4 Hang the safety cord attached to the driver to the hook inside the luminaire s main body Figure...

Страница 3: ...he ceiling with the appropriate hardware provided by others Figure 4 5 Hang the safety cord attached to the driver to the hook inside the luminaire Figure 5 6 Make all wiring connections in accordance...

Страница 4: ...The correlated color temperature of ValueLED Garage luminaire can be adjusted by toggling between the switch located on the inside of the luminaire Use the sliding switch to select the desired correl...

Страница 5: ...ce may be needed Use a mild soap or detergent which is essentially neutral pH pH approximately 6 to 8 nonabrasive and which contains no chlorinated or aromatic hydrocarbons Wash thoroughly using a sof...

Страница 6: ...LECTRIQUE OU DOMMAGE AUX COMPOSANTES VEUILLEZ COUPER L ALIMENTATION AVANT D EFFECTUER L INSTALLATION OU L ENTRETIEN NE PAS UTILISER UN G N RATEUR POUR TESTER CE LUMINAIRE CE PRODUIT DEVRAIT TRE INSTAL...

Страница 7: ...uspendre le cordon de s curit rattach au pilote dans le crochet l int rieur du bo tier principal du luminaire Figure 4 5 Effectuer toutes les connexions de c blage en respectant les exigences du Code...

Страница 8: ...e des ferrures ad quates non incluses Figure 4 5 Suspendre le cordon de s curit rattach au pilote dans le crochet l int rieur du bo tier principal du luminaire Figure 5 6 Effectuer toutes les connexio...

Страница 9: ...DIM level Niveau de GRAD en attente SYNC SYNC Installation hole Trou pour installation AC Input Entr e c a AC output control Contr le de sortie c a BR1823 B D wiring wC blage BR1823 B D avec b Dimming...

Страница 10: ...iode de temps durant laquelle la lampe demeure un clairement de 100 apr s l absence de mouvement R glage l usine VI P riode d attente R f rence la p riode de temps durant laquelle la lampe demeure un...

Отзывы: