


- 11 -
EN
9J27
SET UP FOR USE
You can program the tuner to scan all the channels you receive in your area.
NOTE:
Channel memory programming is NOT needed when connected to a cable box or satellite box. Just
select the TV/VCR channel selector to the output channel of the cable box or satellite box (Ex CH3). Then
select the channel to be viewed on the Cable Box or Satellite Box.
CHANNEL SET UP FOR THE
FIRST TIME
1
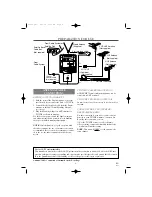
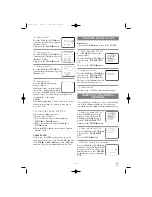
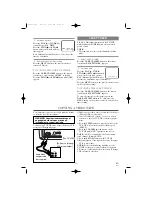
Plug in the TV/VCR power cord
Attach the smaller end of the sup-
plied AC cord to the AC 120V
connector on the back of the
TV/VCR. Then, plug the other
end into a standard AC outlet.
NOTES:
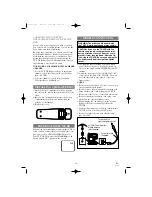
•
You must disconnect the car battery cord from the
TV/VCR before you use AC power.
•
If some digits appear in the corner of the screen,
press the POWER button without unplugging the
power cord.
2
Turn on the TV/VCR
Press the POWER button to turn on the TV/VCR.
3
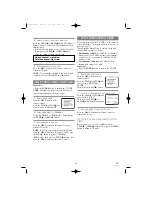
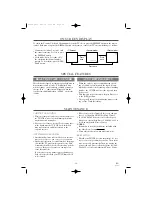
Select “ENGLISH” or “ESPAÑOL”
Select “ENGLISH” or
“ESPAÑOL”=Spanish using the
F.FWD/
B
or REW/
s
button. “[ ]”
indicate the selected language.
4
Begin auto preset
Press the PLAY/
K
or STOP/
L
but-
ton to point to “AUTO PRESET”.
Then press the F.FWD/
B
button.
The tuner scans and memorizes all
active channels in your area.
NOTES:
•
The TV/VCR distinguishes between standard TV
channels and cable channels.
•
If you want to play or record a video tape BEFORE
presetting the tuner, you must press the MENU but-
ton on the remote control. To preset the tuner again,
see “CHANNEL SET UP AGAIN” on page 13.
•
The TV/VCR may recognize TV channels to be
CATV channels by the receiving conditions. In this
case, try auto preset again in the fine receiving
conditions.
5
After scanning
The tuner stops on the lowest memorized channel.
If you want to recall the selected channels, you can
select the desired channel directly with the remote
control number buttons or CHANNEL
K
or
L
button.
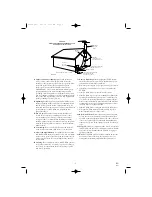
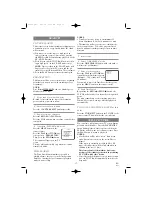
ANT
DC 13.2V
AC 120V
AC 120V
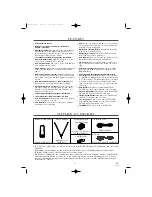
– SET UP –
B
LANGUAGE
[ENGLISH] ESPAÑOL
AUTO PRESET
– SET UP –
LANGUAGE
[ENGLISH] ESPAÑOL
B
AUTO PRESET
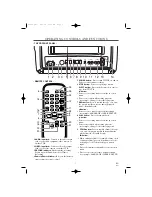
TO SELECT A DESIRED CHANNEL
You can select the desired channel by using the
CHANNEL
K
or
L
button or directly pressing the
number buttons on the remote control.
Note for using the number buttons:
•
When selecting cable channels which are higher
than 99, press the +100 button first, then, press the
last two digits. (Example: to select channel 125,
first press the +100 button then press “2” and “5”).
•
You must proceed single-digit channel numbers
with a zero (Example: 02 ... 09).
CLOCK SET UP
(AUTO / MANUAL)
Set the clock accurately for proper automatic timer
recording. If the Public Broadcasting Station (PBS)
is available in your area, follow “AUTO CLOCK
SETTING”. If it is not, follow “MANUAL CLOCK
SETTING”.
AUTO CLOCK SETTING
You can have the TV/VCR set the clock automatical-
ly by using the Public Broadcasting Station (PBS)
channel in your area. Once you have set the clock by
using the following procedure, the TV/VCR will
automatically monitor the correct time and date
being broadcast by the PBS station in your area,
using a new service called Extended Data Service
(XDS).
Make sure ...
•
TV/VCR power must be turned on.
•
Confirm that the antenna connections are correct.
•
The cable converter box must be turned on if your
TV/VCR is connected directly to it. (See NOTES:)
•
The channel is properly set in advance.
T4304.QX33 02.1.16 3:06 PM Page 11


