background image

62

Editing Discs in Video Mode

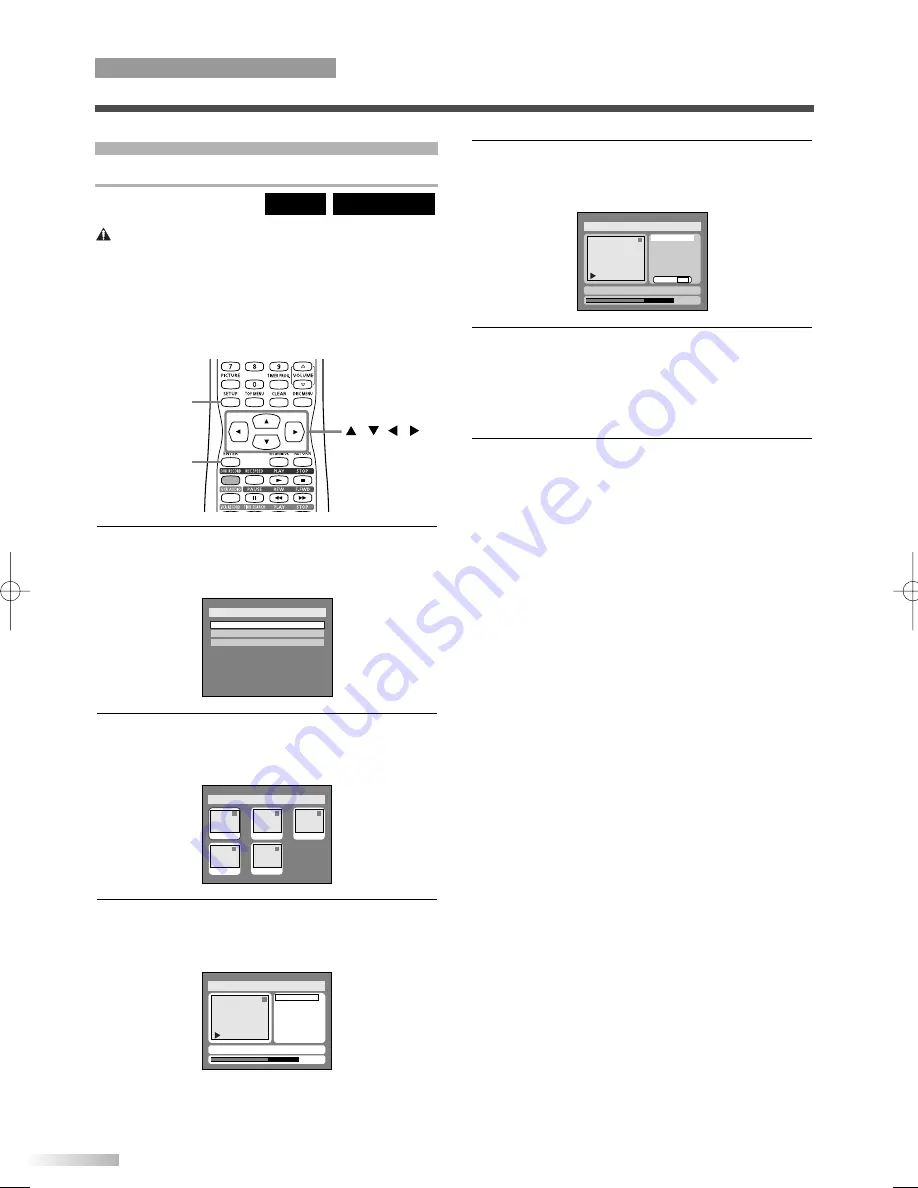
Deleting Titles 

Caution:

You can delete titles that you do not need anymore.
The titles once deleted cannot be recovered to the
disc. When the last title in the title list in Video mode
is deleted, the disc space to record will be
increased. For DVD-R disc, the disc space to record
will not be changed.

DVD-RW (Video)

DVD-R

1

Press 

SETUP

button. Select "DISC" using 

/

B

buttons, then press 

ENTER

button.

DISC menu will appear.

2

Select "Edit" using 

K

/

L

buttons, then press

ENTER

button.

Title list will appear.

3

Select a desired title using 

K

/

L

/

/

B

buttons,

then press 

ENTER

button.

Edit menu will appear.

• You cannot select “Chapter Mark” when a DVD-R

disc is inserted into this unit.

Disc > Edit

1

Title Delete
Edit Title Name
Chapter Mark

0:01:25

JAN/ 1   1:00AM  CH12     XP

Disc > Edit

1

1

3

2

5

4

JAN/1 1:00AM

JAN/1 4:00AM

JAN/1 2:00AM

JAN/1 3:00AM

JAN/1 5:00AM

Disc

Edit

Format

Finalize

4

Select "Title Delete" using 

K

/

L

buttons, then

press 

ENTER

button.

Option window will appear.

5

Select "Yes" using 

/

B

buttons, then press

ENTER

button.

Title will be deleted.

NOTE:

• This operation may take a few minutes to complete.

6

After writing to disc is completed, press 

SETUP

button to exit DISC menu.

Disc > Edit

1

0:01:25

Title Delete
Edit Title Name
Chapter Mark

Yes        No

JAN/ 1   1:00AM  CH12     XP

ENTER

SETUP

/

/

/

EDITING DISCS

OPERATING DVD RECORDER

T2021UB_45-88.QX33  04.9.16  4:29 PM  Page 62

Содержание SREC427

Страница 1: ...fe place for easy access in the future COLOR TV VCR DVD TRIPLE RECORDER COMBO Before you use this unit you need to complete connections Refer to Connections on pages 10 13 To record a program easily refer to Easy DVD recording on pages 46 47 after connections are completed You CANNOT copy any copyright protected DVD disc with this unit P Owner s Manual 1EMN20176 P Remote Control NE237UD P AA batte...

Страница 2: ...rer s instructions and should use a mounting accessory recommended by the manufacturer An appliance and cart combination should be moved with care Quick stops excessive force and uneven surfaces may cause the appliance and cart combination to overturn AMEUBLES Cet appareil ne doit être placé que sur un meuble avec ou sans roulettes recommandé par le fabricant Si vous l installez sur un meuble à ro...

Страница 3: ...u to dangerous voltage or other hazards Refer all servicing to qualified service personnel 19 Damage Requiring Service Unplug this TV VCR DVD from the wall outlet and refer servicing to qualified service personnel under the following conditions a When the power supply cord or plug is damaged or frayed b If liquid has been spilled or objects have fallen into the TV VCR DVD c If the TV VCR DVD has b...

Страница 4: ...ital apparatus complies with Canadian ICES 003 Cet appareil numérique de la classe B est conforme à la norme NMB 003 du Canada Este aparato digital de la Clase B cumple con la norma ICES 003 de Canadá FCC WARNING This equipment may generate or use radio frequency energy Changes or modifications to this equip ment may cause harmful interference unless the modifications are expressly approved in the...

Страница 5: ...se of theft REGARDING THIS MANUAL Product and company names appearing within this manual are trademarks or registered trademarks of their respective owners Although special care has been taken to ensure that all information contained within this manual is correct at time of writing the information is subject to change without notice Make sure to read the manual carefully and follow all instruction...

Страница 6: ... 39 Repeat Random Program Play 40 Repeat Play 40 Random Play 40 Program Play 41 Selecting AUDIO VIDEO Menu 41 Switching Audio Soundtrack 41 Switching Subtitles 43 Switching Camera Angles 43 Reducing Block Noise 44 Virtual Surround Setting 44 GUIDE TO DISPLAYS ON SCREEN MENU 45 EASY DVD RECORDING 46 RECORDING 48 About DVD Recording 48 Video mode VR Video Recording mode 48 Recording Speed 48 Restric...

Страница 7: ...13 DUBBING button VCR DVD Press to start VCR to DVD duplication 14 VCR DVD indicator Shows the operating status Indicator for VCR illuminates during VCR playing and one for DVD illuminates during DVD playing 15 CHANNEL K L buttons Press to change the chan nel up or down During DVD playback press to change the DVD chapter 16 C STOP button DVD Press to stop playback or record ing Press to stop the p...

Страница 8: ...ayback press to change the DVD chapter Press to adjust the video tape playback tracking man ually 17 VOLUME X X Y Y buttons Press to adjust the sound level 18 TIMER PROG button Press to display the timer program setting menu 19 DISC MENU button DVD Press to display the Disc menu Press to change Original and Playlist VR mode only 20 CLEAR button During DVD operation Press to clear the password once...

Страница 9: ...ment Operate the remote control within 30 degree angle on both sides of the infrared sensor on the main unit You can operate the remote control from a dis tance of several feet away from the main unit NOTE Other devices that use infrared beams sunlight fluores cent lights may affect the range and effectiveness of the remote control Make sure that this unit should be posi tioned where there is the ...

Страница 10: ...box or satellite box 1 Turn on this unit by pressing POWER button Then press the CHANNEL K L buttons to select channel 3 or 4 the same channel as the output channel of the cable box or satellite box 2 At the cable box or satellite box select the channel you want to view or record AUDIO OUT COAXIAL Rear of main unit IN OUT Cable Signal Cable box or Satellite box Note for the Cable TV System Install...

Страница 11: ...e Digital Out setting in the SETUP menu Playing a DVD using incorrect settings may generate noise distortion and may also damage the speakers Refer to pages 12 13 Set Dolby Digital to PCM for the Digital Out setting in the SETUP menu for connecting to an MD deck or DAT deck Refer to pages 12 13 By hooking this unit up to a Multi channel receiver with a Dolby Digital decoder you can enjoy high qual...

Страница 12: ...normal playback 48kHz If your amplifier receiver is NOT compati ble with 96kHz PCM select 48kHz 96kHz sound will be output in 48kHz 96kHz If your amplifier receiver is compatible with 96kHz PCM select 96kHz 96kHz sound will be output NOTE When playing disc with copyright protection If you select Auto the sound will be down sampled at 48kHz If you select 96kHz no digital sound will be output Select...

Страница 13: ...guage Subtitle Language Digital Out Dynamic Range Control Fast Forward with Audio 4 3 Letter Box All English Original OFF ON OFF DVD ON OFF Setup Playback TV Mode Parental Lock Disc Menu Language Audio Language Subtitle Language Digital Out Dynamic Range Control Fast Forward with Audio 4 3 Letter Box All English Original OFF ON OFF DVD ntrol udio g Original OFF OFF ON PCM Dolby Digital PCM Stream ...

Страница 14: ... POWER OSD Background Color Default 1 Green Set the OSD screen color You can choose one from 1 Green 2 Blue and 3 Red Screen Saver Default 10 minutes Set the time before the screen saver appears on the screen 6 Press SETUP button to exit SETUP menu Select a setting using K L buttons then press ENTER button Your setting will be activated Setup Display OSD Background Transparency OSD Background Colo...

Страница 15: ... window will appear 5 Select OSD Language using K L buttons then press ENTER button NOTE Default OSD language setting is English 6 Select your desired language among English Français and Español using K L buttons then press ENTER button Your language setting will be activated 7 Press SETUP button to exit SETUP menu Setup Display OSD Background Transparency OSD Background Color OSD Language 1 Engli...

Страница 16: ...SETUP button to display SETUP DISC menu SETUP DISC menu will appear 2 Select SETUP using s B buttons then press ENTER button SETUP menu will appear 3 Select Channel using K L s B buttons then press ENTER button Channel Preset menu will appear 4 Select Auto Preset using K L buttons then press ENTER button The unit will begin scanning channels available in your area To cancel the Auto Preset during ...

Страница 17: ...mber Press B button to move to a higher channel number 6 Select Add or Delete using K L buttons then press ENTER button The channel number will be added or deleted from the channel memory Setup Channel Preset Manual Preset CH18 Add Delete CH2 Add Delete Setup Channel Preset Manual Preset ENTER SETUP 1 Press SETUP button to display SETUP DISC menu SETUP DISC menu will appear 2 Select SETUP using s ...

Страница 18: ...e signal to this unit and plug in the power cord After setting turn the power on to check the current time appeared on the TV screen is correct If the current time is not displayed or the displayed clock is not correct set the clock manually Setup Clock Clock Setting Auto Clock Setting Auto Daylight Saving Time Off VCR DVD OFF Manual Set Channel No CH1 Set the clock before you try timer recording ...

Страница 19: ...g Auto Clock Setting Daylight Saving Time OFF ON VCR DVD Setup Clock Clock Setting Auto Clock Setting Daylight Saving Time OFF JAN 12 2004 MON 09 24 AM ON VCR DVD 1 Press SETUP button to display SETUP DISC menu SETUP DISC menu will appear 2 Select SETUP using s B buttons then press ENTER button SETUP menu will appear 3 Select Clock using K L s B buttons then press ENTER button Clock menu will appe...

Страница 20: ... then press ENTER button SETUP menu will appear 3 Select Clock using K L s B buttons then press ENTER button Clock menu will appear 4 Select Daylight Saving Time using K L but tons then press ENTER button Daylight Saving Time options will appear 5 Select ON or OFF using K L buttons then press ENTER button Choose ON when currently observing the day light saving time 6 Press SETUP button to exit Set...

Страница 21: ...ht picture with both sides trimmed 5 Select a desired option using K L buttons then press ENTER button 6 Press SETUP button to exit Setup Playback TV Mode Parental Lock Disc Menu Language Audio Language Subtitle Language Digital Out Dynamic Range Control Fast Forward with Audio 16 9 Wide 8 English Original OFF ON OFF 4 3 Letter Box 4 3 Pan Scan DVD GUIDE TO DISPLAY MENUS Every time you press DISPL...

Страница 22: ...function automatically turns off the power at a specified time period 1 Press SLEEP button Sleep timer menu will appear 2 Press SLEEP button repeatedly to change the sleep time The timer can be set up to 2 hours by 30 min utes each time you press SLEEP button 3 To cancel the sleep timer press SLEEP button repeatedly until SLEEP TIMER OFF is dis played NOTE If you disconnect the unit from the AC ou...

Страница 23: ...ICTURE COLOR TINT SHARPNESS BRIGHT CONTRAST to pale to purple to soft to decrease brightness to decrease contrast to brilliant to green to clear to increase brightness to increase contrast The adjustments you can make are as follows BRIGHT CONTRAST COLOR TINT SHARPNESS NOTE In the above steps the picture adjustment display will disap pear automatically in about 5 seconds if you do not press any bu...

Страница 24: ...ENTER button SETUP menu will appear 3 Select Display using K L s B buttons then press ENTER button Display menu will appear ENTER SETUP Number 4 Select V CHIP Setup using K L buttons then press ENTER button ACCESS CODE screen will appear 5 Enter the 4 digit access code using Number but tons The default access code is 0000 If you have not set a personal access code enter 0000 6 Select MPAA RATING u...

Страница 25: ...hange to BLOCK or VIEW automatically 8 Press SETUP button to exit Rating Category Explanations Setting V CHIP Sub Ratings When you select TV Y7 TV PG TV 14 or TV MA and press ENTER button the sub rating menu will appear If you select the rating category example TV PG and change it to BLOCK or VIEW the sub rat ings example V for Violence will change to BLOCK or VIEW automatically You can set the su...

Страница 26: ...ode in NEW CODE box using Number buttons then enter the same code in CONFIRM CODE box Your new access code is set The display returns to V CHIP SET UP menu NOTE If the code in CONFIRM CODE does not match the code in NEW CODE repeat step 7 making sure you enter exactly the same new code in CONFIRM CODE box If a power failure occurs the access code returns to the default access code 0000 If you conn...

Страница 27: ... Display menu will appear 4 Select Caption using K L buttons then press ENTER button Option window will appear 5 Select a desired option using K L buttons then press ENTER button Select OFF to cancel the closed caption sys tem 6 Press SETUP button to exit NOTE If the TV VCR DVD displays a black box on the TV screen this means that the TV VCR DVD is set to the TEXT mode To clear screen select CAPTI...

Страница 28: ...peed should be selected in SP standard play or SLP super long play mode by pressing REC SPEED button twice on the remote con trol Use K L buttons to change the recording speed Refer to page 58 for instructions on timer recording Recording speed Tape speed Type of tape T160 T120 Recording Playback Time T60 2 2 3hours 2hours 1hour SP mode 8hours 6hours 3hours SLP mode SP VCR C VCR PLAY B VCR STOP C ...

Страница 29: ... entering the exact amount of time you wish to skip VCR 1 Press TIME SEARCH button Time search menu will appear 2 Enter your desired time to skip using K L but tons 3 Press s B buttons to start time search Forward or Reverse If you want to move a tape forward press B but ton If you want to move a tape backward press s button After time search the unit will play the tape automatically NOTES Time Se...

Страница 30: ...elect Hi Fi or MONO for playback sound mode When you want to enjoy the sound in stereo select HIFI NOTE Still Slow Pause mode will be automatically cancelled in 5 minutes to prevent damage to the tape and the video head To return to playback from the Picture Search Still Slow mode press PLAY B VCR button Auto Rewind Eject When the end of a tape is reached during record ing playback or fast forward...

Страница 31: ...on 1 represents the United States Canada Bermuda the U S Virgin Islands and small regions near Australia A DVD labeled for a specific region can only play on the unit with the same region code DVD playback The contents of DVD disc are generally divided into titles Titles may be further subdivided into chapters Logo Disc DVDVIDEO DVD RW VIDEO VR MODE DVD R VIDEO MODE CD DA AUDIO CD CD R CD DA FORMA...

Страница 32: ...code using Number buttons When you finish entering the code press ENTER button Refer to the language code table on page 78 5 Press SETUP button to exit SETUP menu Setup Playback TV Mode Parental Lock Disc Menu Language Audio Language Subtitle Language Digital Out Dynamic Range Control Fast Forward with Audio English Original All 4 3 Letter Box OFF ON OFF English French Spanish Other Code Input Sel...

Страница 33: ...OTE Press the TOP MENU button to exit the menu Disc menu is only available for VR mode recorded disc For DVD R Video mode and DVD RW Video mode discs which are already finalized a title list will be displayed instead of thumbnails as shown below 5 Select a desired title using K L s B buttons then press ENTER button Playback will start 6 Press STOP C DVD button to stop playback NOTE You can resume ...

Страница 34: ... ENTER button Press s button or RETURN button to go to the previous hierarchy Press STOP C DVD button to return to the first item Hints for MP3 files Folders are known as Groups files are known as Tracks Folders are accompanied by icon MP3 files are accompanied by icon Playback will start from the selected track and go to the next one in turn The system can recognize up to 255 groups or fold ers a...

Страница 35: ...tion Number buttons Selects a numbered menu option only for some discs ENTER button should be pressed after pressing Number buttons 3 Press DISC MENU button to exit the menu ENTER DISC MENU Number Playback with Title Menu Some DVDs have a title menu which lists the titles available on them It helps you to start playback at a specific title DVD V 1 Press TOP MENU button The title menu will appear N...

Страница 36: ...ng playback in fast forward of x2 only if you set Fast Forward with Audio to ON for the Playback setting in the SETUP menu Forward reverse speed will be indicated with icons as follows Forward Approx Speed Reverse Approx Speed x2 x5 x20 x20 x40 x40 x20 Normal speed playback x2 x20 x5 x40 x40 MP3 CD DVD RW VR DVD RW Video DVD R DVD V MP3 CD DVD RW VR DVD RW Video DVD R DVD V PLAY B DVD STOP C DVD P...

Страница 37: ...PLAY button repeated ly until the DVD status display menu appears 2 Select icon using s B buttons then press ENTER button Zoom option menu will appear Three options x1 2 x1 5 x2 0 excluding the current zoom rate are displayed 3 Select a desired zoom factor to zoom using s B buttons then press ENTER button The zoom area will be displayed 4 Select a desired zoom position using K L s B buttons then p...

Страница 38: ...ss ENTER button Chapter search will start 1 1 1 23 45 DVD Video DISPLAY CHANNEL K L ENTER Number 38 Setting Marker This feature allows you to assign a specific point on a disc to be returned to later 1 During playback press DISPLAY button repeated ly until the DVD status display menu appears 2 Select icon using s B buttons then press ENTER button Marker setup menu will appear Screen for DVD Screen...

Страница 39: ...using K L buttons or Number buttons then press ENTER button Track search will start 1 01 23 45 Audio CD ENTER DISPLAY CHANNEL K L Number OPERATING DVD RECORDER PLAYING Time Search CD DVD RW VR DVD RW Video DVD R DVD V 1 During playback press DISPLAY button repeated ly until the DVD status display menu appears Screen for DVD Screen for CD 2 Select icon using s B buttons then press ENTER button T fo...

Страница 40: ...utton again to select the ending point B NOTE The A B Repeat playback can only be set within the current title for DVDs or current track for Audio CDs OFF Title Chapter A B 1 1 01 23 45 DVD Video 1 1 1 23 45 DVD Video Random Play You can play tracks on a disc randomly instead of playing it in the recorded sequence MP3 CD 1 In the stop mode press SETUP button to display SETUP CD menu SETUP CD menu ...

Страница 41: ...rogram Play Total 00 00 00 Selecting AUDIO VIDEO Menu You can select an audio or video format as you pre fer depending on the contents of the disc you are playing Switching Audio Soundtrack When playing a DVD Video disc recorded with two or more soundtracks mostly in different languages you can switch between them anytime during play back NOTE Some discs will only allow you to change the soundtrac...

Страница 42: ...Program at the same time 1 1 1 23 45 1 Dolby Digital Dual 2 Dolby Digital 2ch DVD RW VR Original L R L R When playing Audio CDs or MP3 files you can switch between stereo the left channel only or the right channel only MP3 CD 1 During playback press DISPLAY button repeated ly until the DVD status display menu appears 2 Select icon using s B buttons then press ENTER button Audio menu will appear 3 ...

Страница 43: ...ill appear 3 Select a desired subtitle language using K L buttons then press ENTER button Subtitle will be displayed in the selected lan guage When selecting OFF subtitle will disappear 1 1 1 23 45 OFF 1English 2Japanese DVD Video 1 1 1 23 45 DVD Video Switching Camera Angles DVD V Some DVD Video discs feature scenes shot from two or more angles check the case of the DVD for details it should be m...

Страница 44: ...d DVD discs with little or no noise select OFF 1 1 1 23 45 OFF Type 1 Type 2 DVD Video 1 1 1 23 45 DVD Video ENTER DISPLAY Virtual Surround Setting Switching to virtual surround setting allows you to enjoy DVD disc with a surround effect DVD RW VR DVD RW Video DVD R DVD V 1 During playback press DISPLAY button repeated ly until the DVD status display menu appears 2 Select icon using s B buttons th...

Страница 45: ...To activate the programmed play back of CD tracks This unit uses the following types of display for most operations SETUP DISC CD menu Title List and DIS PLAY which allows you to change the playing status of disc during play SETUP DISC CD menu Press SETUP button to display the setup main menu then choose either of SETUP DISC CD by pressing s B buttons Then press ENTER button to display each menu T...

Страница 46: ... you format the entire contents on that disc will be erased Finalize the disc After recording you will need to finalize the DVD discs recorded in this unit before they can be played in other DVD players See page 54 DVD disc types DVD RW VR DVD RW Video You want to Record TV programs Reuse by deleting unwanted contents Edit recorded contents Edit Record from connected equipment Copy discs for distr...

Страница 47: ...te This allows a user to edit within a specific scene ex commercials Original and Playlist VR mode You can edit the recordings in Playlist without changing the original recordings Any Playlist does not take up much disc space What Original or Playlist is for Throughout this manual you will find Original and Playlist to refer to the actual content and the edited version Original content refers to w...

Страница 48: ...neral ver 2 0 8x DVD RW ver 1 2 2 4xCPRM compatible Important Video mode VR Video Recording mode Video Format Select the Video Recording Mode to record discs that can played back on most standard DVD players Video Recording Mode creates discs compatible with most DVD players but there is no capability to edit the recordings DVD R discs can only be formatted in the Video mode DVD RW discs can be fo...

Страница 49: ...r 3 Select Recording using K L s B buttons then press ENTER button Recording menu will appear 4 Select DVD RW Recording Format using K L buttons then press ENTER button Option window will appear Video mode has been selected as the default Setup Recording Auto Chapter Timer Programming Video mode DVD Player Compatibility mode VR mode Editing possibility mode DVD RW Recording Format VR mode 10 minut...

Страница 50: ...ompatible players See page 54 Setup Recording Auto Chapter Timer Programming DVD RW Recording Format VR mode 10 minutes VCR DVD DVD OFF 5 minutes 10 minutes 15 minutes 30 minutes 60 minutes Reformatting If you are using a DVD RW disc by default it will be Video mode You can change this to VR mode from SETUP menu Caution Erasing Reformatting Reformatting will erase the contents of the disc Once era...

Страница 51: ... Format Setting on pages 49 50 When a DVD R disc is loaded DVD R discs will always be in Video mode NOTES If the clock has not been set the space for a date and time of title names in the original or playlist will be blank You cannot mix two formats on one DVD RW disc When you load a disc once recorded before the recording format cannot be changed even if you change it in SETUP menu SP 1 01 Rem DV...

Страница 52: ...quality You can confirm the recording speed you have selected before recording to a DVD disc DVD RW VR DVD RW Video DVD R 1 While the unit is in STOP or REC with a record able DVD disc inserted press REC MONITOR button 2 The TV program will be shown on the screen with the recording speed you have selected Please confirm this is the speed you wish to record NOTE The recording picture can be confirm...

Страница 53: ...e way to set the recording time in blocks of 30 minutes Check that the disc you are recording onto has enough space for the time you set DVD RW VR DVD RW Video DVD R 1 Turn on the unit and load a recordable disc NOTE This operation may take a few minutes to complete 2 Press REC SPEED button then change the recording speed using K L buttons Refer to Recording speed on page 48 3 Make sure that the r...

Страница 54: ... You cannot cancel finalizing the DVD R disc once it starts 1 Press SETUP button to display SETUP DISC menu SETUP DISC menu will appear 2 Select DISC using s B buttons then press ENTER button DISC menu will appear 3 Select Finalize using K L buttons then press ENTER button Option window will appear VR mode only 4 Select Yes using s B buttons then press ENTER button Finalizing will start NOTE Final...

Страница 55: ...on A disc will be protected NOTE This operation may take a few minutes to complete The Disc Protect setting is available only when a disc with VR mode is inserted You can only select Disc Protect Menu when a protected disc is inserted Writing to Disc 58 Disc Edit Format Finalize Disc Protect OFF ON Yes No TO CANCEL THE DISC PROTECT When you insert a disc protected with this unit Disc Protect ON OF...

Страница 56: ...ions VCR DVD RW VR DVD RW Video DVD R 1 Turn the unit on 2 When you want to record onto a DVD Press A OPEN CLOSE button on the main unit to open the disc tray then place the disc to record properly then press A OPEN CLOSE button again to close the disc tray NOTE This operation may take a few minutes to complete When you want to record to a tape Insert the tape with a safety tab into the cassette c...

Страница 57: ...ol or on the main unit to stop the recording NOTE DVD Dubbing Duplicating operation from DVD to VCR is only available when DVD stops or during DVD playing and when VCR stops You cannot make a dub from a DVD disc protected by copy right such as a prerecorded DVD The DVD recording speed and format should be selected first Refer to Recording on page 48 and Formatting on pages 49 50 1 Press REC SPEED ...

Страница 58: ...press ENTER button Setup Recording Timer Programming Date Start End CH Speed JAN 1 2004 THU 12 00 PM DVD VCR 6 Enter the date using K L buttons then press B button e g January 1st NOTE When pressing L button at the current date timer recording mode will change as follows 7 Enter the time to start and to end using K L but tons then press B button NOTE Press s or B buttons to move the cursor to the ...

Страница 59: ... STOP A EJECT to stop the tape recording STOP C button on the remote control does not work for timer recording ENTER TIMER PROG CLEAR POWER 10 Select a recording speed using K L buttons Refer to Recording speed on page 48 for DVD or page 28 for VCR If you set Recording speed to Auto at step 10 this unit will automatically adjust the recording speed so that the program will fit into one disc You ca...

Страница 60: ...ed Start time for DVD recording is within 2 minutes from the current time the power will turn on for recording standby right after you turn the power off For a videotape recording the power will turn on shortly before the Start time If a videotape ends during timer recording the unit will stop eject the videotape and turn itself off When two or more programmings are overlapped Overlap will be disp...

Страница 61: ...ge 63 Setting or clearing chapter markers Refer to page 63 NOTE Finalized Discs Once a disc is finalized editing the disc or recording to the disc will not be available Except DVD RW discs in VR mode A playlist is not available with the DVD R discs and DVD RW discs in Video mode Editing in VR Mode For discs in VR mode you can edit from Original menu or Playlist menu which is created from the origi...

Страница 62: ...B buttons then press ENTER button Edit menu will appear You cannot select Chapter Mark when a DVD R disc is inserted into this unit Disc Edit 1 Title Delete Edit Title Name Chapter Mark 0 01 25 JAN 1 1 00AM CH12 XP Disc Edit 1 1 3 2 5 4 JAN 1 1 00AM JAN 1 4 00AM JAN 1 2 00AM JAN 1 3 00AM JAN 1 5 00AM Disc Edit Format Finalize 4 Select Title Delete using K L buttons then press ENTER button Option w...

Страница 63: ... ENTER SETUP Naming Titles You can name the titles and change the names from this menu The title names will be displayed on a Title List DVD RW Video DVD R Follow the steps 1 to 3 on page 62 to display the Edit menu 1 Select Edit Title Name using K L buttons then press ENTER button A window for entering a title name will appear 2 To enter a title name follow the steps shown in Guide to edit title ...

Страница 64: ...it Original Disc Edit Format Finalize Disc Protect OFF ON 4 Select a desired title using K L s B buttons then press ENTER button Original menu will appear 5 Select Title Delete using K L buttons then press ENTER button Option window will appear Caution Once erased the material cannot be retrieved 6 Select Yes using s B buttons then press ENTER button Title will be deleted NOTE This operation may t...

Страница 65: ... Title Name 1 0 01 25 A B C a b c 1 2 3 JAN 1 1 00AM CH12 XP Naming Titles You can name the titles and change the names from this menu The title names will be displayed on a Title List ENTER SETUP DVD RW VR Deleting Parts of Titles You can delete part of a title so that the disc space to record will increase Caution Be advised that the parts once deleted cannot be recovered DVD RW VR Follow the st...

Страница 66: ...ure Protect OFF Yes No JAN 1 1 00AM CH12 XP ON Add Delete Disc Edit Original Chapter 1 1 F Disc Edit Original 1 0 01 25 Title Delete Scene Delete Edit Title Name Chapter Mark Index Picture Protect OFF JAN 1 1 00AM CH12 XP ON Add Delete Chapter 1 1 ENTER SETUP Setting Pictures for Thumbnails You can set a picture to each title for a thumbnail It helps you to remember the contents of the title you a...

Страница 67: ...ene Delete Edit Title Name Chapter Mark Index Picture Set Protect OFF Disc Edit Original 1 0 01 25 Title Delete Scene Delete Edit Title Name Chapter Mark Index Picture Set Protect OFF Yes No JAN 1 1 00AM CH12 XP ON ENTER SETUP Releasing Title Protect You can release the title protection once you pro tected DVD RW VR Follow the steps 1 to 3 on page 64 to display the Original list 1 Select a desired...

Страница 68: ...AM JAN 1 3 00AM JAN 1 5 00AM Disc Edit Original Disc Edit Format Finalize Disc Protect OFF ON 4 Select a desired title using K L s B buttons then press ENTER button Playlist menu will appear 5 Select Title Delete using K L buttons then press ENTER button Option window will appear 6 Select Yes using s B buttons then press ENTER button Title will be deleted NOTE This operation may take a few minutes...

Страница 69: ...g Titles You can name the titles and change the names from this menu The title names will be displayed on a Title List DVD RW VR Follow the steps 1 to 4 on page 68 to display the Playlist menu 1 Select Edit Title Name using K L buttons then press ENTER button A window for entering a title name will appear 2 To enter a title name follow the steps shown in Guide to edit title name below When you fin...

Страница 70: ...elete Yes No JAN 1 1 00AM CH12 XP Disc Edit Playlist Chapter 1 1 F Disc Edit Playlist 1 0 01 25 Title Delete Scene Delete Edit Title Name Chapter Mark Index Picture Set Add Delete JAN 1 1 00AM CH12 XP Chapter 1 1 ENTER SETUP Setting Pictures for Thumbnails You can set a picture to each title for a thumbnail It helps you to remember the contents of the title you are playing The beginning picture ha...

Страница 71: ...t section Disc Edit Playlist 6 1 1 3 2 5 4 JAN 1 1 00AM JAN 1 4 00AM JAN 1 2 00AM JAN 1 5 00AM JAN 1 3 00AM JAN 12 8 00PM Disc Edit Playlist Add New Title Writing to Disc 58 Disc Edit Playlist Add New Title 1 1 3 2 JAN 12 5 00PM JAN 12 8 00PM JAN 10 10 30AM ENTER SETUP Deleting Playlist A Playlist can be deleted if no longer needed DVD RW VR Follow the steps 1 to 3 on page 68 to display the Playli...

Страница 72: ... word using Number but tons Setup Playback TV Mode Parental Lock Disc Menu Language Audio Language Subtitle Language Digital Out Dynamic Range Control Fast Forward with Audio 4 3 Letter Box All English Original OFF ON OFF DVD All 8 7 6 5 4 3 2 1 Password Select Yes using s B but tons then enter a new pass word using Number buttons Then press ENTER button Your setting will be activated Setup Playba...

Страница 73: ... the sound recorded in 96kHz will be down sampled in 48kHz Compressing the range of sound volume Outputting the sound during play in fast forward Set the parental level of your DVD discs Set and change the password Audio Language Subtitle Language OSD Background Transparency OSD Background Color Screen Saver Digital Out Dynamic Range Control Fast Forward with Audio Parental Lock Change password En...

Страница 74: ...menu page 16 Select a channel of any TV program using the CHANNEL K L buttons Check antenna cable wire and the fittings at each end of the wire Sound No sound is output Adjust volume control The disc is dirty or flawed Re connect all connections securely The connecting cord is damaged Check the connections to the amplifier input The input source setting on the amplifier is incorrect The unit is in...

Страница 75: ...ing does not stop immediately after you press STOP C button It will take a few seconds for the unit to input disc data before recording stops Timer recording is not completed or did not start from the beginning The timer setting overlapped with another setting that was set later or has priority page 60 Disc space was not enough Timer recording is not available Make sure that the recordable tape or...

Страница 76: ...erence caused by building power lines thunderstorms etc may cause scrambled or incomplete captions to appear My program guide listed a TV show as being closed captioned but none of the captions were displayed Broadcasters may at times use a time compression process to speed up the actual program so that additional advertising time can be given Since the decoder cannot read the compressed informati...

Страница 77: ...ams Set DVD RW Recording Format to VR mode page 49 50 Release the disc protect setting in the Disc Setting menu page 55 Insert the recordable disc and ensure the disc status satisfies the recording requirements pages 48 55 Insert a ver 1 1 CPRM compatible DVD RW disc page 49 Recording Error Disc is full Recording Error You cannot record more than 99 titles on one disc Recording Error You cannot re...

Страница 78: ...ISCS When a disc becomes dirty clean it with a cleaning cloth Wipe the disc from the center out Do not wipe in a circular motion Do not use solvents such as benzine thinner commercially available cleaners detergent abrasive cleaning agents or antistatic spray intended for analogue records CLEANING THE DISC LENS If this unit still does not perform properly although you refer to the relevant section...

Страница 79: ...ch have been recorded on possible to play in other DVD players With this unit it is possible to finalize DVD R DVD RW discs PCM Pulse Code Modulation The most common system of encoding digital audio found on CDs and DAT Excellent quality but requires a lot of data compared to formats such as Dolby Digital and MPEG audio For compatibility with digital audio recorders CD MD and DAT and AV amplifiers...

Страница 80: ...unbalanced F type S Video input 75 ohm 4 pin mini DIN Video input RCA connector 1 Audio L R input RCA connector 2 Headphone 1 8 stereo 3 5 mm Coaxial digital audio output One pin jack 500m Vpp 75 ohm Remote control Digital encoded infrared light system Operating temperature 5 C to 40 C 41 F 104 F Operating humidity 5 to 85 no condensation Power requirements AC 120V 60Hz Power consumption Maximum 1...

Страница 81: ...81 MEMO ...

Страница 82: ...disposi tivos para obtener más información AUDIO OUT COAXIAL AUDIO OUT COAXIAL COAXIAL NOTA Cuando reproduce un disco DVD con conexión del TV VCR DVD a un receptor con descodificador Dolby Digital seleccione el Dolby Digital en la posición Stream para el ajuste Salida Digital en el menú SETUP La fuente de audio en un disco DVD en formato de sonido envolvente de canal Dolby Digital 5 1 no puede gra...

Страница 83: ...televisión 5 Pulse el botón SETUP para salir del menú Puede seleccionar únicamente los canales memorizados en esta unidad utilizando los botones CHANNEL K L Para seleccionar un canal Puede seleccionar un canal introduciendo direc tamente el mismo utilizando los botones numéricos del mando a distancia Notas para la utilización de los botones numéricos Cuando seleccione los canales de cable superior...

Страница 84: ...trol de la imagen para obtener un aspecto natural 5 Cuando termine de ver la televisión pulse el botón POWER para apagar el televisor FUNCIONES VCR Reproducción VCR 1 Pulse el botón POWER para encender la unidad PLAY B VCR STOP C VCR POWER CHANNEL K L 2 Introduzca la cinta pregrabada y pulse el botón PLAY B VCR para comenzar la reproducción NOTA Cuando se introduce una cinta sin etiqueta de grabac...

Страница 85: ...DISC MENU NOTA Pulse el botón TOP MENU para salir del menú Para discos DVD R Modo de Video y DVD RW Modo de Video que ya han sido ultimados se mostrará una lista de títulos en lugar de pequeñas reseñas tal y como se muestra posteriormente 5 Seleccione el título deseado pulsando los botones K L s B posteriormente pulse el botón ENTER Comenzará la reproducción 6 Pulse el botón STOP C DVD para detene...

Страница 86: ...todos los contenidos del disco se borran Finalización del disco Después de la grabación deberá finalizar los discos DVD grabados en esta unidad antes de poder reproducirlos en otros reproductores de DVD Diríjase a la página 54 Tipos de disco DVD DVD RW VR DVD RW Video Desea Grabar programas de televisión Reutilizar borrando contenidos no deseados Editar los contenidos grabados Editar Grabar desde ...

Страница 87: ...Borrar escena Esto permite al usuario editar una escena específica p e anuncios publicitarios Original y Playlist Modo de VR Puede editar las grabaciones en una Playlist sin modificar las grabaciones originales Las Listas de Reproducción no ocupan mucho espacio en el disco Para qué sirve Original o Playlist A lo largo de este manual encontrará los términos Original y Playlist para referirse al con...

Страница 88: ...ommercial use such as hotel rental or office use of this product or damage which results from fire flood lightning or other acts of God THIS WARRANTY DOES NOT COVER PACKING MATERIALS ANY ACCESSORIES EXCEPT REMOTE CONTROL ANY COSMETIC PARTS COMPLETE ASSEMBLY PARTS DEMO OR FLOOR MODELS FUNAI CORP AND ITS REPRESENTATIVES OR AGENTS SHALL IN NO EVENT BE LIABLE FOR ANY GENERAL INDIRECT OR CONSEQUENTIAL ...

Отзывы: