background image

- 11 -

EN

9J27

SET UP FOR USE

You can program the tuner to scan all the channels you receive in your area.
NOTE: Channel memory programming is NOT needed when connected to a cable box or satellite box. Just
select the TV/VCR channel selector to the output channel of the cable box or satellite box (Ex CH3). Then
select the channel to be viewed on the Cable Box or Satellite Box.

CHANNEL SET UP FOR THE 

FIRST TIME

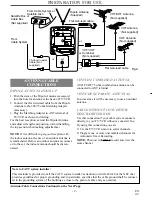
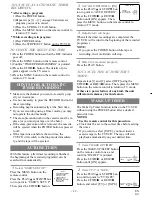
1

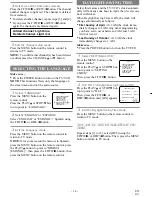
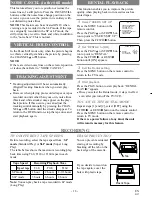
Plug in the TV/VCR power cord

Attach the smaller end of the sup-
plied AC cord to the AC 120V
connector on the back of the
TV/VCR. Then, plug the other
end into a standard AC outlet.
NOTES:

You must disconnect the car battery cord from the
TV/VCR before you use AC power.

If some digits appear in the corner of the screen,
press the POWER button without unplugging the
power cord.

2

Turn on the TV/VCR

Press the POWER button to turn on the TV/VCR.

3

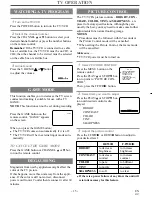
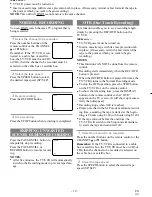
Select “ENGLISH” or “ESPAÑOL”

Select “ENGLISH” or
“ESPAÑOL”=Spanish using the
F.FWD/

B

or REW/

s

button. “[ ]”

indicate the selected language.

4

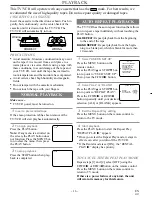
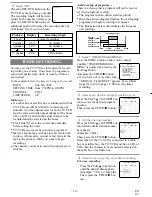
Begin auto preset

Press the PLAY/

K

or STOP/

L

but-

ton to point to “AUTO PRESET”.
Then press the F.FWD/

B

button.

The tuner scans and memorizes all
active channels in your area.
NOTES:

The TV/VCR distinguishes between standard TV
channels and cable channels.

If you want to play or record a video tape BEFORE
presetting the tuner, you must press the MENU but-
ton on the remote control. To preset the tuner again,
see “CHANNEL SET UP AGAIN” on page 13.

The TV/VCR may recognize TV channels to be
CATV channels by the receiving conditions. In this
case, try auto preset again in the fine receiving
conditions.

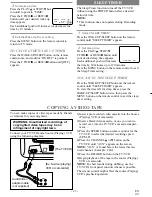
5

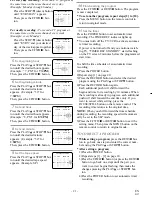
After scanning

The tuner stops on the lowest memorized channel.
If you want to recall the selected channels, you can
select the desired channel directly with the remote
control number buttons or CHANNEL

K

or 

L

button.

ANT

DC  13.2V

AC  120V

AC 120V

– SET UP –

B

LANGUAGE
[ENGLISH]   ESPAÑOL

AUTO PRESET

– SET UP –

LANGUAGE
[ENGLISH]   ESPAÑOL

B

AUTO PRESET

TO SELECT A DESIRED  CHANNEL

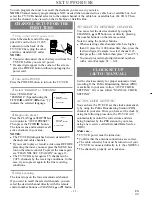
You can select the desires channel by using the
CHANNEL

K

or 

L

button on or directly pressing

the number buttons on the remote control.
Note for using the number buttons:

When selecting cable channels which are higher
than 99, press the +100 button first, then, press the
last two digits. (Example: to select channel 125,
first press the +100 button then press “2” and “5”).

You must proceed single-digit channel numbers
with a zero (Example: 02 ...  09).

CLOCK SET UP

(AUTO / MANUAL)

Set the clock accurately for proper automatic timer
recording. If the Public Broadcasting Station (PBS)
is available in your area, follow “AUTO CLOCK
SETTING”. If it is not, follow “MANUAL CLOCK
SETTING”.

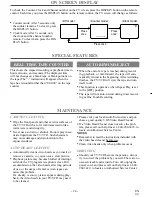
AUTO CLOCK SETTING

You can have the TV/VCR set the clock automatical-
ly by using the Public Broadcasting Station (PBS)
channel in your area. Once you have set the clock by
using the following procedure, the TV/VCR will
automatically monitor the correct time and date
being broadcast by the PBS station in your area,
using a new service called Extended Data Service
(XDS).

Make sure ...

TV/VCR power must be turned on.

Confirm that the antenna connections are correct.

The cable converter box must be turned on if your
TV/VCR is connected directly to it. (See NOTES:)

The channel is properly set in advance.

Содержание SRC2109E

Страница 1: ...NERGY STAR guidelines for energy efficiency ENERGY STAR is a U S registered mark If you need additional assistance for set up or operating after reading owner s manual please call TOLL FREE 1 800 968...

Страница 2: ...m overheat ing and these openings must not be blocked or covered The openings should never be blocked by placing the TV VCR on a bed sofa rug or other similar surface This TV VCR should never be place...

Страница 3: ...overs may expose you to danger ous voltage or other hazards Refer all servicing to quali fied service personnel 19 Damage Requiring Service Unplug this TV VCR from the wall outlet and refer servicing...

Страница 4: ...ields Avoid moving TV VCR to locations where temper ature differences are extreme Do not handle the power cord with wet hands Do not pull on the power cord when disconnecting it from an AC wall outlet...

Страница 5: ...NG A TV PROGRAM 15 GAME MODE 15 DEGAUSSING 15 PICTURE CONTROL 15 C PLAYBACK 16 NORMAL PLAYBACK 16 AUTO REPEAT PLAYBACK 16 SEARCH 17 STILL PICTURE 17 NOISE CANCEL in the Still mode 18 VERTICAL HOLD CON...

Страница 6: ...eat the playing of a tape indefinitely without pressing the PLAY button Time search Let you set the TV VCR to advance the tape by entering the desired playback time you want to skip OTR One Touch Reco...

Страница 7: ...ind Search s button Press to select a mode from a particular menu for example LANGUAGE or USER S SET UP 8 PLAY button Press to begin playback K button Press to select setting modes from the on screen...

Страница 8: ...MENU button Press to display the main menu on the TV screen 17 DISPLAY button Display the counter or the cur rent channel number and current time on the TV screen See page 24 18 SPEED button Press to...

Страница 9: ...channels 2 Program one or more unscrambled channels for Automatic Timer Recording NOTE This unit will ONLY record and view the same channel VHF UHF SEPARATE ANTENNAS In some areas it will be necessar...

Страница 10: ...ry cord Using another cord could damage the TV VCR Be sure the socket is free of ashes and other debris Be sure to push the car battery cord s plug com pletely into the cigarette lighter socket Always...

Страница 11: ...conditions In this case try auto preset again in the fine receiving conditions 5 After scanning The tuner stops on the lowest memorized channel If you want to recall the selected channels you can sel...

Страница 12: ...TTING CLOCK AUTO CLOCK ON B AUTO CLOCK CH AUTO MANUAL CLOCK SET D S T OFF M E N U TIMER PROGRAMMING PICTURE CONTROL B SETTING CLOCK CHANNEL SET UP USER S SET UP LANGUAGE ENGLISH ZERO RETURN TIME SEARC...

Страница 13: ...may have to reset the clock TO CHANGE CLOCK SETTING If you want to change the clock 1 Follow steps 1 and 2 2 Select where you want to change using the F FWD B or REW s button 3 Enter correct numbers u...

Страница 14: ...NOTE To confirm that channel s has been deleted or added press the CHANNEL K or L button Added channel Light blue Deleted channel Light red DAYLIGHT SAVING TIME Select this feature and the TV VCR s c...

Страница 15: ...L The TV VCR s picture controls BRIGHT CON TRAST COLOR TINT and SHARPNESS are preset to factory specifications Although they are usually the best you may need to make some further adjustments for a na...

Страница 16: ...ORRECT Window WRONG The TV VCR has the auto repeat function that allows you to repeat a tape indefinitely without touching the PLAY button ALL REPEAT Repeat playback from the beginning to the end of t...

Страница 17: ...ning point at which you want to review 2 Reset the counter to 0 00 00 Press the COUNTER RESET button repeatedly 3 Begin recording or playback Press the RECORD or PLAY button Press the STOP button when...

Страница 18: ...recorded in the SLP mode If the tape was originally recorded in the SP or LP mode the still picture may revert to black and white in addition to the noise bars This is normal In the Pause Still mode...

Страница 19: ...gth simply by pressing the REC OTR button on the TV VCR Make sure TV VCR power must be turned on Insert a cassette tape with its erase prevention tab in place If necessary rewind or fast forward the t...

Страница 20: ...recording Press the PLAY K up button until the desired date appears Example 7 06 for July 6th Then press the F FWD B but ton TIMER RECORDING 9 00AM 10 00AM 12 00PM Program 1 10 00AM 11 00AM Program 2...

Страница 21: ...another program repeat steps 2 to 10 Press the MENU button on the remote control to return to original mode 11 Set the timer Press the POWER button to set automatic timer recording The TIMER REC indic...

Страница 22: ...n to point to USER S SET UP Then press the F FWD B button 2 Set AUTO RETURN to ON Press the PLAY K or STOP L but ton to point to AUTO RETURN Press the F FWD B or REW s button until ON appears Then pre...

Страница 23: ...s To view the time left for sleep timer press the WAKE UP SLEEP button twice then press the MENU button on the remote control to exit the sleep timer setting SLEEP TIMER 2 00 WAKE UP ON OFF ON TIMER T...

Страница 24: ...o correct the problem by yourself There are no user serviceable parts inside Turn off unplug the power cord and please call our help line at 1 800 968 3429 to locate an Authorized Service Center ON SC...

Страница 25: ...No sound or poor sound Adjust volume control on remote control or main unit Press the MUTE button to restore sound Timer recording is not possible Make sure the timer recording is set correctly Make...

Страница 26: ...n designate channels with letters or letter number combinations Please check with your local cable company The following is a chart of common cable channel designations TV Display TV Display TV Displa...

Страница 27: ...ducci n PLAY P lselo para iniciar la repro ducci n Bot n K P lselo para seleccionar los modos de ajuste desde el men de la pantalla P lselo para introducir d gitos cuando establezca un programa Por ej...

Страница 28: ...n mero del canal actual y la hora actual en la pantalla del tele visor 18 Bot n de velocidad de cinta SPEED P lselo para elegir la velocidad de grabaci n deseada SP SLP 19 Bot n T PROG CLEAR P lselo...

Страница 29: ...servicio de televisi n por cable le suministra un convertidor o si usted utiliza un sistema de emisiones v a sat lite usted podr utilizar las conexiones b sicas Utilizando estas conexiones usted tamb...

Страница 30: ...ue su veh culo tlene un sistema el ctrico a tierra neg ativo de 13 2 12 voltios Confirme que est usando s lo el cord n provisto para la bater a del autom vil El uso de otro cord n puede da ar su TV VC...

Страница 31: ...El sintonizador se para en el canal memorizado m s bajo Si desea recuperar canales seleccionados usted podr seleccionar directamente el canal deseado con los botones numerados del mando a distancia o...

Страница 32: ...rs For repair of major brand appliances in your own home no matter who made it no matter who sold it 1 800 4 MY HOME SM Anytime day or night 1 800 469 4663 www sears com To bring in products such as v...

Отзывы: